A very high quality rock route – fantastic varied climbing on solid rock basking in the afternoon sun overlooking the Fox glacier. Highly recommended.
Difficulty: Grade : II, 4+, Rock 17
Equipment: 2x 60m ropes. Double rack up to BD size 4
Approach time: on skis from Pioneer Hut around 1h to base of climb.
Climb time: 5h
Season: Late spring/summer. We climbed in November – still some snow around but route was clear.
Team: Joe Collinson, Maria Koo 12/11/2024
Climb
Length : 300m (as stated on thecrag.com; we make it out to be just shy of this probably because of the snow line being high when we climbed it)
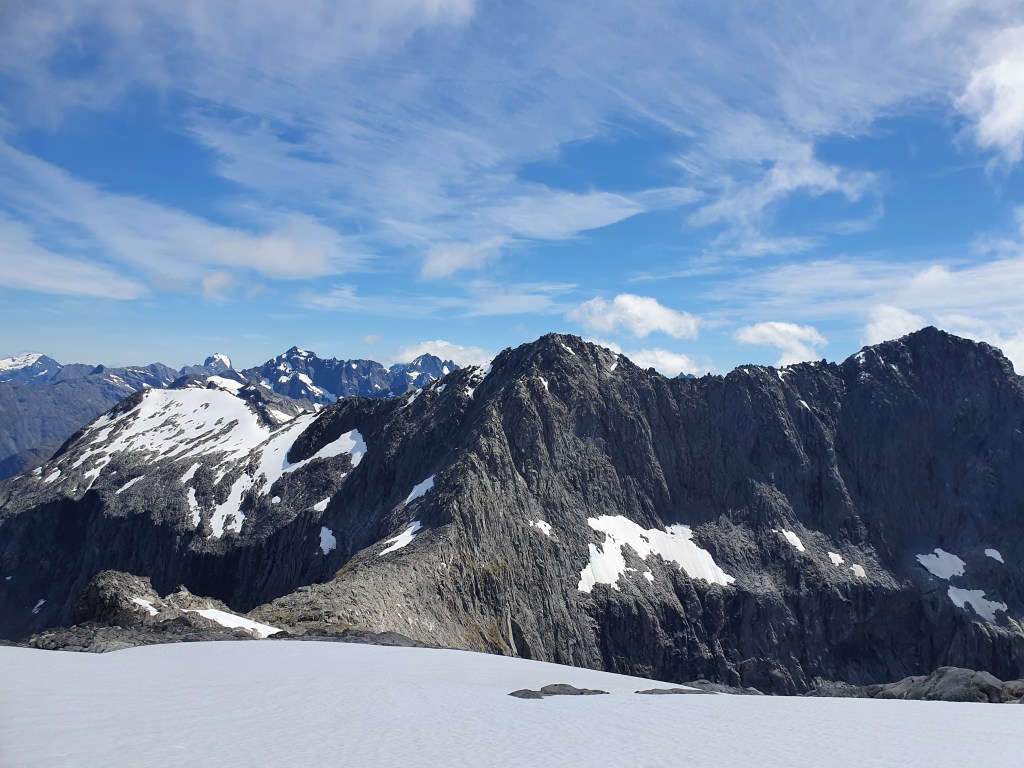
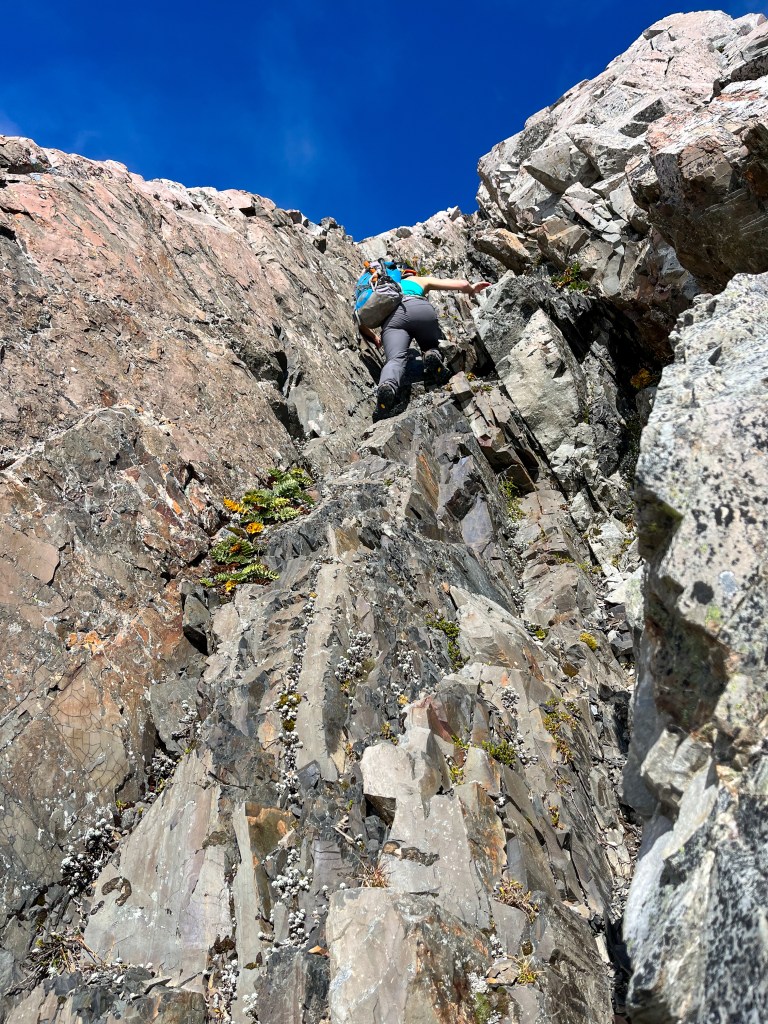
There are 3 prominent peaks on Haast – Sun Circle is on the 3rd one on looker’s right. We climbed early season so could walk up the centre of the gully to the main face – topo shows some traversing required to do this late season.
Pitch 1 Access to the main face – was easier for us as it was so early season the snow leads right up to the small rock the meets the main face where the obvious schrund is. Some scrambling up the small block to the rap tat marking the proper start of the route. From the topo this is more involved later in season and involves some traversing from out right. 15m, grade 11.
Short 1st pitch; 2nd pitch trends left at base of route proper
Pitch 2 On the main face there are a number of obvious crack systems that trend up and left all the way to the ridge, just left of a large obvious grey block on the top of the ridge. Some rap tat is on the rock at the bottom marking the start of the route proper. We followed the obvious line of weakness trending up and left which tops out at the ridge about 20m left of the big grey block. V good gear and solid rock. Small gear required to make anchor on the ridge (we used 3x microcams, no obvious block to sling. Around 40m, grade 15.
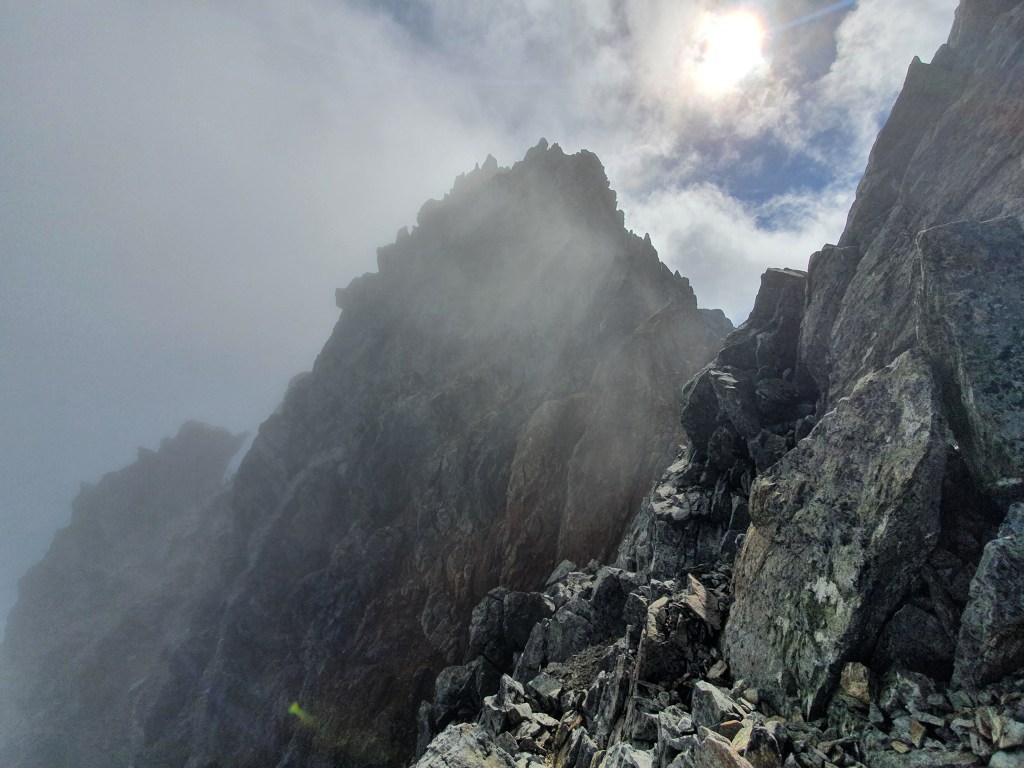
Pitch 3 Traversed along the ridge, some balancey moves with great exposure staying on the face to get past the block. Once you’re round the block, the going gets easier – keep going until you reach a large ledge which runs diagonally across the buttress. Large flake / spike belay here. 50m, Grade 17
Pitch 4 Stay low/step right from the flake and follow the crack / ledge up and right. Looking above you you can see the amazing parallel cracks that lead towards a roof with lots of large grey blocks. We aimed for the right hand side of this. Some cool moves traversing some flakes / cracks. We built an anchor just where the rock turns grey and the parallel splitters start as was running out of gear. For full value link this and the first half of the next pitch finishing at the rap tat. 50m, Grade 16
Pitch 5 Phenomenal climbing up finger cracks, stepping round a square block and then trending right around the corner just to the left of the large orange block at the corner. This puts you on a ledge with a bunch of rap tat for the descent. But its a bit too soon to build an anchor here – turn left and head up the face until the drag gets too much. 50m, Grade 17
Pitch 6 Trend up and right to the summit. Another amazing fist crack that trends right up to a roof feature of a few overhanging blocks. Easiest to get through on the right, onto flatter ground with a load of large loose blocks. Spike belay from which we rapped. 60m, Grade 15
descent
Real risk of getting ropes stuck – lots of blocks and cracks and not vertical ground so be very careful. Rap back down to the tat you passed on pitch 4. We got our rope stuck pulling on this first rap but thankfully only 10m above the anchor so had enough rope to lead back up to it and free it. From here there’s a steep gully down to the left which is pretty clean (and was full of snow when we were there) which we rapped down and put us back to the snow about 80m above the start of the route. Some good spikes here to rap down the snow gully back to the start of the route / your gear.
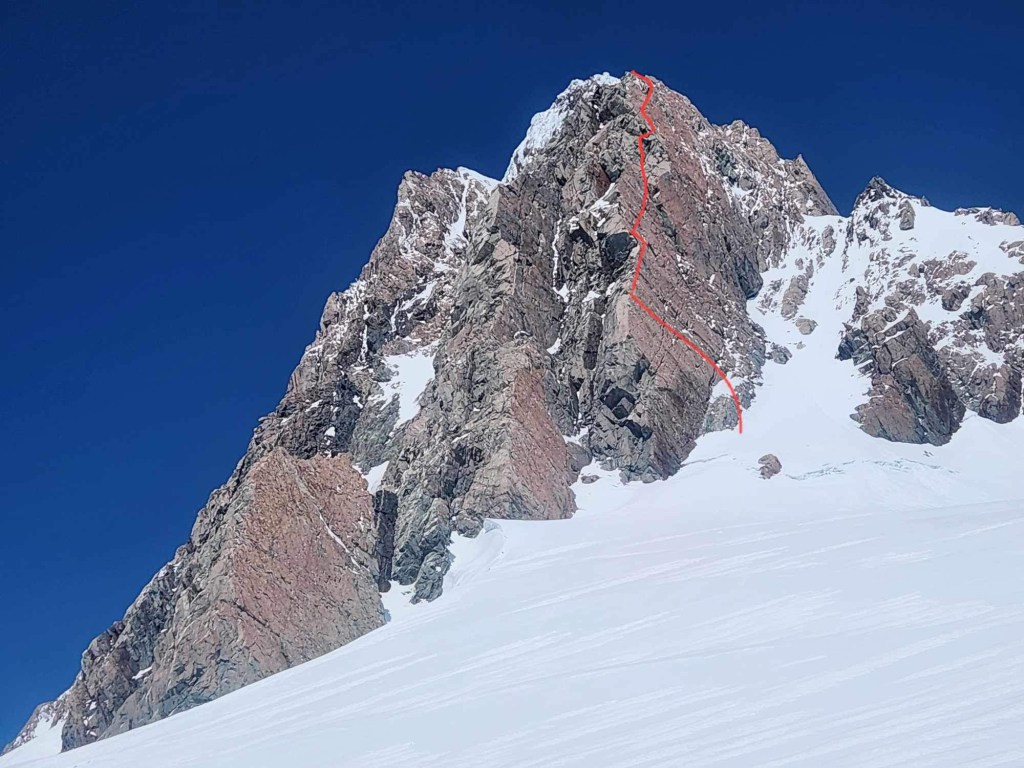
A huge day, stoked to have climbed this one! Decribed in the guide book as ‘one of New Zealands great ice climbs’ and ‘a perfect line on a beautiful face’, we had to see if it lived up to the hype. Not only is its reputation enticing, but its an incredibly aesthetic mountain and (provided you heli in to Pinoeer) is only an hour approach from the hut. Despite being only slightly taller than neighbouring 3000-ers Haidinger and Glacier peak, due to its sheer, forboding near vertical south face it dominates the surrounding skyline, appearing to overshadow everything nearby.
Ice is nice, but it ain’t rock so Joe took one for the team, taking on all the leading. Thanks Joe!
In terms of difficulty, the main issue is the long length of the route, especially if pitching the whole thing. You need to be efficient and confident at the grade to get off the face in time. Technical difficulty varies depending on the conditions but expect back to back pitches of sustained WI3, and when we were there short but delicate vertical sections, edging more into WI4.
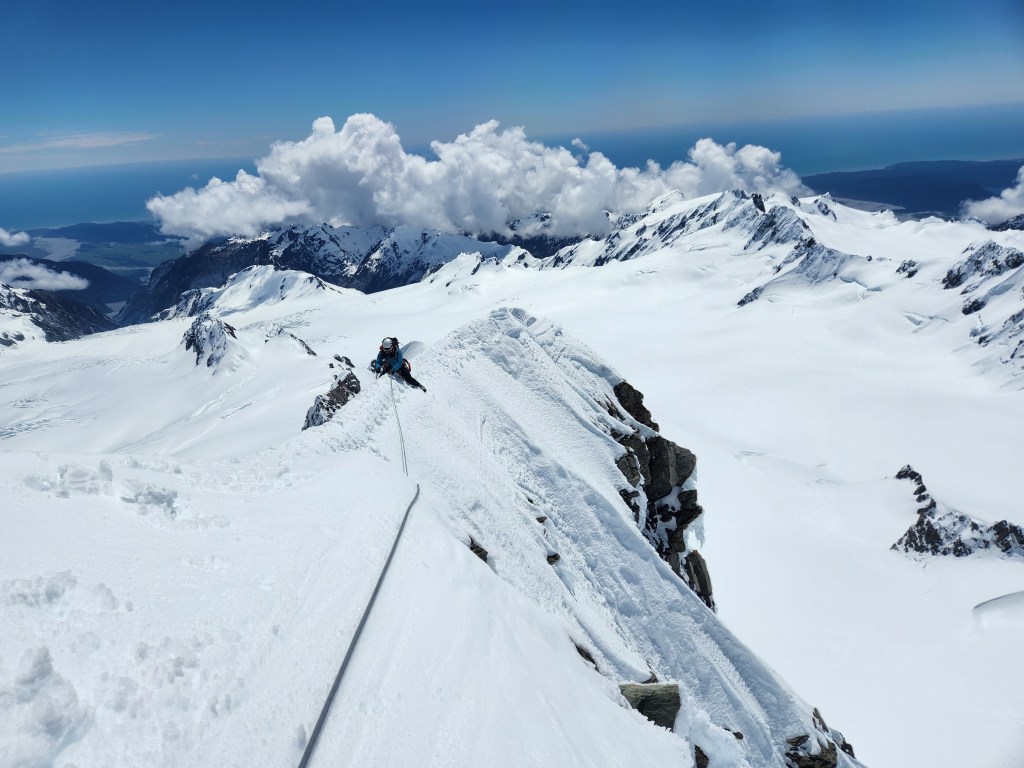
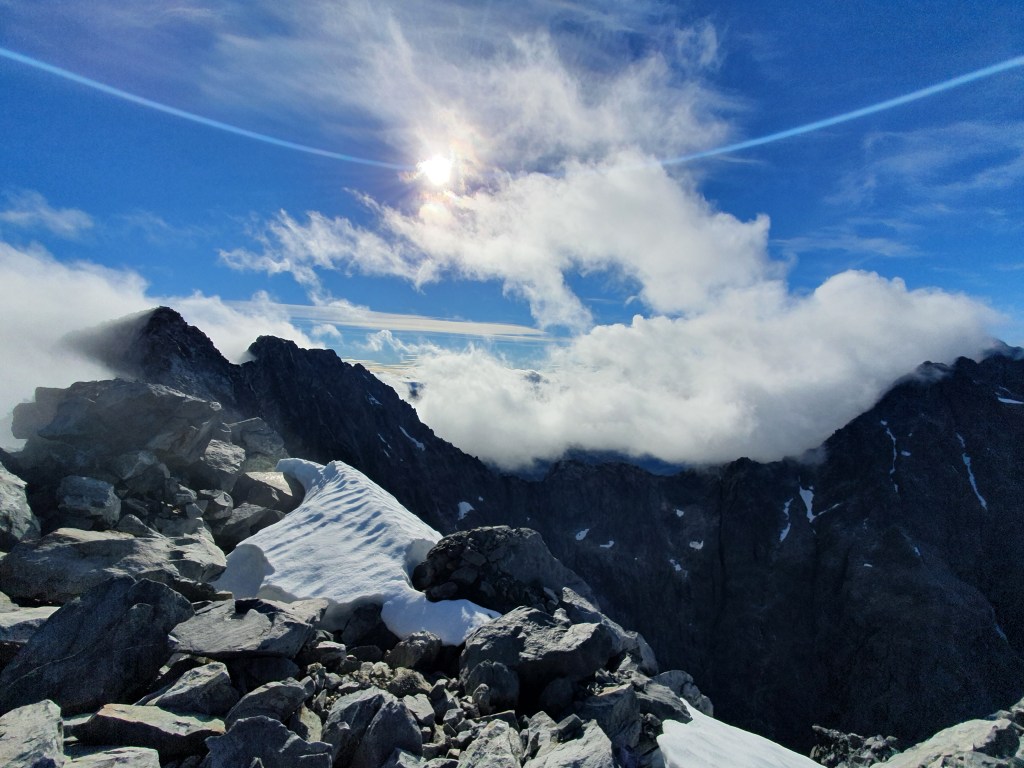
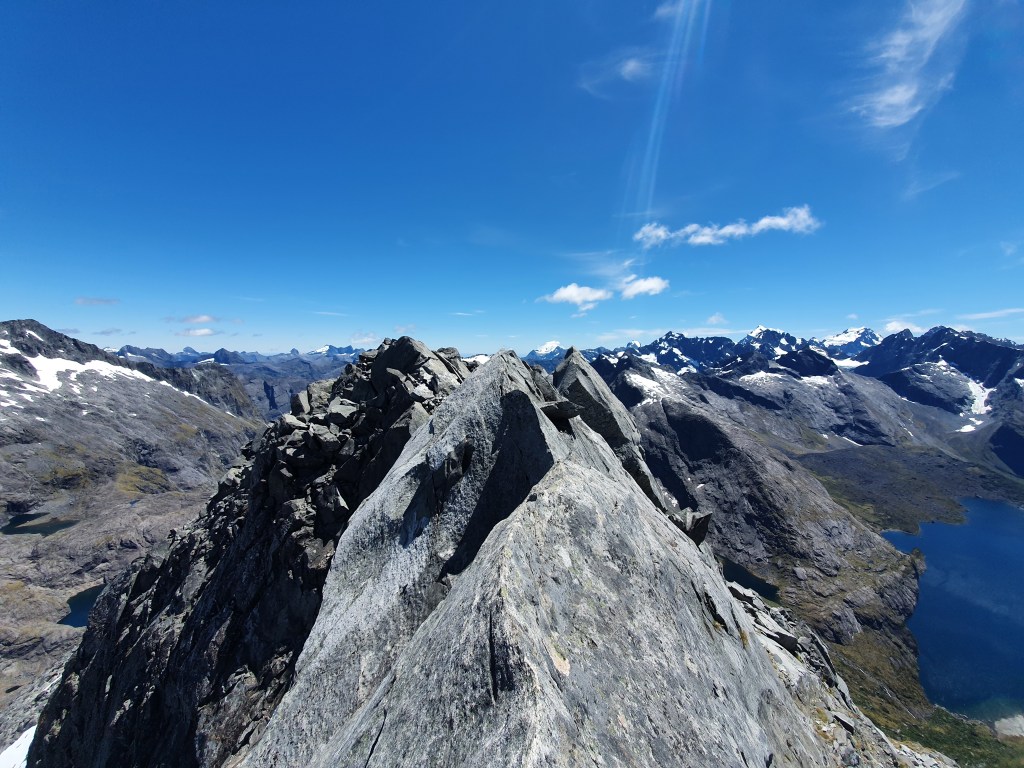
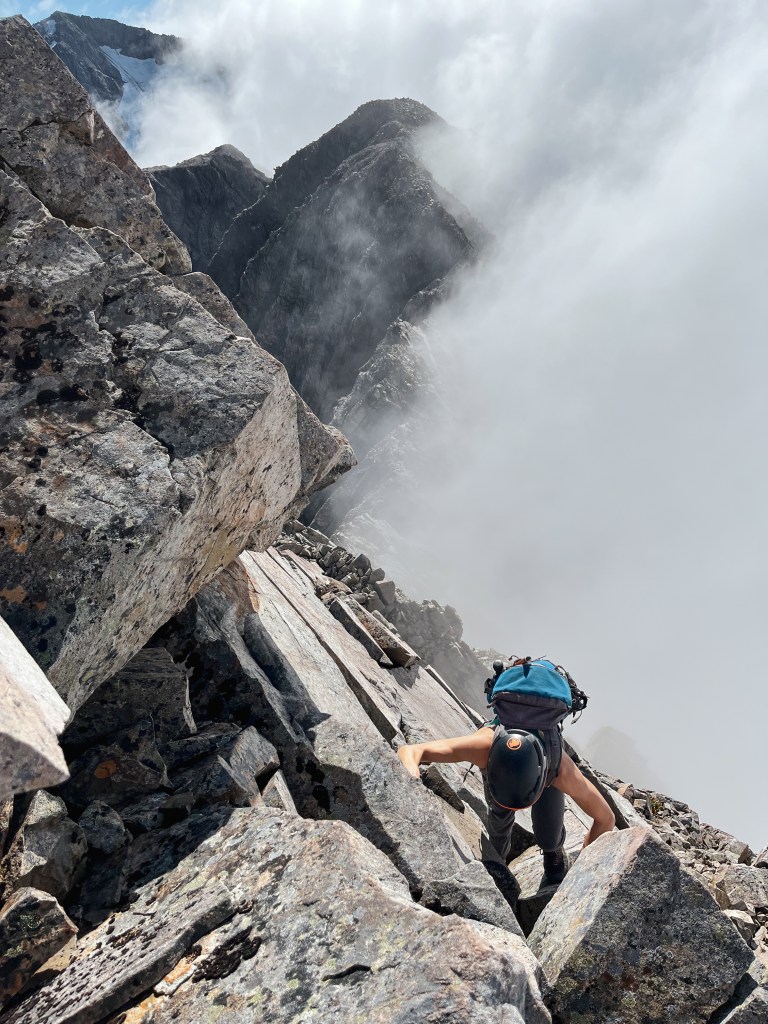
Summit stoke! Ridge behind that we had to shuffle across to get to the summit.
Grade : Technical grade = 5, Seriousness grade = IV
Equipment : 2x 60m ropes, 12 screws with long runners, small rock rack (didn’t end up using). 2 x snow stakes. Tat for V threads.
Approach : 1 hour from Pioneer hut on skis, 30 mins on skis.
Climb time : time on route around 12h (we pitched it all); round trip via glacier peak was 18h
Season : 19/11/2023
Team : Joe and Maria
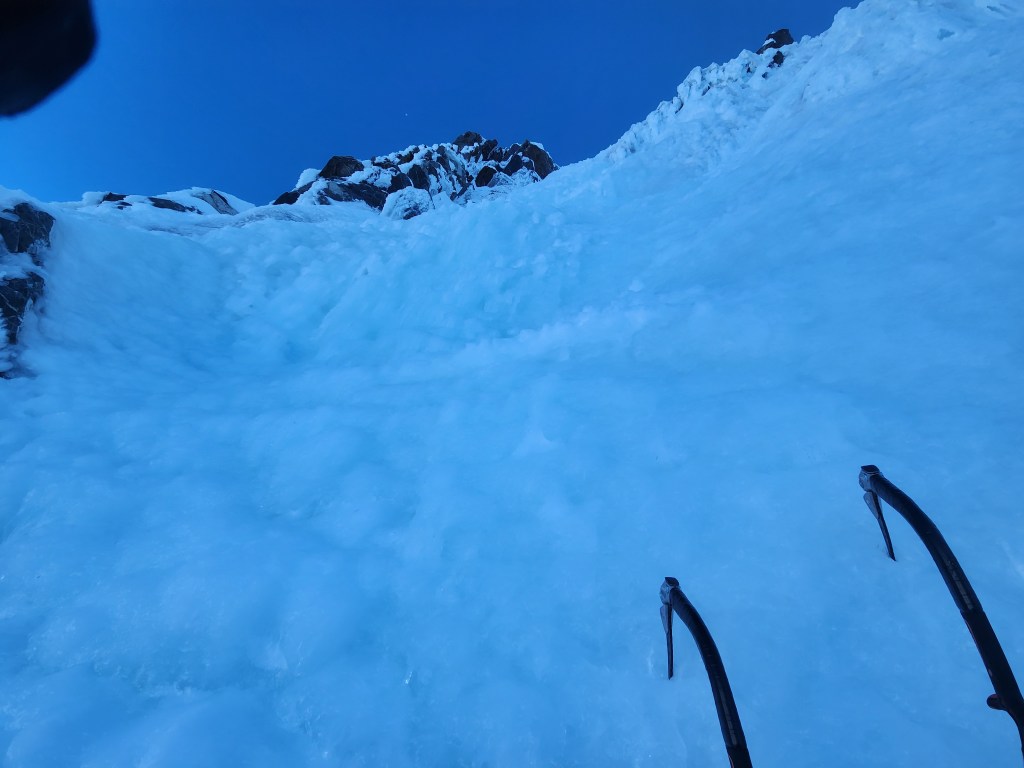
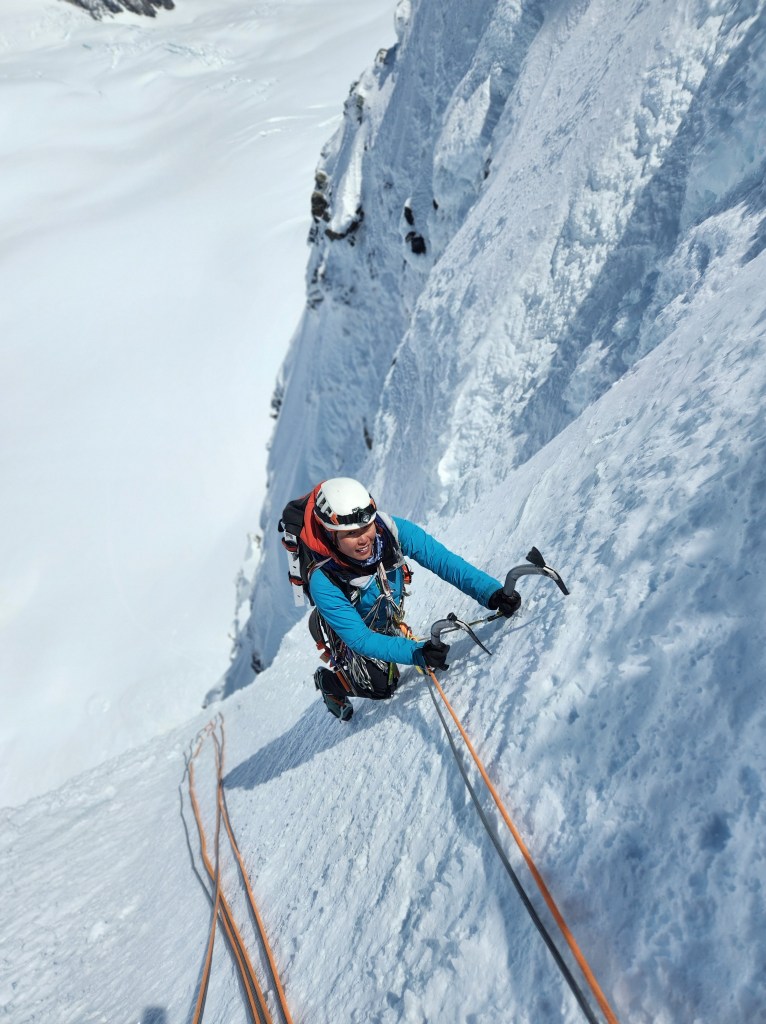
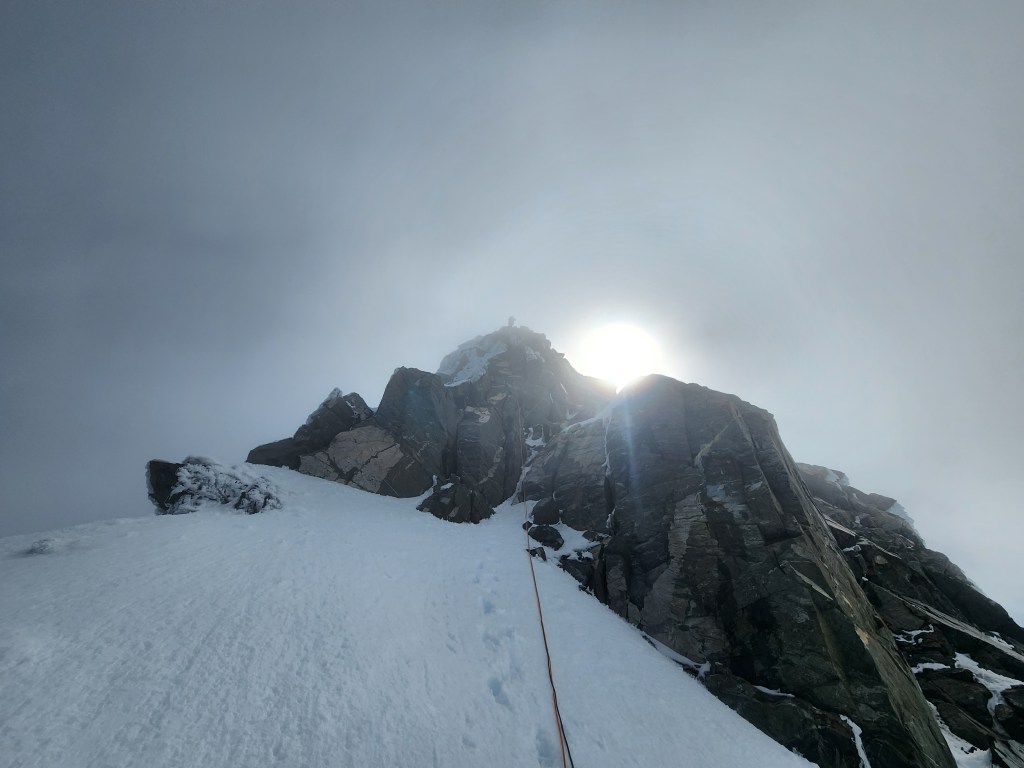
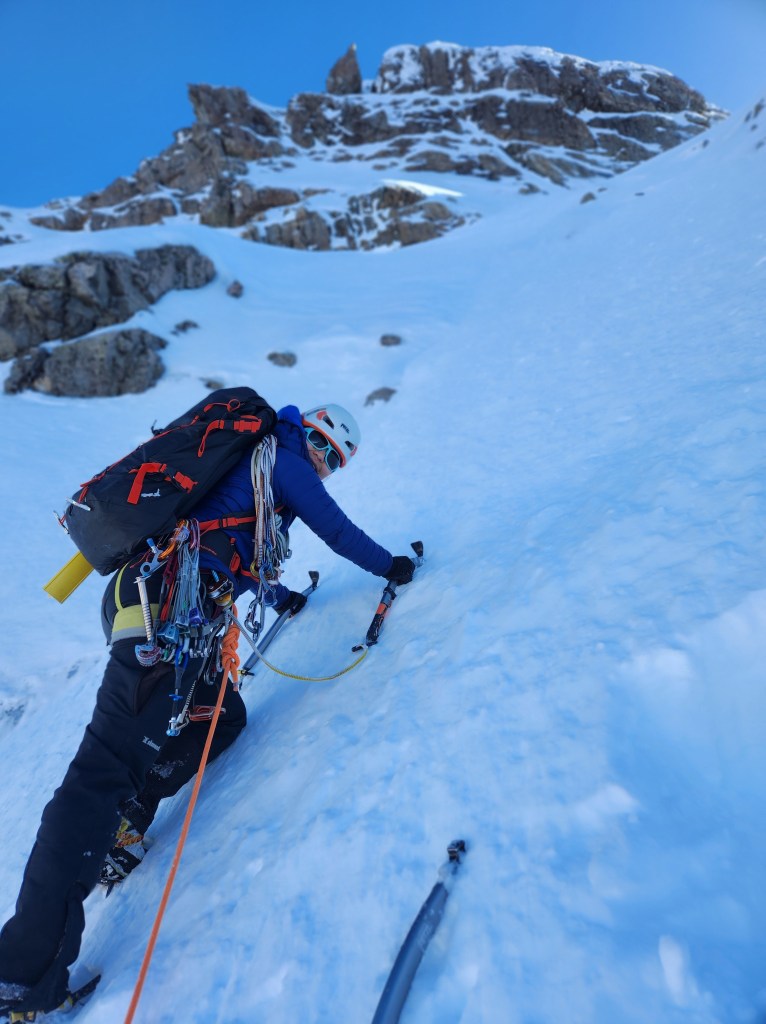
Coming up the lower snice pitches before the crux section. The conditions here were excellent, with confidence inspiring placements with a single swing and decent screws. Sometimes this section is snow.
Approach
Stayed at NZAC’s H.E.L Porter Memorial Lodge the night before. Flew with Heliservices, linking up with 2 other climbers making it $525 between 2 of us (770 on the way out between 2). We have never walked in or out of the west coast neves. It is still possible and reguarly done, but it looks increasingly gnarly and difficult as the glacier recedes leaving unstable moraine walls. Horror stories abound, and it certainly seems more dangerous objectively that anything you would experience on the route.
We landed at the hut mid morning, so went to scope the route out to plan for the next day. It’s an easy approach from Pioneer hut, giving you a full view of the face without having to get too close. We could see the route was looking fat, but also that by midday it had turned into a shooting gallery. The sun hits the final headwall around then, and all the debris gets funnelled directly down the route. Options are to either climb in the winter so it stays cold and a few days after a storm so there is less ammo at the top, or aim to be off the route by around midday. Factor this in if you’re planning to rap the face. We stashed our gear at the base of the route for a cruisy approach the next day and headed back to the hut.
Onto the water ice! Beatuiful ice climbing over blobby bulges with short body length near vertical sections and bomber screws. As is often the way we didnt get any photos of the crux
We had always planned on descending via glacier peak as a round trip always seems like a more complete day out, and the afternoon icefall confirmed that this was the way to go. If your planning on descending this way, its vital to walk round and make sure the descent from Glacier peak onto Explorer glacier isnt cut off – this only takes 30min from the hut.
The hut book showed the route had been climbed a couple of times in the last week, and that the conditions were generally good but with poor quality ice at the top. This cemented our decision to avoid rapping the route if possible. It seemed like there had been some epics in the previous week, with one team getting benighted – we aimed for an early start and to move fast to avoid the same.
Back at the hut, we almost had to call the whole trip off after #bootgate when someone else staying at the hut knocked one of Joe’s boots that were drying outside off the platform they were on – a platform perched out over a 50m cliff with a big shrund at the bottom. Miraculously, the boot and footbed both landed on seperate little ledges on the cliff just shy of the crevasses below…!! A good lesson to not leave stuff out drying over a cliff!
More snice cruising
climb
We were up at midnight, and left the hut at 1am.
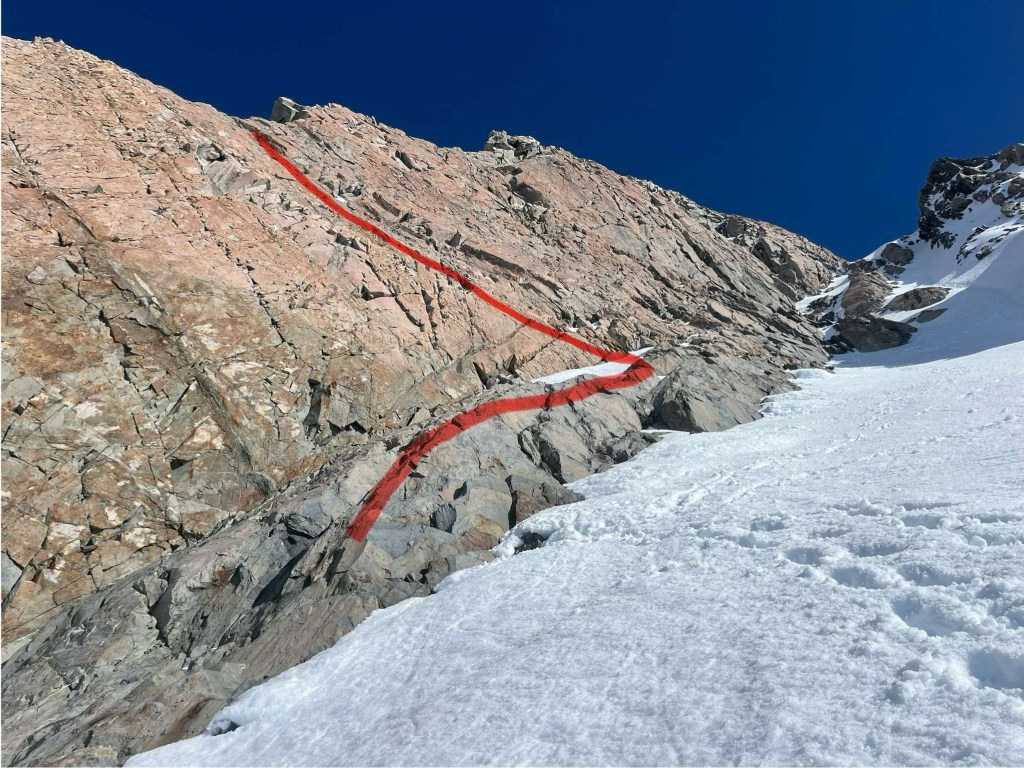
From the base of the route, there are 3x relatively low angle (50ish degrees?) pitches to get you warmed up. Some parties solo or simul this section to get to the water ice, especially it this section is snow. For us this section was hard snice, littered with small rocks and with a waist to overhead deep runnel straight down the middle where a fridge sized boulder had plowed its way down the bottom of the route. You definitely don’t want to be here when the rockfall starts! We pitched this whole section, but were able to move pretty quickly.
Pitches 4-8 were phenomenal – full pitches of fat water ice climbing, taking bomber screws at a sustained WI3. Multiple blobby bulges mostly in the 70-80 deg region. Pitch 6 was the definite crux (the 11.62 section in blue in the guide). Here the ice steepened up to just below vertical and became more technical, but this section was short, 20-30m. After the crux its back to the hero blobs for a couple more pitches until reaching the final headwall. The angle drops off to around 70 deg to the summit – we made a total of 12 pitches but these were all rope stretchers so could easily end up being a bit more than that. This time of year the sun effect on the top pitches was affecting the ice quality, but could still make reasonable picket anchors. If you were rapping the route this late in the year you would need to be leaving pickets for several raps as it was too soft for threads.
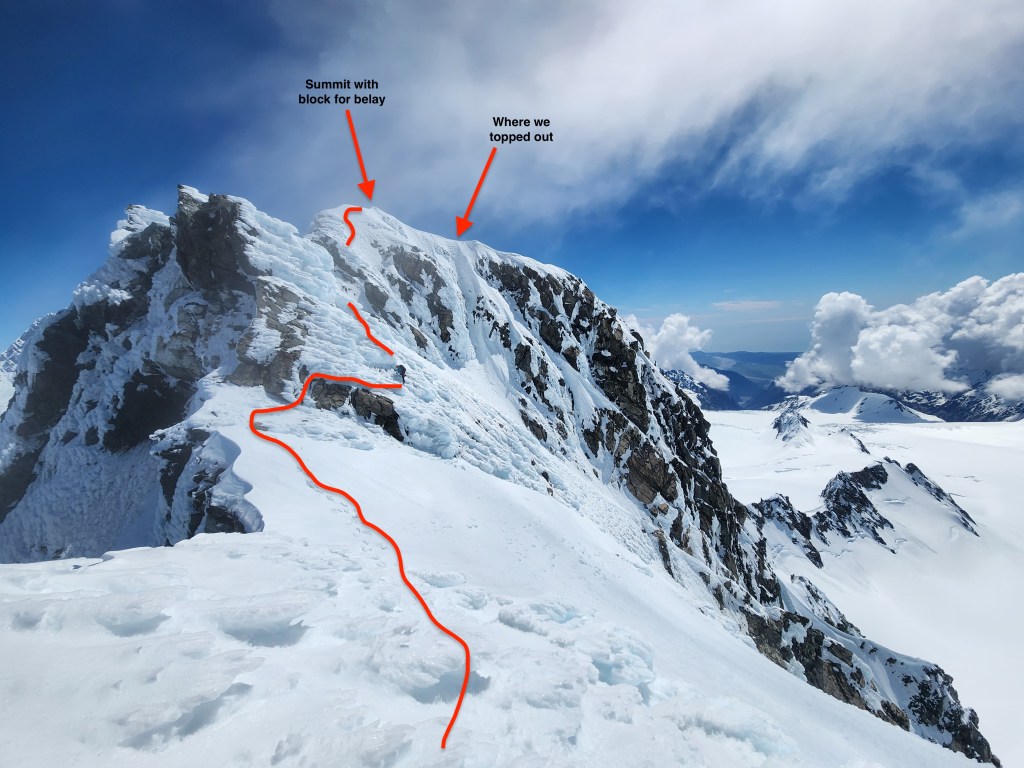
The summit is a knife edge ridge that extends towards a large block at the far climbers right side of the face, which is the true summit. The topos mostly show the route aiming up to the far climbers left of the face which is the route we took – this is a bit awkward as making a belay on the ridge is not the easiest. Genuine knife edge ridge with a lot of exposure on both sides, and the sun is blasting the other side of the ridge so going down there to make a belay wasn’t going to work for us. The top of the south face also catches sun so the snow / ice quality if pretty poor here – we made a 2x picket anchor just below the ridge, but there was a bit of messing around from me going up and down figuring out where best to make the anchor which wasted a bit of time. We then chevalled across the ridge to the true summit where theres a good belay rock you can sling. If we were doing the route again, on the final pitches would just trend climbers right to just top out at the block / true summit and avoid the messing around on the ridge.
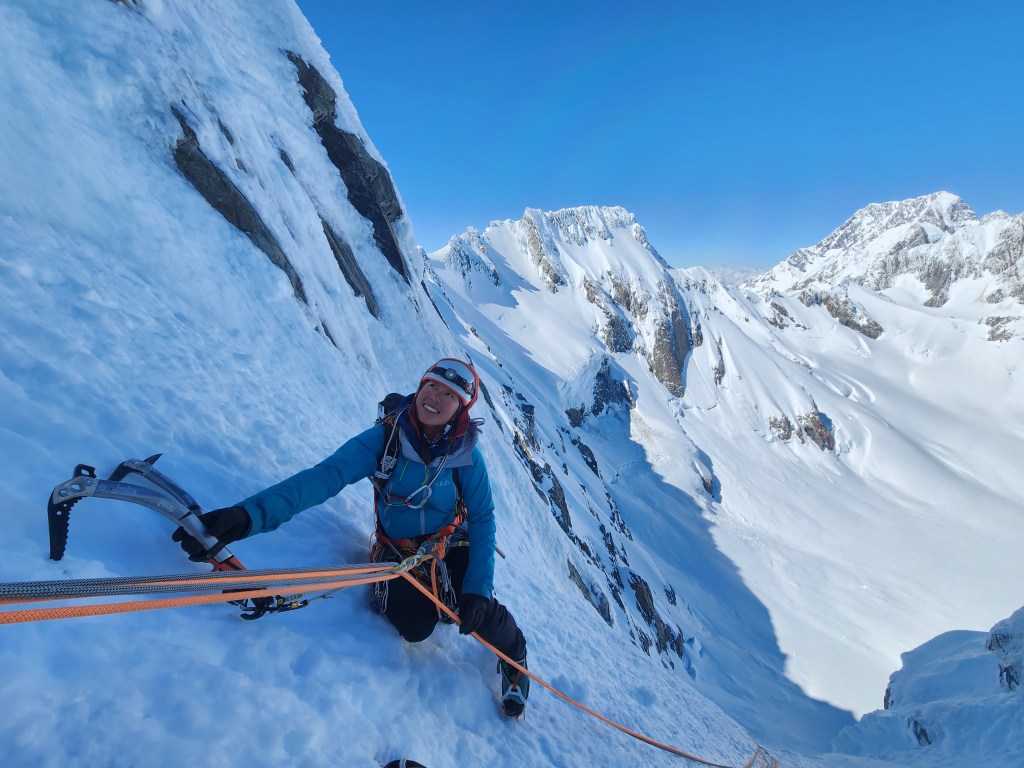
On the upper snowfields above the crux. The sun effect meant the ice was softer, quick and easy to climb but not taking screws without a lot of digging. Pickets were good.
descent
Rapping the route – a popular option, and espeically good in a team of 3 where one person can be equipping the threads as your going up. However probably wouldnt recommend it this late in the year unless you can move fast enough to be off the face by around midday or 13:00 due to icefall. Another party climbed a route to the left of us at the same time as us and ended up rapping through the heat of the afternoon, and it sounded like a fairly terrifying experience with a constant bombardment of ice and rock.
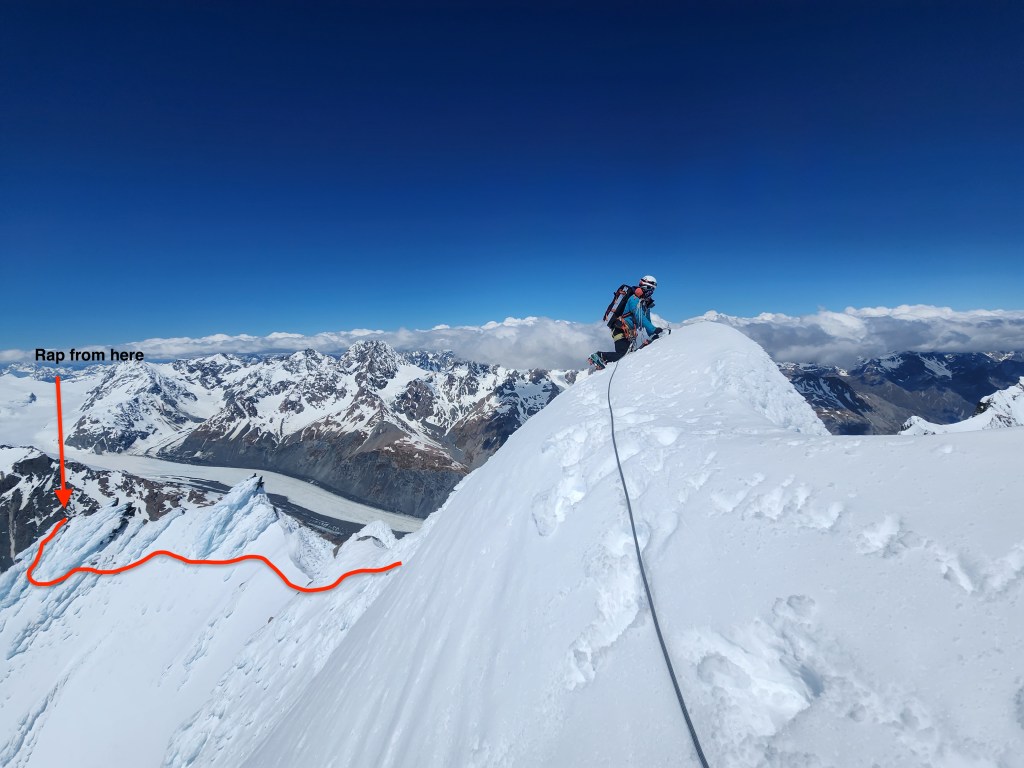
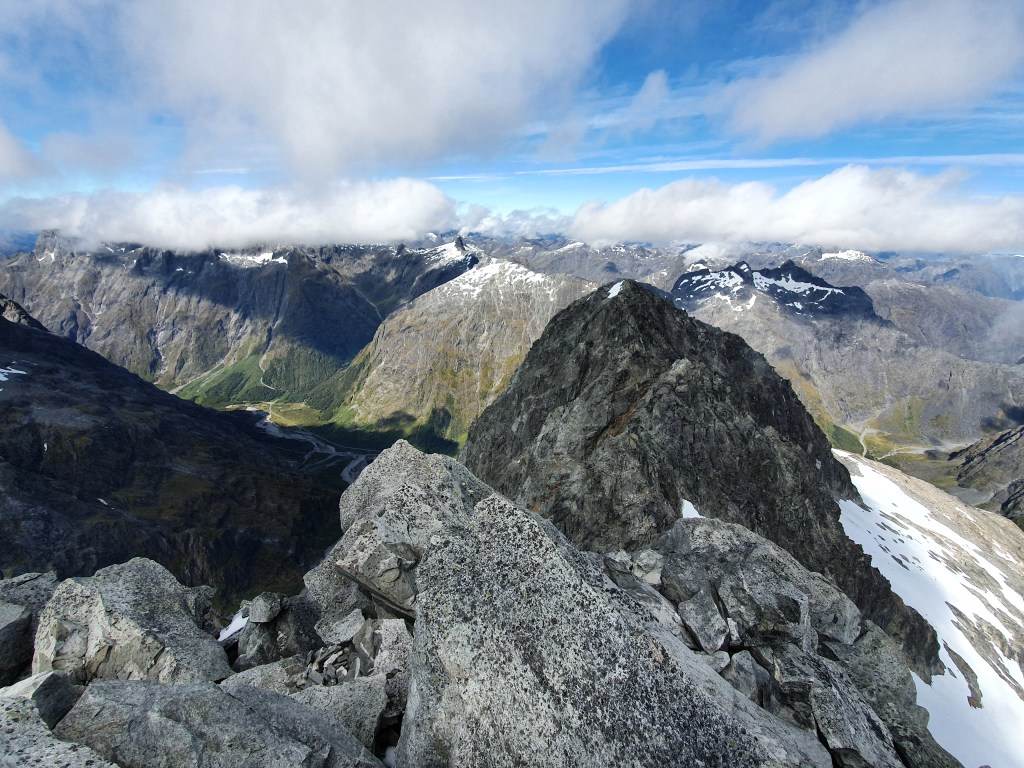
Me on the summit, Maria on the sub summit. You have to traverse a fair way to get to the rap, wouldnt be obvious in poor weather / the dark.Looking back towards Douglas summit from the North. If you aim for the climbers left of the face you top out at the wrong side of the ridge and need to traverse. Sticking right puts you right at the summit / good belay spot. After short downclimb (first red line) we did a short rap to the snowfield then traversed around to the rap station
Standing at the rap station, Tasman glacier below. Go off the north side of the ridge to get to the Glacier Peak ridge
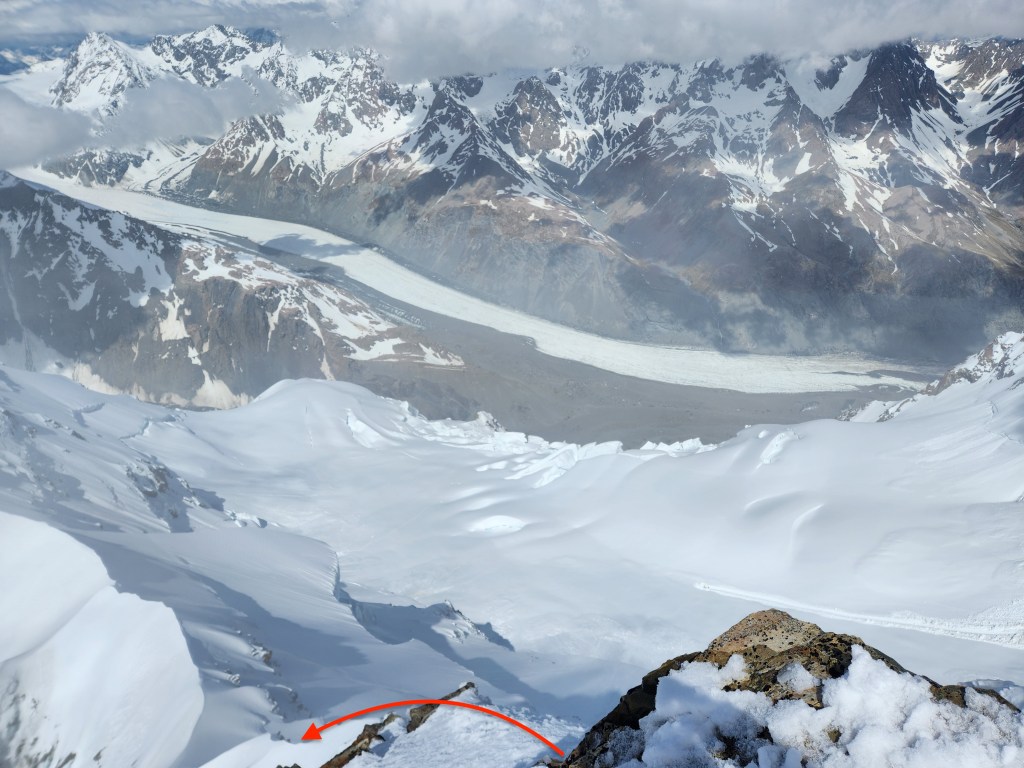
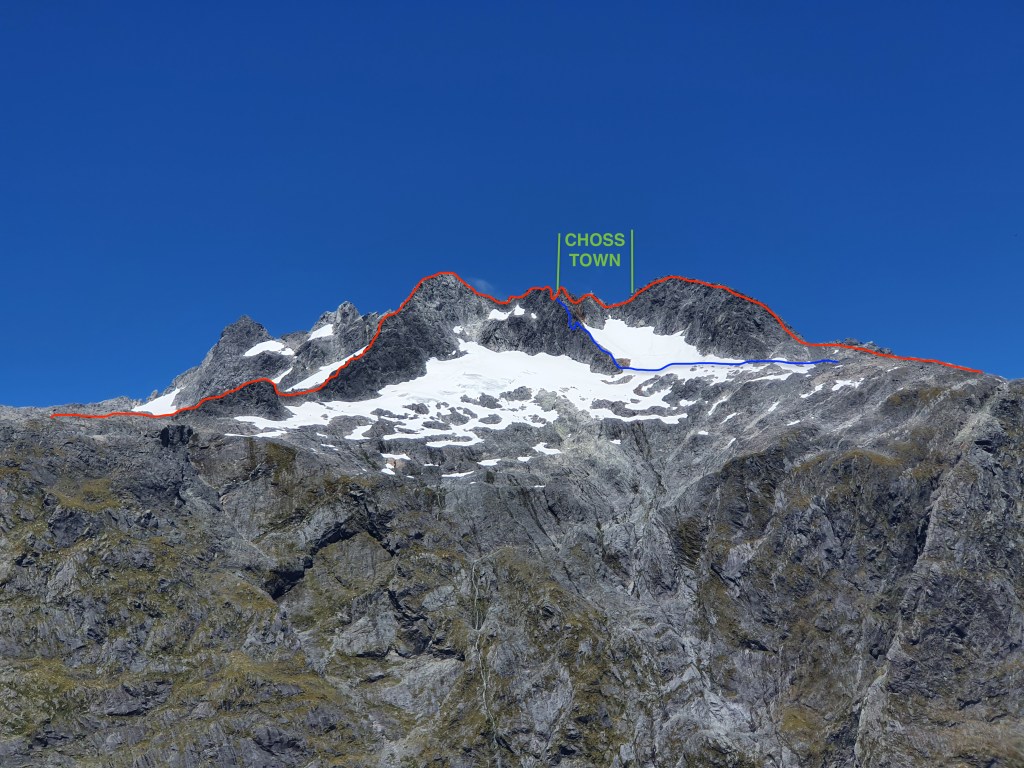
Preferring a loop, and because we had topped out after midday, we opted to descend via Glacier peak. On the summit of Douglas there is a decent rock that you can sling for an anchor. The first section of the traverse towards glacier peak is a little involved – we made one 30m rap from just below the summit to get to the lower snow field, and then traversed on the North side of the ridge around 2x large rime covered blocks for around 100-200m to get to the main rap. Stay on the north side of the ridge and go as far as you can until the ridge forms a point to find the rap station which may well be hidden by snow. From the end of the ridge aim to rap on the north side, around 50m, putting you onto the main ridge connecting to Glacier peak. See photo below.
Looking back up at the main 50m rap down to the Glacier Peak ridgeThe route along the Glacier Peak ridge and down onto the Explorer Glacier. Big crevasses towards the bottom that can get cut off
Then it’s a straightforward walk to the lowest point of the col between Douglas and Glacier peak. We descended from there onto Explorer glacier, and were glad for the photos we had taken the day before of the route down through the crevasses. By now it was 6-7pm and the snow was soft. We post holed once or twice along the way back, so again, we didn’t hang around and boosted back to the hut. The others at the hut spotted us returning, so the water was pre-boiled and ready – hallelujah.
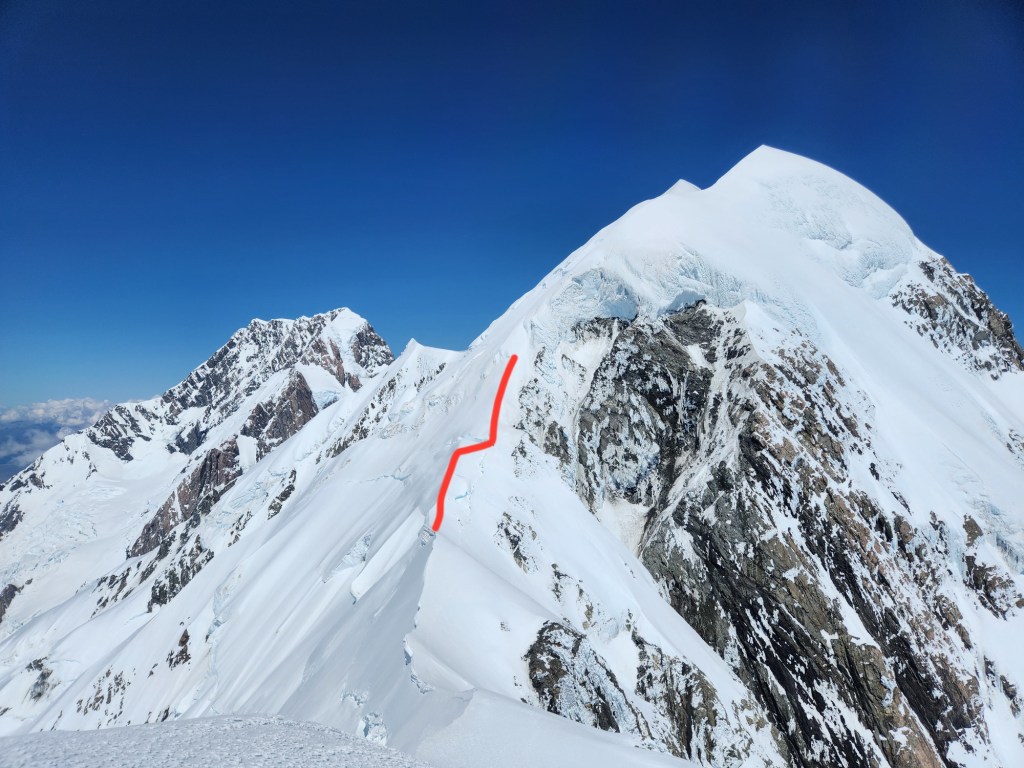
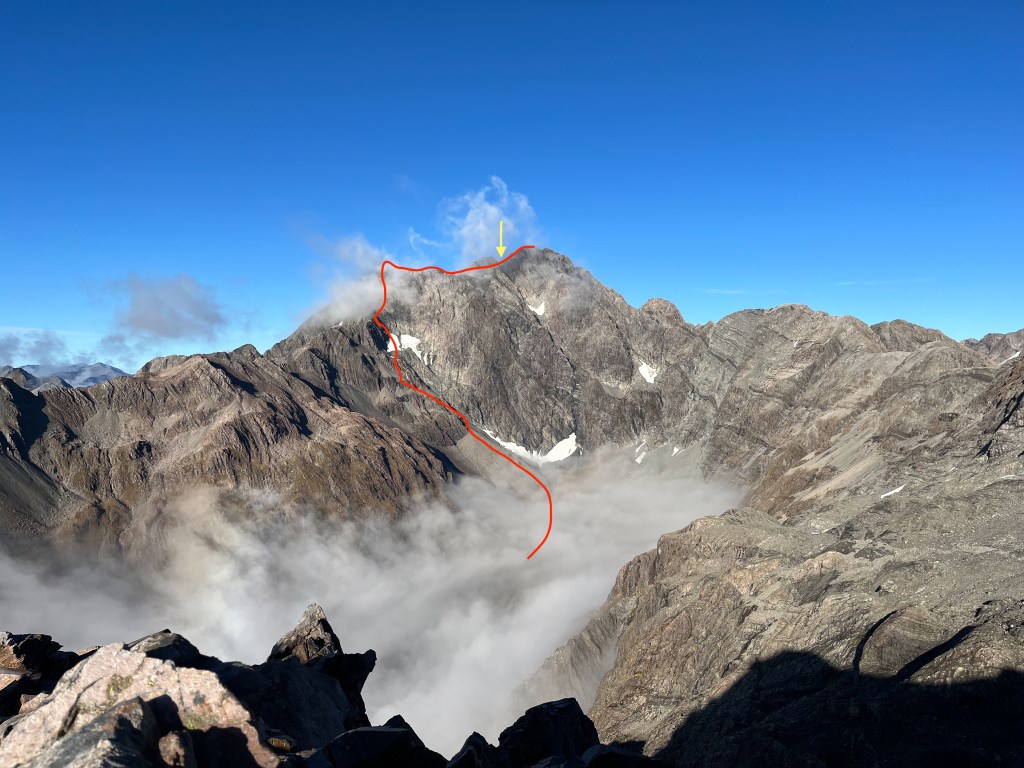
A very special day out amongst the mighty maunga of the Southern Alps. Having just summited Mt Douglas 2 days prior, our bodies were still recovering and we still had some outstanding sleep debt. We had one more good day of weather before a storm was due to come in. If we attempted Mt Tasman, we would have to return early enough to catch a heli out or commit to being stuck in the hut for a few days to sit out the storm.
It wasn’t too hard a decision – we weren’t sure if we’d get a chance to come back this season so we settled in for another early night and early start to give it a go.
Initially, we wanted to go via the Stevenson-Dick couloir and down via the N shoulder which would make for a nice loop. We had recce’d the access a few days earlier, as theres a schrund at the base of the couloir that can cut the route off, but it looked negotiable. This route was going to be more committing however, as reversing the rockfall prone NE facing gully after the sun was up didnt sound particularly enticing if we needed to bail for whatever reason, and in the interest of getting a flight out before the storm we opted to try the N shoulder via Lendenfeld.
Grade : IV, 3+
Equipment : 1x 60m rope, 10 screws with long runners, 2 x snow stakes. Tat.
Time : 12.5h return (from turn around point) ; 1340m elevation gain, 12.6km
Season : Late spring/early summer – late summer may see access cut off
Team : Joe and Maria, 21/11/2023
approach
Leaving the hut around 2am, we found a decent freeze overnight made the walk across the Albert glacier cruisey. Towards Marcel col, you need to navigate a bit of a maze of crevasses and seracs – worth taking a photo of from the heli in as figuring this out in the dark would be hard. Luckily for us a party had climbed Lendenfeld the day before so we could just follow their tracks.
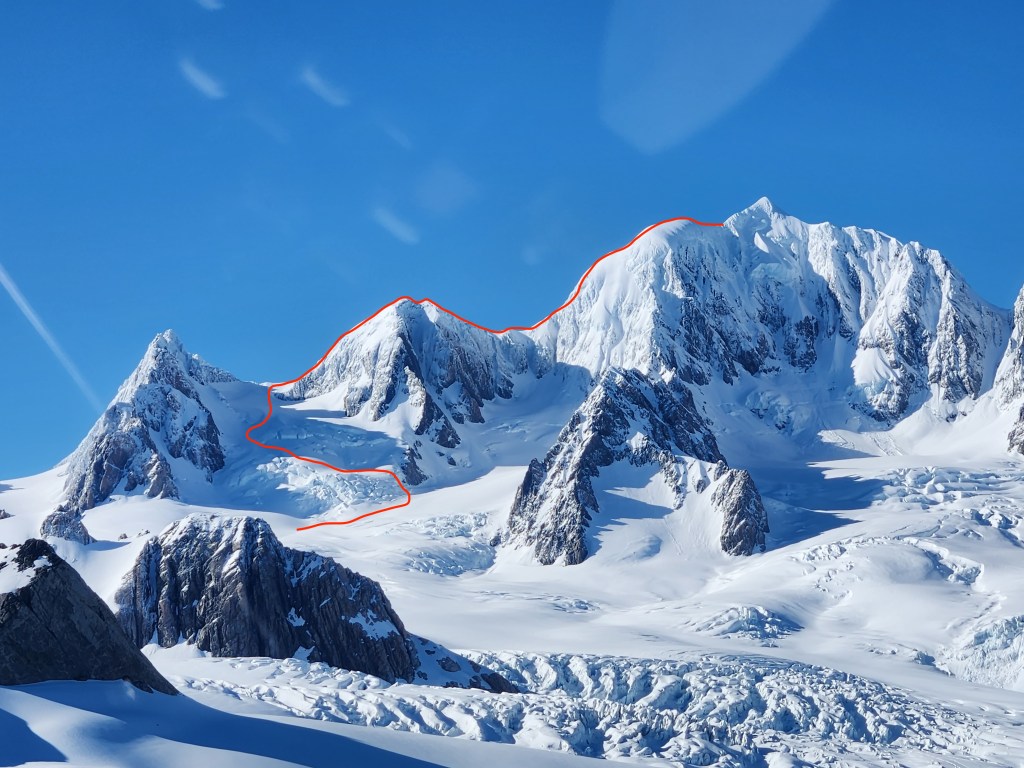
Photo of our route from the heli
Easy ground on supportive neve made fast progress to Marcel col, which steepens to around 40-45 degrees to the summit of Lendenfeld. It took 2.5 hours from the hut to the summit. Heading up to Lendenfeld, we were treated with a gorgeous alpine sunrise, illuminating the entirety of the southern alps and the ocean on the horizon too, with Plateau hut a tiny dot 1000 vertical meters below you to the south.
Sunrise on Lendenfeld – primo!
On leaving Lendenfeld the climbing gets considerably more technical and progress slowed down. You’re onto the kind of ridge travel that is typical for this area – big undercut cornices hanging over the south faces and wind stripped ice on the north. The ice makes for solid tool placements, and the angle is not very steep, but you are constantly above serious exposure so full focus is required for the traversing the downclimb to Engineer col. We ran a running belay between us for this section – the ice was taking bomber screws and we crossed in 2x blocks. If you’re planning on using a rope for this section, I personally think bringing a full rack of screws is well worth the small extra weight in your pack to allow extra long simul pitches.
Traversing from Lendenfeld (middle of shot) towards Engineer col (behind photographer)
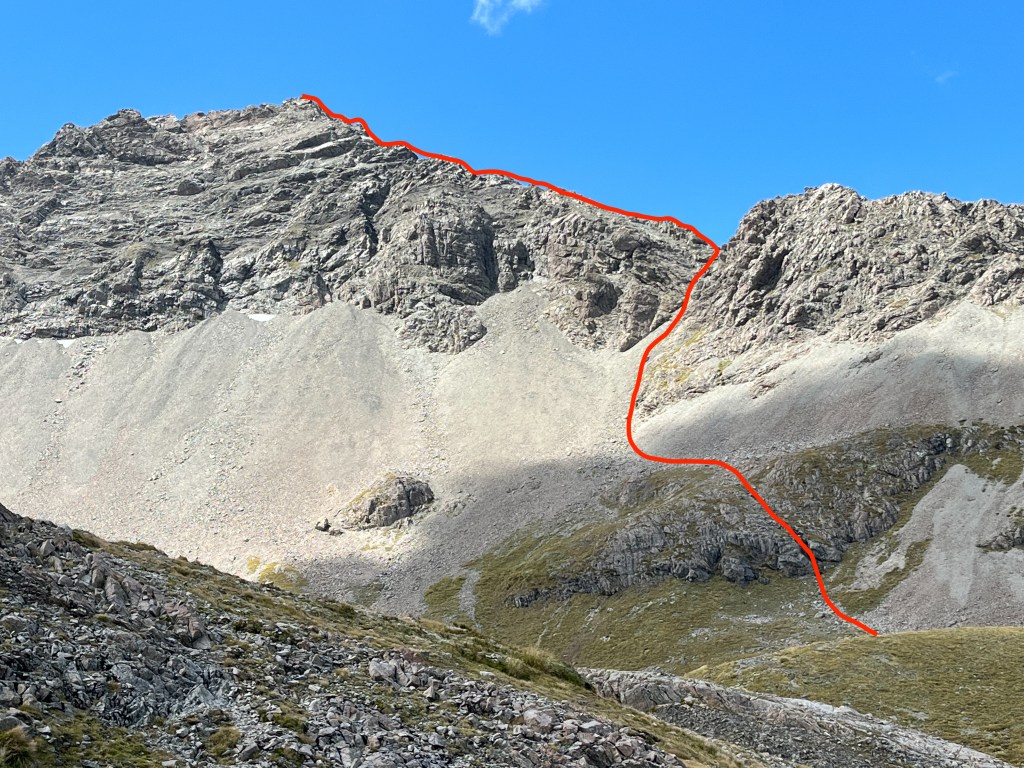
The section from Engineer col is often the crux of the route as it can be cut off by a large schrund, requiring some shenanigans to traverse onto the East face of Tasman to gain Syme ridge. Luckily we found it completely filled in and we could stick to the North side of the ridge which connects the col to the top of Syme ridge. Easy but exposed 45ish degree climbing, we simulclimbed with good screws and a couple of microtraxions taking around 90 minutes to get to point 3300m, the flat spot just below the summit. If pitching this whole section it would have taken significantly longer.
Our route from Engineer col up to Syme ridge. Can often be cut off requiring a traverse onto the East face of Tasman. Subpeak at 3300 on the right, with Tasman summit peaking out just to the left
Joining Syme ridge however gave us our first taste of the conditions on the East face: 5 days earlier there had been 25cm new snow that was well into a melt freeze cycle, and the E face was still plastered. While there had been a solid freeze overnight, the sun was absolutely blasting and by 7am when we were leaving Engineer col it was already starting to soften. Along the ridge itself where the wind had stripped everything back, there was a strip of good ice so we could avoid touching it all the way to the 3300m flat spot.
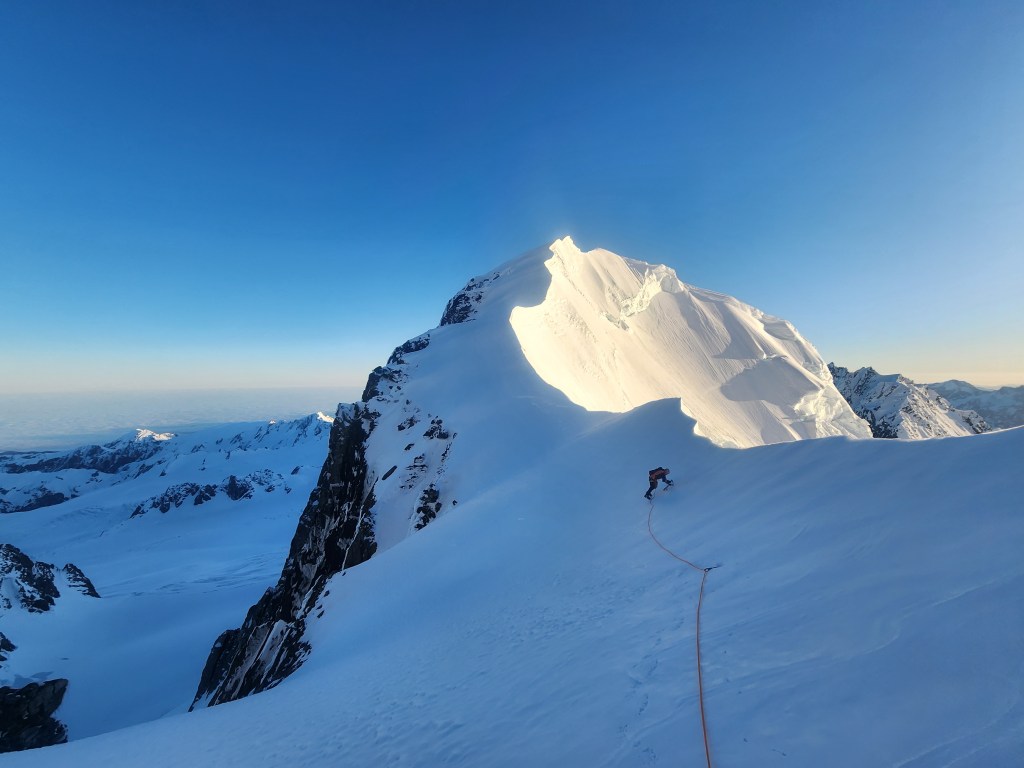
From here, there is another short (roughly 200m) traverse to the final snow ridge to the summit. More classic Aoraki ridge travel – hard ice on the north side with 1000m of air under your feet down to the Janszoon glacier. Except this time covered in large, fragile lumps of sastrugi and rime ice. We started simul climbing again, but the sastrugi made this impossible with the rope constantly getting snagged and tugging at the leader doing more harm than good, so the rope went away and we soloed to the the final snow slope. This was slow going and mentally taxing, and we got to the base of the final ridge at 0900. From here the north side of the ridge is plastered with with monstrous rime blobs and so the standard approach is to traverse onto the east face for the final section to the summit. If conditions are good this is an exposed but fairly straightforward section of the route to the summit. Reaching over the icy safety of the ridge and punching into the snow on the east face it was clear this wasn’t happening – even by 9am it was totally cooked, with my arm disappearing almost to the elbow. Setting off any size of loose wet from the summit of the east face of Tasman would definitely be the end of you, so the decision to turn around was easy – even though we were only 100m or so from the top.
We retraced our steps, following the strip of ice down Syme ridge to avoid the increasingly scary looking snow. We had originally planned to make threads and rap this section above Engineer col, but even this ice was starting to soften by the time we got there just after 1030, so we downclimbed the whole thing. Once past Lendenfeld the progress was really fast and we got back to the hut by 1430. It was hotter than forecast, and the heat crossing the Albert glacier back to the hut was hard to handle – we got back and immediately downed a litre of water each. We got back to the hut in time for one of the last heli flights of the day – with only 20 minutes notice, this was the fastest turn around we’ve achieved for packing up!
Reflecting on this day, we were caught out by higher temps than expected. We had 9.30/10am in our heads as a turnaround / summit time, on a forecast of 3000m FAFL in mid November with a solid overnight freeze, but we were a few hours late. It was also the first time we had done one of these ridge routes together, with sections of easy but unprotectable (due to the amount of rime) terrain with terminal consequences for any small mistake. We talked a lot about whether the risk to enjoyment ratio is worth it, especially compared to a route like S face Douglas which we had done a few days earlier and while technically much harder, is well protected the entire way, especially for the second. Ultimately, the summit is not everything and being able to bail even when you’re just half an hour away if it’s not safe is the key to avoiding accidents in the mountains.
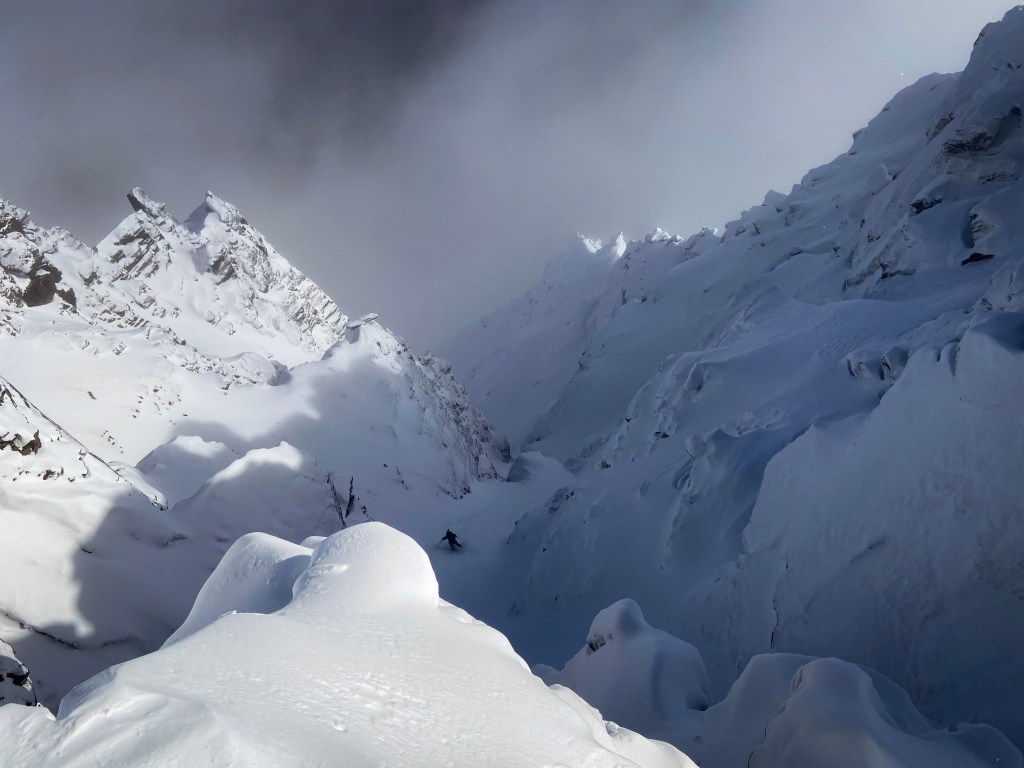
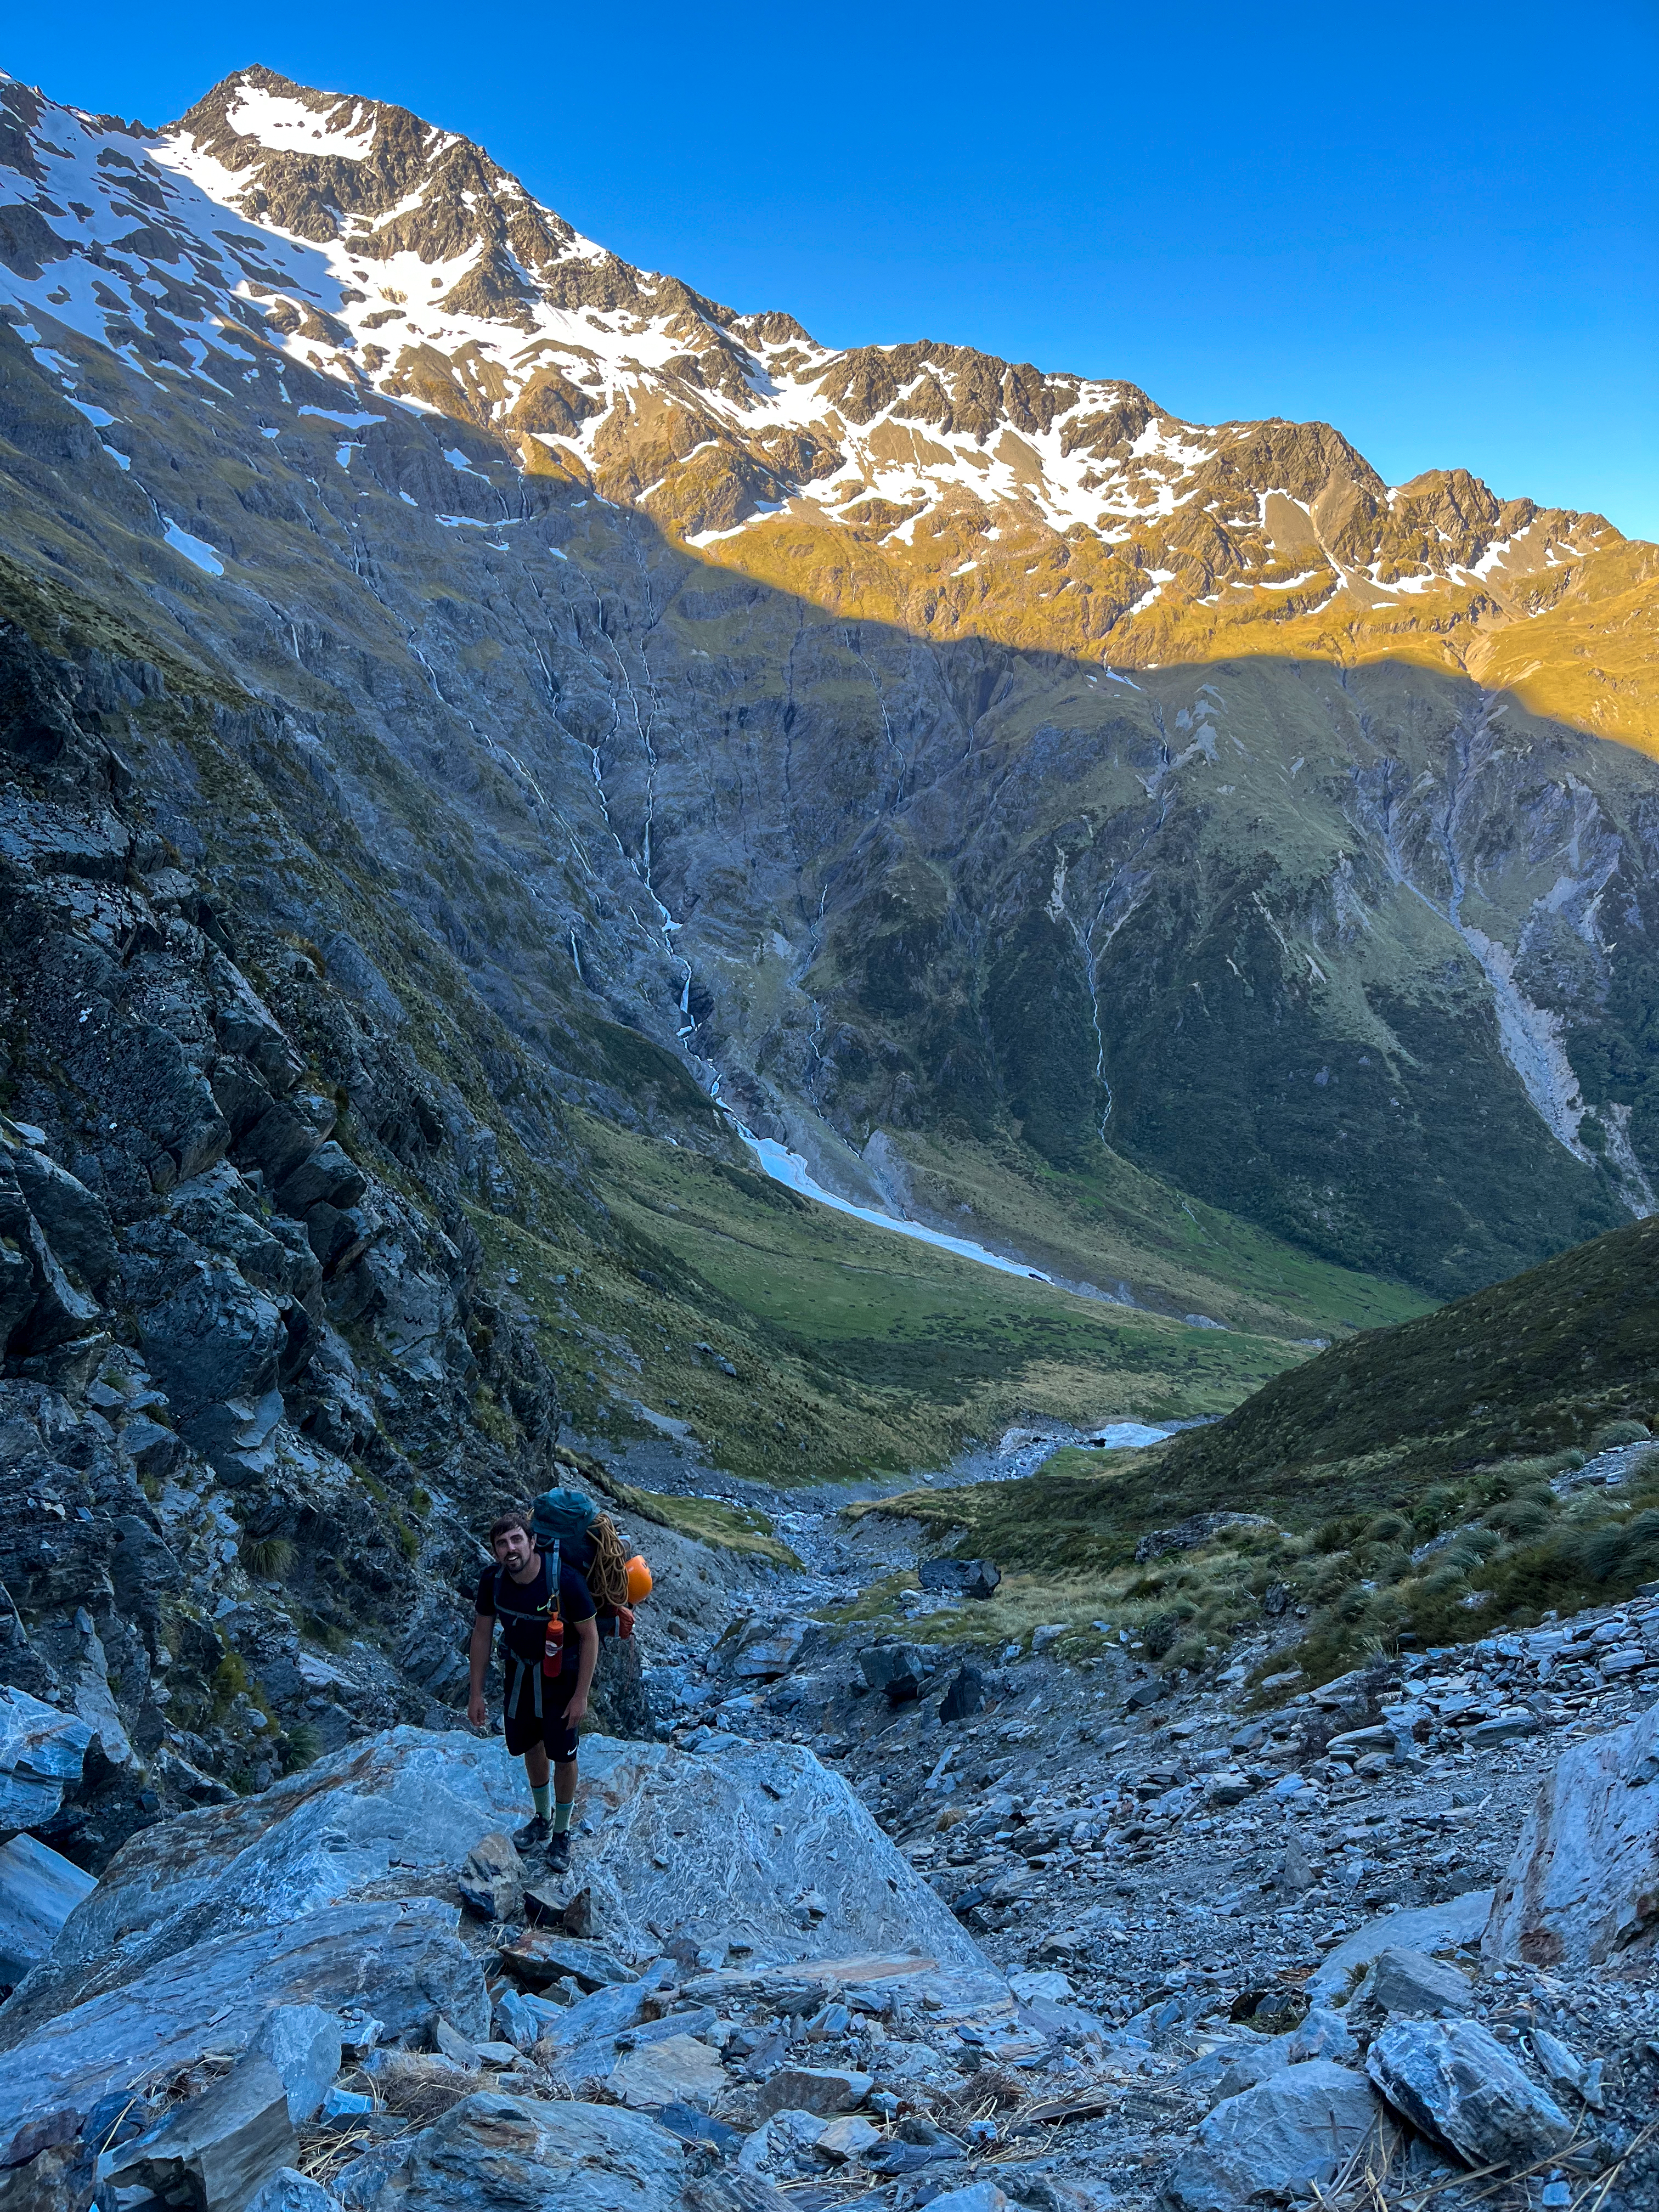
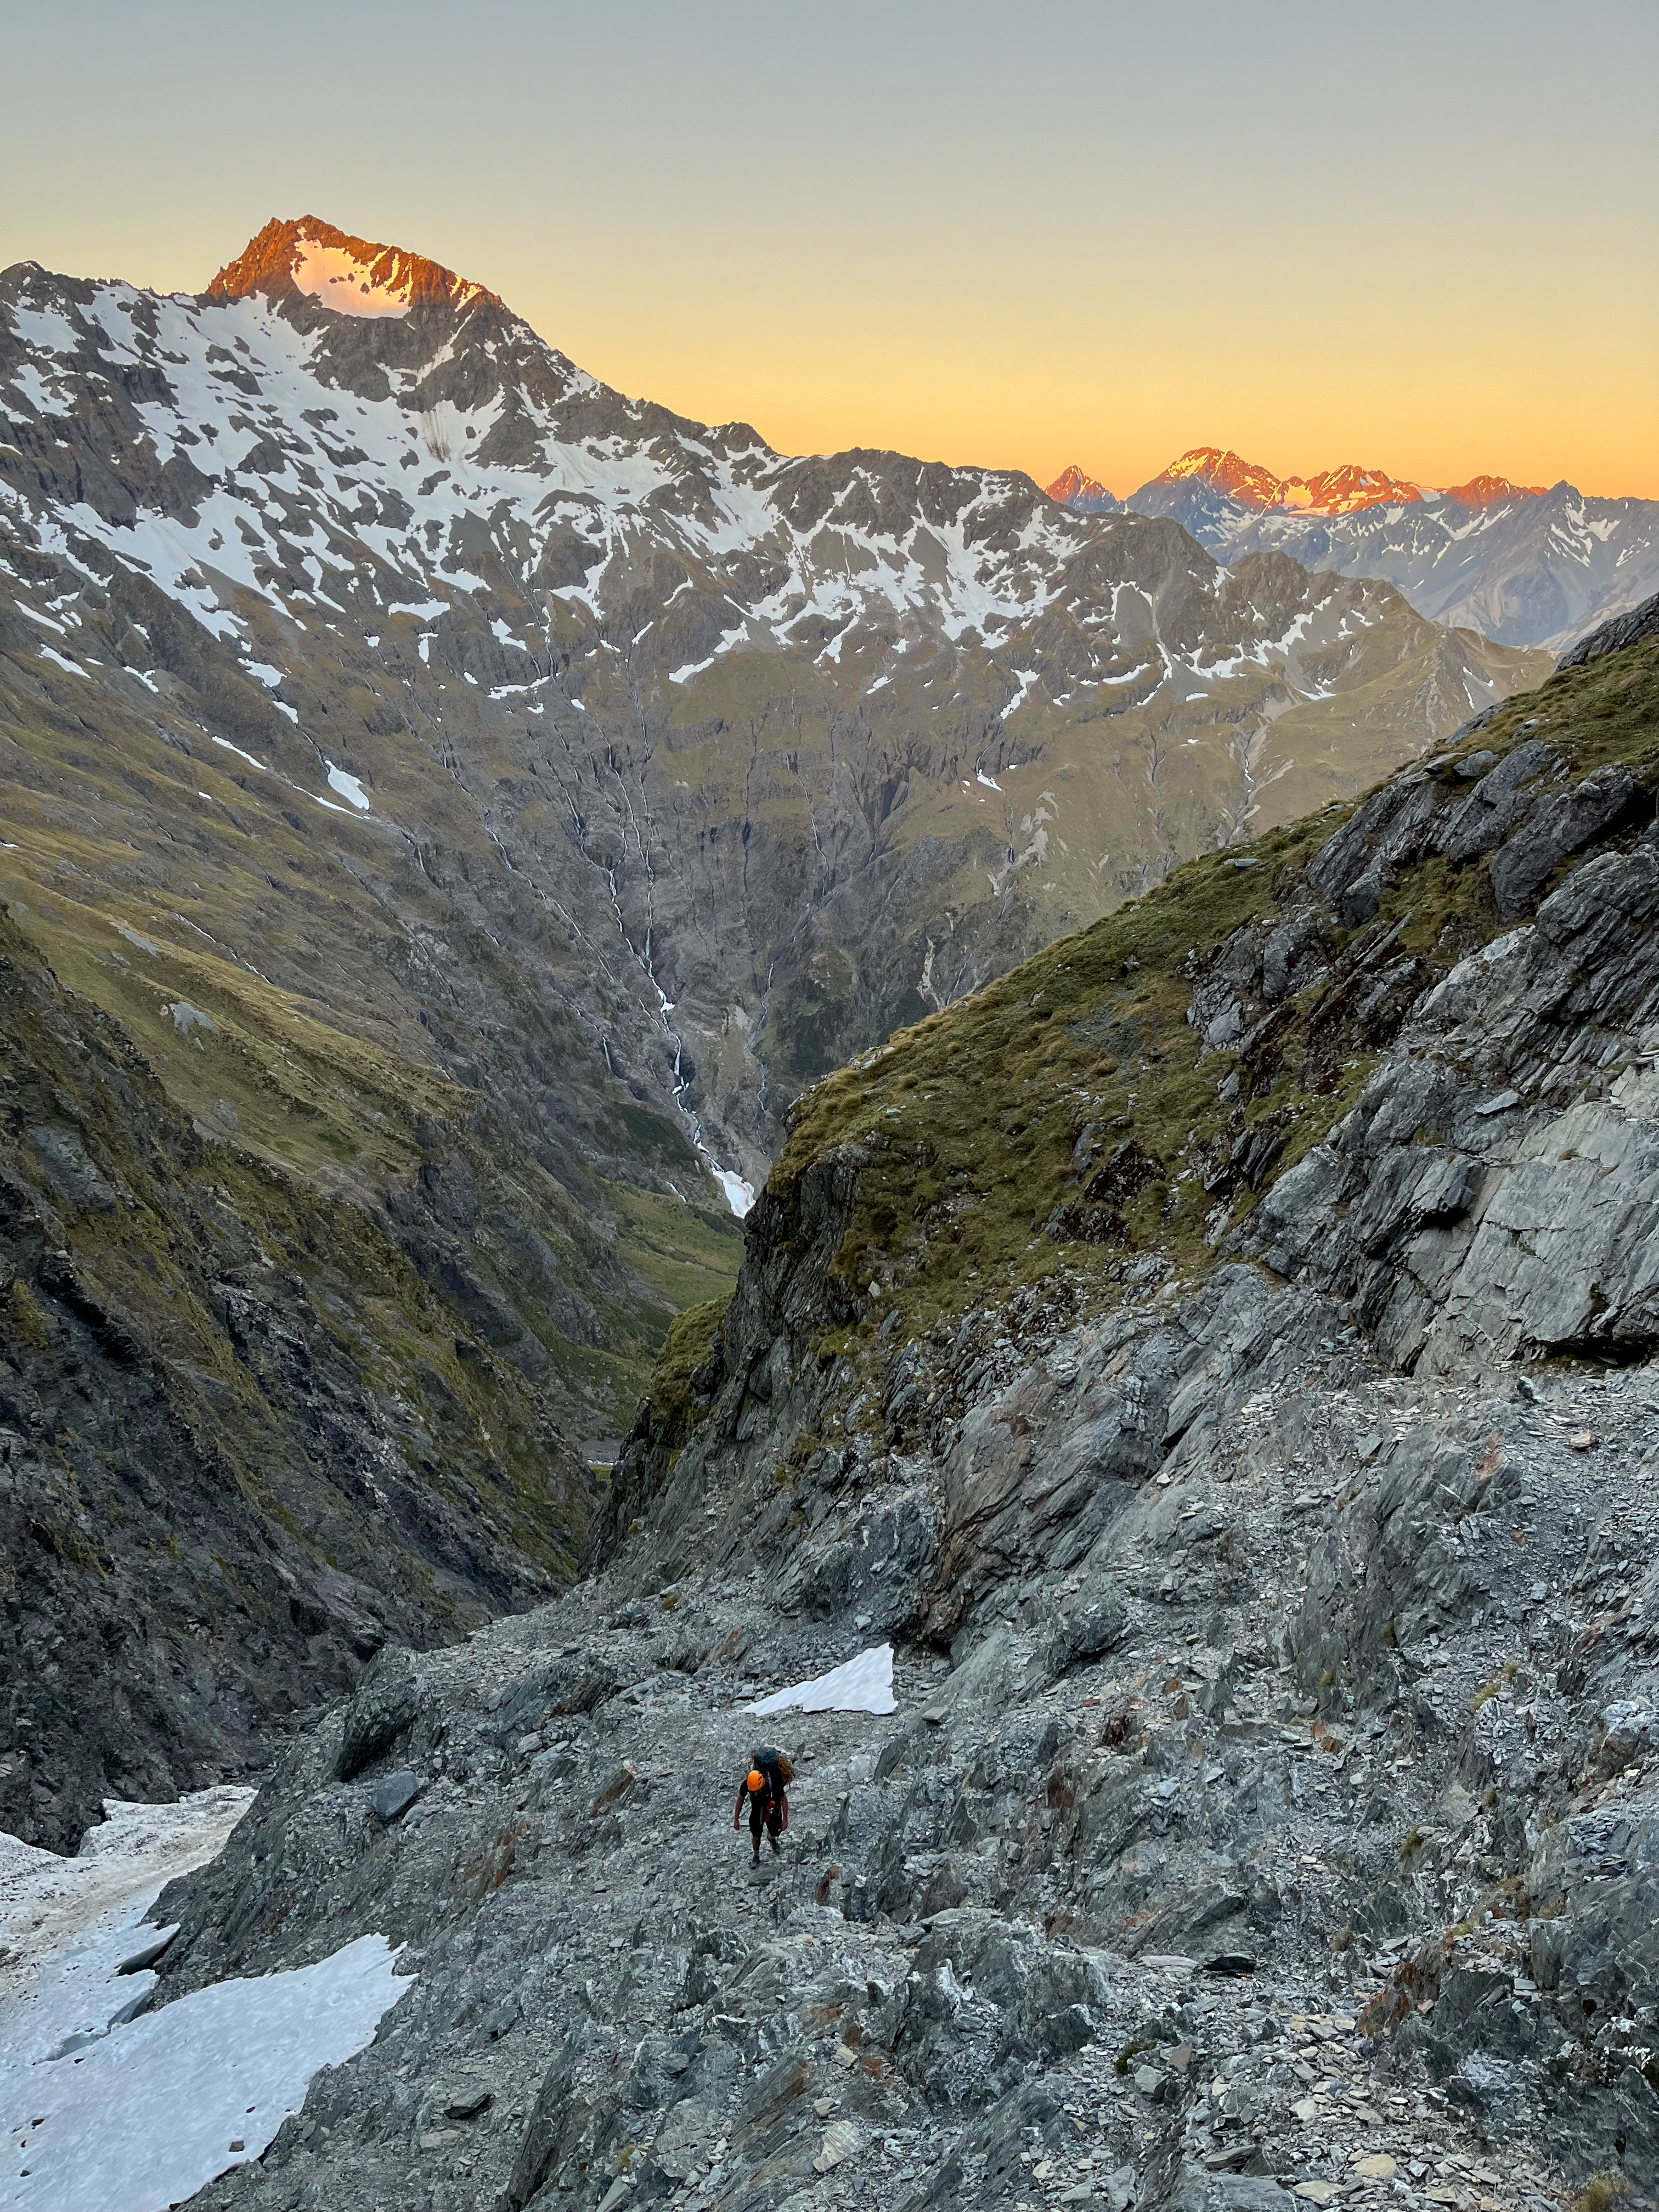
A classic climb on the proudest peak in Arthurs Pass, or a steep and technical ski mountaineering line easliy accessible as a day trip from Christchurch. Up there in terms of the steeper and more sustained lines Ive skiied in New Zealand, and with big exposure the whole way this is a serious ski. I went with Maria, Sean and Marije in early September 2023 to climb the route. I’d been thinking about the possibility of skiing the face for a while, but had no recent beta on conditions and it had been a particuarly thin winter so almost didnt bring my skis, but once we hit Rome Ridge and found cold dry snow on the shady aspects it became apparent it was on! Firm windpressed powder and some breakable crust – not dream conditions, especially on such a steep line, but edgeable enough to make it work. Would be an incredible line to ski in powder!
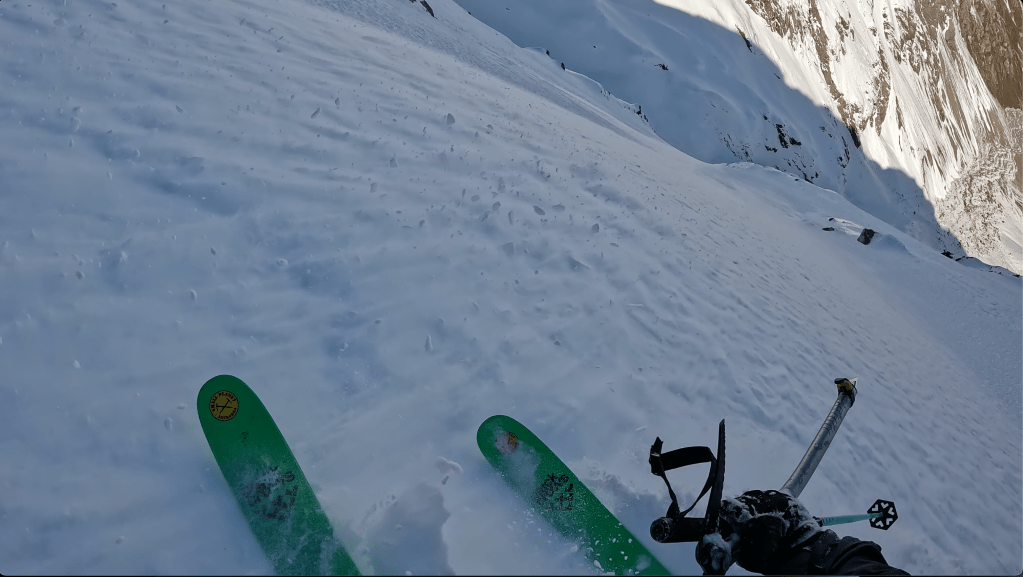
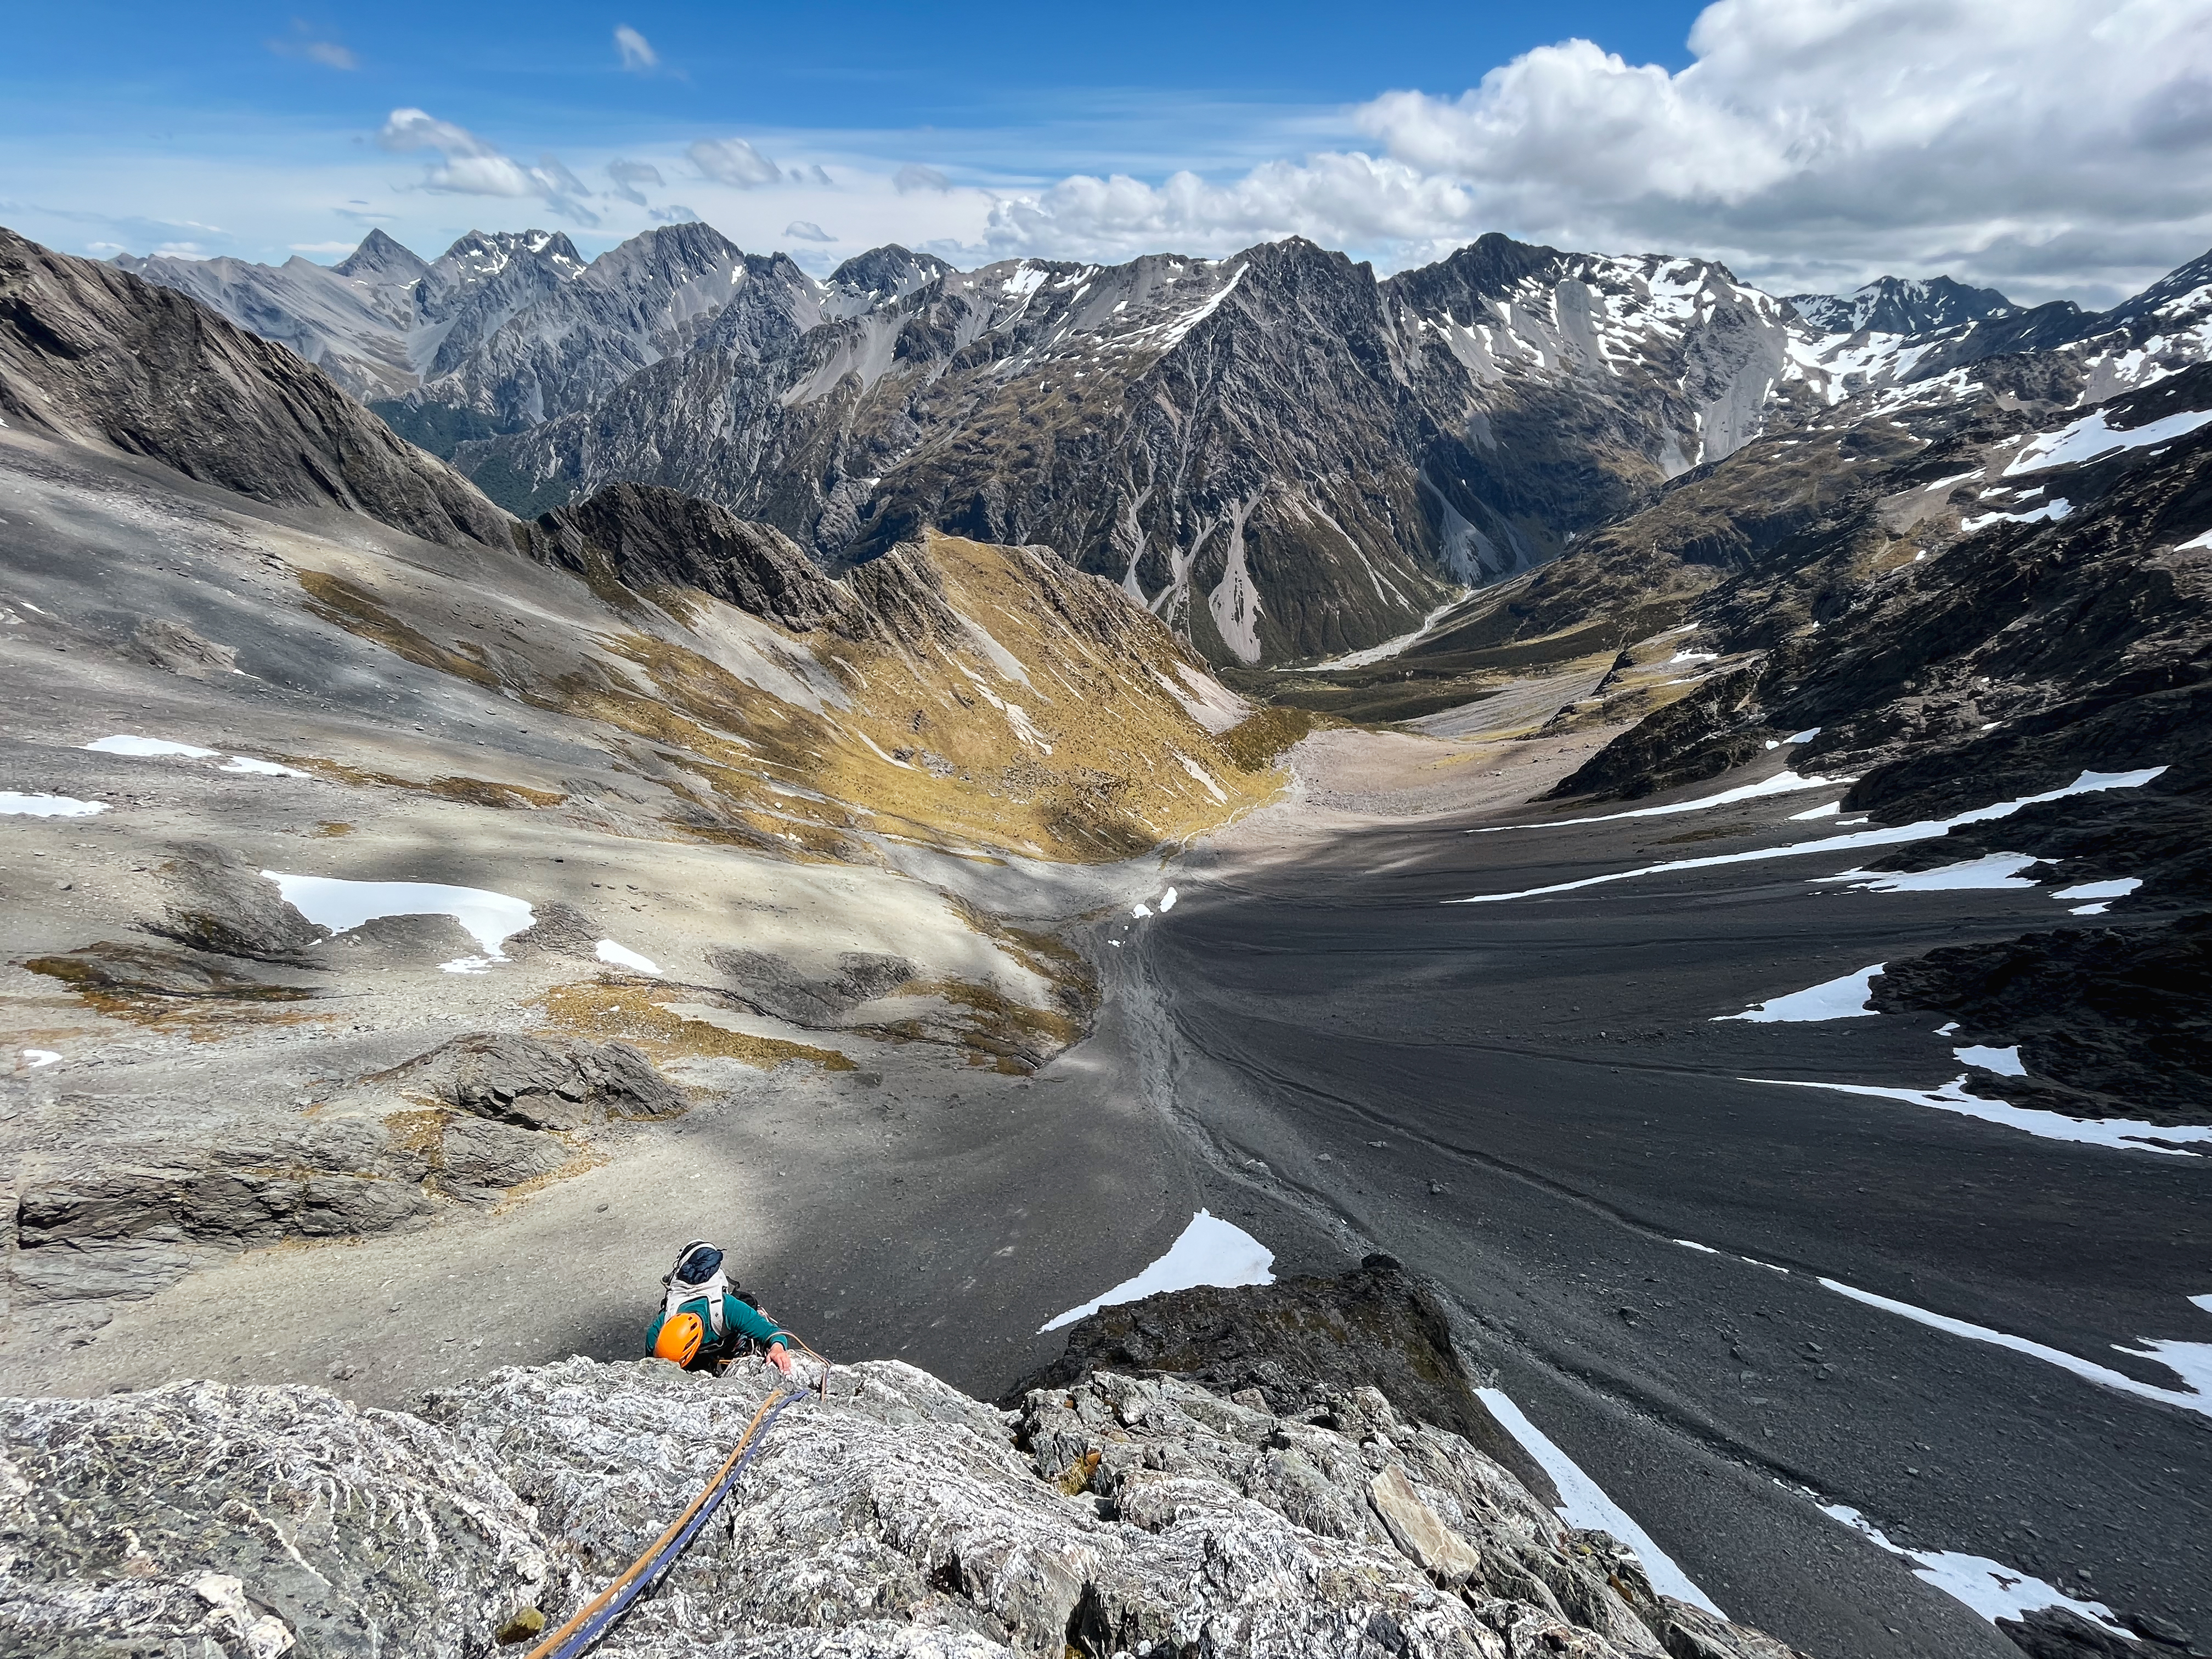
Stading on the summit ridge looking down the line. The first section is pretty full on. Skiing all the way down to the snow line in the Crow Valley is possible
Length – 400m of steep ground with optional further 500m down towards the crow rived Steepness – Very steep and sustained. Opwards of 55deg at the top Exposure – Constant serious exposure the whole way Aspect – S Extras – Picket for rap. Rad line. Screws – 3-4 to protect the climb. Threads may be possible for the descent
Looking along Rome Ridge towards Rolleston. Mostly cruisy ridge travel. Short steep section to gain the filnal flat part of the ridge
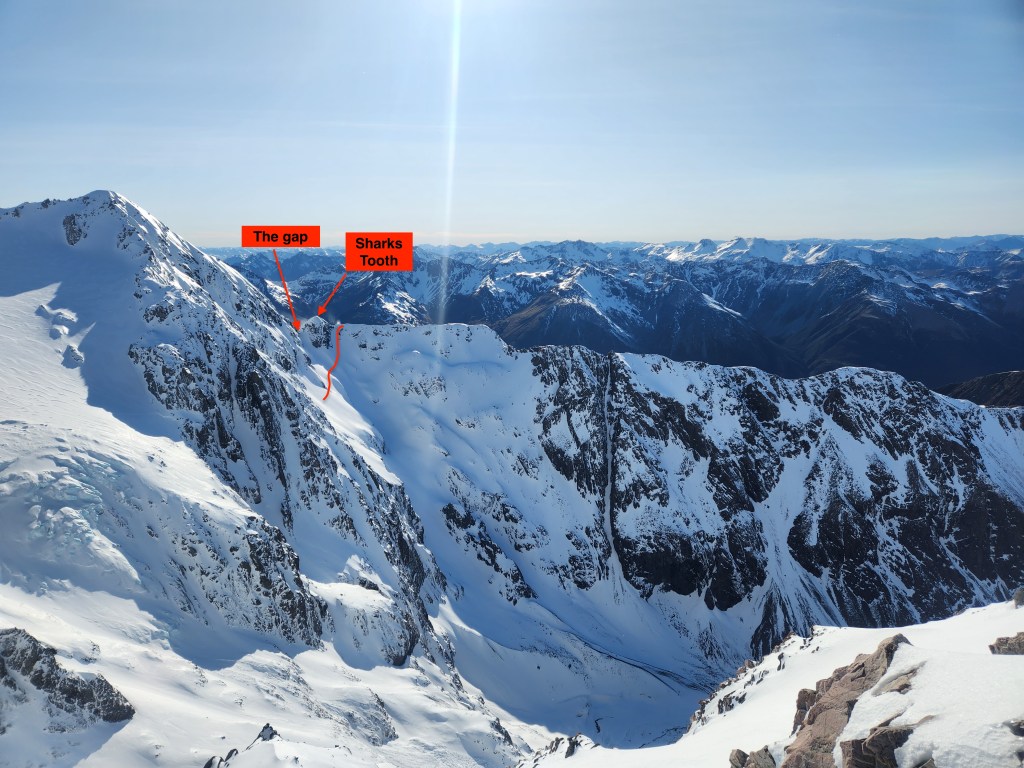
We went up Coral track to Rome Ridge, along Rome Ridge to the Sharks tooth / the gap – the end of the flat section of ridge just before the final ascent to low peak. From here theres an obvious gully that drops you down directly under the Crow face, and continues down into the Crow valley.
Travel along rome ridge when the conditions are good is fast and straightforward, but if coverage is thin and you end up on rock it would become a lot slower.
From the car it took us around 1 hour to the treeline, and 3 hours to the sharks tooth, then another 20 minutes to the base of the route.
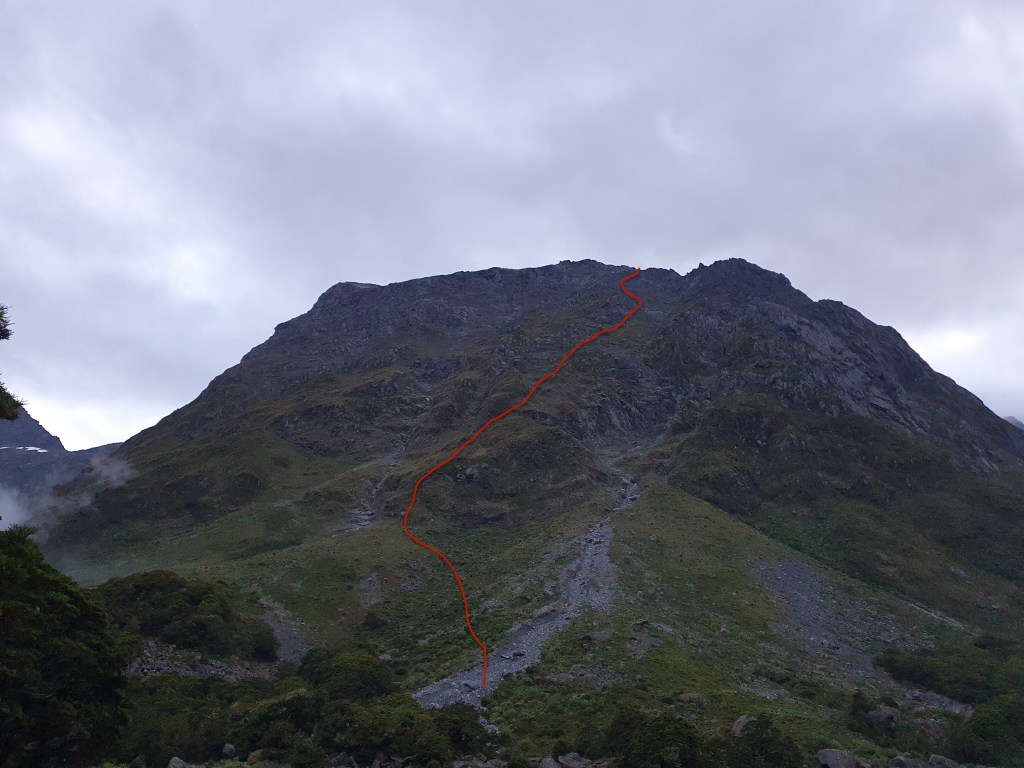
Taken from Mt Lancelot. Rome Ridge coming in from the right. Follow the ridge until the sharks tooth and then decend under the Crow Face to get to the start of the line. If climbing Rome Ridge to the summit, follow this same route but the cut back up to the gap. Good view of the ski line down the face, and also the option to extend down into the Crow valley
From Rome Ridge you get a reasonably good view of the face to pick a line – although its not possible to see the bottom section in its entirety to figure out the best way through the lower rock band.
We chose a line starting on the left side of the face following the most obvious line of weakness to the summit ridge, but multiple variations exist. When we were there the other lines would have involved some scratchy mixed climbing to get establihed on the face
Climb
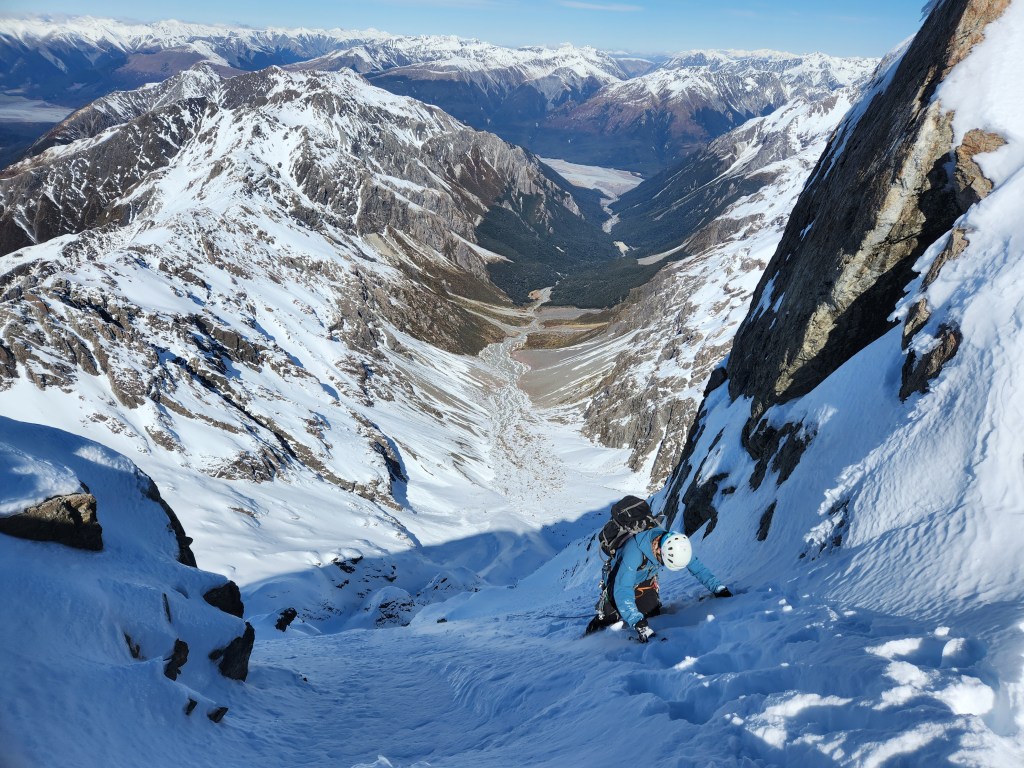
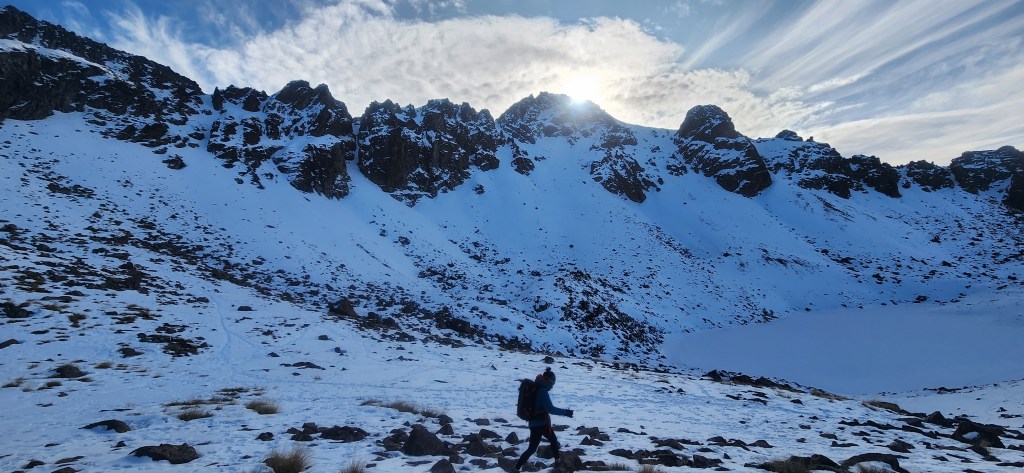
Sean booting up through the upper part of the face.
Will vary massivley year to year, but for us we found mostly pressed powder and breakable crust the whole way up the face which made for fast progress. There was a 30 section of WI2 at the very bottom of the route which we pitched, and took reasonable screws. There was another short rock step to negotiate near the summit, only a couple of metres long and no more than M2. There were plenty of oppurtunities for rock pro along the way if needed, and the pickets were solid.
Apart from those 2 sections we simulclimbed and it took us just under 3 hours to climb the route – expect longer if pitching the whole thing.
Maria climbing the Crow Face
We followed the snow ramps to the summit ridge, just below low peak. The final section to the top was hard rime and rocky, but with the right conditions does look like it would go.
The climb is a really fun day out in itself, with a real sense of remoteness and scale despite only being a day trip from Christchurch, and well worth it even without the ski.
Ski
The wide open section of the face, just before cutting left above the WI2 section.
I followed the exact climbing line back down – especially on a face with such fickle conditions this gives a lot of confidence your not going to hit an unexpected chunk of ice and get thrown off the face. Starting at the obvious notch on the ridge, drop into the super steep and narrow right trending gully. This section is really steep and sustained, and the exposure is right in your face so its full focus time. This funnels you into the first rockband – I transitioned to crampons and downclimbed through this to save on loosing a picket. Once through this rockband theres a rightward traverse on a narrow terrace that puts you into the large open snowfield.
Just below the upper rock step. Follow the narrow ramp right to gain the big open face and slightly less steep ground
Once into this the exposure isnt quite as heinous and the angle eases off and you can open it up a bit more. I then tucked back left for the final section, which funneled me back into another steep and narrow gully ending in the WI2 section. I left a picket here and rapped 30m back to the snow.
From here its all go : mellow angle and no exposure = hoon time! You can go all the way to the snow line in the Crow Valley – an option is to then walk out via the Crow Valley to Klondyke corner (about 3 hours and a bunch of river crossings, but a good way to avoid the late in the day soft snow on Rome Ridge). I was meeting the others back at the village so instead retraced my steps exactly back up to Rome Ridge and the back down Coral Track to Arthurs.
Another view of the Crow Face, taken from the Crow valley a few weeks after I skiied it, looking a little more filled in. A line from the summit coming down the central gully looks like it would go in a better snow year
Length – 13.57km, 1,938m elevation. 9hr 9 min solo (longer if using a rope!)
Gear : I had a 30m rope and some tat in case of needing a rap but didnt end up using it. Shoes with some ability to edge – glad I wasnt in trail runners. I’d just bought some Mammut 3 season mountain boots that were perfect. TX5 style approach shoes would also be ideal if you want to move faster. Late in the season the snow travel was very mellow – I had some lightweight crampons and ice axe but only used them coming down from Barrier Knob
I was meeting Maria and some other friends at Homer Hut for a trip to climb at copper point, but had an extra day of good weather and time off work so came down a day early for a solo wander. I couldn’t find a heap of beta online about this loop, which is easily accessable as a day trip from Homer Hut, so thought I would have an explore. The route starts pretty much at Homer hut, climbing up to the West Peak and then traversing to the Middle Peak of Crosscut, before descending a rib to the Crosscut-Barrier col and then ascending again to take in Barrier Peak and Barrier Knob before descending back to the hut via Gertrude Saddle. The Darrans guidebook describes it as ‘loose scrambling at grade 8-9 to West peak, and grade 10 downclimb from middle peak on solid rock’ and estimates 12-14 hours. Apart form the West Peak bit (which is horrendusly chossy and I would avoid at all costs), this is a mega fun day trip with some excellent exposed ridge travel and unbeatable views of the Darrans.
Crosscut on the right, Barrier Peak on the left. Taken from below Barrier Knob
Its hard to get a sense of relative difficulty of these traverses form the guidebook – this is a lot more serious, involved and exposed than the Talbot McPherson traverse or Phillestine-Rollerston traverse and was right on the edge of my comfort zone to be soloing. Sustained mega exposure and a few sections of some actual climbing moves (although easy) means you’ve got to be mentally switched on the whole time – or bring a rope!
The first section is from Homer Hut up to the snowfield below West Peak. Head up Gertrude Valley track for about 5 minutes until you get to a clearing and then turn right up towards West peak.
Crosscut from Homer hut. Choose your own adventure up here. Thats the way I went. Plenty of steep slippy tussock. If you grab enough of it its solid right??
Next up to West Peak. The ‘loose scrambling’ description in the guidebook is somewhat of an understatement – while getting to the summit of West peak is a walk, I wasnt prepared for the heinous levels of choss from here towards Middle peak : this is not what you come to the Darrans for! It was scary and dangerous and I wouldnt recommend it – teetering towers of weetbix which topple with the slightest tickle, above around 1000m or so of exposure to the south and east. Its also very easy to just miss this section out by sidling around the snow below West peak to take the small rib up to the sub peak between West and Middle peaks, which is where the bomber granite starts. I was very happy when this section was over, and the more heroic ridge travel started on excellent rock.
Middle peak and East peak on the left, and the ridge towards Christina on the rightJust below the West peak of Crosscut looking north east. In the depths of the choss. The brown section is especially dodgyCrosscut – West peak on the far right. Route I took in red from right to left. The route I wish I’d taken in blue – the section from west peak towards middle peak is horrendously chossy and uncharacteristic of the rest of the route. Once you pass that rib the rock quality is excellentLooking back at West Peak
The section from Middle Peak down the rib to the col is the crux and is especially good – winding around the ridge on excellent rock over some good exposure down to the glacier below. A couple of sections had a few delicate moves – definitely is more like climbing than I was expecting. Easy but sustained and exposed. Plenty of oppurtnities to sling a spike and rap down to the glacier if the constant head game gets too much, as it is full focus for this whole section. Would have been easy to protect with a running belay if your not by yourself. Grade 10-12 seems about right to me.
Being late season I could follow the ridge all the way down to the col without hitting any snow, and there were some good tarns at the col for refilling the water bottle (and a good spot to admire the imposing south face of Marian) before heading up to Barrier Peak.
Ridge up to Barrier Peak in the middle. Marian peak off to the right, and Barrier Knob on the left. I skirted left around the snow patch at the base to gain the ridge. Straightforward but exposed
I cut around to the west of the ridge / just west of point 1734 where easy low angle slabs cut back up to join the main ridge which is then very straightforward up to Barrier peak. You could also go head on from the col to the ridge but looked a bit trickier to me.
The section to the west of Barrier Peak is really epic – easier ground than Crosscut and very good rock, but with huge exposure and amazing views up towards Lake Adelaide. Some of the best Cheval shuffling around. Soon your onto Barrier Knob and its plain sailing down the Gertrude Saddle track.
One of the chevals to the west of Barrier Peak, with Lake Adelaide to the right
All up a great route and well worth doing if you avoid the choss. If you are protecting the ridge then could get a bit time consuming so leave early!
Looking down at Lake Adilaide from Barrier ridgehappy boy after a day in the sun
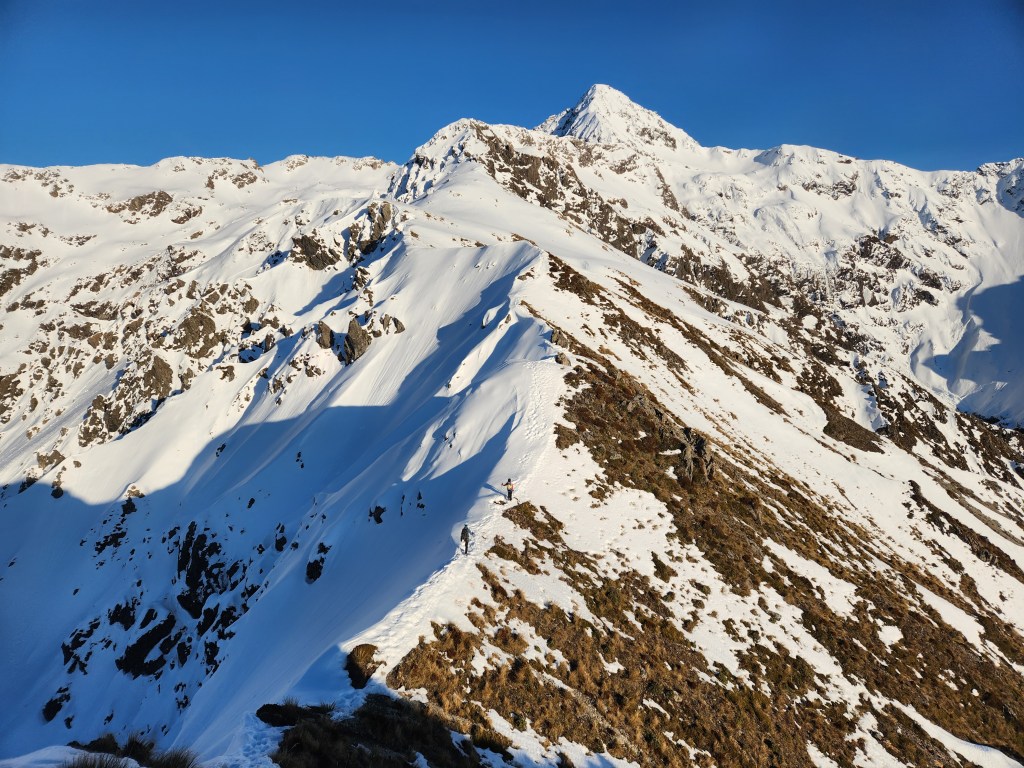
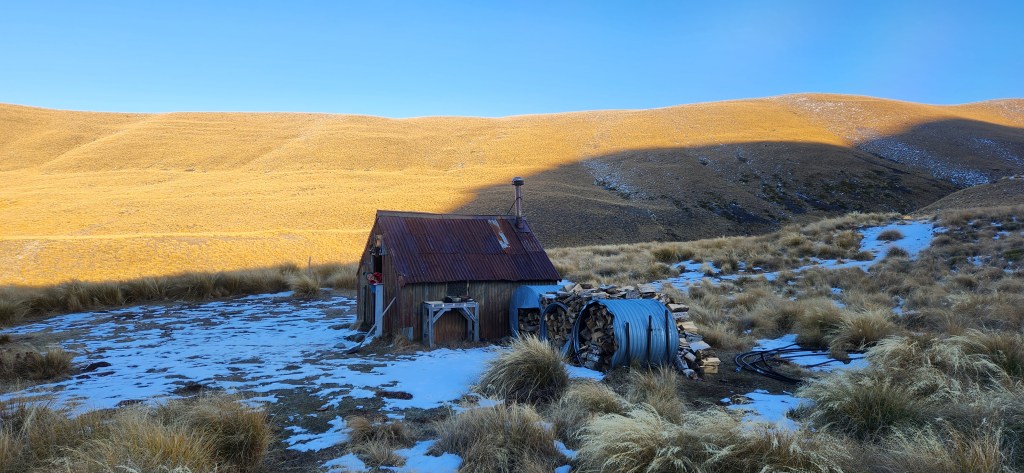
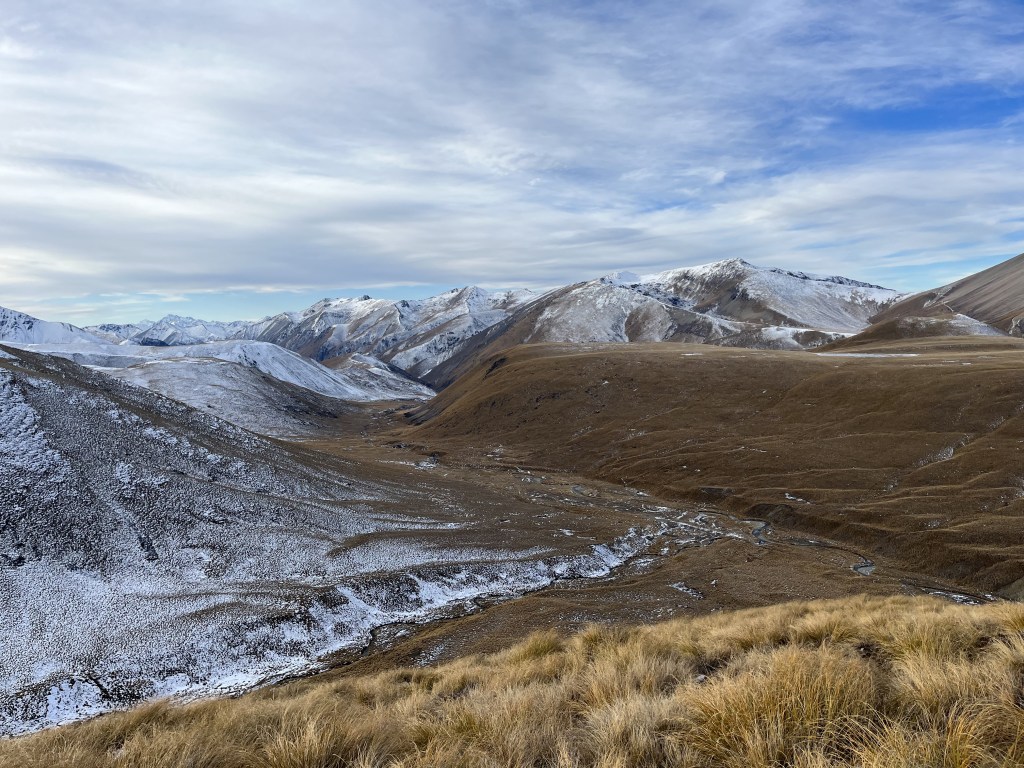
With winter somewhat postponed due to the lack of snow, we decided to explore the Two Thumb range on foot. We chose a route involving as much time on a ridge as possible; it included some of the TA trail. I haven’t done the TA but surely this must be one of the most aesthetic segments – the area offers 360 views of the Southern Alps! I would recommend not banking on the log burners for warmth however – the first hut had firewood for days but a blocked chimney (?dead possum) and the second no firewood!
Time: 2-3 days from Christchurch
Season: we did this off-peak in winter and went in trail runners – carried lightweight crampons but didn’t feel the need to use. We saw no-one else; expect Camp Stream Hut to be full during the warmer months given it is on the TA although could avoid the crowds and do it as a 2 day trip and just stay at Royal Hut.
Team: Joe, Maria 16-18/07/23
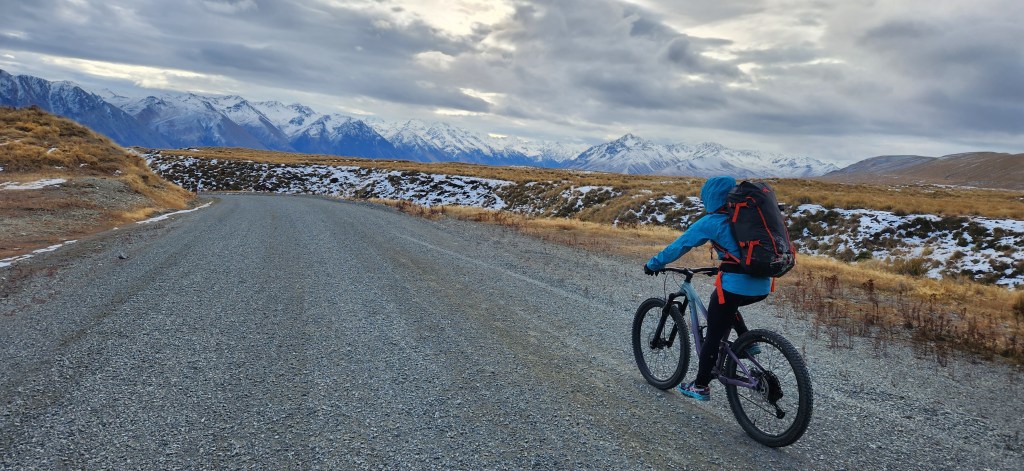
Day 1 (start to B): park just before the gate on Roundhill Ski access road, bike 1h (3.7km) along 4WD track to where trail for Camp Stream Hut starts – marked by doc sign (A on map). Stashed the bikes just off the road. Hike 1.5h (5km) to Camp Stream Hut – 2-3 river crossings – fecking freezing.
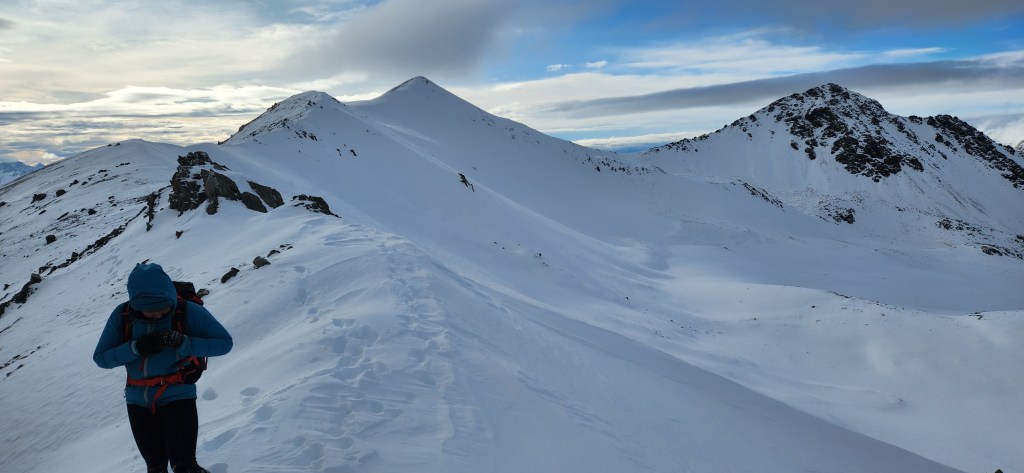
Day 2 (B to C): 6.5h (14.22km) to Royal Hut. From Camp Stream Hut we gained the ridge directly N up to 1641. Bit of low lying tussock, nothing too heinous. We wondered about going along to Mt Hope but the ridge looked increasingly technical and we had no rope/gear, so we dropped East from point 2036, into the basin then pretty much beelined it to the hut. Royal Hut has an open hearth and no firewood so we retired into the sleeping bags very early! Star jumps and squats generated some heat also…
Day 3 (C back to start): 7.5h (23km) – gained SW ridge from the hut up to point 1891 and followed ridge along to Mt Musgrave (2251). At point 2133 (point D) we dropped down to the ski field – scree run ahoy – then walked down the road back to the car.
Camp Stream Hut – so much firewood but blocked chimney – disasterthe ridge towards Braun-Elwart peakHeading towards valley floor to Royal HutView across TekapoGrateful for the bikes – homeward bound!Ridge just beyond Mt Musgrave
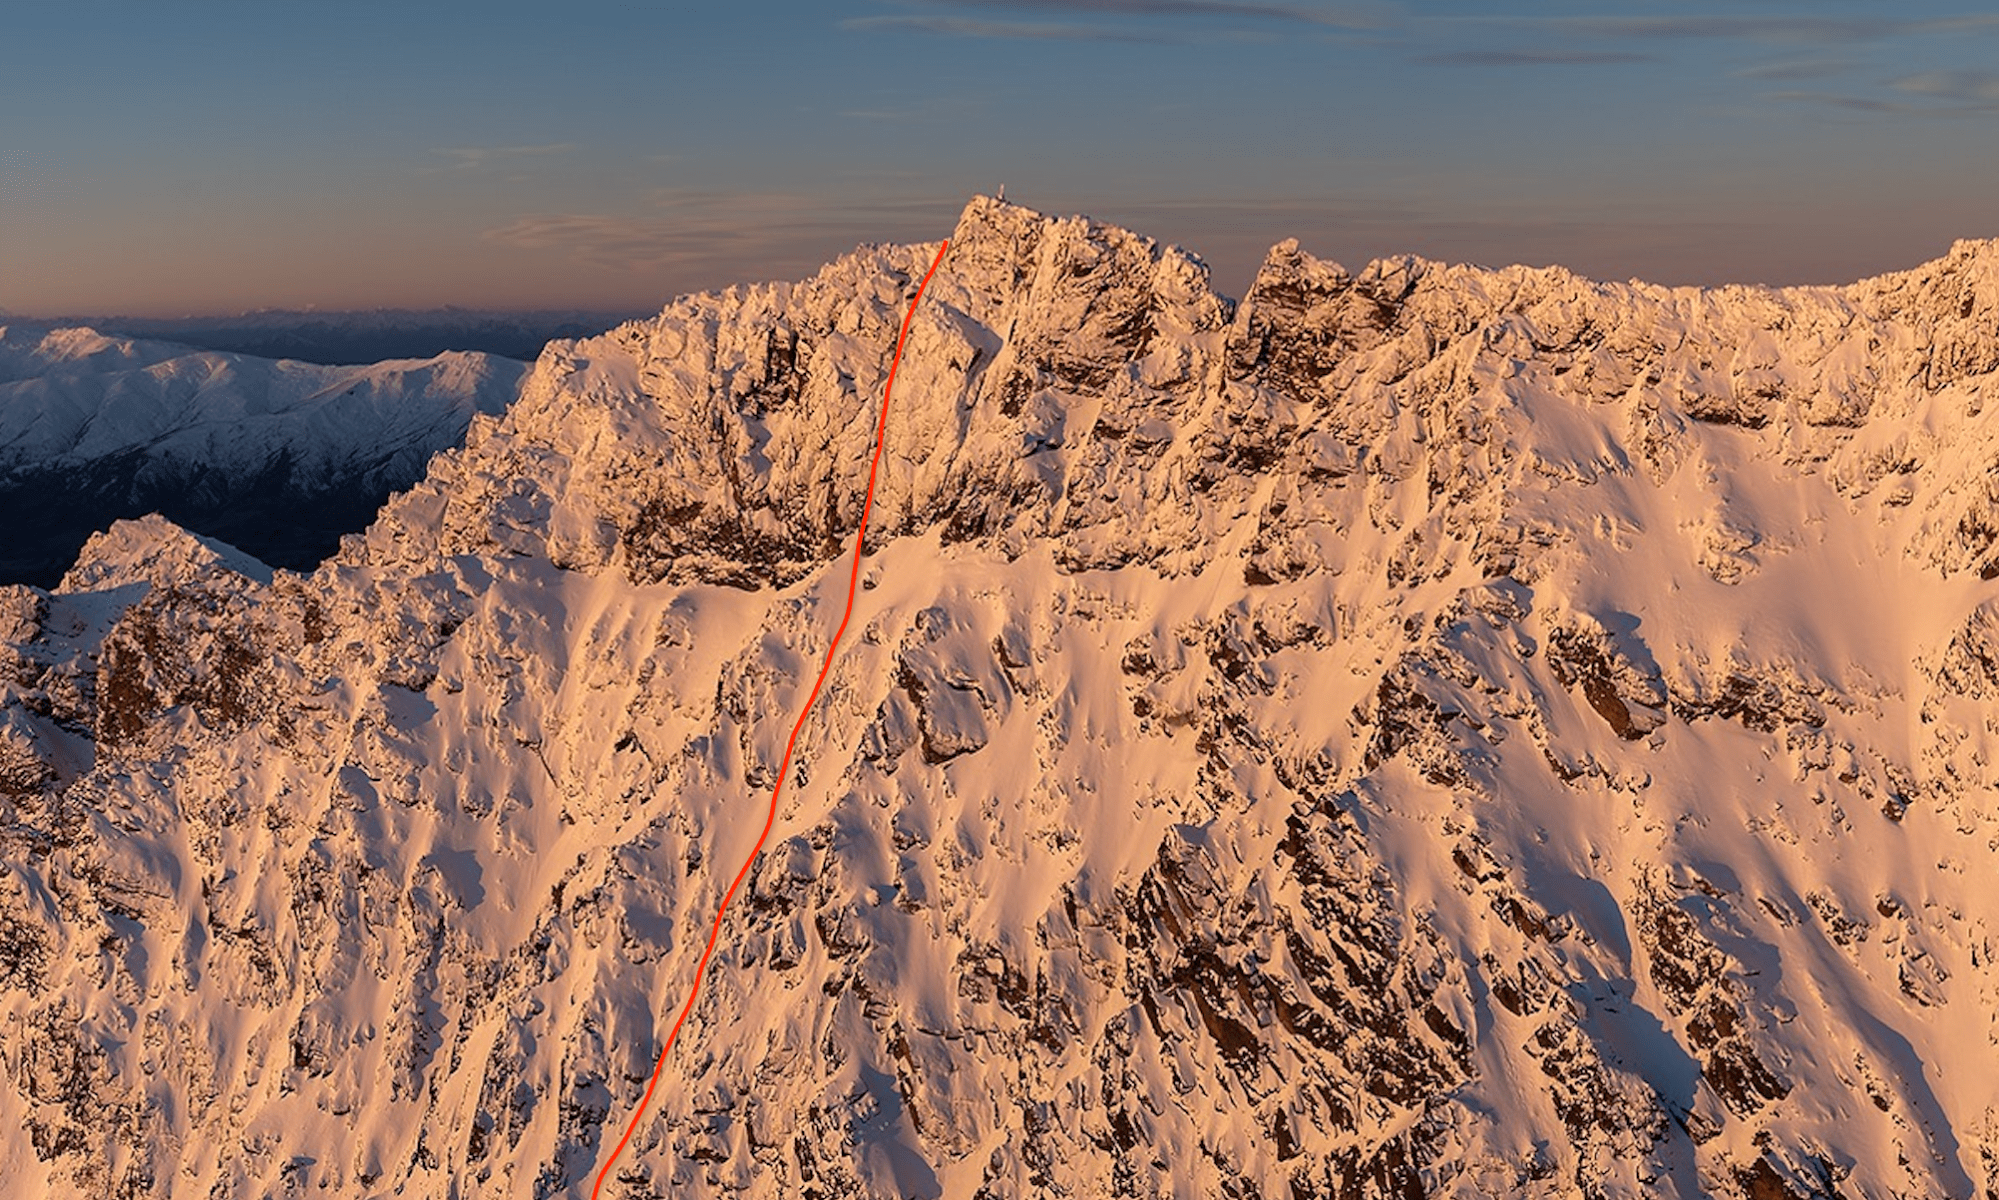
A classic moderate M3 mixed climb on the west face of the Remarks, previously unskiied. Back in July 2021, Maria and I had taken some friends there a few days earlier for an intro to mixed climbing, and as we were wallowing up the route through knee deep powder I got thinking this would be a great ski line. Luckily I was off work the next day so came back with the skis to open the line. Farily hectic line : short but technical and exposed at the top, with a mandatory air into the steepest narrowest part of the gully, just above another cliff band. High pressure stuff! Bumped into Grice who was working patrol and told him my plans and was keen to join me, but sadly couldn’t get out of work duties. But it did mean he was at the top of the line to take these rad photos! Chur!
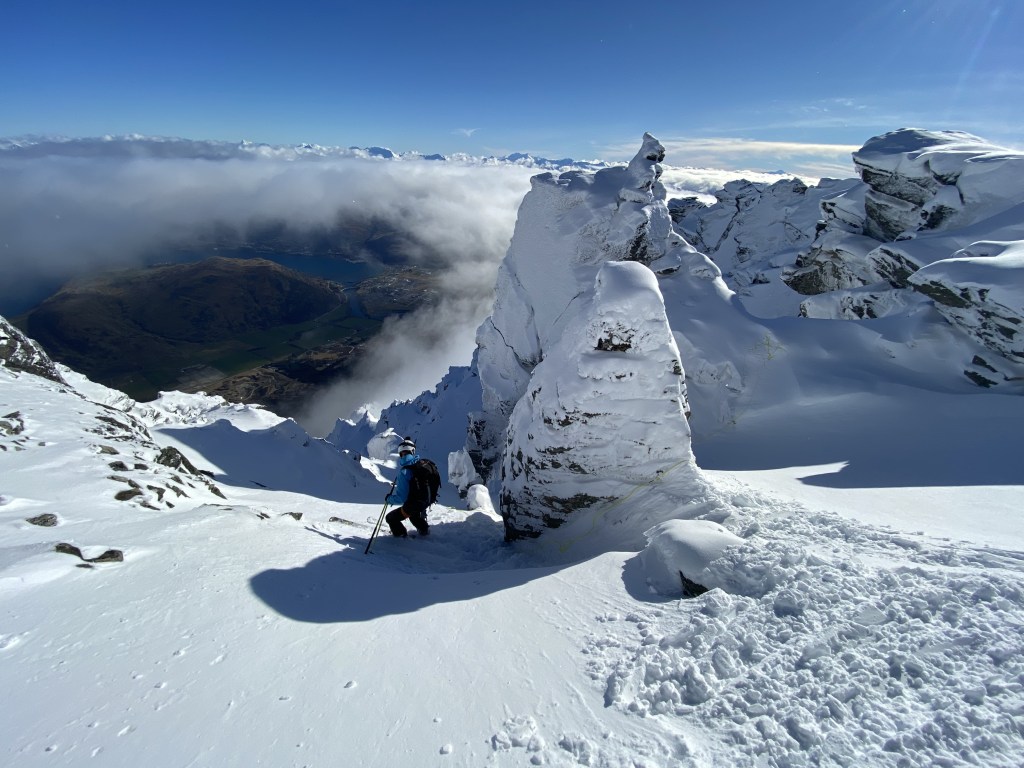
Skiing the top section of MK gully, above the mandatory airStanding at the entry to MK gully. Block to the right is good to rap off
Length – The climbing route to Queens Drive is 150m. But you can keep going beyond there until the snow runs out, I made it about another 300m.
Steepness – Initially around 40-45. After the air its steep (around 45-50) and you havent got long to control your speed before the next drop
Exposure – Critical in the top section. Gets its M3 grade from several vertical rock steps which are linked by snow ramps. Once your through this your cruising
Aspect – West
Difficulty – 5.2 E3. Difficulty really all comes in sticking the air and controlling your speed in the narrow and steep mid section before the next cliff. Falling on the landing would cause a really nasty tumble through the next cliff band
Equipment – 60m rad line. Crampons and 1x tool. Picket and rap tat
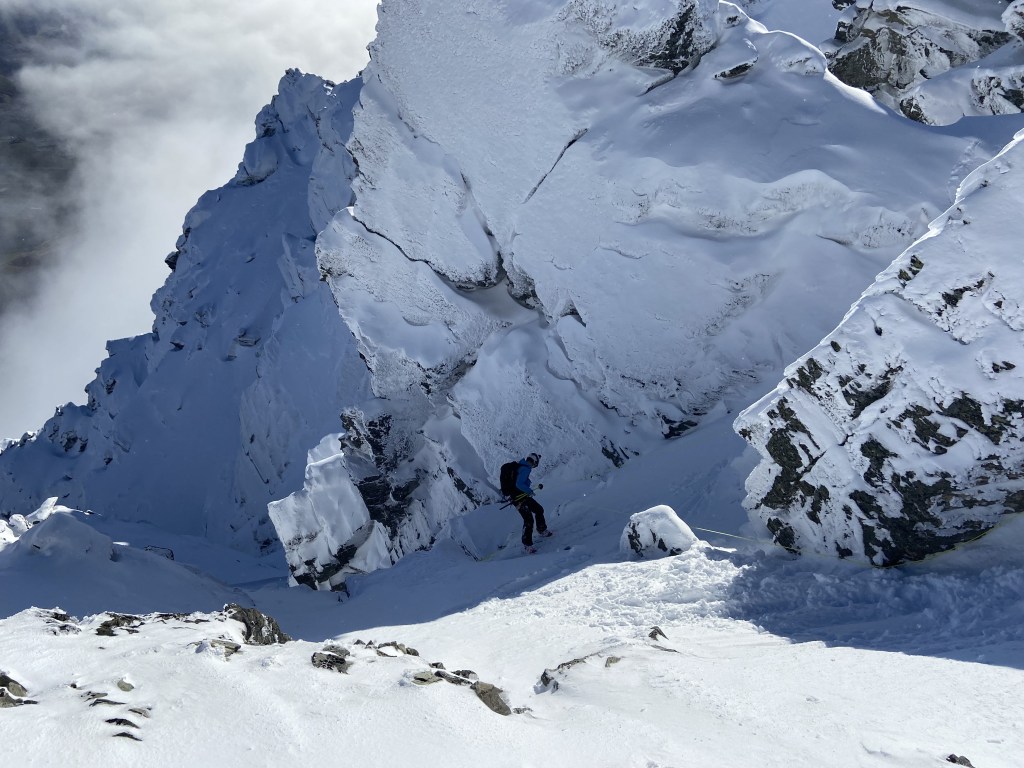
Got the rope out right at the top to get into the main part of the line.
As with all of these climbing lines, its critical to check theres nobody coming up the route before you start skiing it.
Start by going up Shadow chair and head up past the chutes across the top of diangulator all the way up to the ridgeline. The top of MK is just in front of you at a flat section. The climb has several different topouts – the furthest skiiers left is the most skiiable. The large block in the above photo is the best landmark to ID it, and also works well as a rap anchor. I rapped about 5m over the rocks at the top – after getting through it and seeing the snow on the other side, it totally would have gone to just jump the rocks. Maybe next time!
The line is in 2 distinct halves – above and below Queens Drive. Above is the climb – steep, narrow, and tight with several rock steps you have to either air or rap. The very top section from the ridge takes you diagnoally down and right to the main fall line, and the first rock step. Roughly 2-3m high into the steepest and narrowest part of the line, with only about 20m or so after to control your speed before the next cliff. I went off the skiiers left of the block where the drop was smaller but you land in a really narrow part of the gully. A more heroic option would be straight off the end of the block, but you really dont have long to stop before the next cliff, and falling through it would be seriously bad.
If you were going to rap this middle cliff a picket would be the way. Unusal to get good ice just there and scraping around for rock pro would be a pain.
The next cliff is a similar height, but had ice on the landing when I was there so I put the crampons on and downclimbed. But again I reckon it would go late season in a big snow year!
Once the skis are back on the pressure is off and its type 1 fun – blast down through Queens Drive and down the gully until the snow runs out! I then just hiked back up to Queens Drive and out to the ski field. I would definitely NOT recommend carrying on down the West Face – did this on a previous trip down Morning Glory and it turned into the quest of all quests
An awesome day on the ridge between two stunning peaks in Arthur’s Pass. I can see why it is so popular! Easily do-able in a day trip from Christchurch. We did this in Autumn, but I think it would make for a great winter day out as well – perhaps even better given you would avoid travelling on loose rock. As Marije said “we’ve given it a good go trying to kill each other today”…
Grade: II, 3+ (grade probably comes from doing it in winter)
Time: 11h total (including breaks and a quick swim in the Otira River secondary to peer pressure)
Equipment: can be done in trail runners/approach shoes. We took a 60m rad line for 1x 25m rap. Tat and a few nuts – didn’t end up using. Lightweight crampons – didn’t use as there was no snow on the route.
Season: summer/early autumn; also a popular winter route but more objective risk.
Team: MJ, MK 22/04/2023
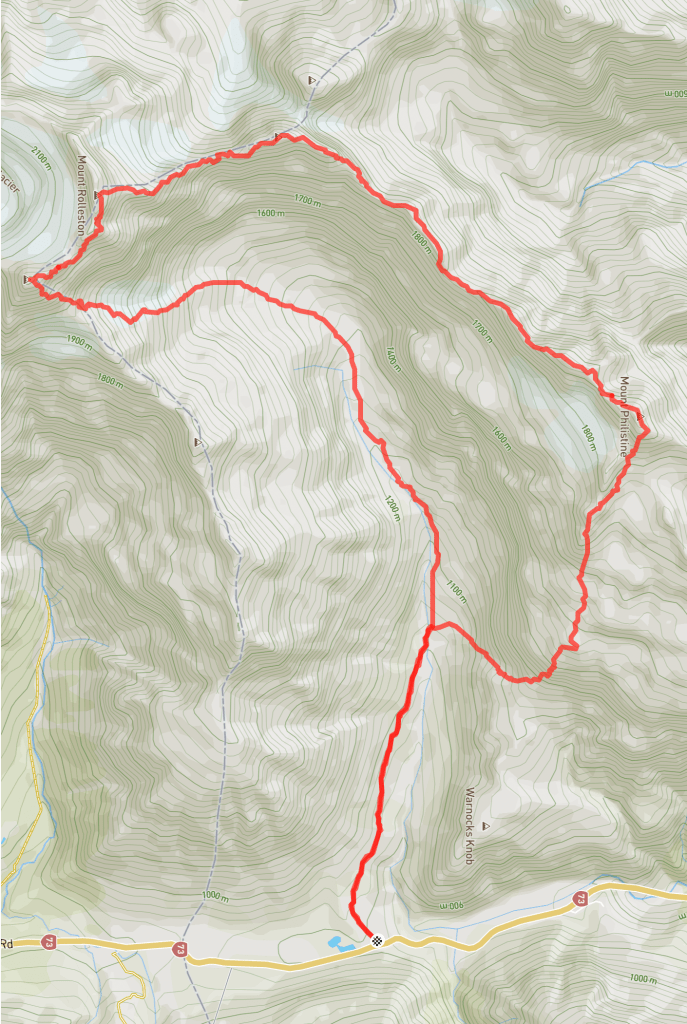
Topo map of our route; msg me for the gpx fileView of our descent from high peak Rolleston – arrow marks where we rapped.
access
Park at the small carpark at the start of the Otira Valley Track. We stayed in MJ’s van the night before, allowing for a lie-in… 6am alarm.
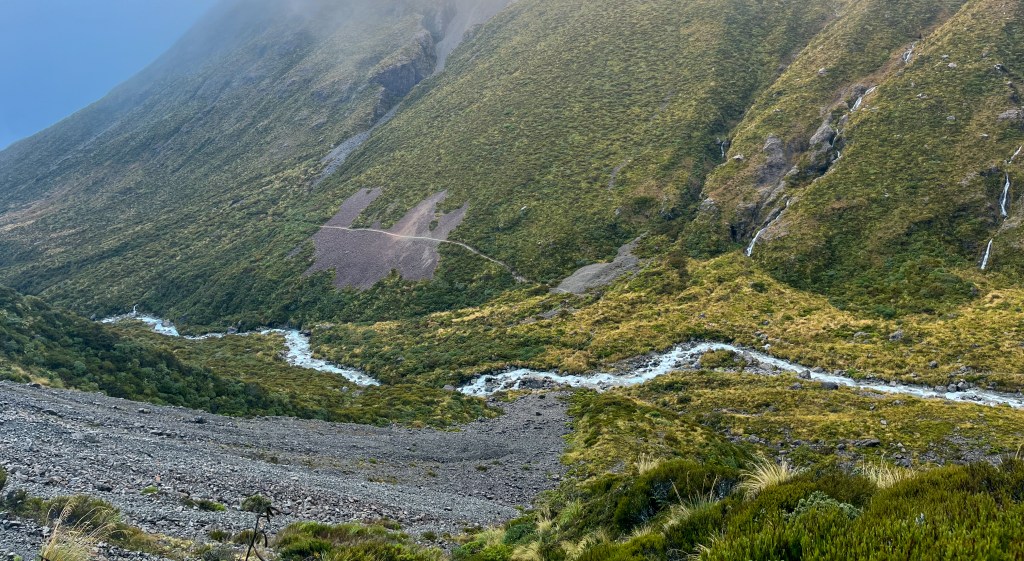
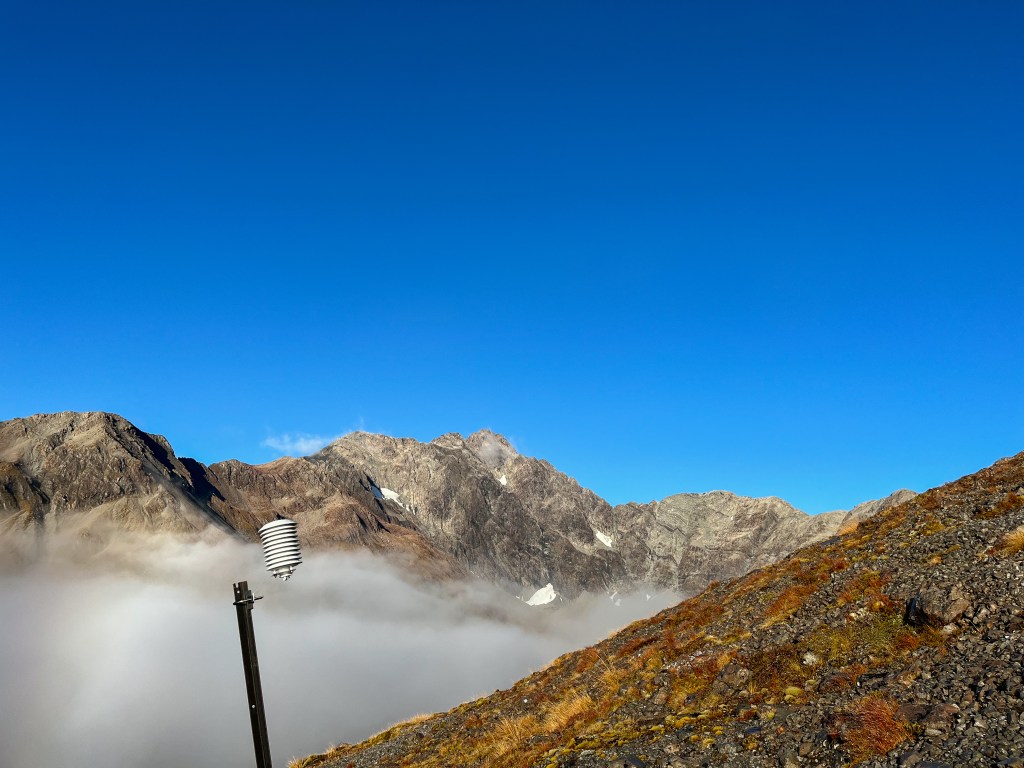
Follow an easy marked trail along the river for about 2km – this took us 30 minutes. Cross the bridge and boost up around 1000m elevation up to Philistine. This took around 2h – there’s a dug in trail through the moraine then head up left through Warnock’s bluffs, passing a marker/pole (see below pic – ?karaoke mic).
Looking back at the trail as we climbed the moraine towards PhilestineCan someone tell us what this is?
climb
From Mt Philistine you get stunning panorama views of the national park and the southern alps. Here the ridge travel begins!
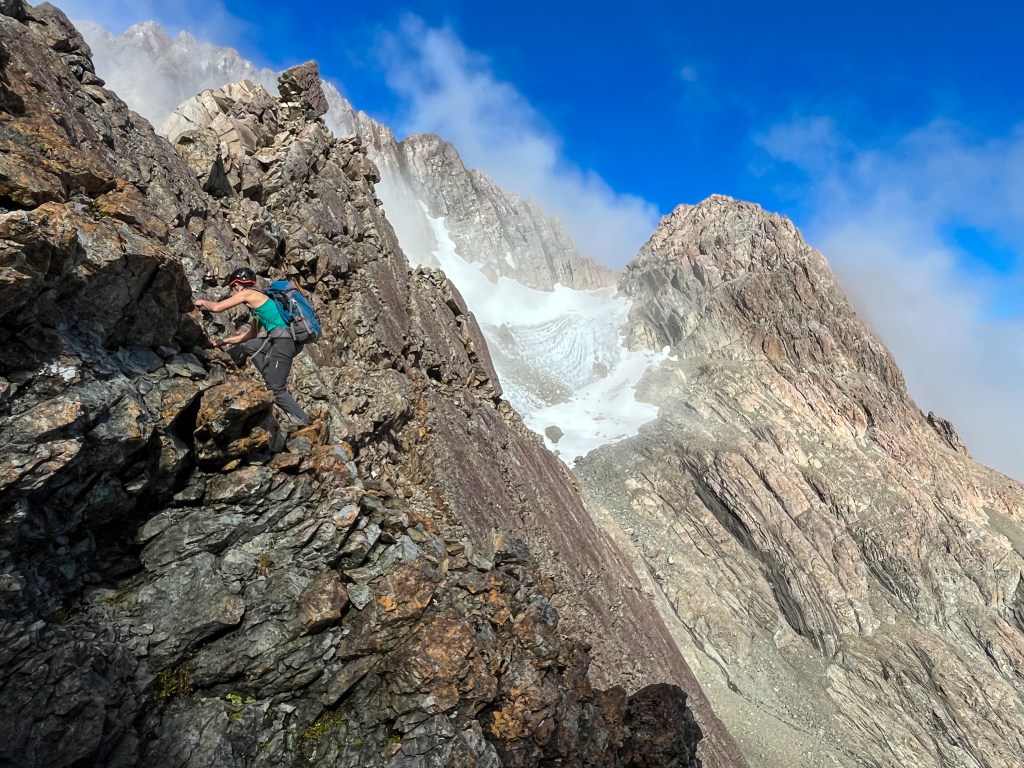
Sidling left, sidling right we navigated the gendarmes – it is pretty intuitive most of the time, but with the heavy clag that came in, we couldn’t see what the best way ahead was so made a couple of errors making for trickier climbing. Some of the rock was slick from the previous nights rainfall which also added to the spice. I found it a harder/more exposed than the Phipps-Temple traverse but still felt happy enough without a rope.
As you approach the high peak of Mt Rolleston there is an obvious gully straight ahead and then some orangey/red slabs to the left. Both ways looked okay but the latter more exposed so we chose the gully – it was loose so we went 1 by 1 but was fine otherwise.
Overall from Philistine to Rolleston the ridge took us around 4.5-5h.
From high peak walk 50m East to a rap station – lots of tat and a mallion. It was around 25m long and drops you into a gully. From here sidle left following the vague trail/cairns. This puts you on low peak (2212). There’s a good biv spot here but no water.
one of many sidlesthe gully leading up to high peakafter the gully were some blocks
descent
Initially follow the ridge for 250m of descent then veer left onto the Otira slide. Variable quality scree but mostly good. We followed some cairns but there were multiple options to pick your way down.
At around 1950m we used a steep gully to descend but this was avoidable in retrospect if you stay left. We found a bit of snow to glacade down which was a brief but welcome respite from the scree!
From here just follow the cairns into the valley floor. Stay left of the river and you’ll meet the trail. Boost back out the way you came – optional swim in the river for bonus points!
Heading down Goldney Ridge towards the Otira slideBottom of Otira slide opening up to the Otira valley
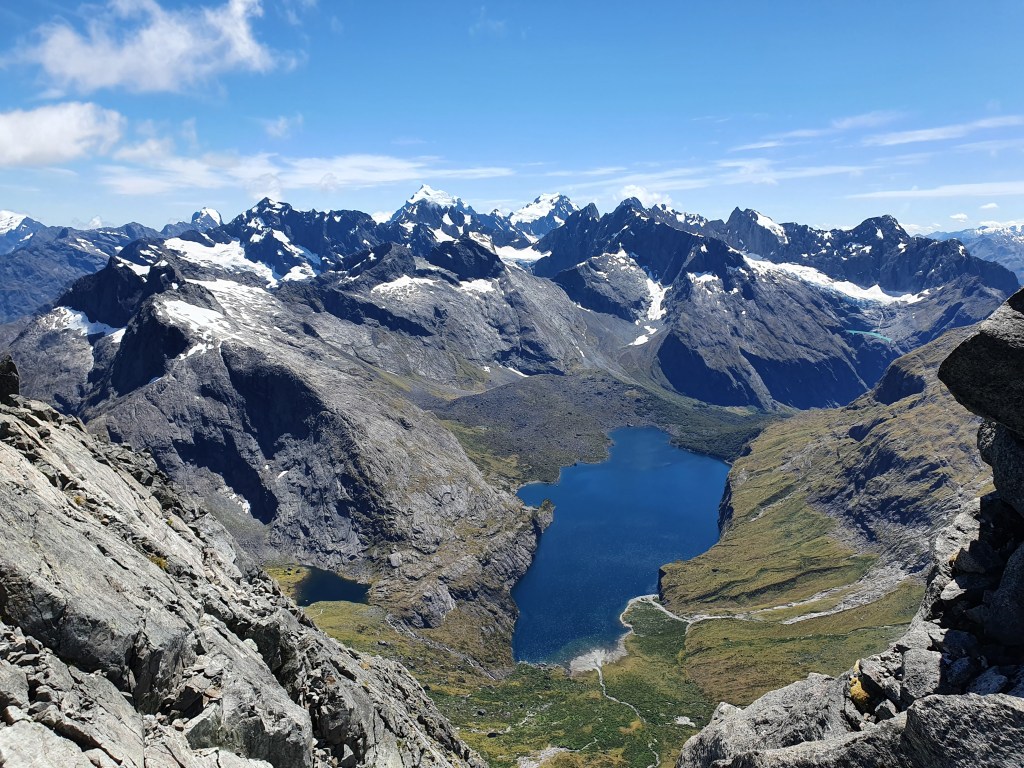
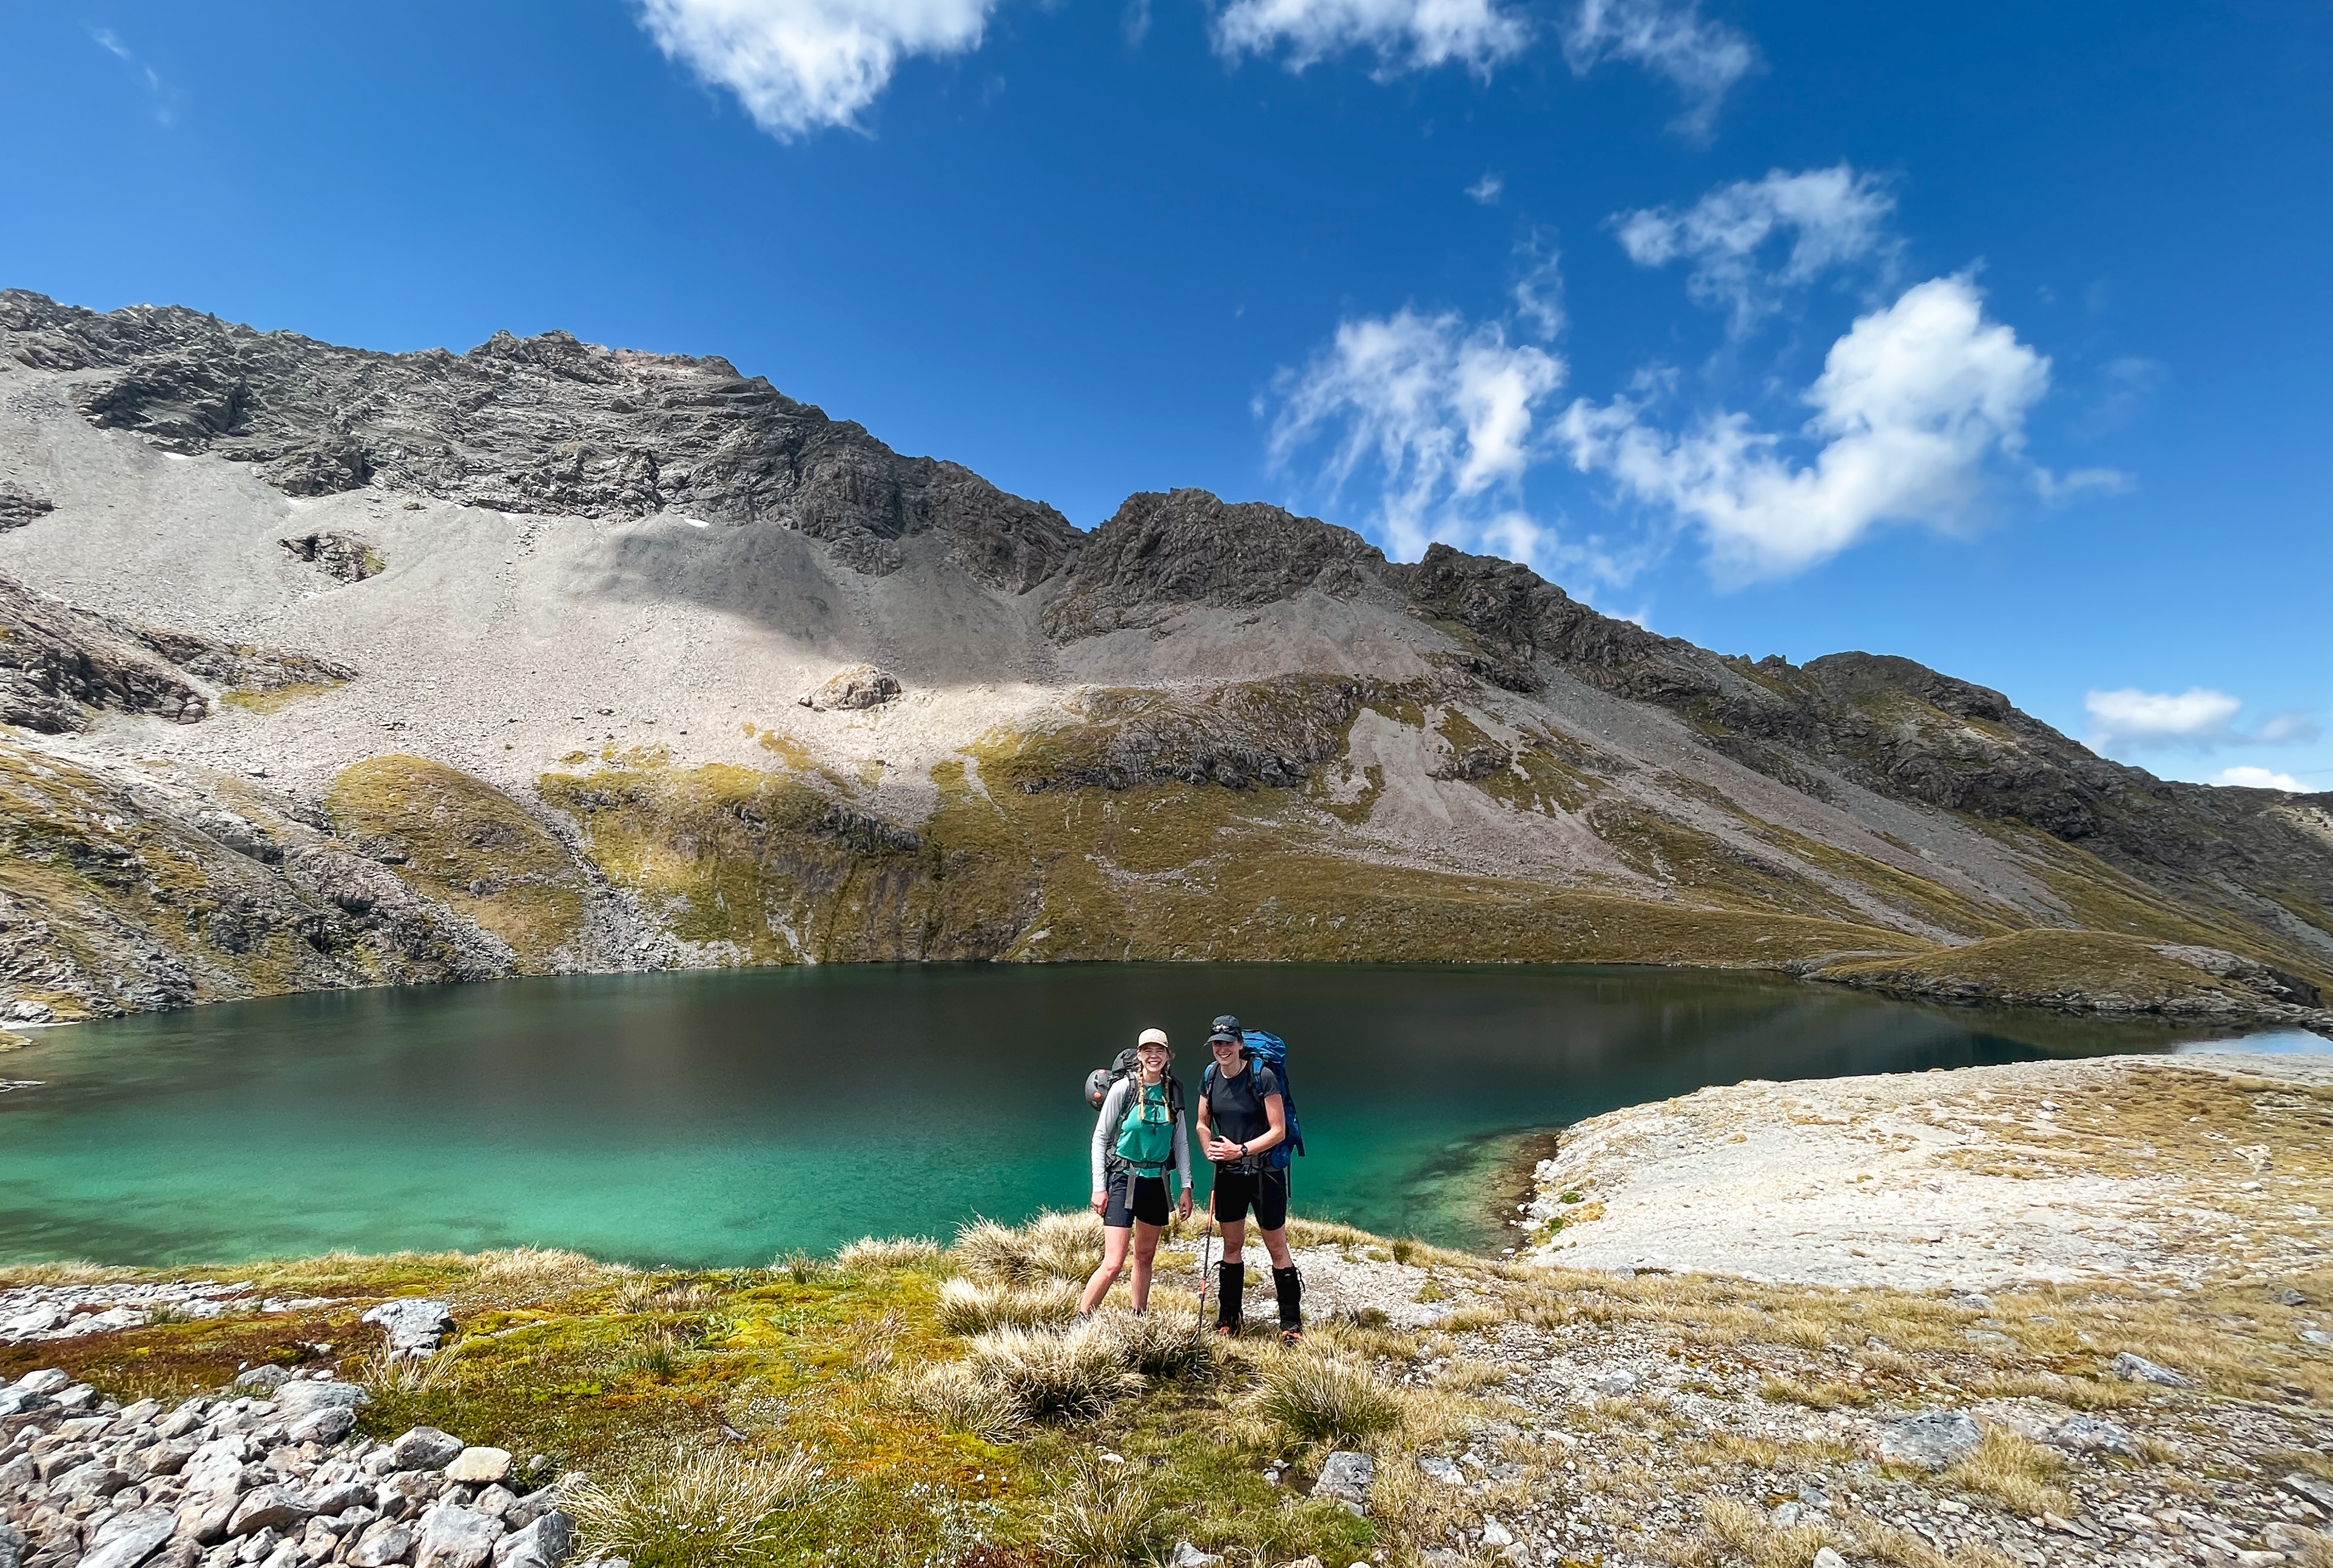
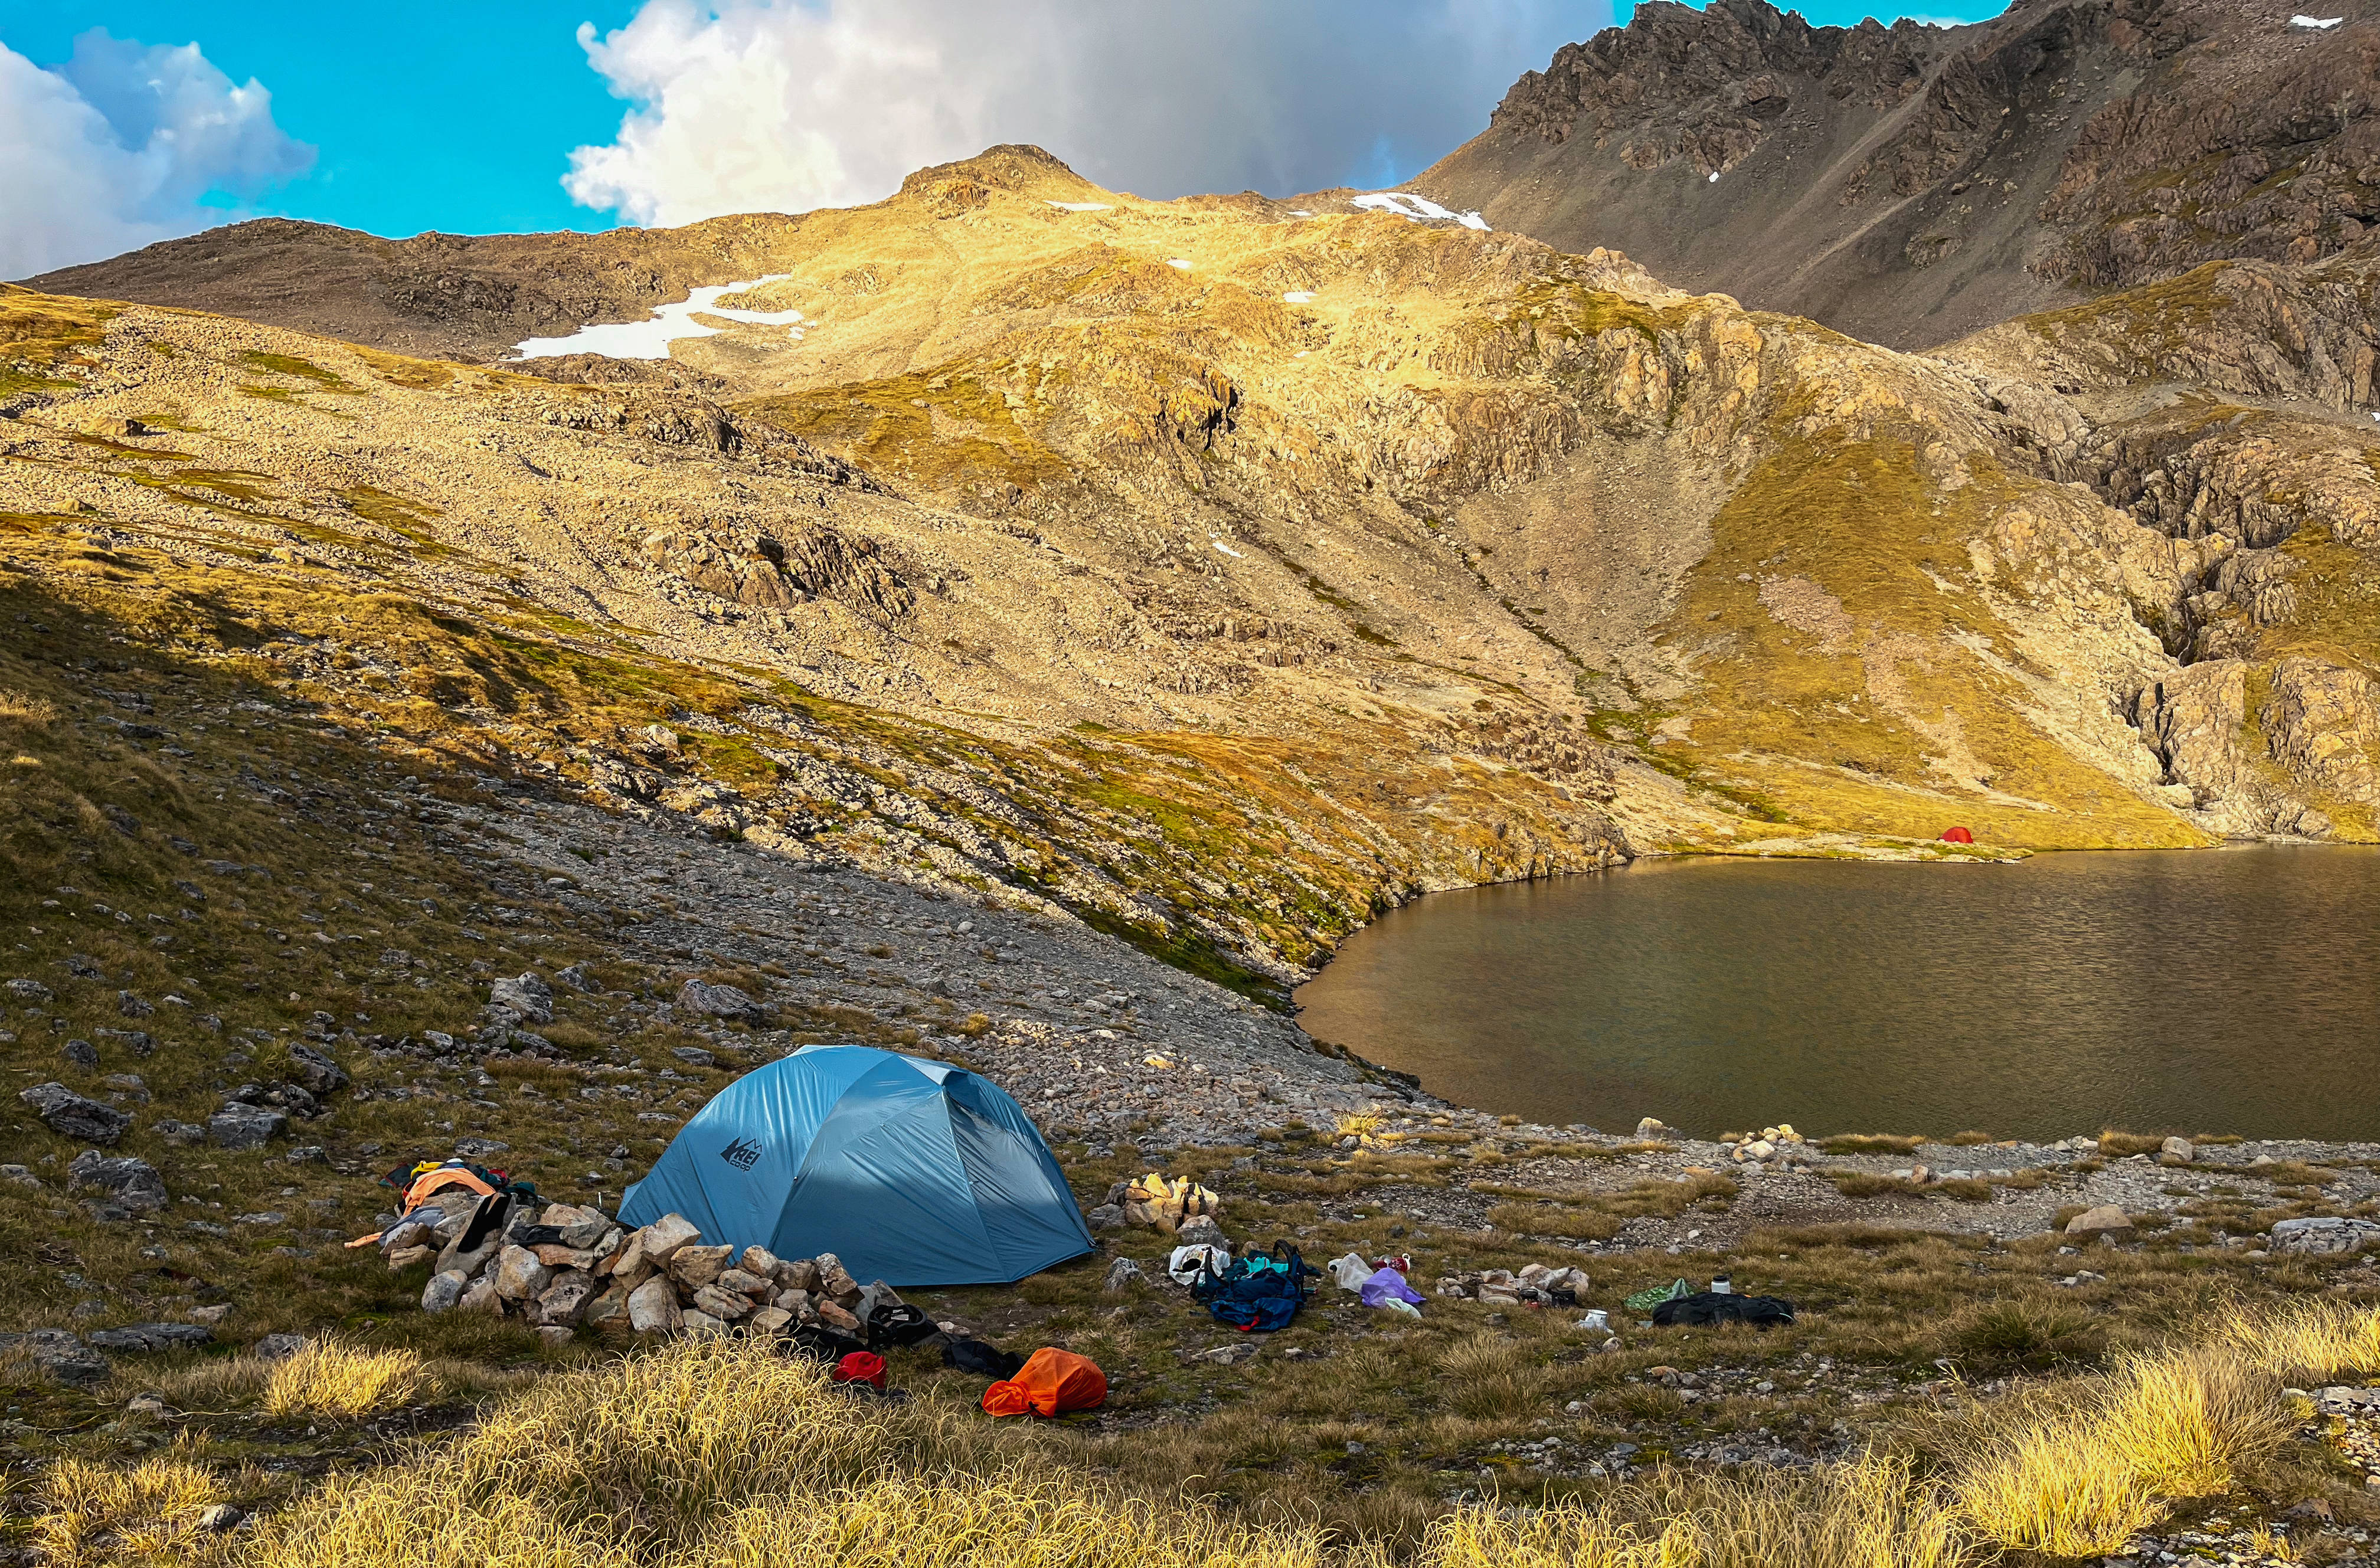
I do love an open body of water. And this one is a goody. A beautiful camping (and skinny dipping) location – albeit not as remote as you might hope as we had the company of 5 other tents, a raft and a glider! Mt Oates also provides an opportunity for some spicy scrambling. The walk up the Mingha takes you along the running segment of the coast to coast race so we bumped into lots of people training for it – so much lycra!
Grade: II, 2
Time: 5h to Lake Mavis (4h to Goat’s Pass then 1h to the lake); 1.5h to low peak of Mt Oates, 3.5h along the N ridge / back to the lake.
Equipment: can be done in trail runners/approach shoes. We didn’t take a rope/rack, only helmets. Easy scrambling to low peak but between low and high peak we wanted a rope; instead we decided to go along the N ridge which was mostly fine.
Season: Lake Mavis would be snow-free in spring/summer; you would want to do Mt Oates in summer to ensure the rock is dry
Team: Laudi, Abbey, Maria 14-15/01/23
Access
Park at Greyney’s Shelter. We stayed at Kennedy Lodge the night before allowing for a bit more of a lie-in! From the Doc sign at the N side of the carpark cross the road and go through a tunnel which puts you on a doc trail. Follow the orange markers. The Waimakariri river level varies significantly, so worth checking this before going as you need to make a few river crossings. It’s just over 11km to the point where you want to take a right up towards Lake Mavis. Don’t be tempted to turn off early – from the stream draining from Lake Mavis continue another 500m on the track. The turn off is marked with cairns. Head up the sparse scrub/scree, following the cairns up to Lake Mavis.
climb
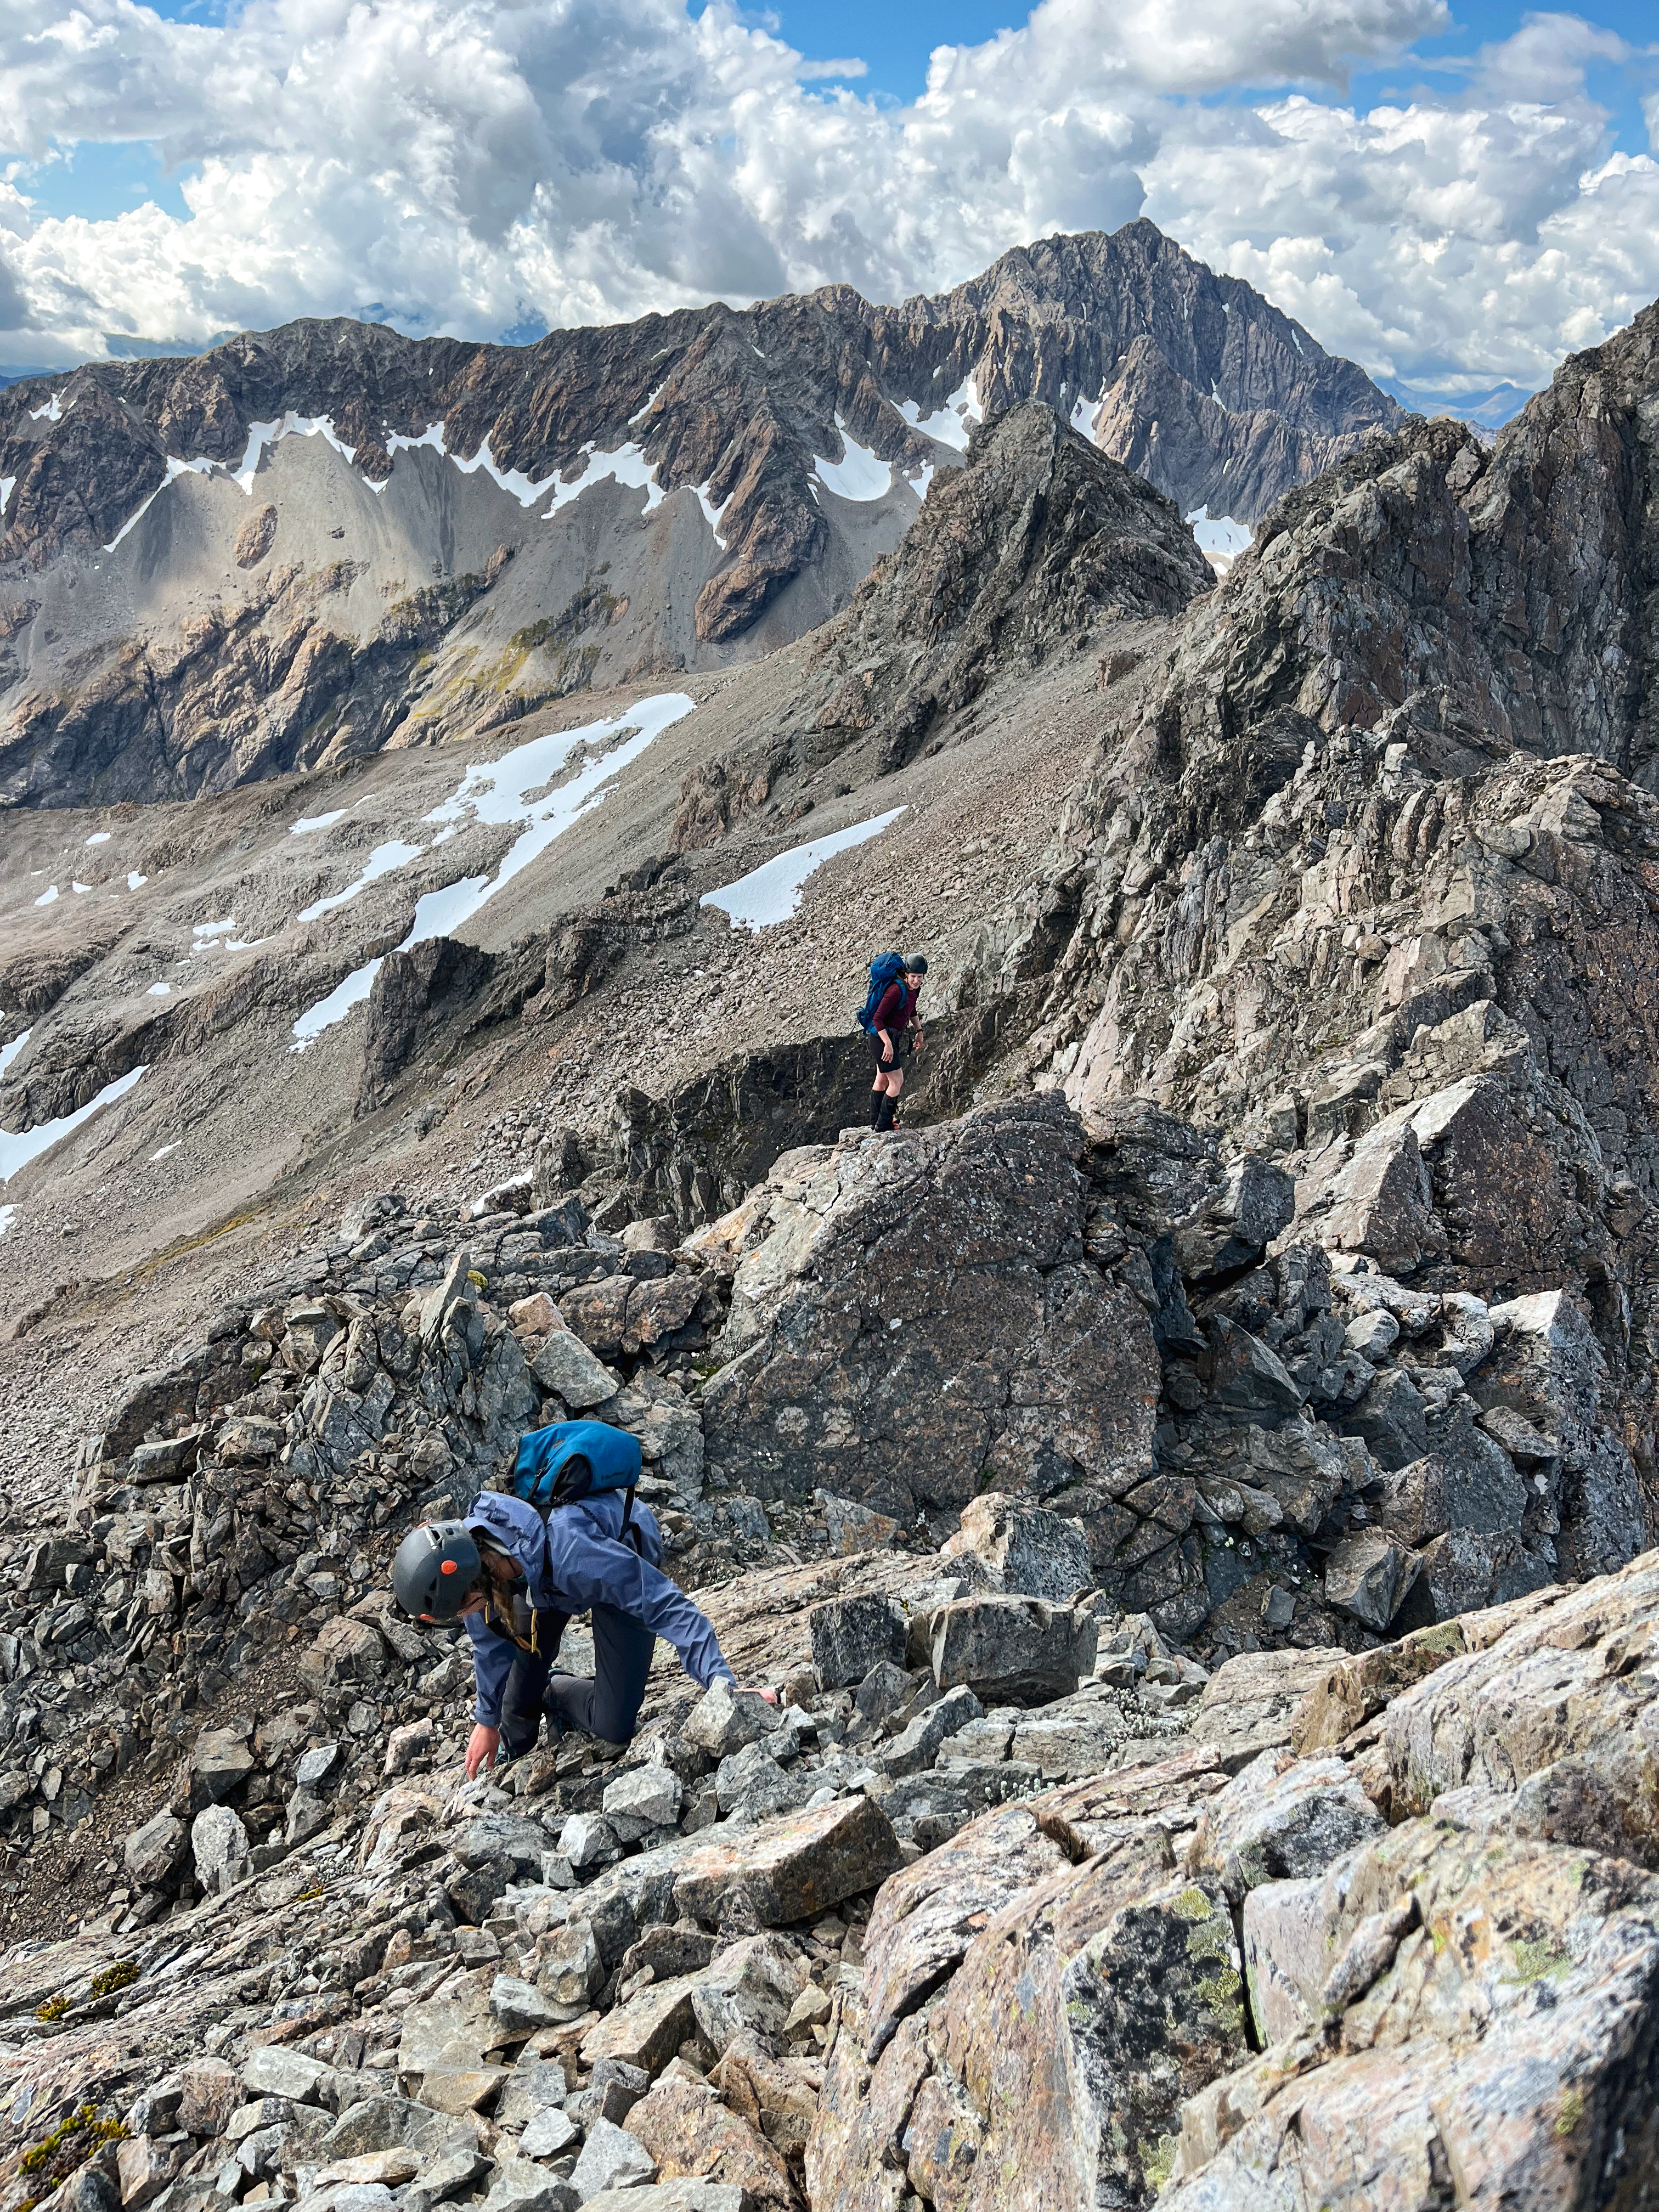
Cross the outlet of the lake then head up the scree gully just left of the buttress that extends the lowest on the scree. Don your helmets! The climbing is easy but the rock is a little crumbly. It was great fun scrambling up to low peak but on traversing the summit to have a look over to high peak, we weren’t too inspired. There is a drop of around 20m then quite a steep climb, which looked pretty gross to down climb.
From Lake Mavis looking up to Mt Oates, low peak. Our route along the West ridge.
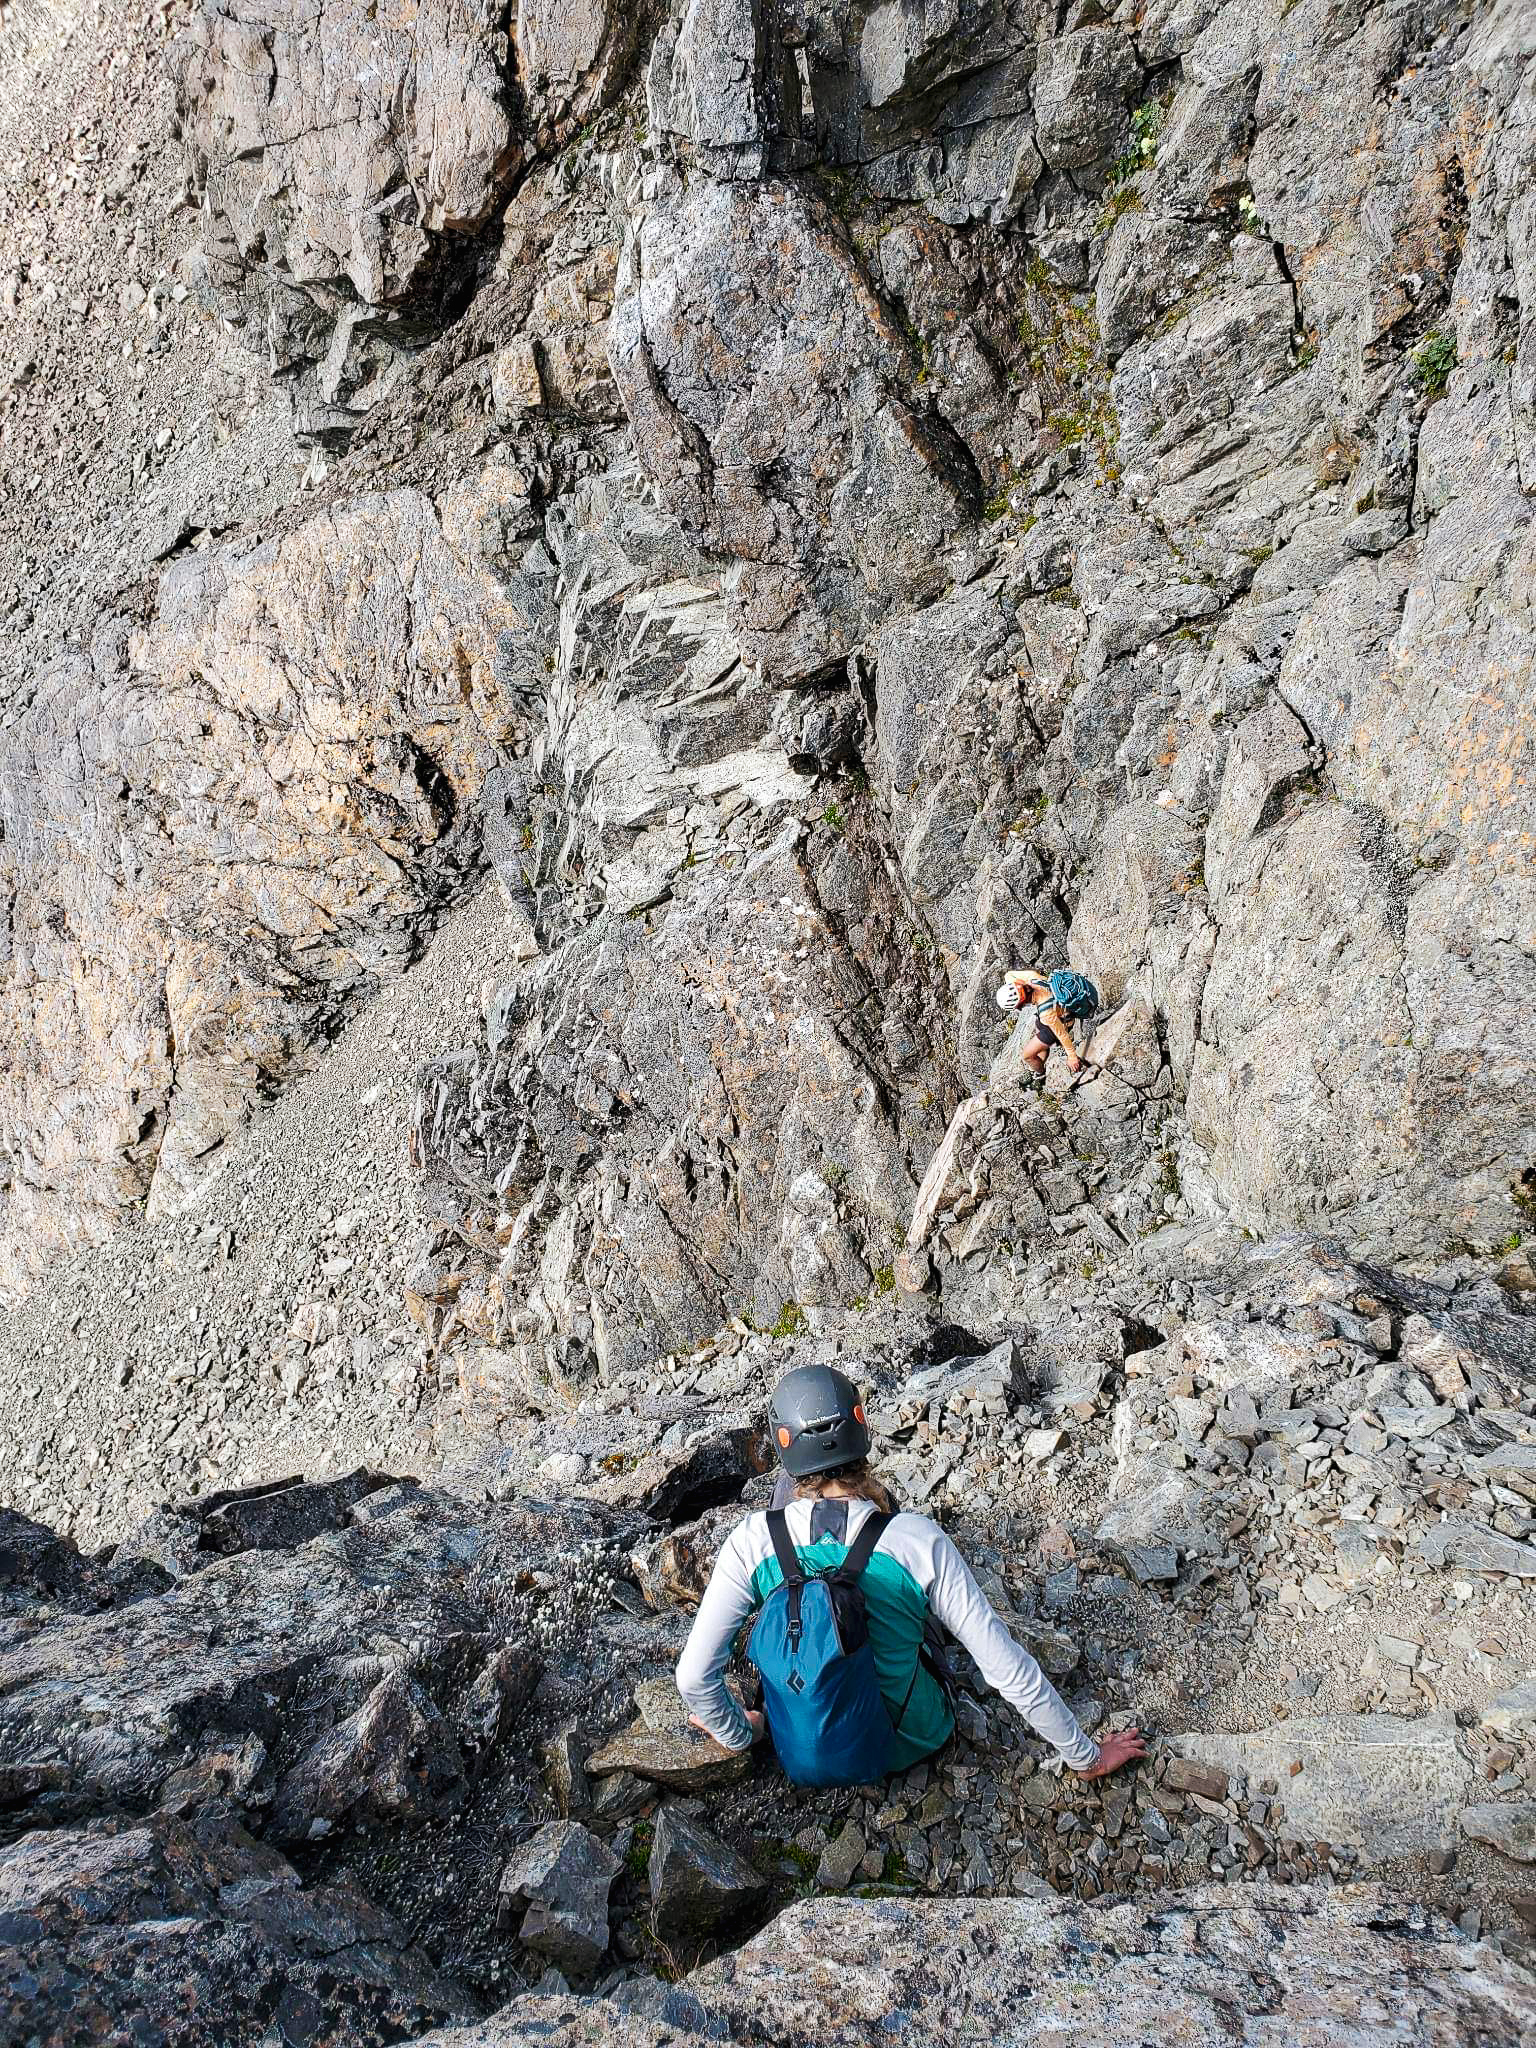
Instead, we opted to go along the N ridge towards point 1978. There are multiple opportunities to drop down from the ridge onto scree, but we were enjoying the scrambling so continued so far as we felt comfortable then dipped down. Towards the end we were increasingly sketched out by the level of choss so were relieved to be on safer ground – “oh blessed scree”. From here it was a quick/easy descent down to camp. Even found a 50m stretch of snow to glacade down! The next day we went out the same way due to time (and food constraints) – but another option would be to go over the ridge N of Oates, descend to Taruahuna Pass then to Edwards Hut and out (approx 9h). Great weekend trip, completed with ice-cream!
Looking over to Mt Oates high peak – no thanksDescent route from the N ridge
Come on a trad multi-pitch climb, she said. It’ll be fun, she said… This was Jack’s first trad/alpine climbing experience and the first on which I lead by myself. The climbing was easy with a crux of 14, and the rock was decent, however a leisurely pace meant we were near-benighted as we struggled to find the walk-off in the dark. Route finding in pitch black and 60kph winds… Not advisable!
Moral(s) of the story – need to work on simul-climbing, bring a lighter rack, a single rope would have been fine, 1 bag of car chips to come back to is not enough
Grade: 5 IV 500m. Crux grade 14 (Largely sub 14, 10-14). All trad including anchors. Good belay ledges.
Equipment: Full trad rack, singles up to #2, full set of nuts. No need for RP/micronuts. 2x 240 slings for anchors. 5-6 alpine draws sufficient including some 120s if confident at the grade – I was only placing 4-5 bits of gear on most pitches. We used 2x 60m half ropes but with long slings a 60m single rope would be fine. We walked off but did come across tat from another party’s rap descent – always a good idea to have some spare tat.
Approach time: 4-5h via the North Temple track/Gunsight Pass
Climbing time: 12h (we took it v slow, a fast party could climb it in half the time)
Season: Best in Summer, for those long days and warm rock. Being on the SW aspect we were largely in shade so layers were appreciated.
Team: Maria, Jack 29/12/2022
Approach
Park at Temple Campsite.
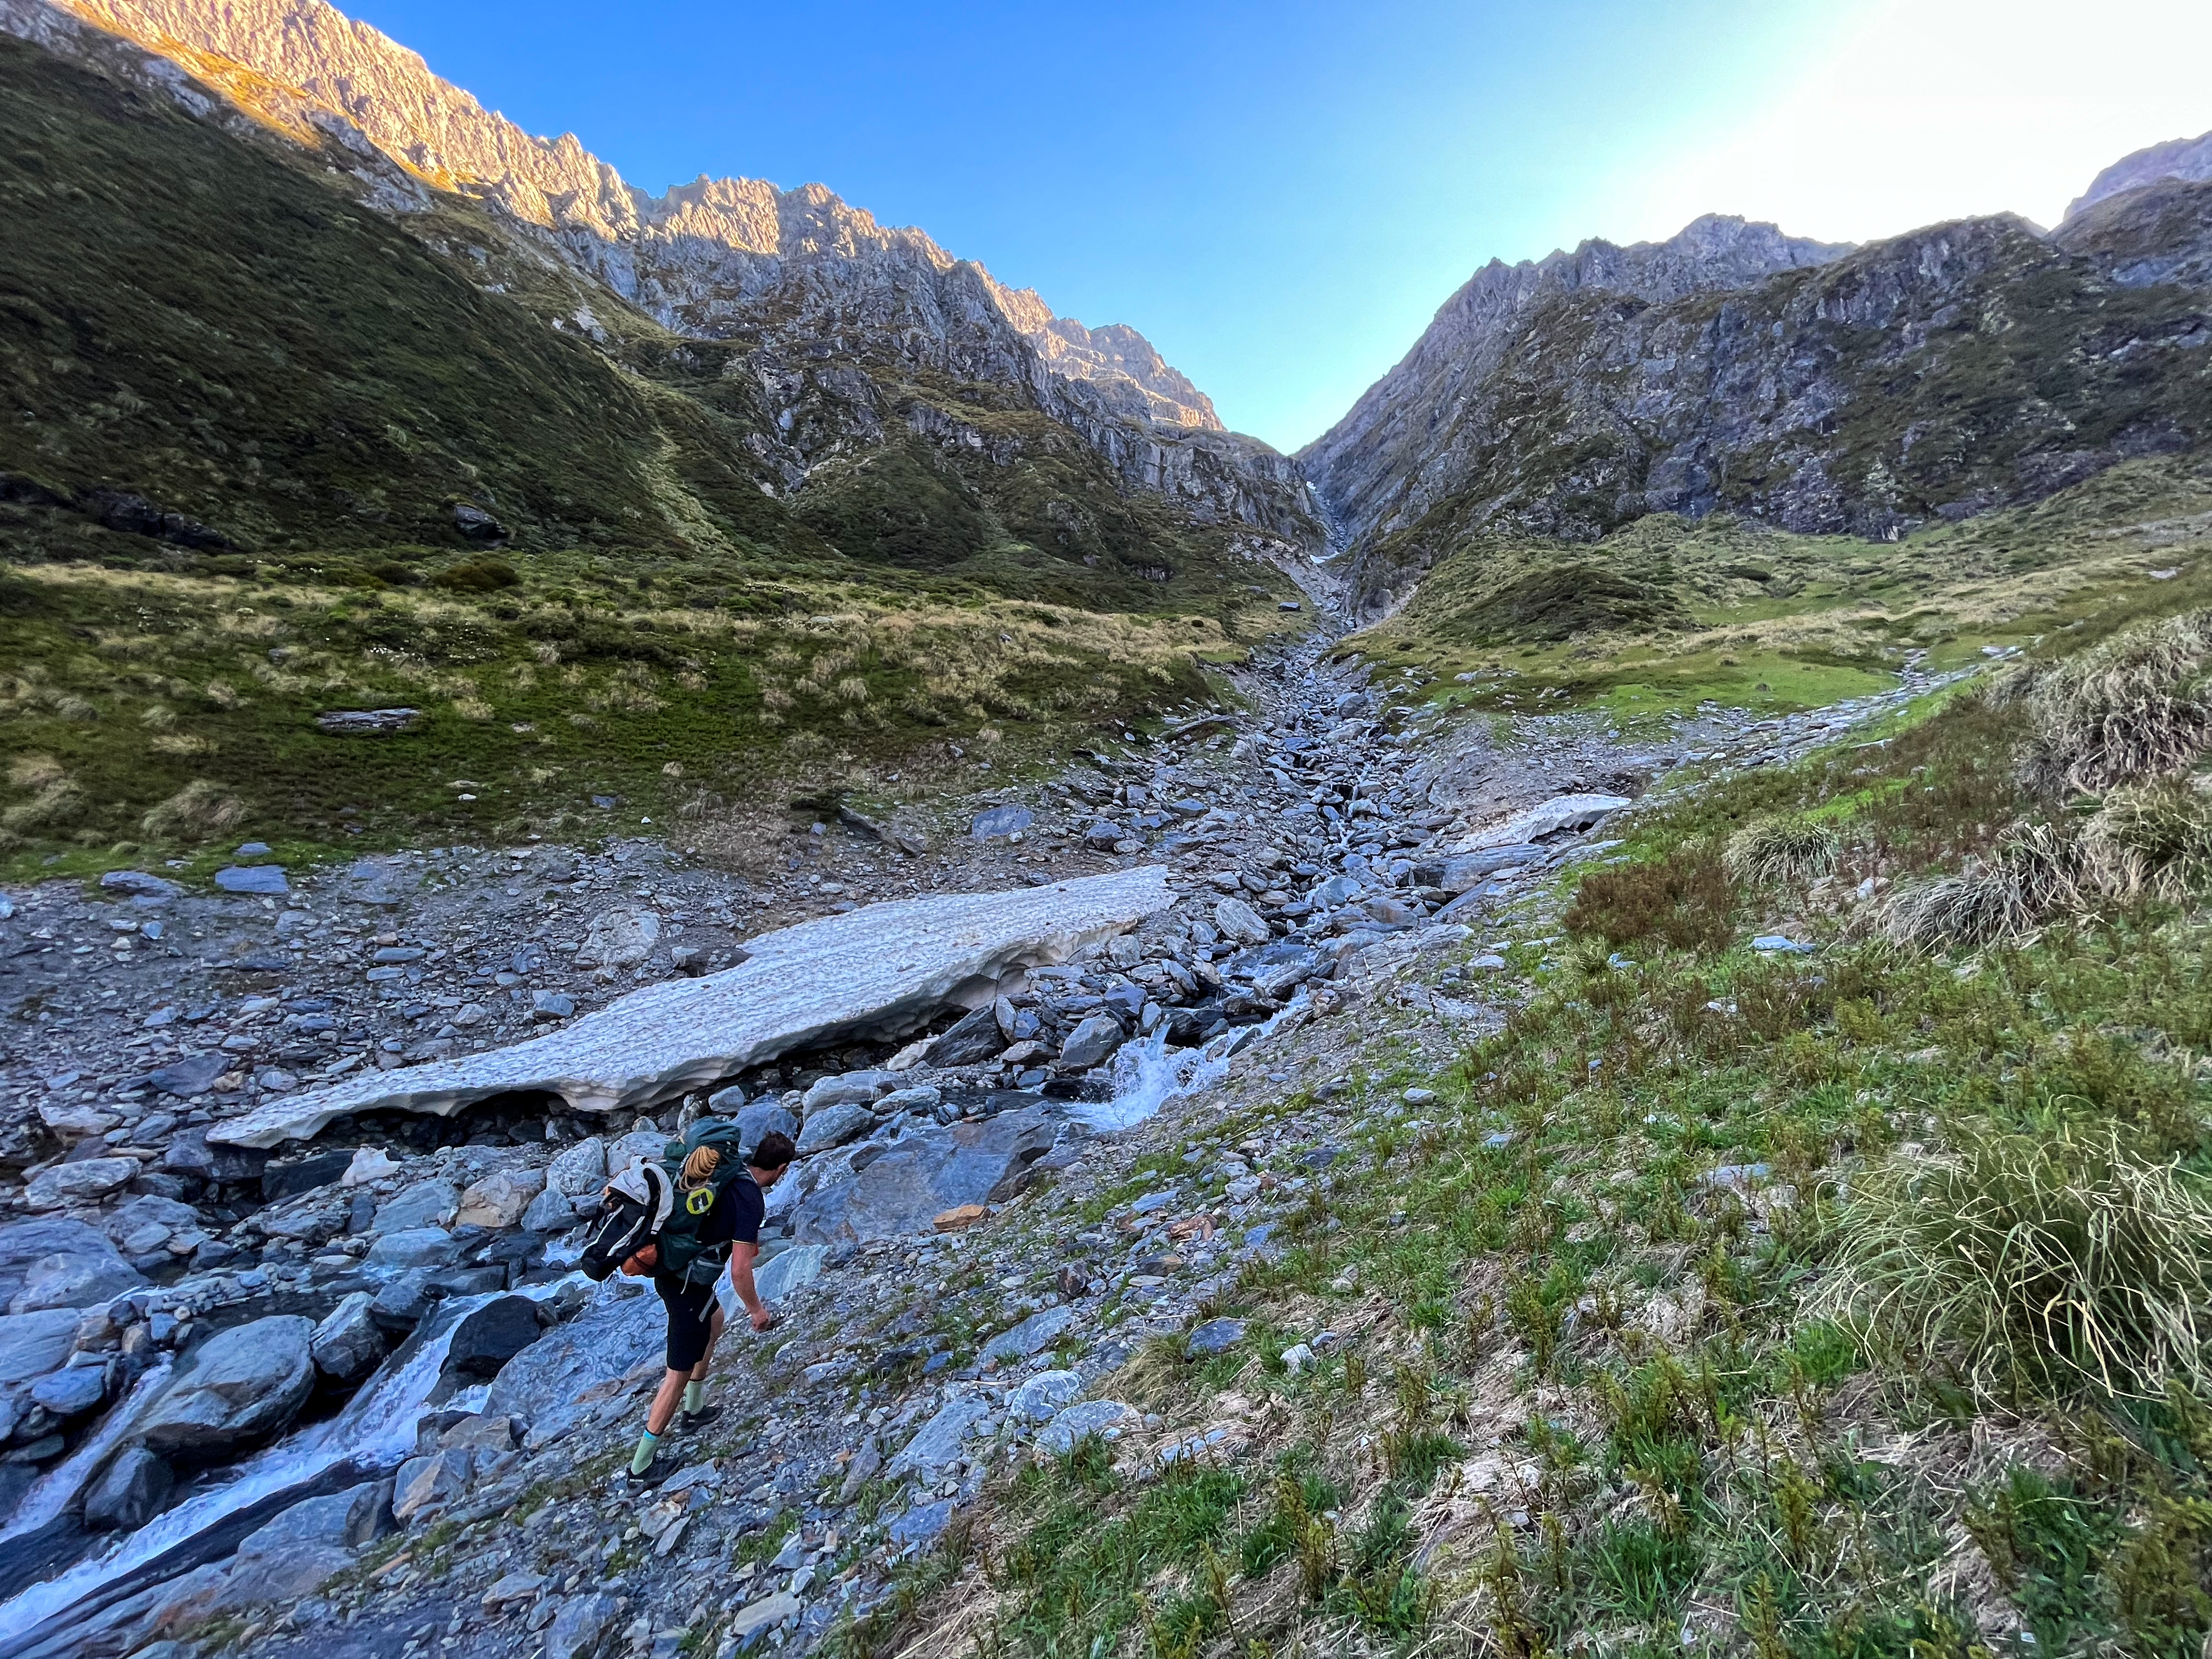
Option 1: Walk in/out via N Temple Track. 1.5h along a doc trail – a few landslides along the way make for navigating some fallen trees. Getting up and over Gunsight Pass to the biv spot took 4-5h. I would not want to descend this chossfest, so would not recommend this as a way out.
Option 2: Walk in via N Temple and out via S Temple (9km, 5-6h in and 16km, 6-7h out). This was the route we opted for. Walk out from the biv to the S Temple track required multiple river crossings. Once you hit the doc trail follow the cairns (there are no regular orange markers until you hit S Temple Hut).
Option 3: As per the guidebook/climbNZ, start on N Temple Track then turn off at BZ14 433 141 and head straight up through scrub towards Bruce-Steeple col. Looking up at the dense beech forest, we thought this might be slow going but I’d be open to trying it next time.
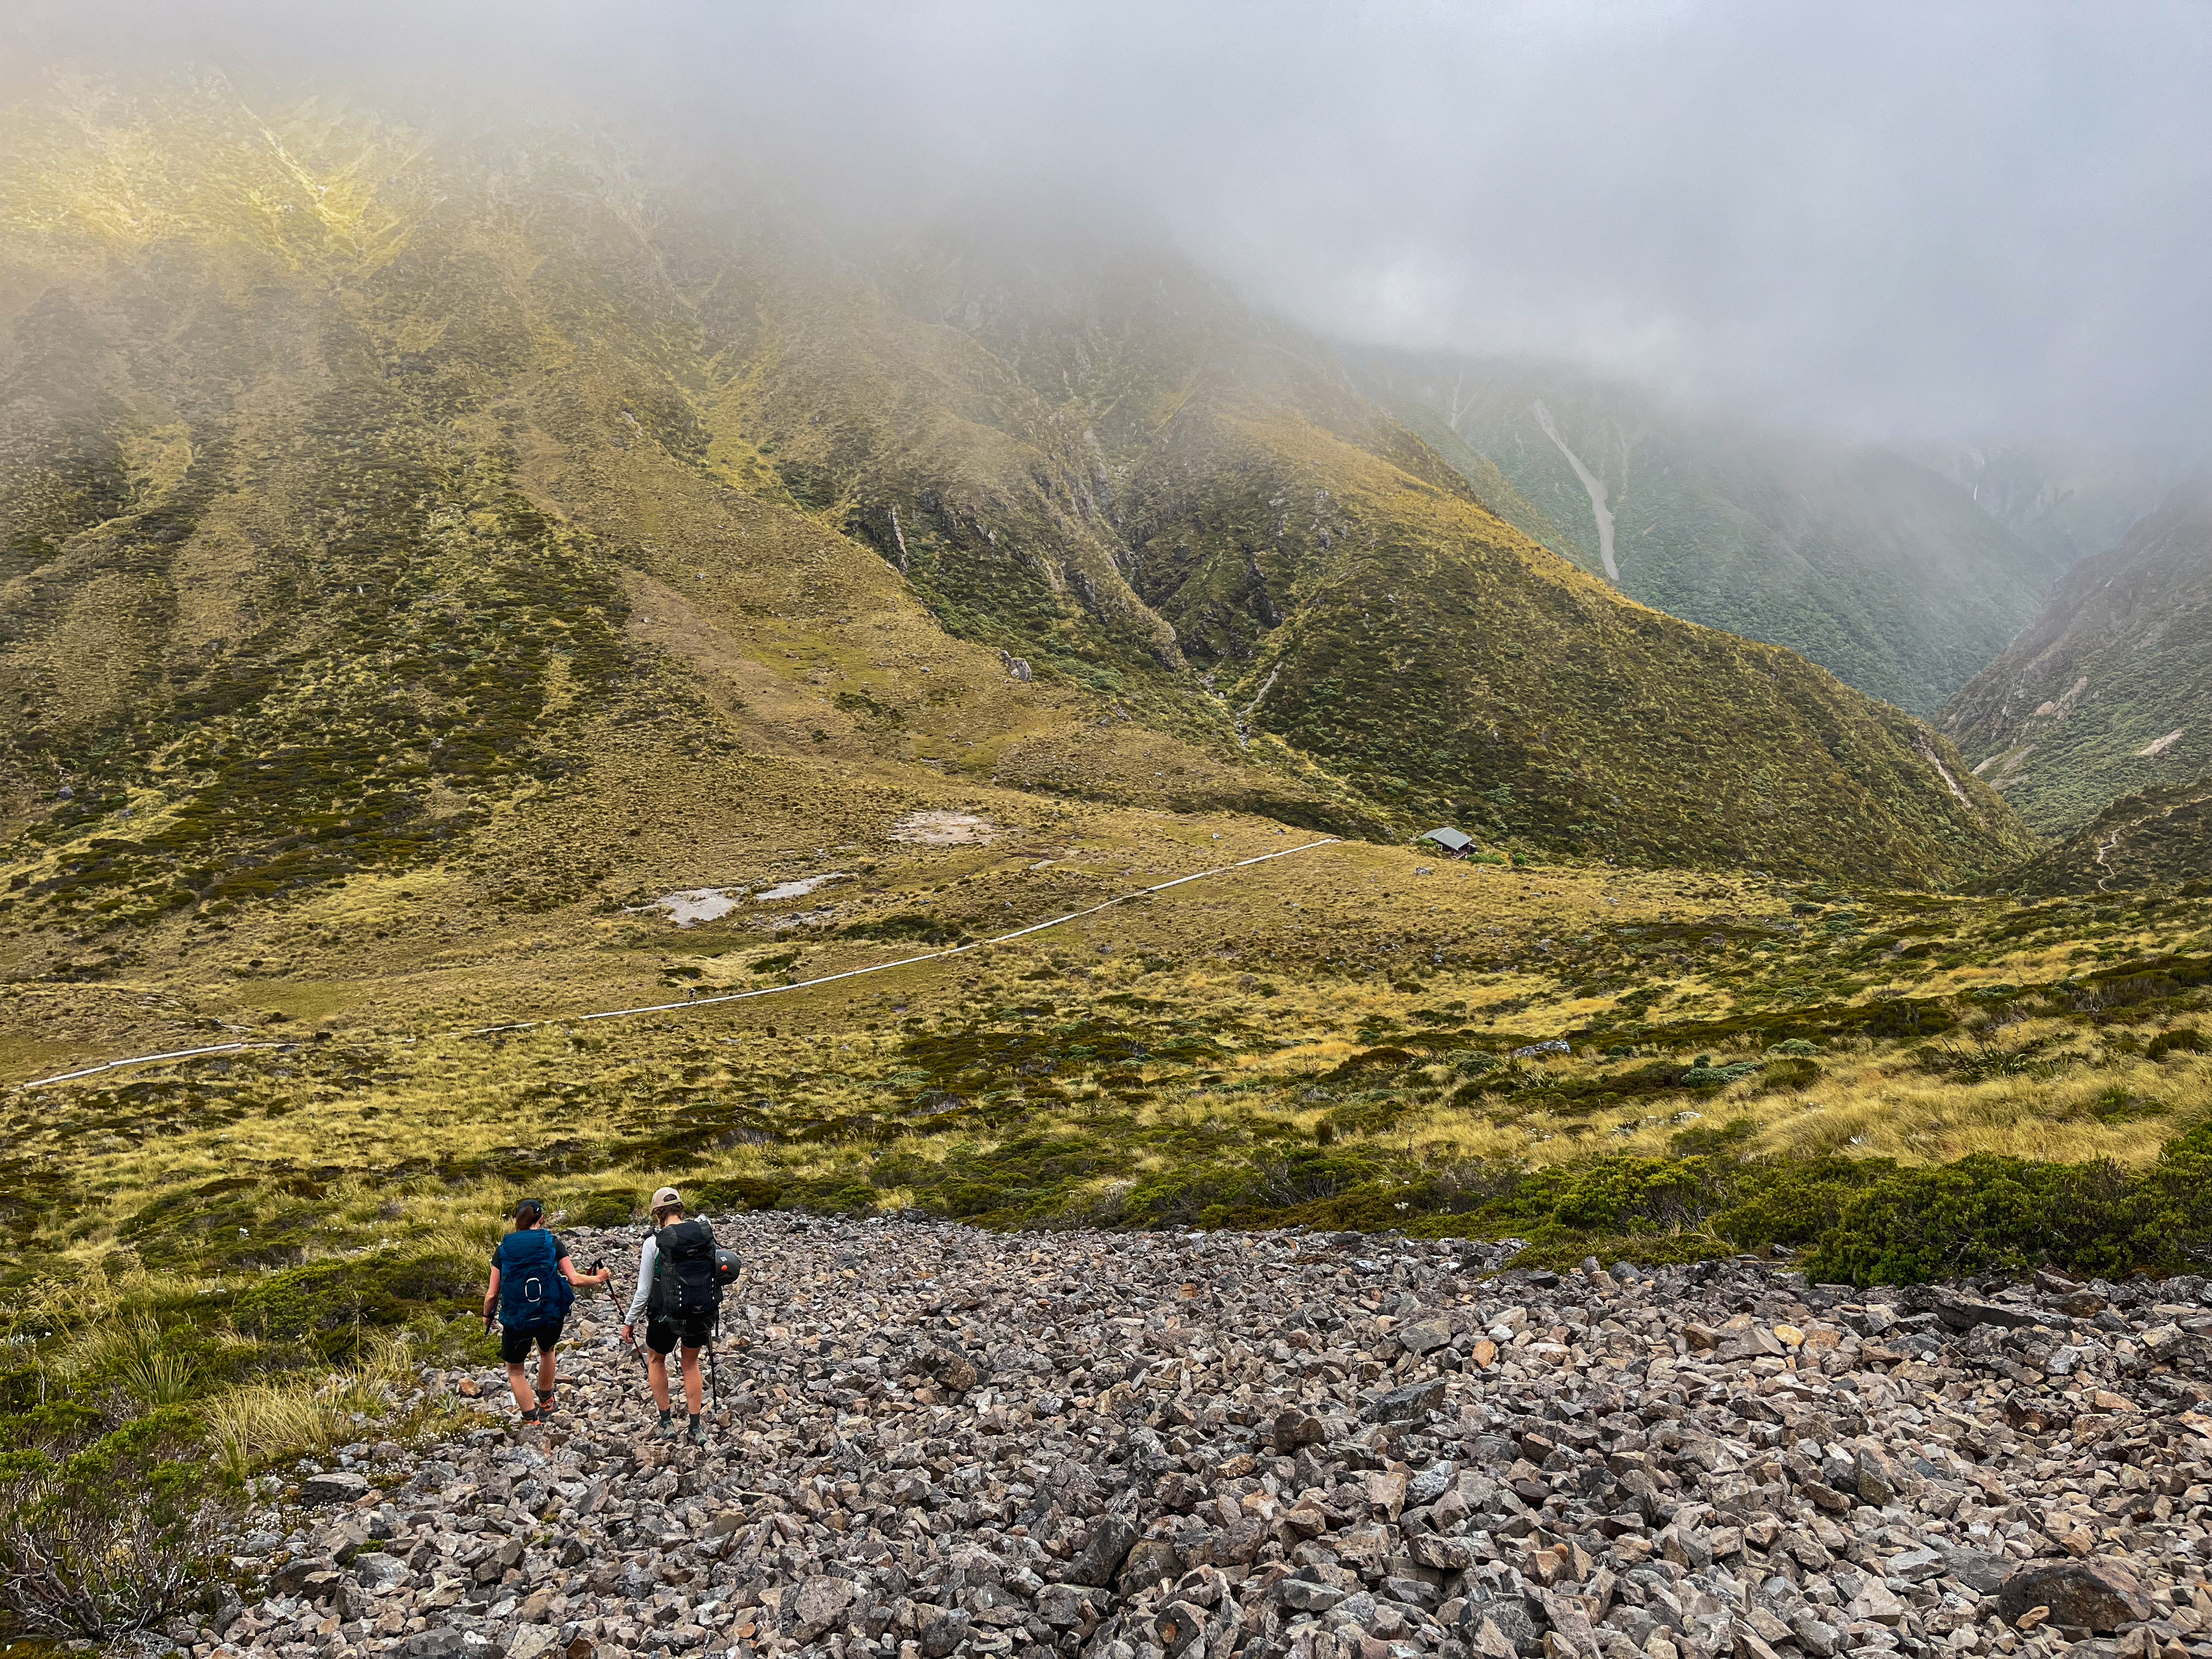
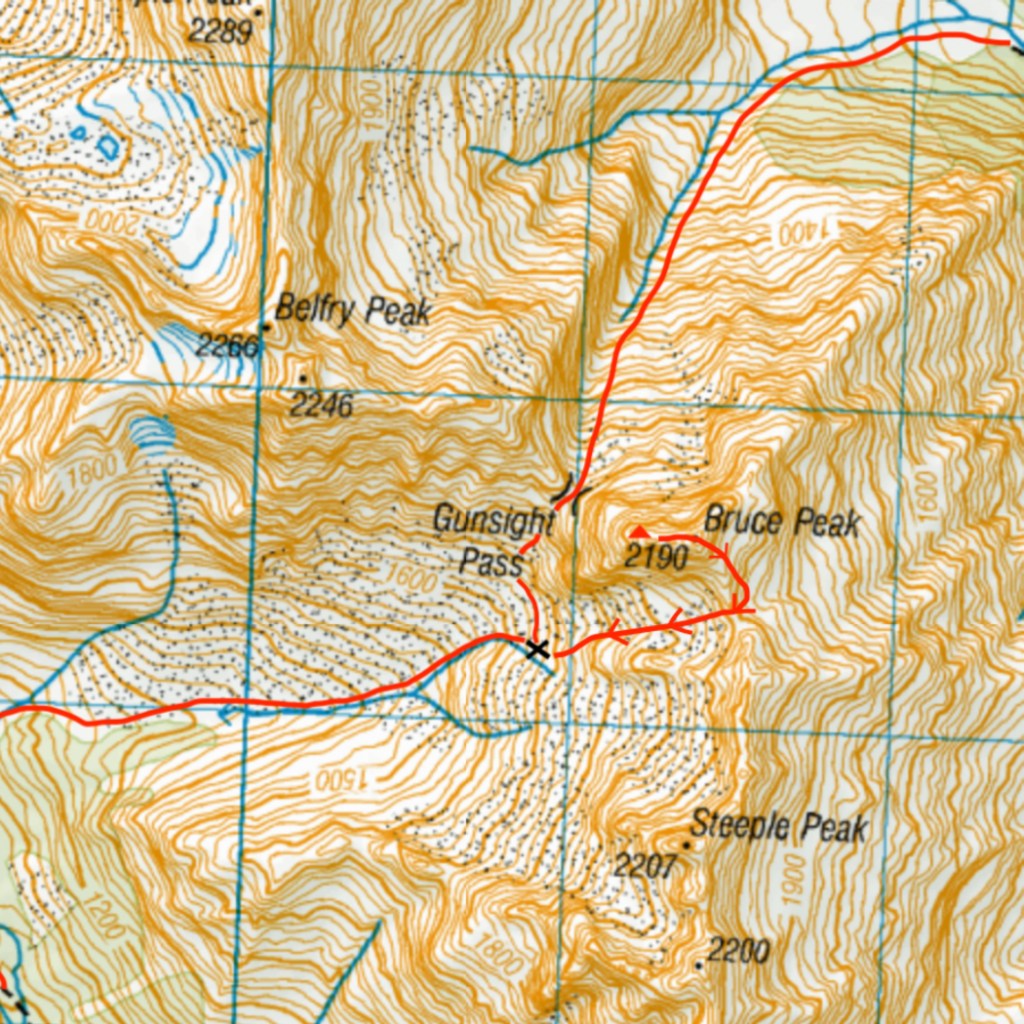
We camped on a strip of tussock amongst the scree marked by X at around 1650m. There’s running water right beside it.
X marks the biv spot; Triangle marks route top out. From the triangle marks our descent route. Climb route not shown, see below.
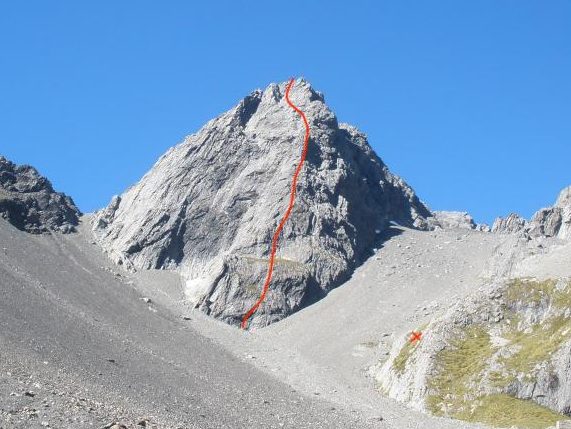
To get to the base of the route, sidle 200m North of the biv spot along the same contour towards Bruce Peak. The climbing starts at the lowest point of the buttress.
P1: (14, 60m) Poor gear. Climbing no harder than a 14 but felt harder as was difficult to protect.
P2: (10, 60m) Very easy scrambling, can be simu-climbed for confident parties. Minimal gear was placed with much better protection than in the first pitch. Finishes over a wide grassy ledge.
P3: (11, 60m) Similar to above. Follow the arete.
P4: (14, 60m) Probably the hardest pitch yet, grade 14 interspersed with easy grassy ledges. Decent gear. Some steeper areas directly up, however can avoid by sidling right.
P5 (13, 60m) Some staunch moves in between easy climbing.
P6-8: (11-13, 60m each) Can stick to the arete but we chose the path of least resistance, going diagonally left which leads you to a rocky platform.
From here we took the rope off and scrambled the last 50m or so up to the top via an easy gully. The true summit lies 100m East of where you top out. It’s easy ground heading to the true summit then you have to navigate ledges down to Bruce-Steeple col. Would have been much easier in the light but doing it with head torch illumination alone resulted in a lot of back/forth. We ended up actually going down the NE face then coming back up the N side of the col. Came across a block that a party had rapped off down the S face – perhaps in the dark as well? Basically, I’d leave plenty of daylight to figure out the descent. Would expect it would take 1-2h to get back to camp.
All in all a great 3 day trip, and awesome to be able to share in a friend’s first trad climb. A little dose of suffering is good for the character anyway…
Addit: struggling to upload the gpx file at the moment. Just comment if you want it and can send through directly.