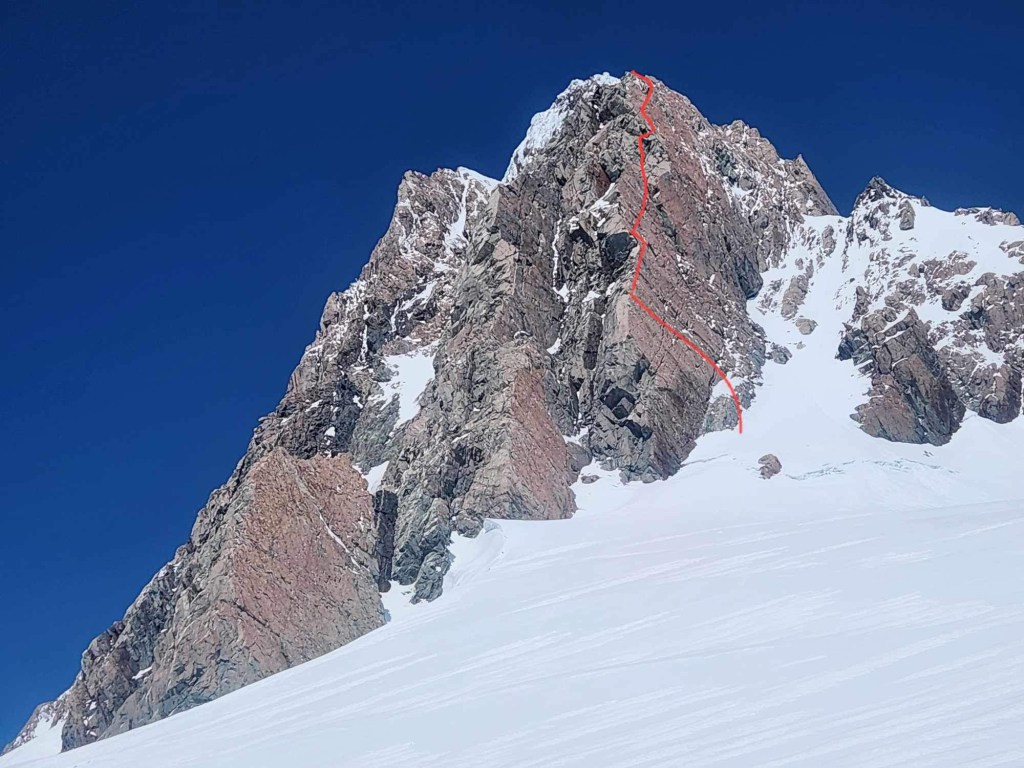
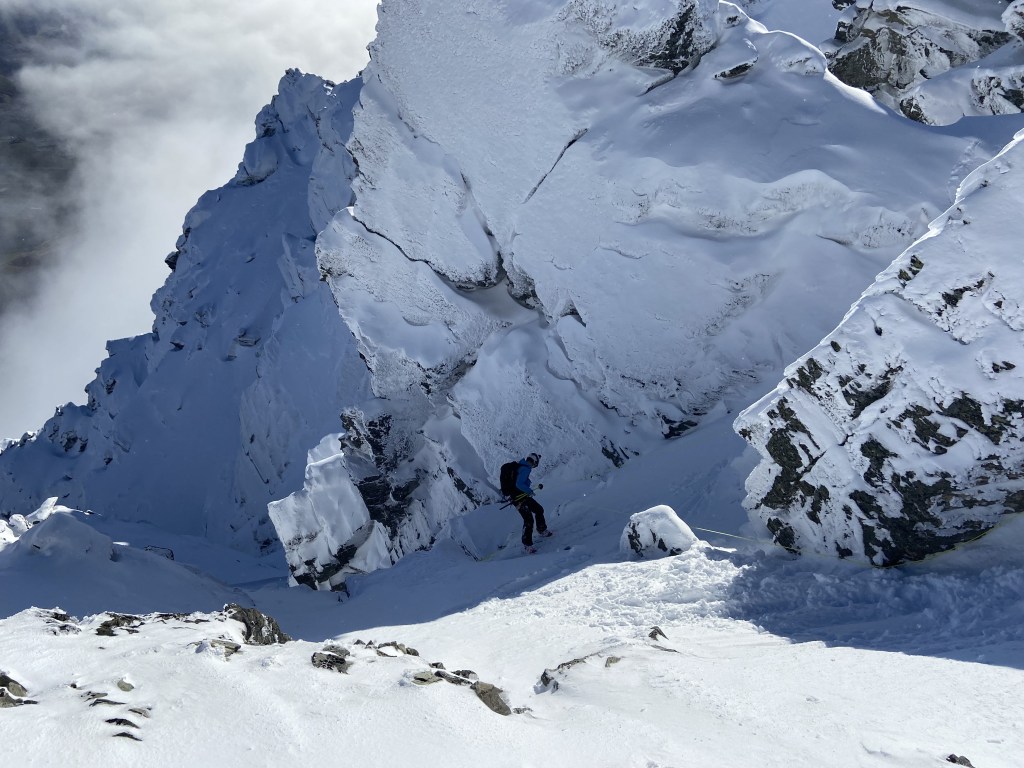
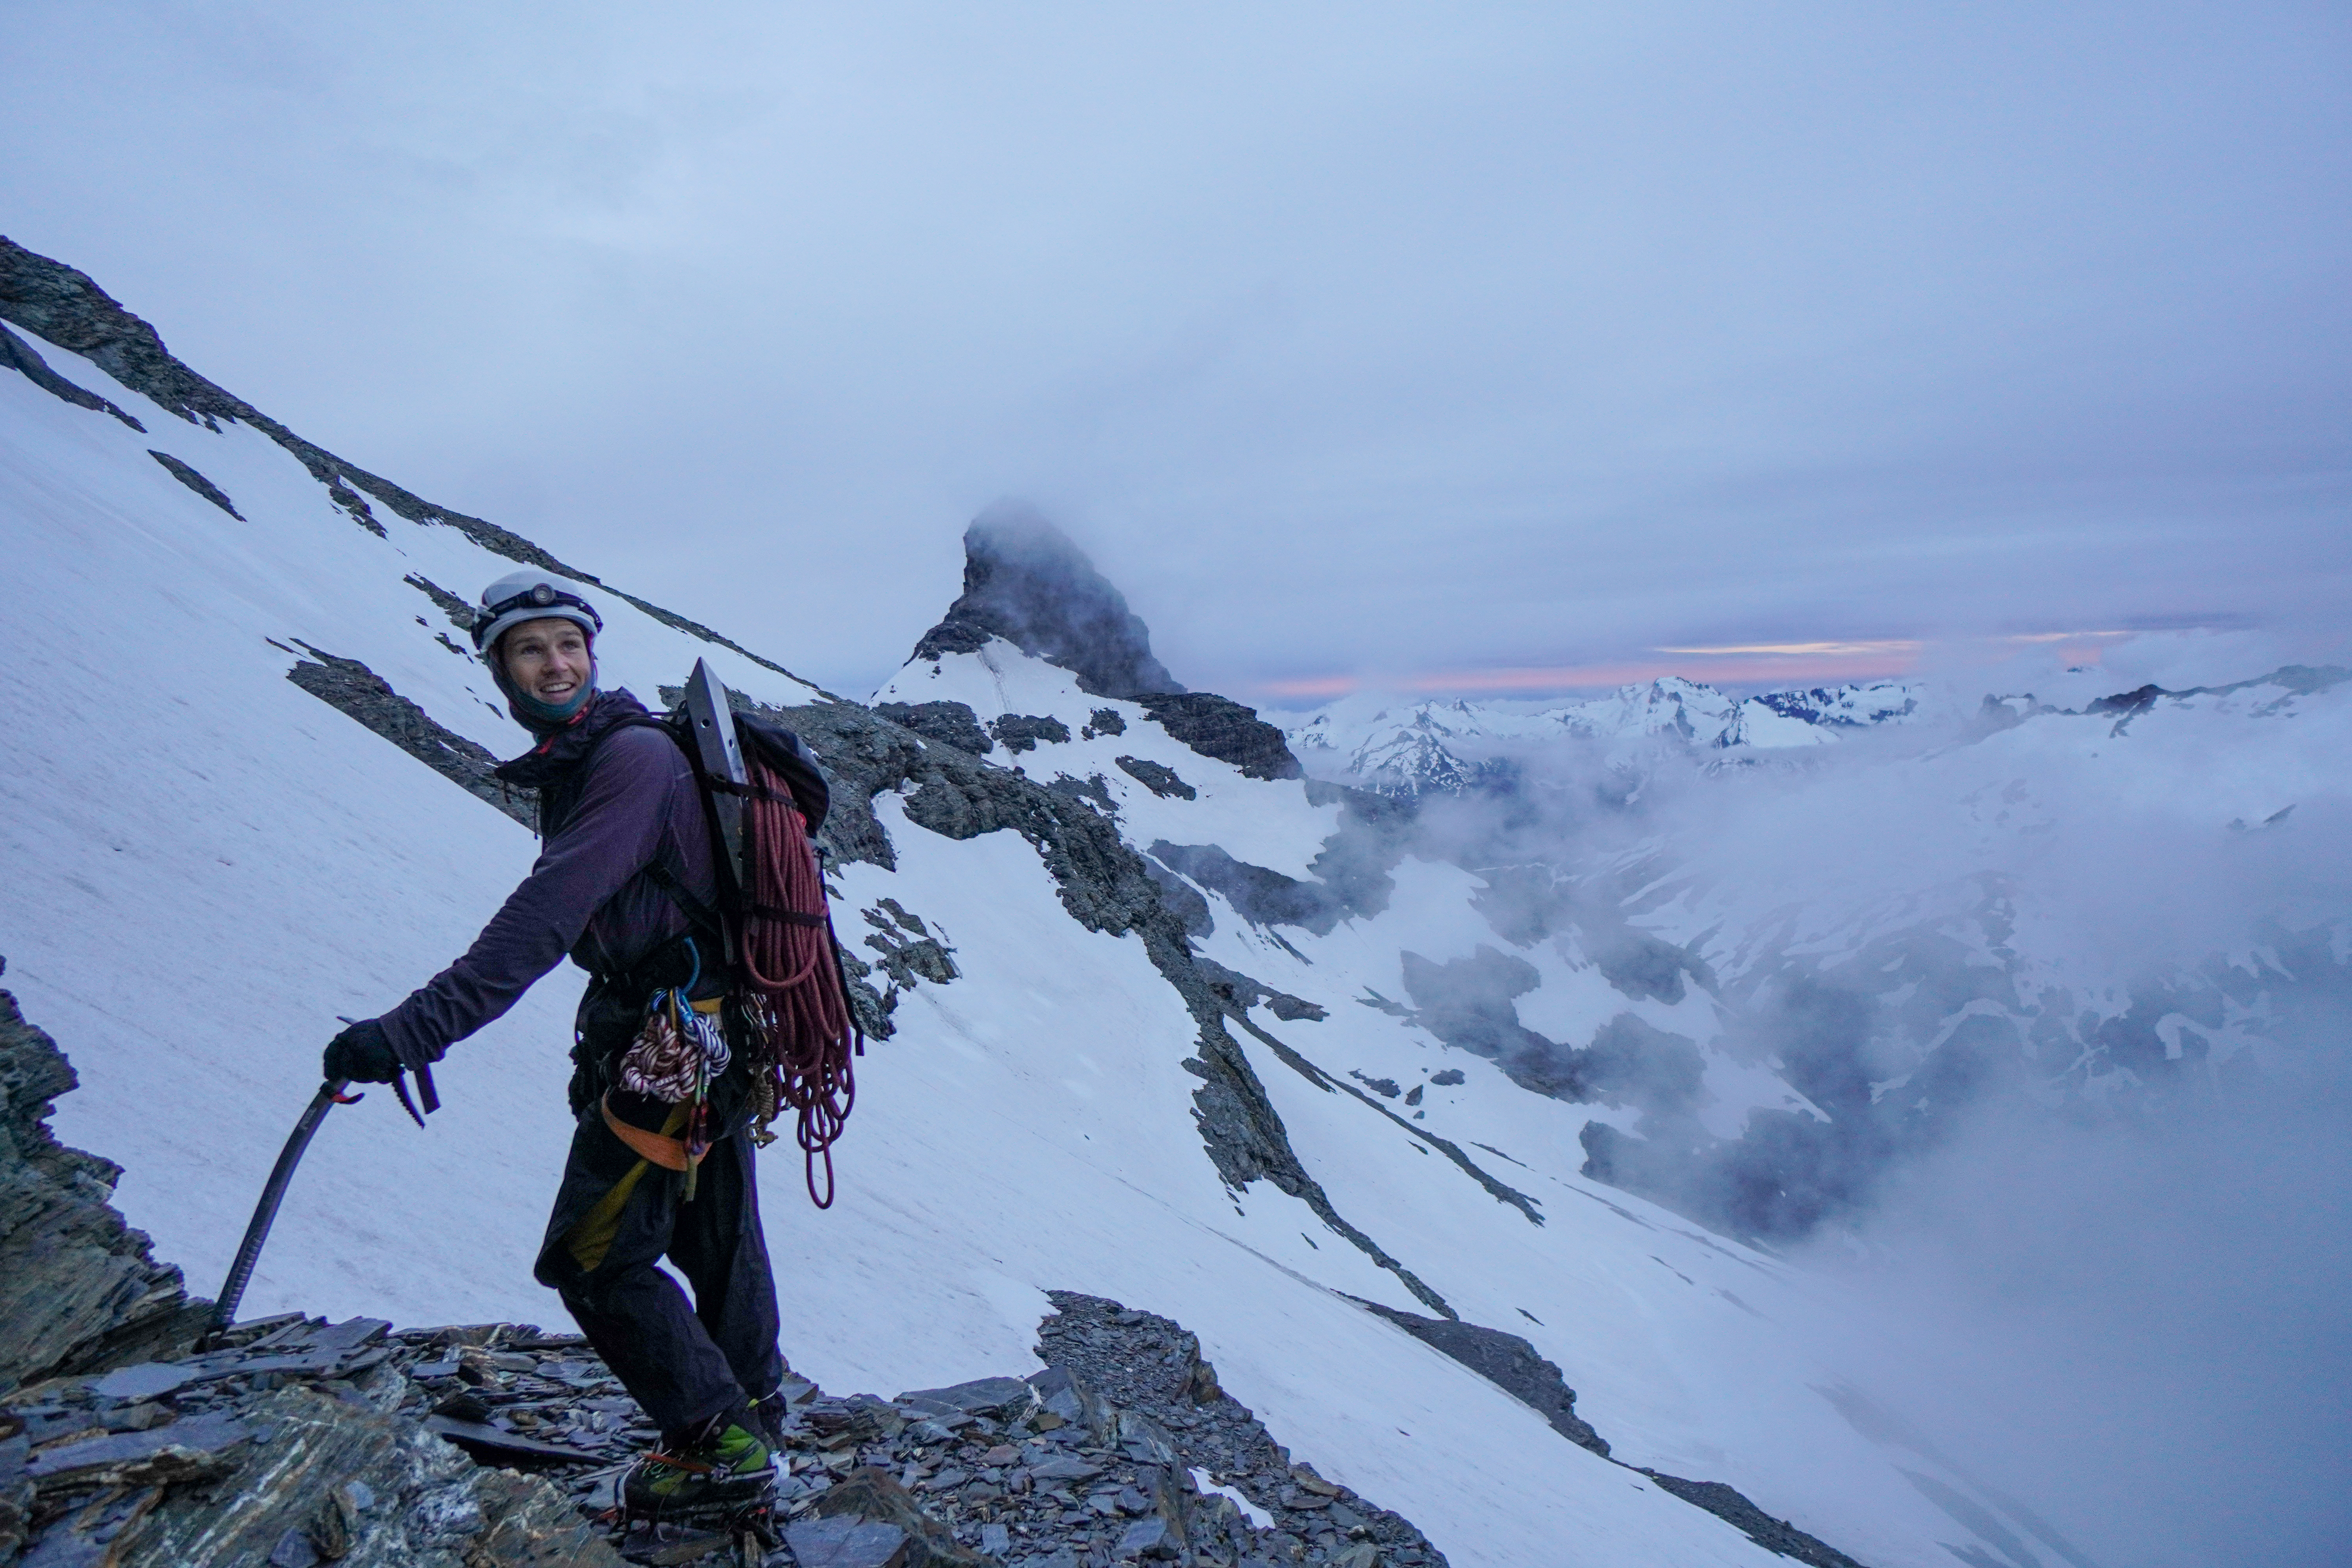
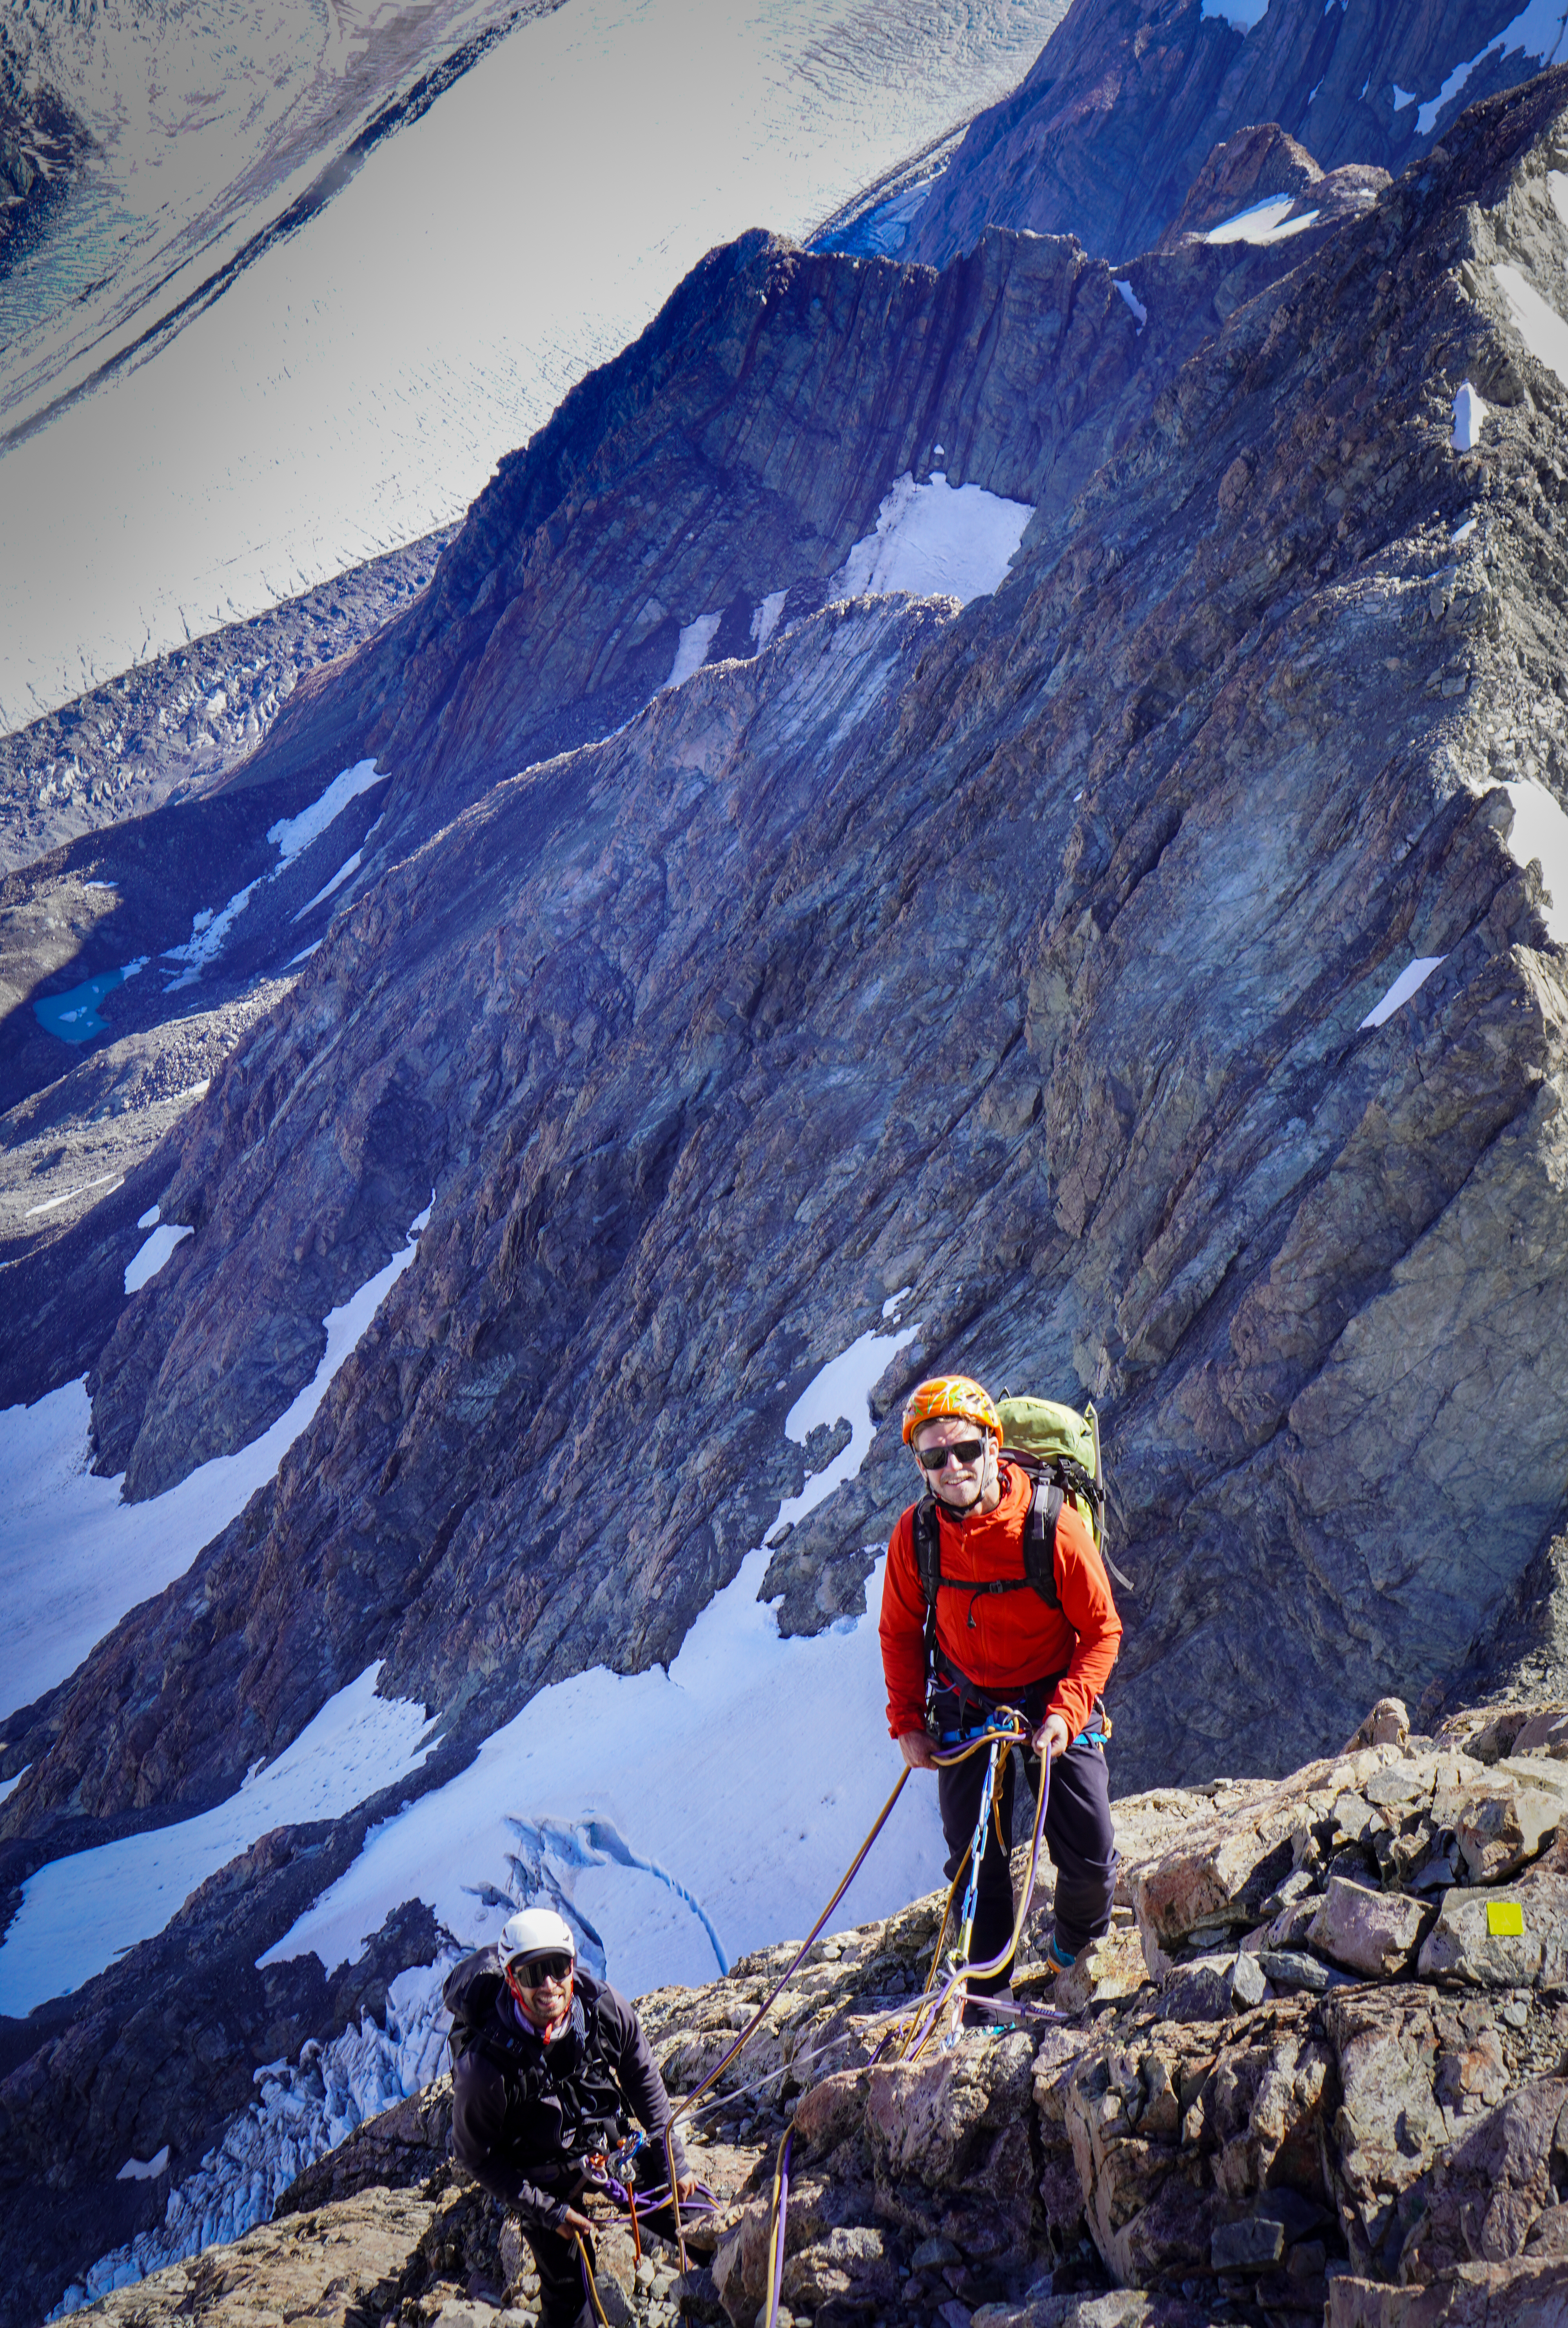
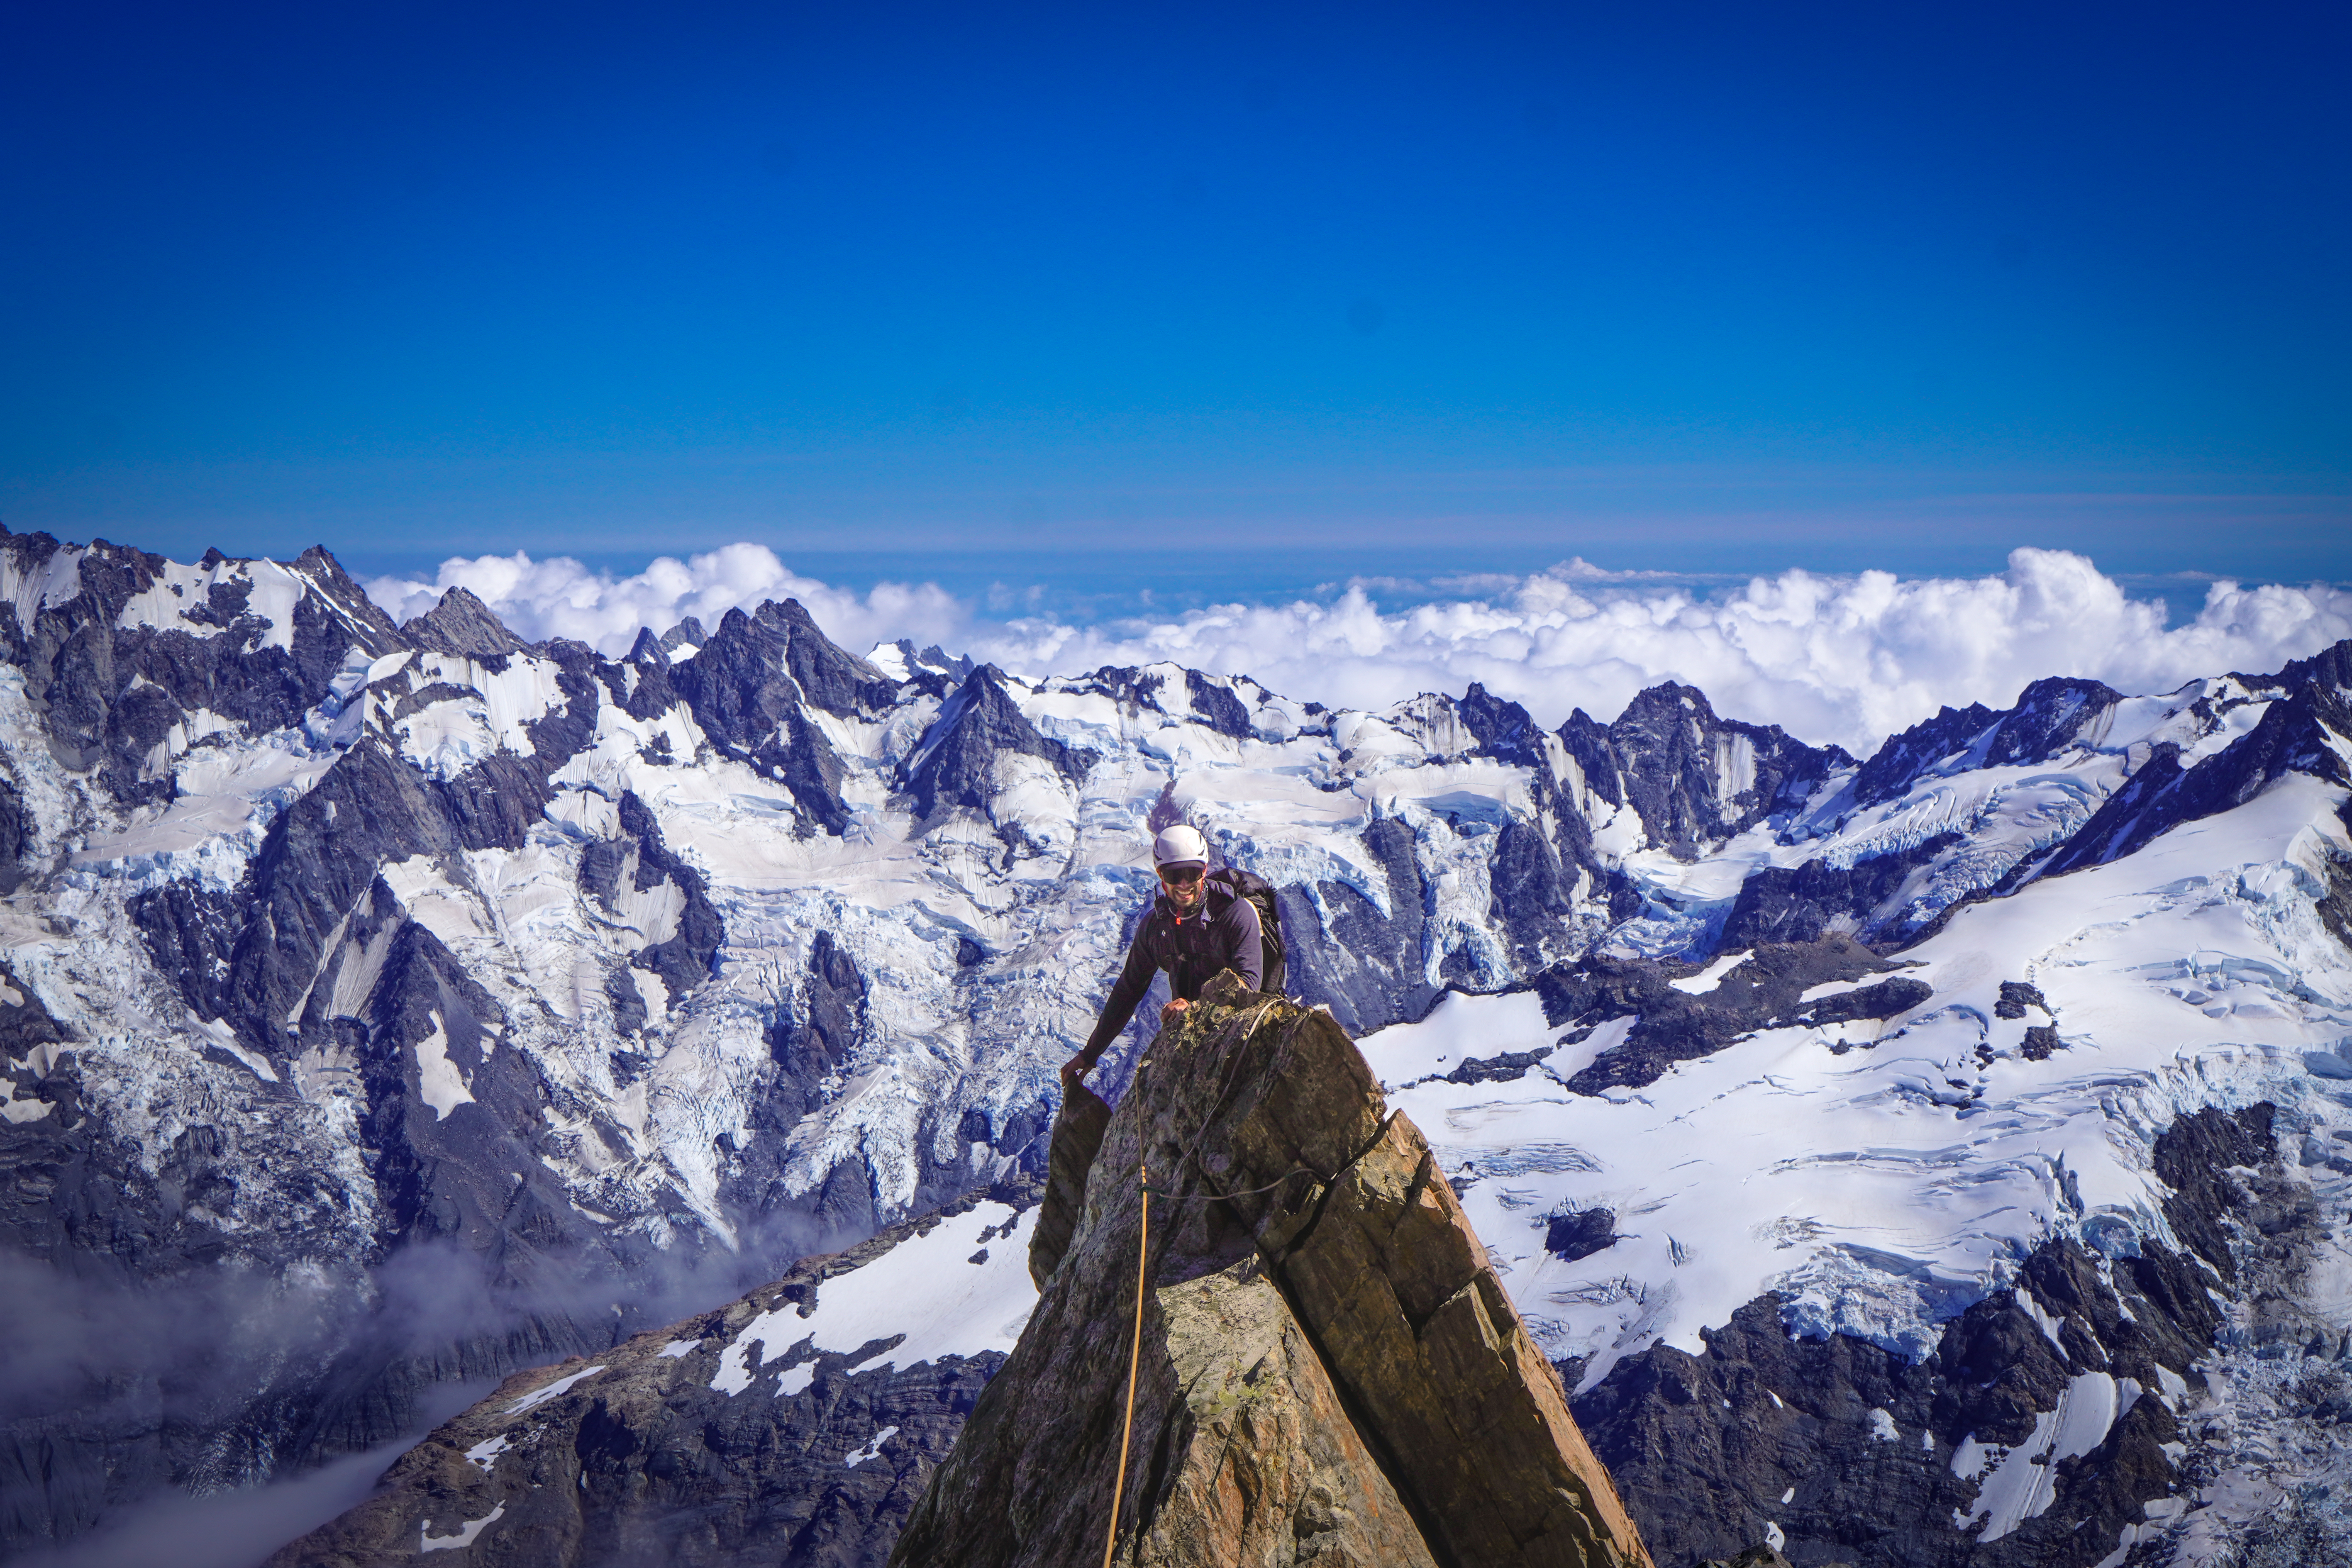
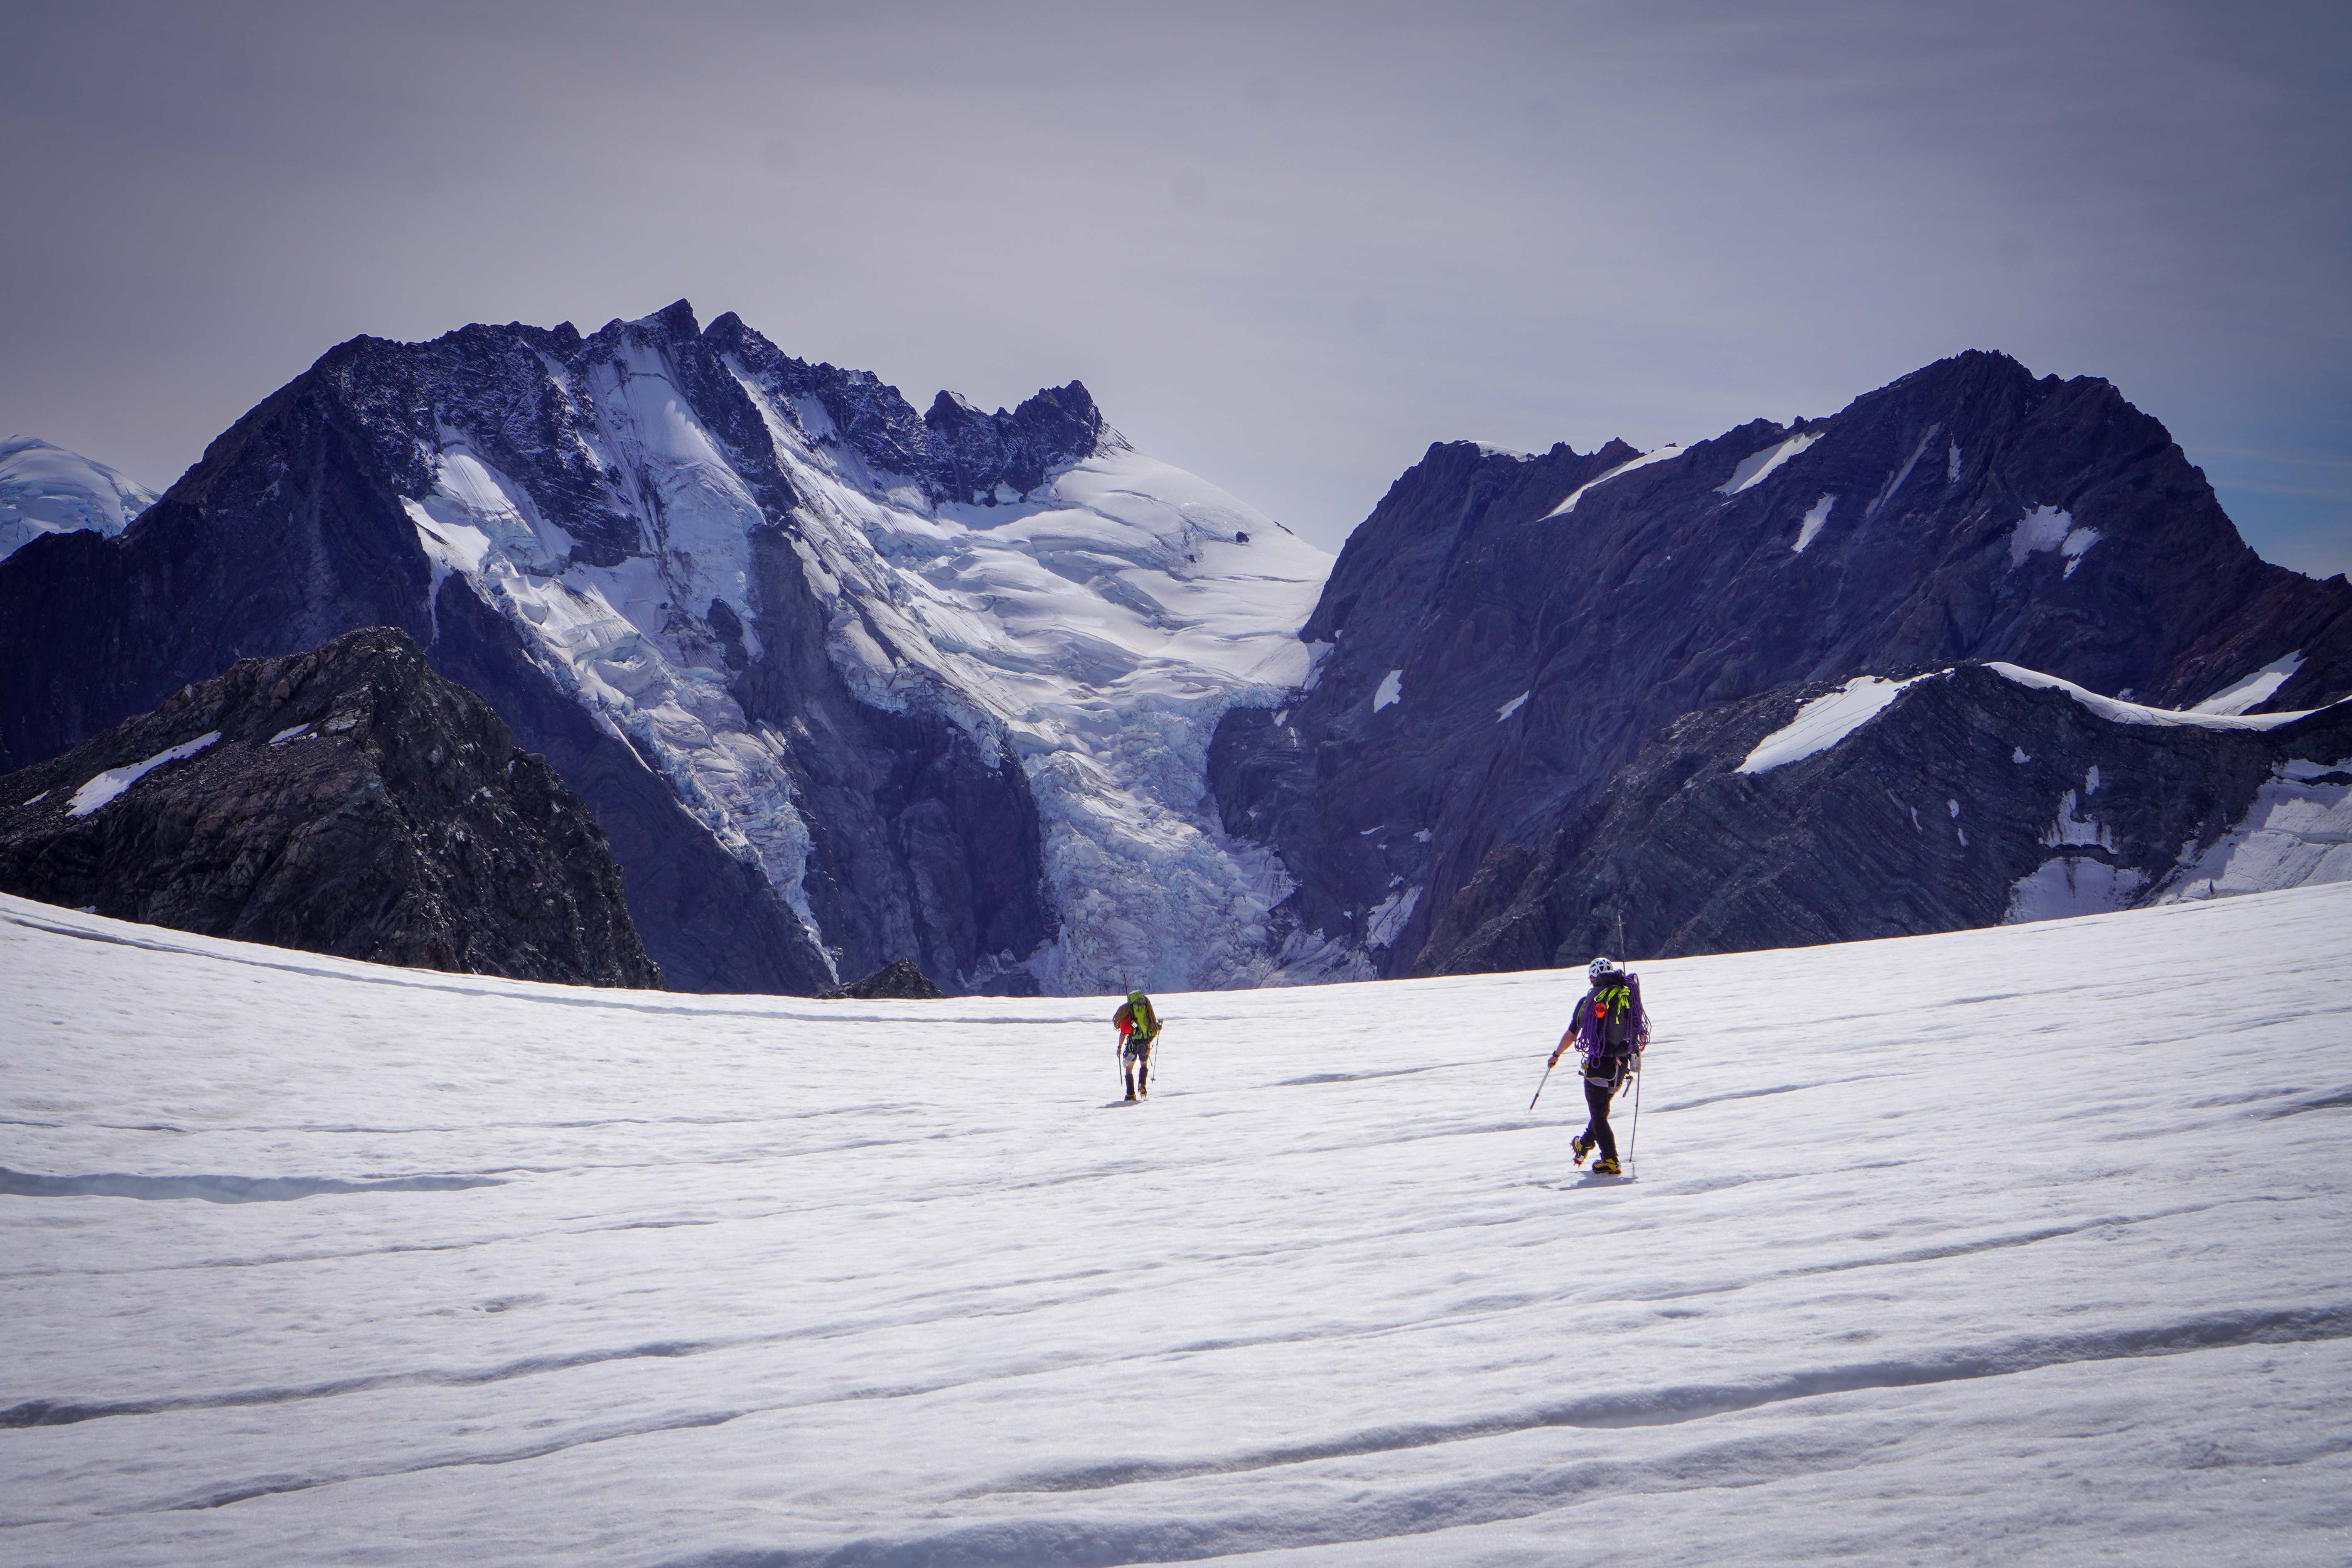
A very high quality rock route – fantastic varied climbing on solid rock basking in the afternoon sun overlooking the Fox glacier. Highly recommended.
Difficulty: Grade : II, 4+, Rock 17
Equipment: 2x 60m ropes. Double rack up to BD size 4
Approach time: on skis from Pioneer Hut around 1h to base of climb.
Climb time: 5h
Season: Late spring/summer. We climbed in November – still some snow around but route was clear.
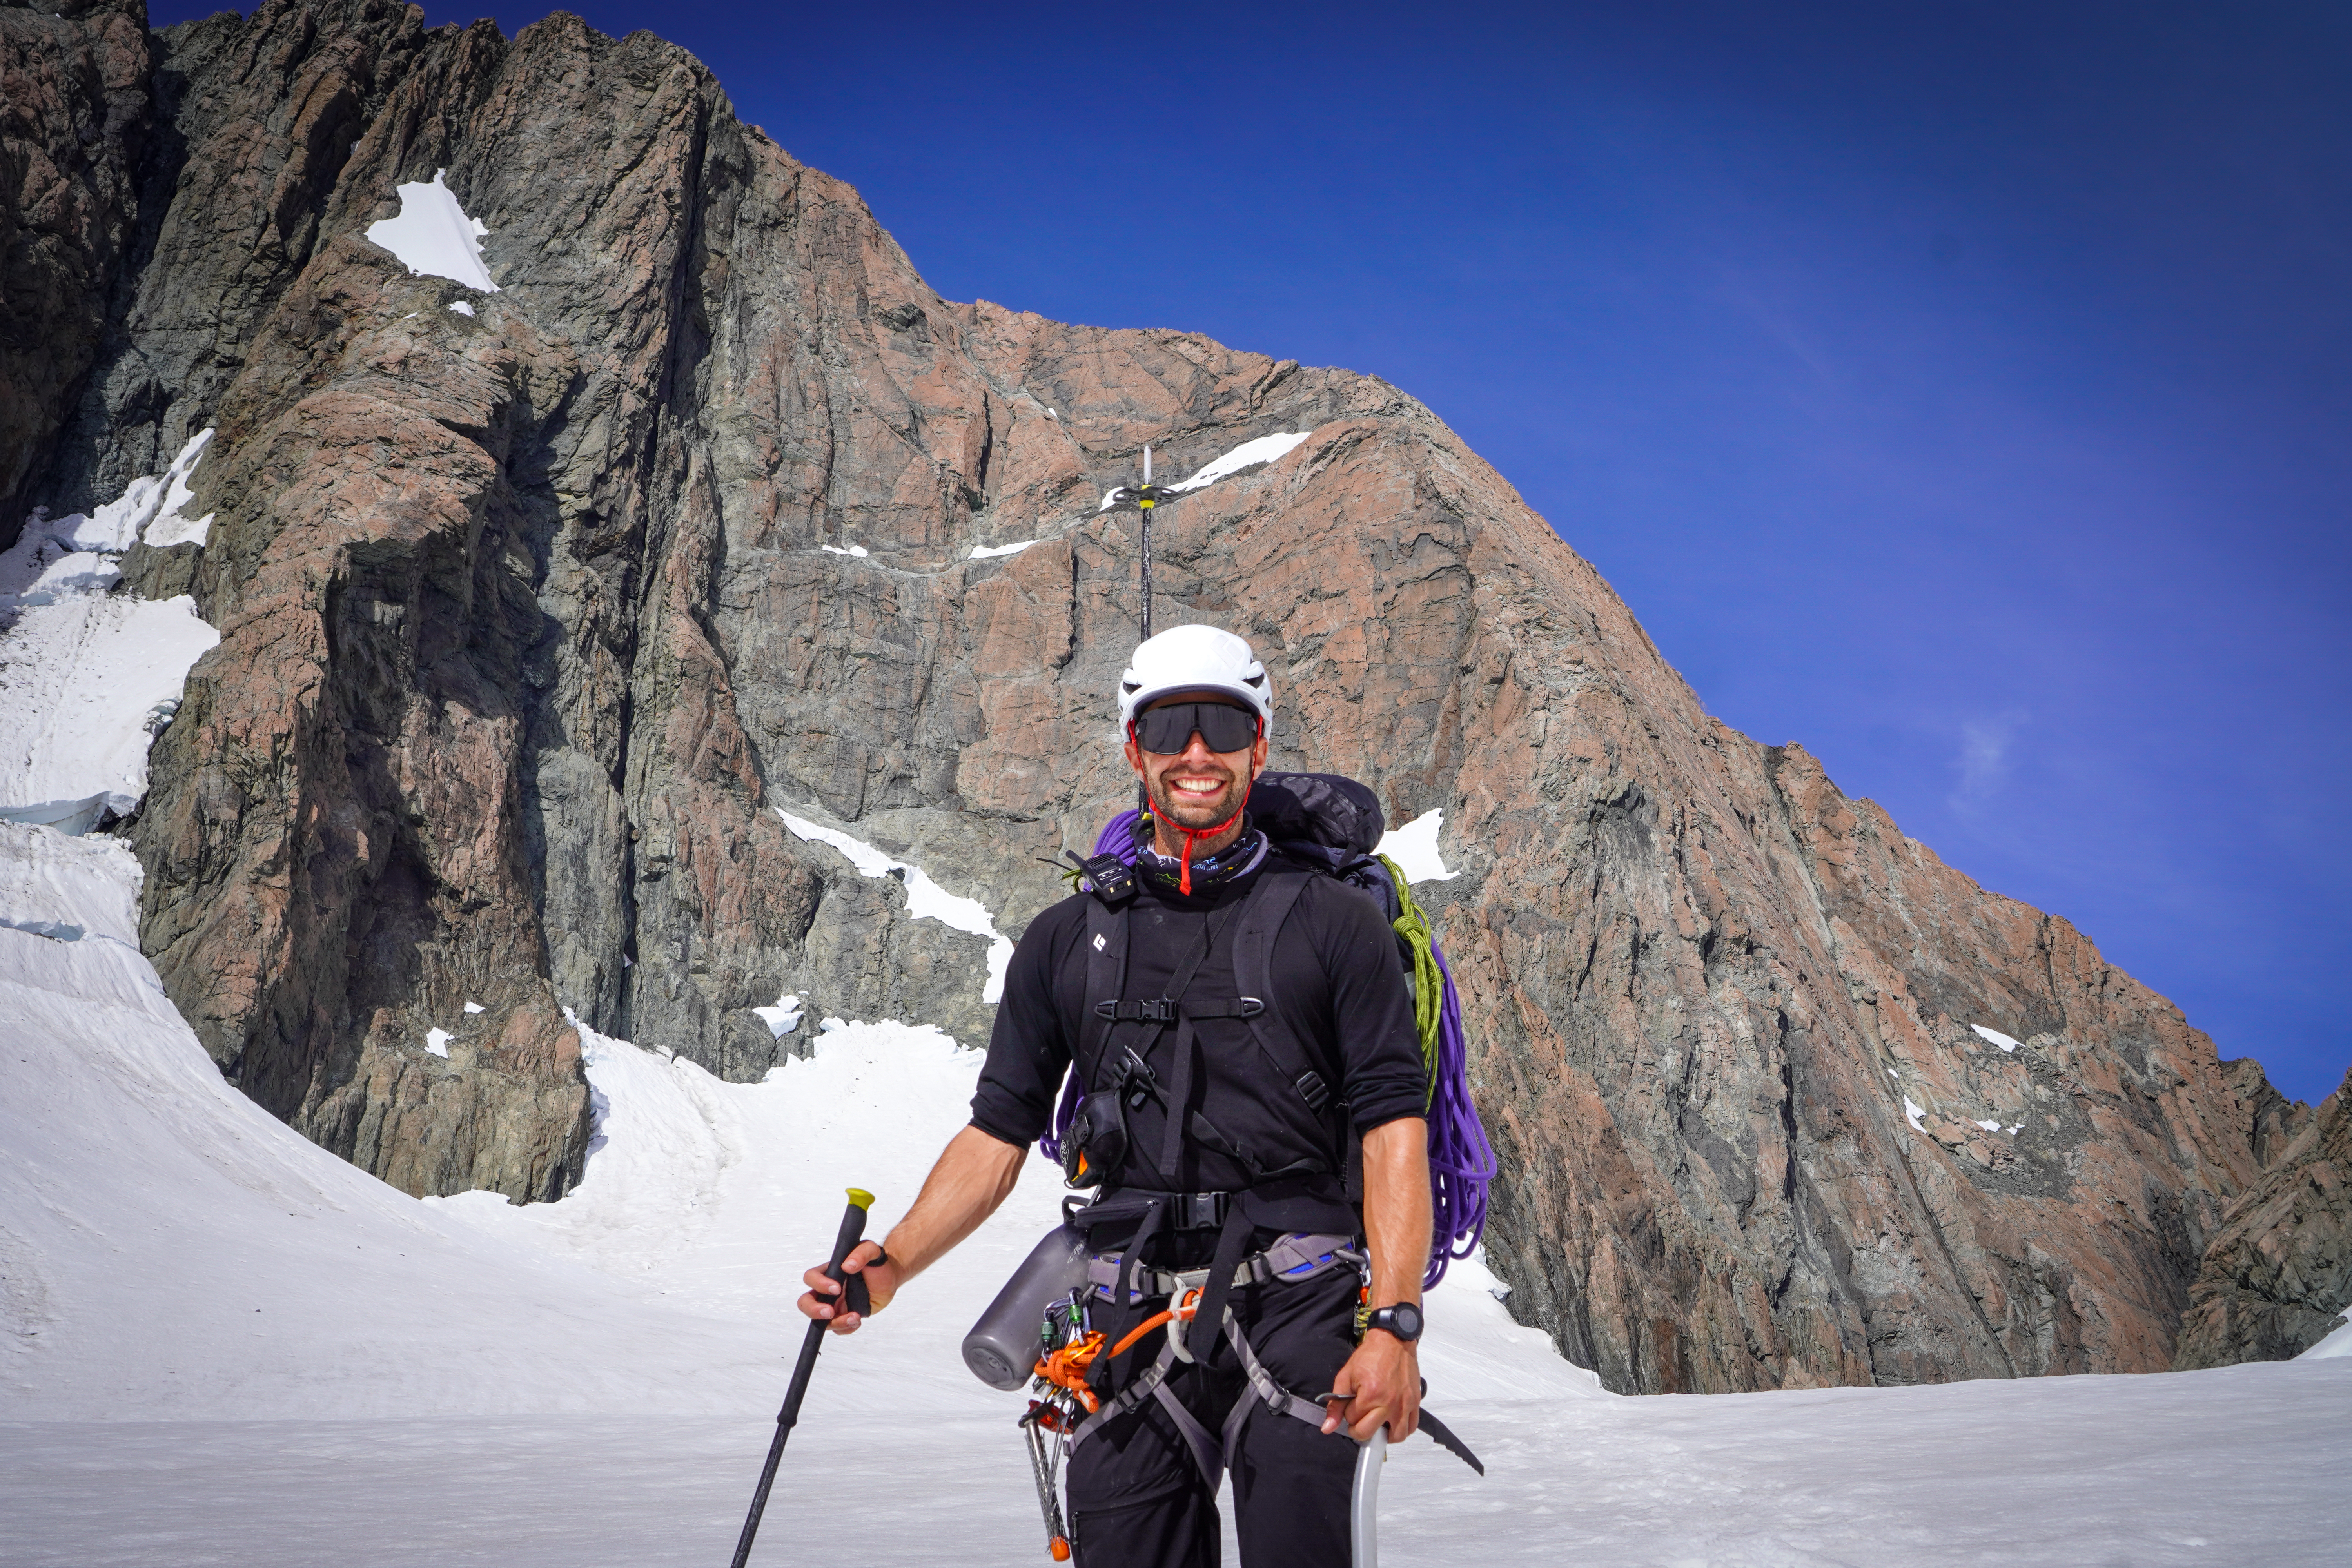
Team: Joe Collinson, Maria Koo 12/11/2024
Climb
Length : 300m (as stated on thecrag.com; we make it out to be just shy of this probably because of the snow line being high when we climbed it)
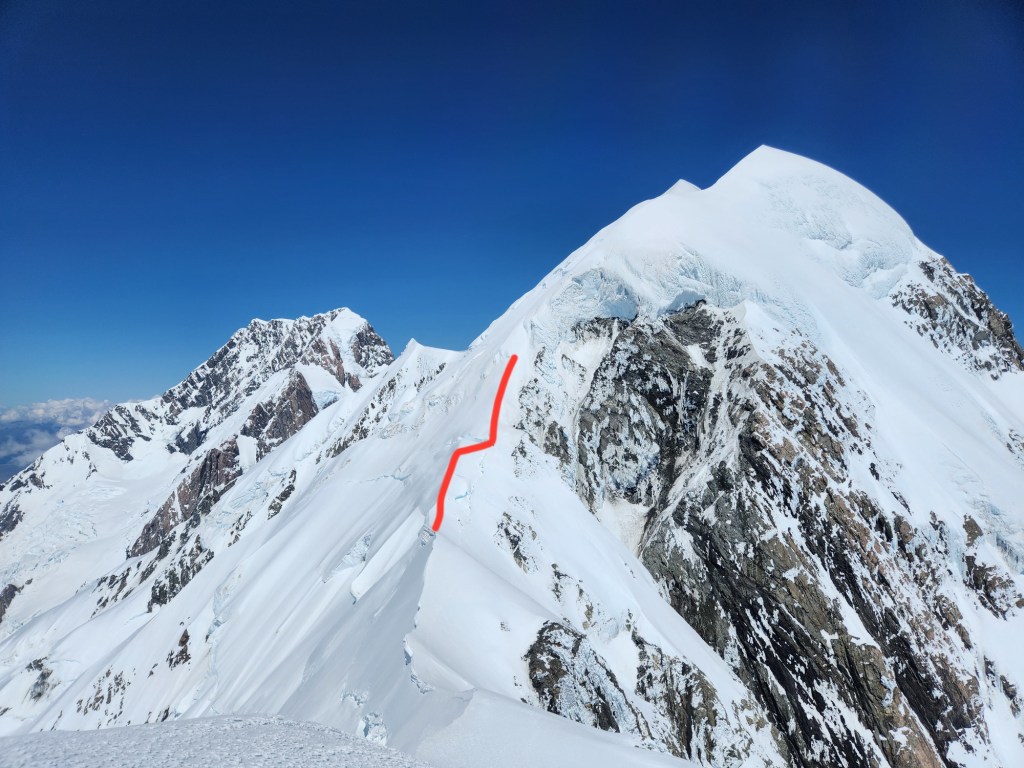
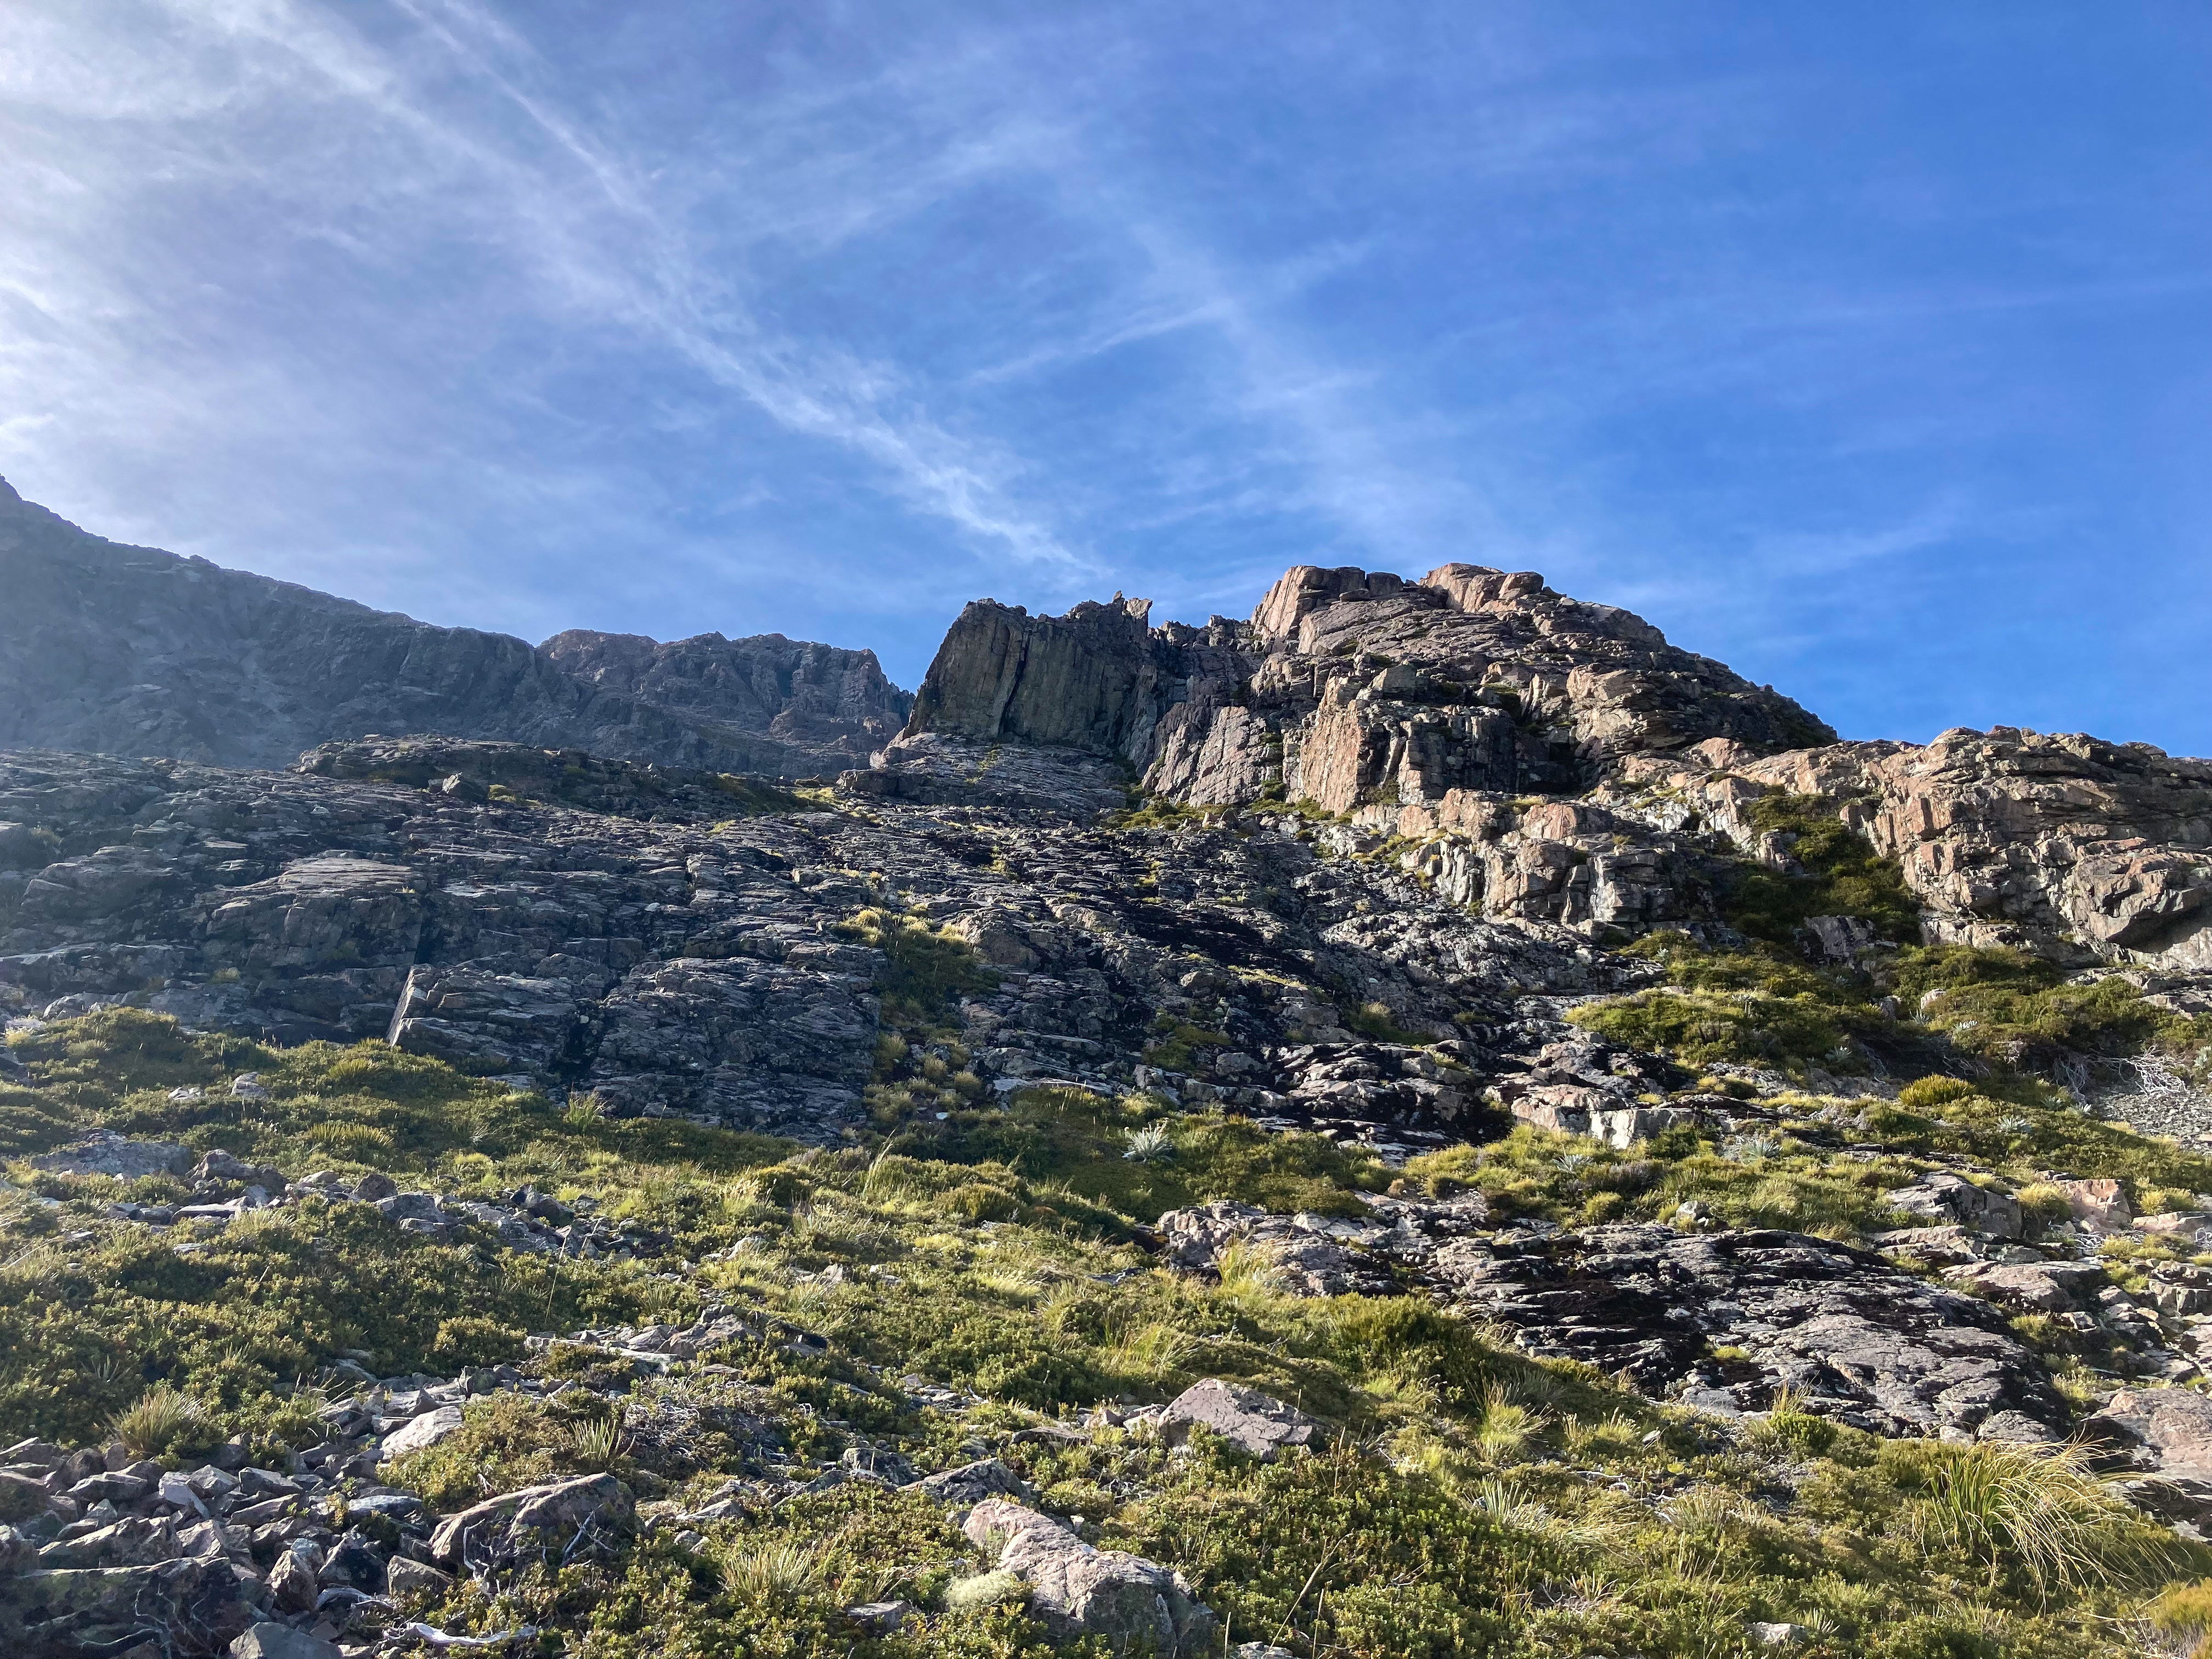
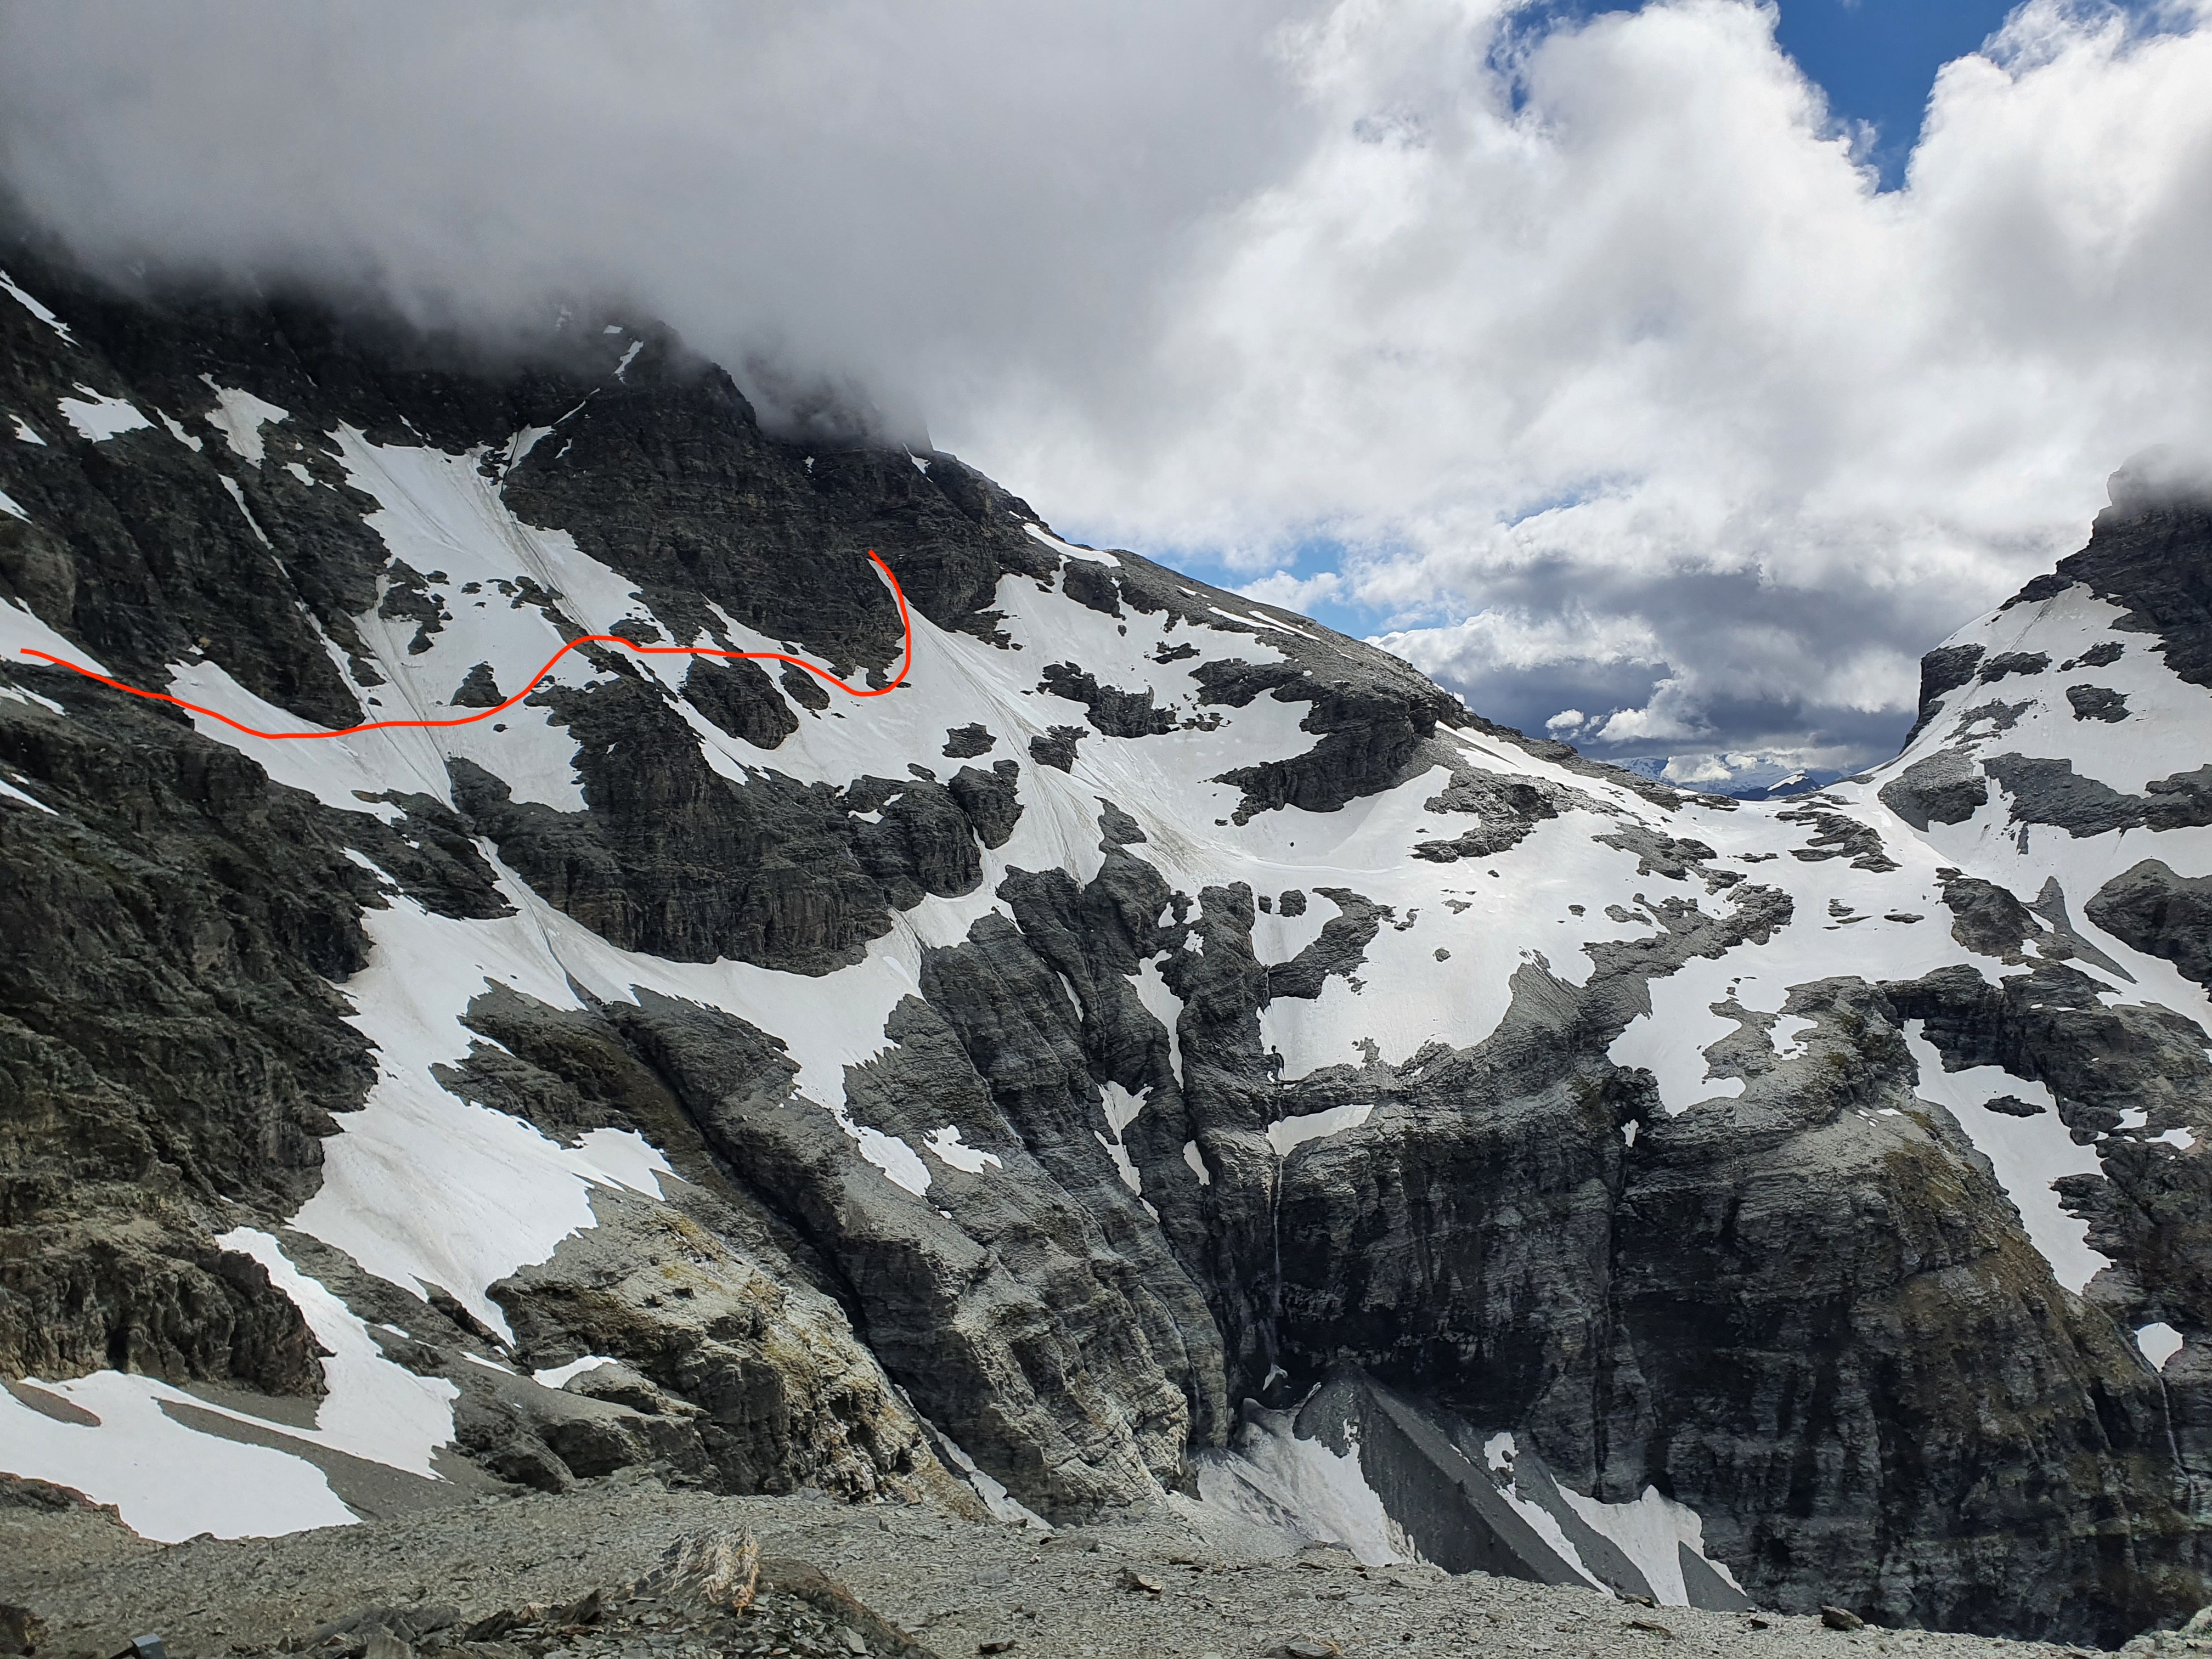
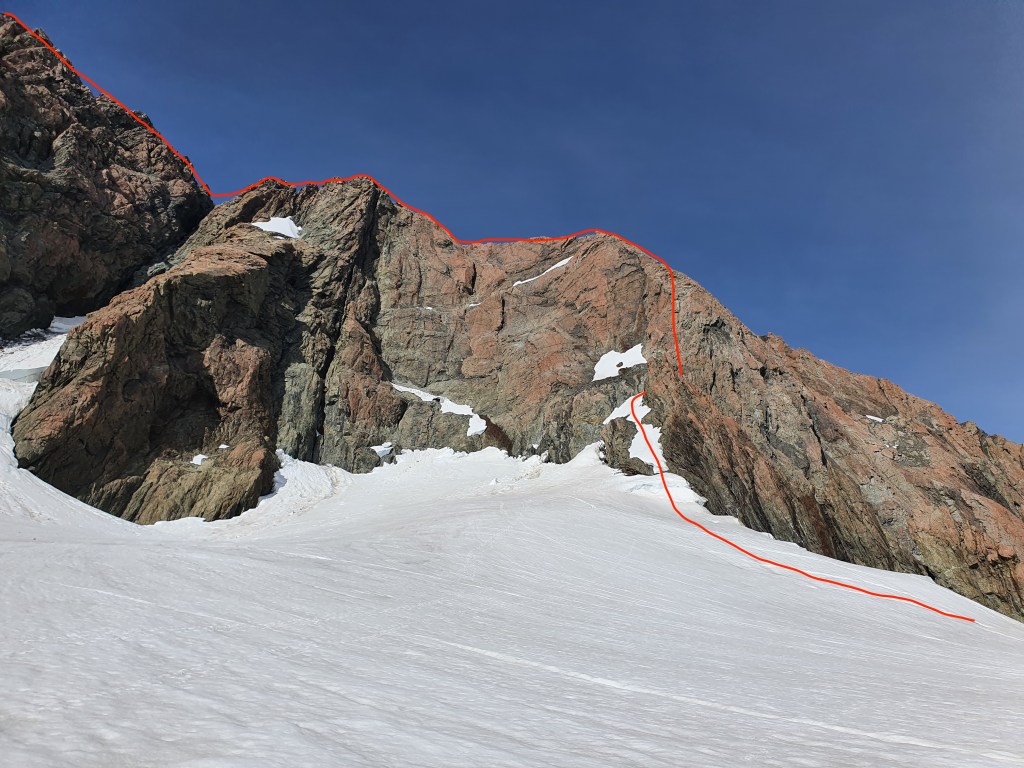
There are 3 prominent peaks on Haast – Sun Circle is on the 3rd one on looker’s right. We climbed early season so could walk up the centre of the gully to the main face – topo shows some traversing required to do this late season.
Pitch 1 Access to the main face – was easier for us as it was so early season the snow leads right up to the small rock the meets the main face where the obvious schrund is. Some scrambling up the small block to the rap tat marking the proper start of the route. From the topo this is more involved later in season and involves some traversing from out right. 15m, grade 11.
Short 1st pitch; 2nd pitch trends left at base of route proper
Pitch 2 On the main face there are a number of obvious crack systems that trend up and left all the way to the ridge, just left of a large obvious grey block on the top of the ridge. Some rap tat is on the rock at the bottom marking the start of the route proper. We followed the obvious line of weakness trending up and left which tops out at the ridge about 20m left of the big grey block. V good gear and solid rock. Small gear required to make anchor on the ridge (we used 3x microcams, no obvious block to sling. Around 40m, grade 15.
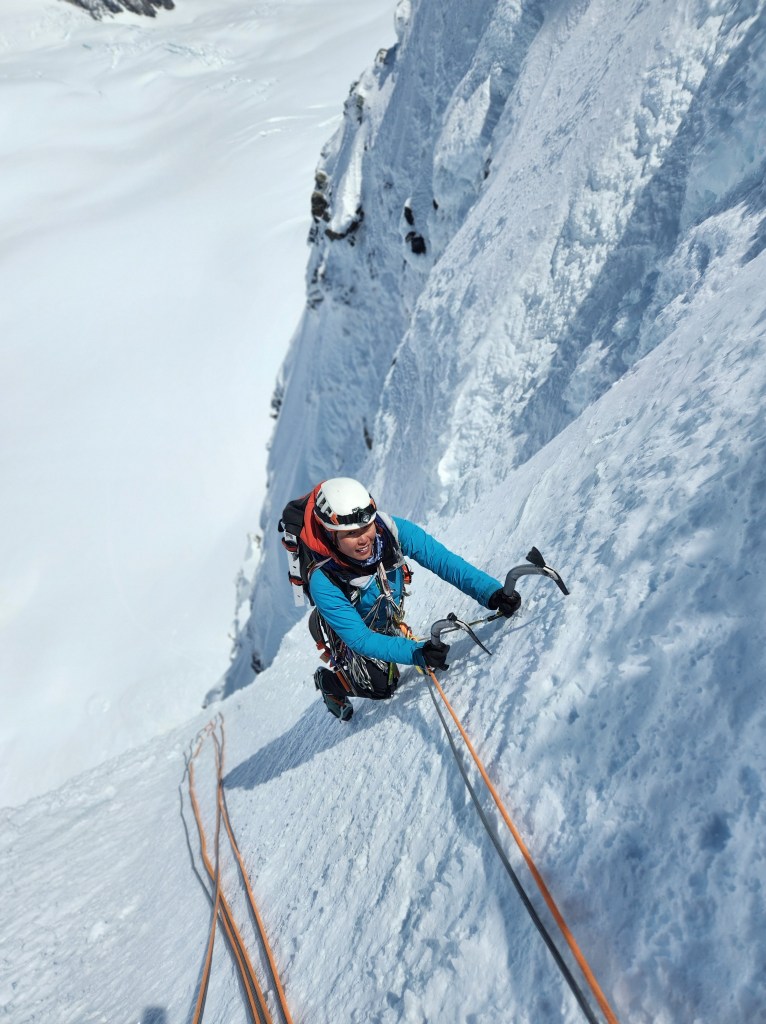
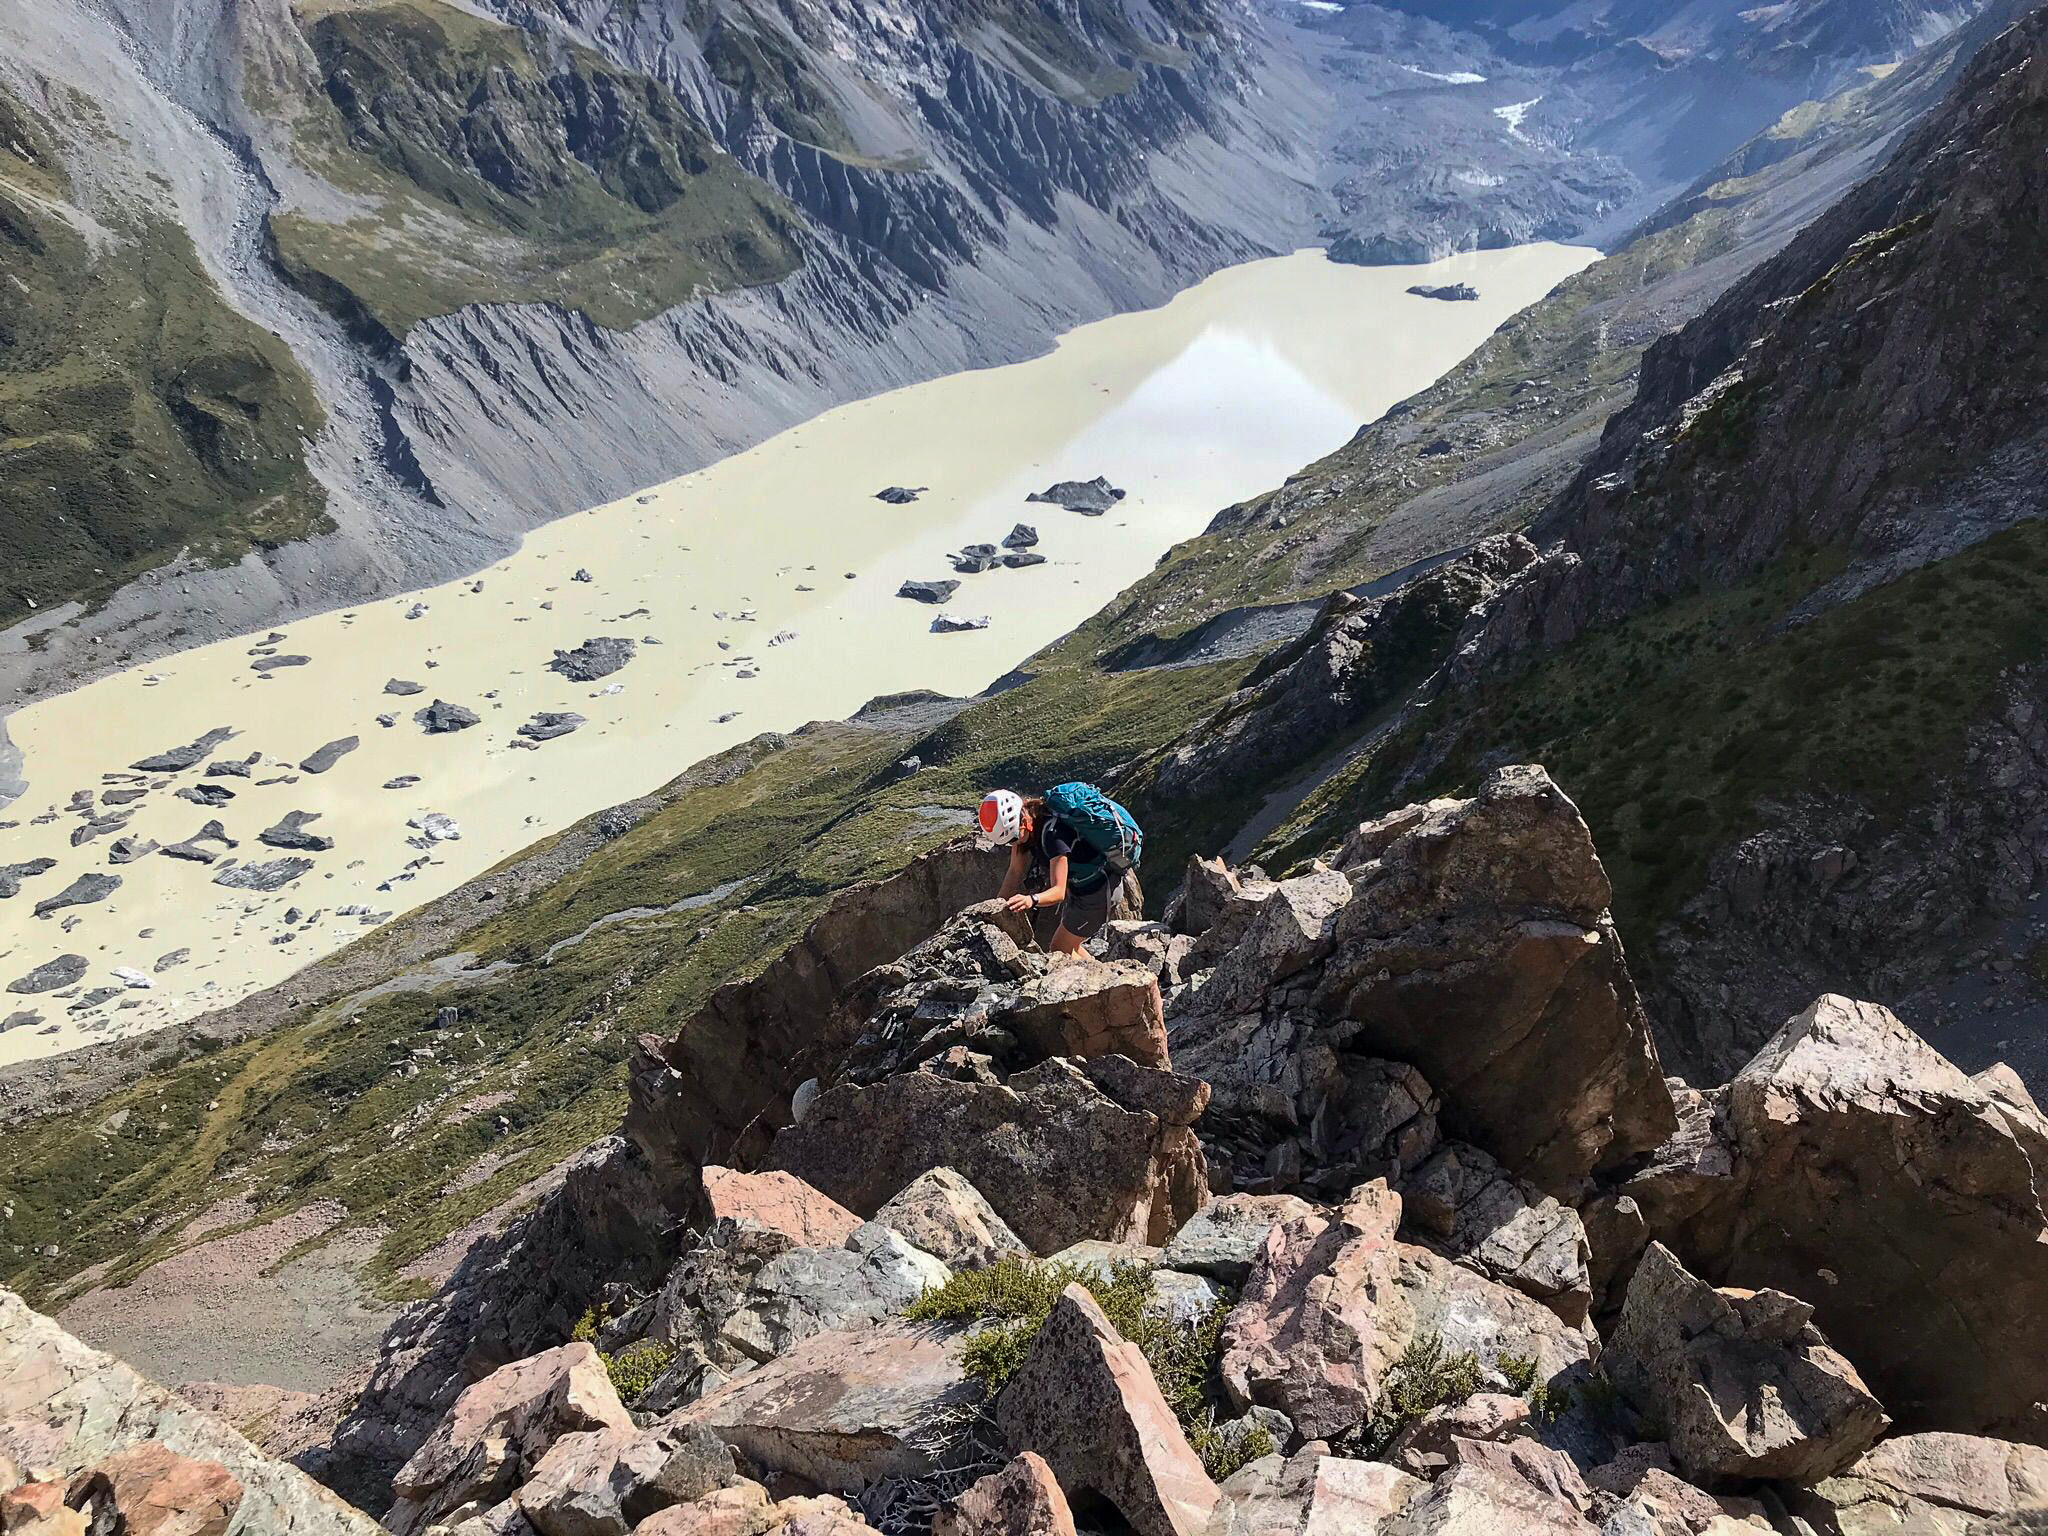
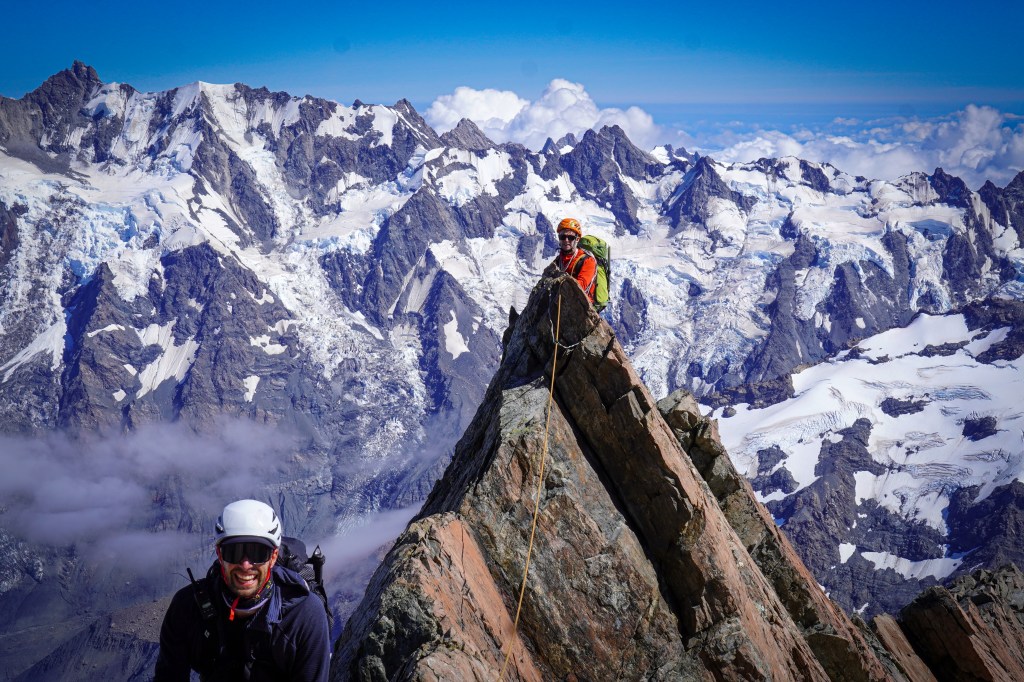
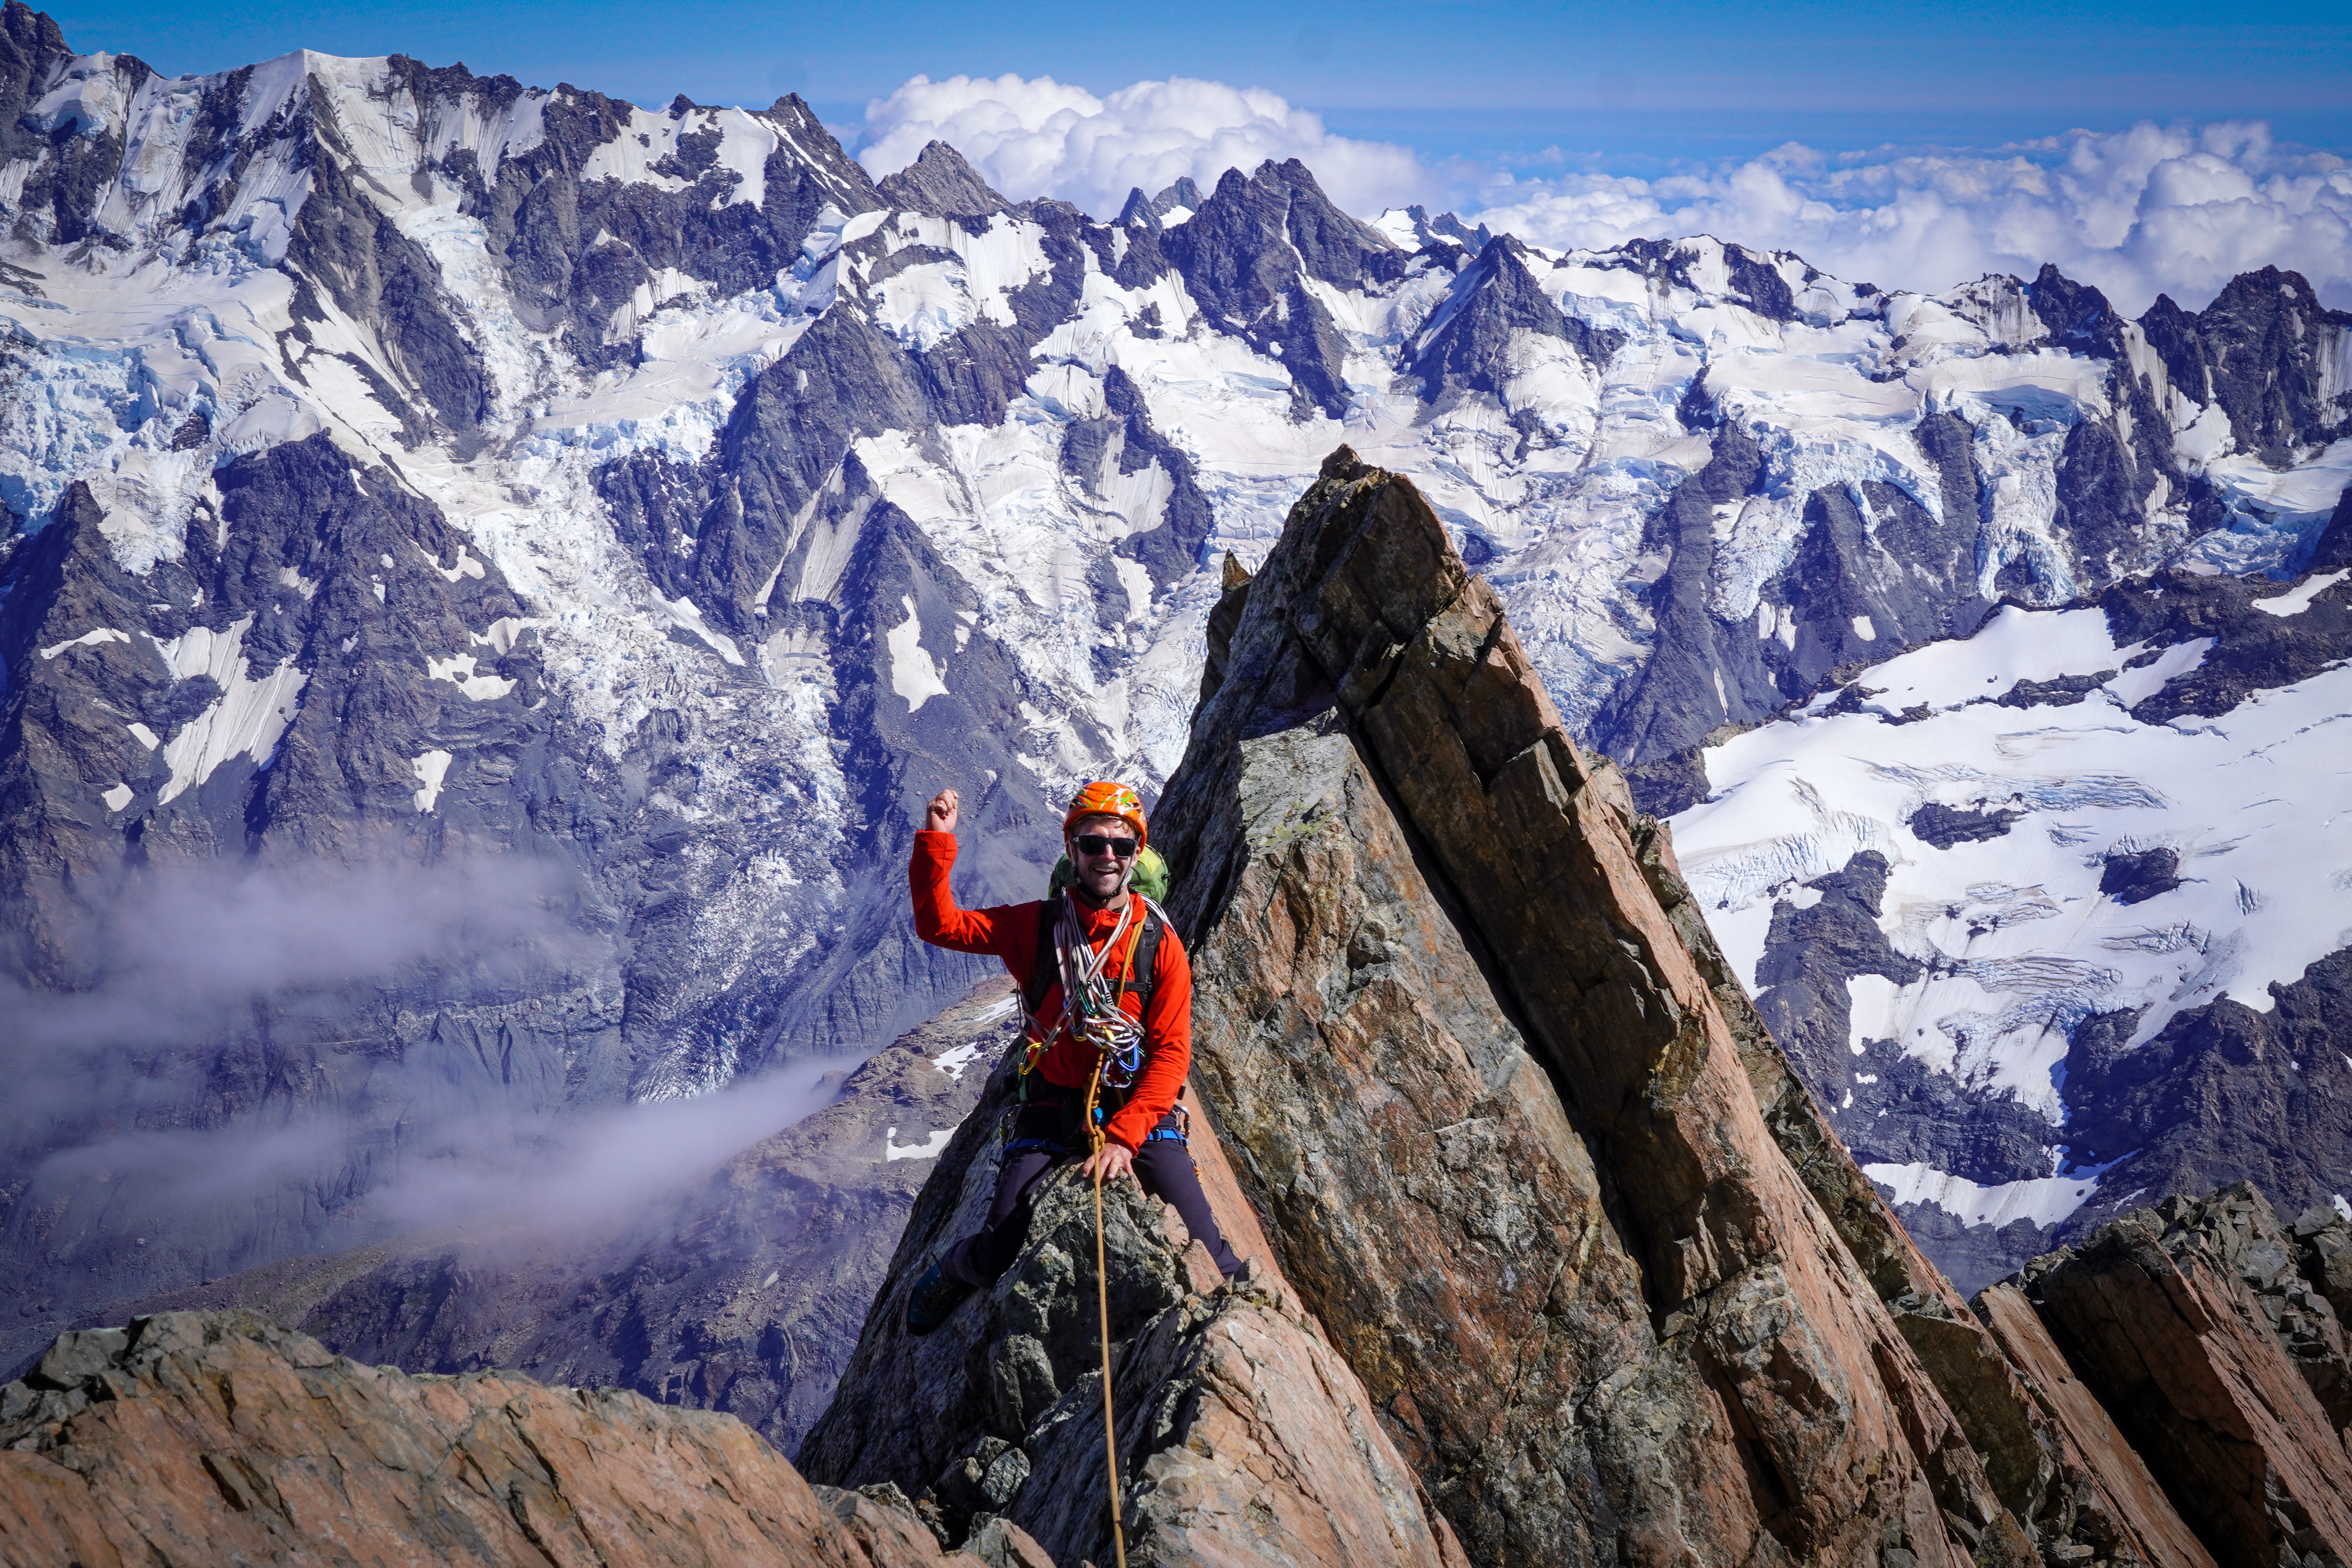
Pitch 3 Traversed along the ridge, some balancey moves with great exposure staying on the face to get past the block. Once you’re round the block, the going gets easier – keep going until you reach a large ledge which runs diagonally across the buttress. Large flake / spike belay here. 50m, Grade 17
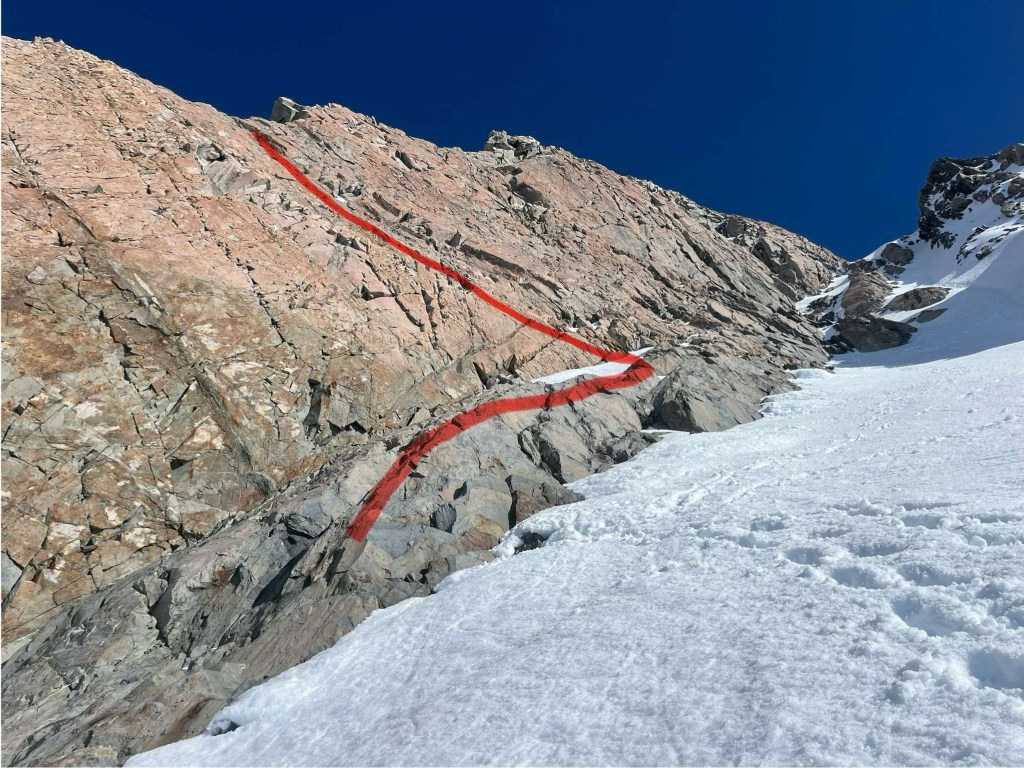
Pitch 4 Stay low/step right from the flake and follow the crack / ledge up and right. Looking above you you can see the amazing parallel cracks that lead towards a roof with lots of large grey blocks. We aimed for the right hand side of this. Some cool moves traversing some flakes / cracks. We built an anchor just where the rock turns grey and the parallel splitters start as was running out of gear. For full value link this and the first half of the next pitch finishing at the rap tat. 50m, Grade 16
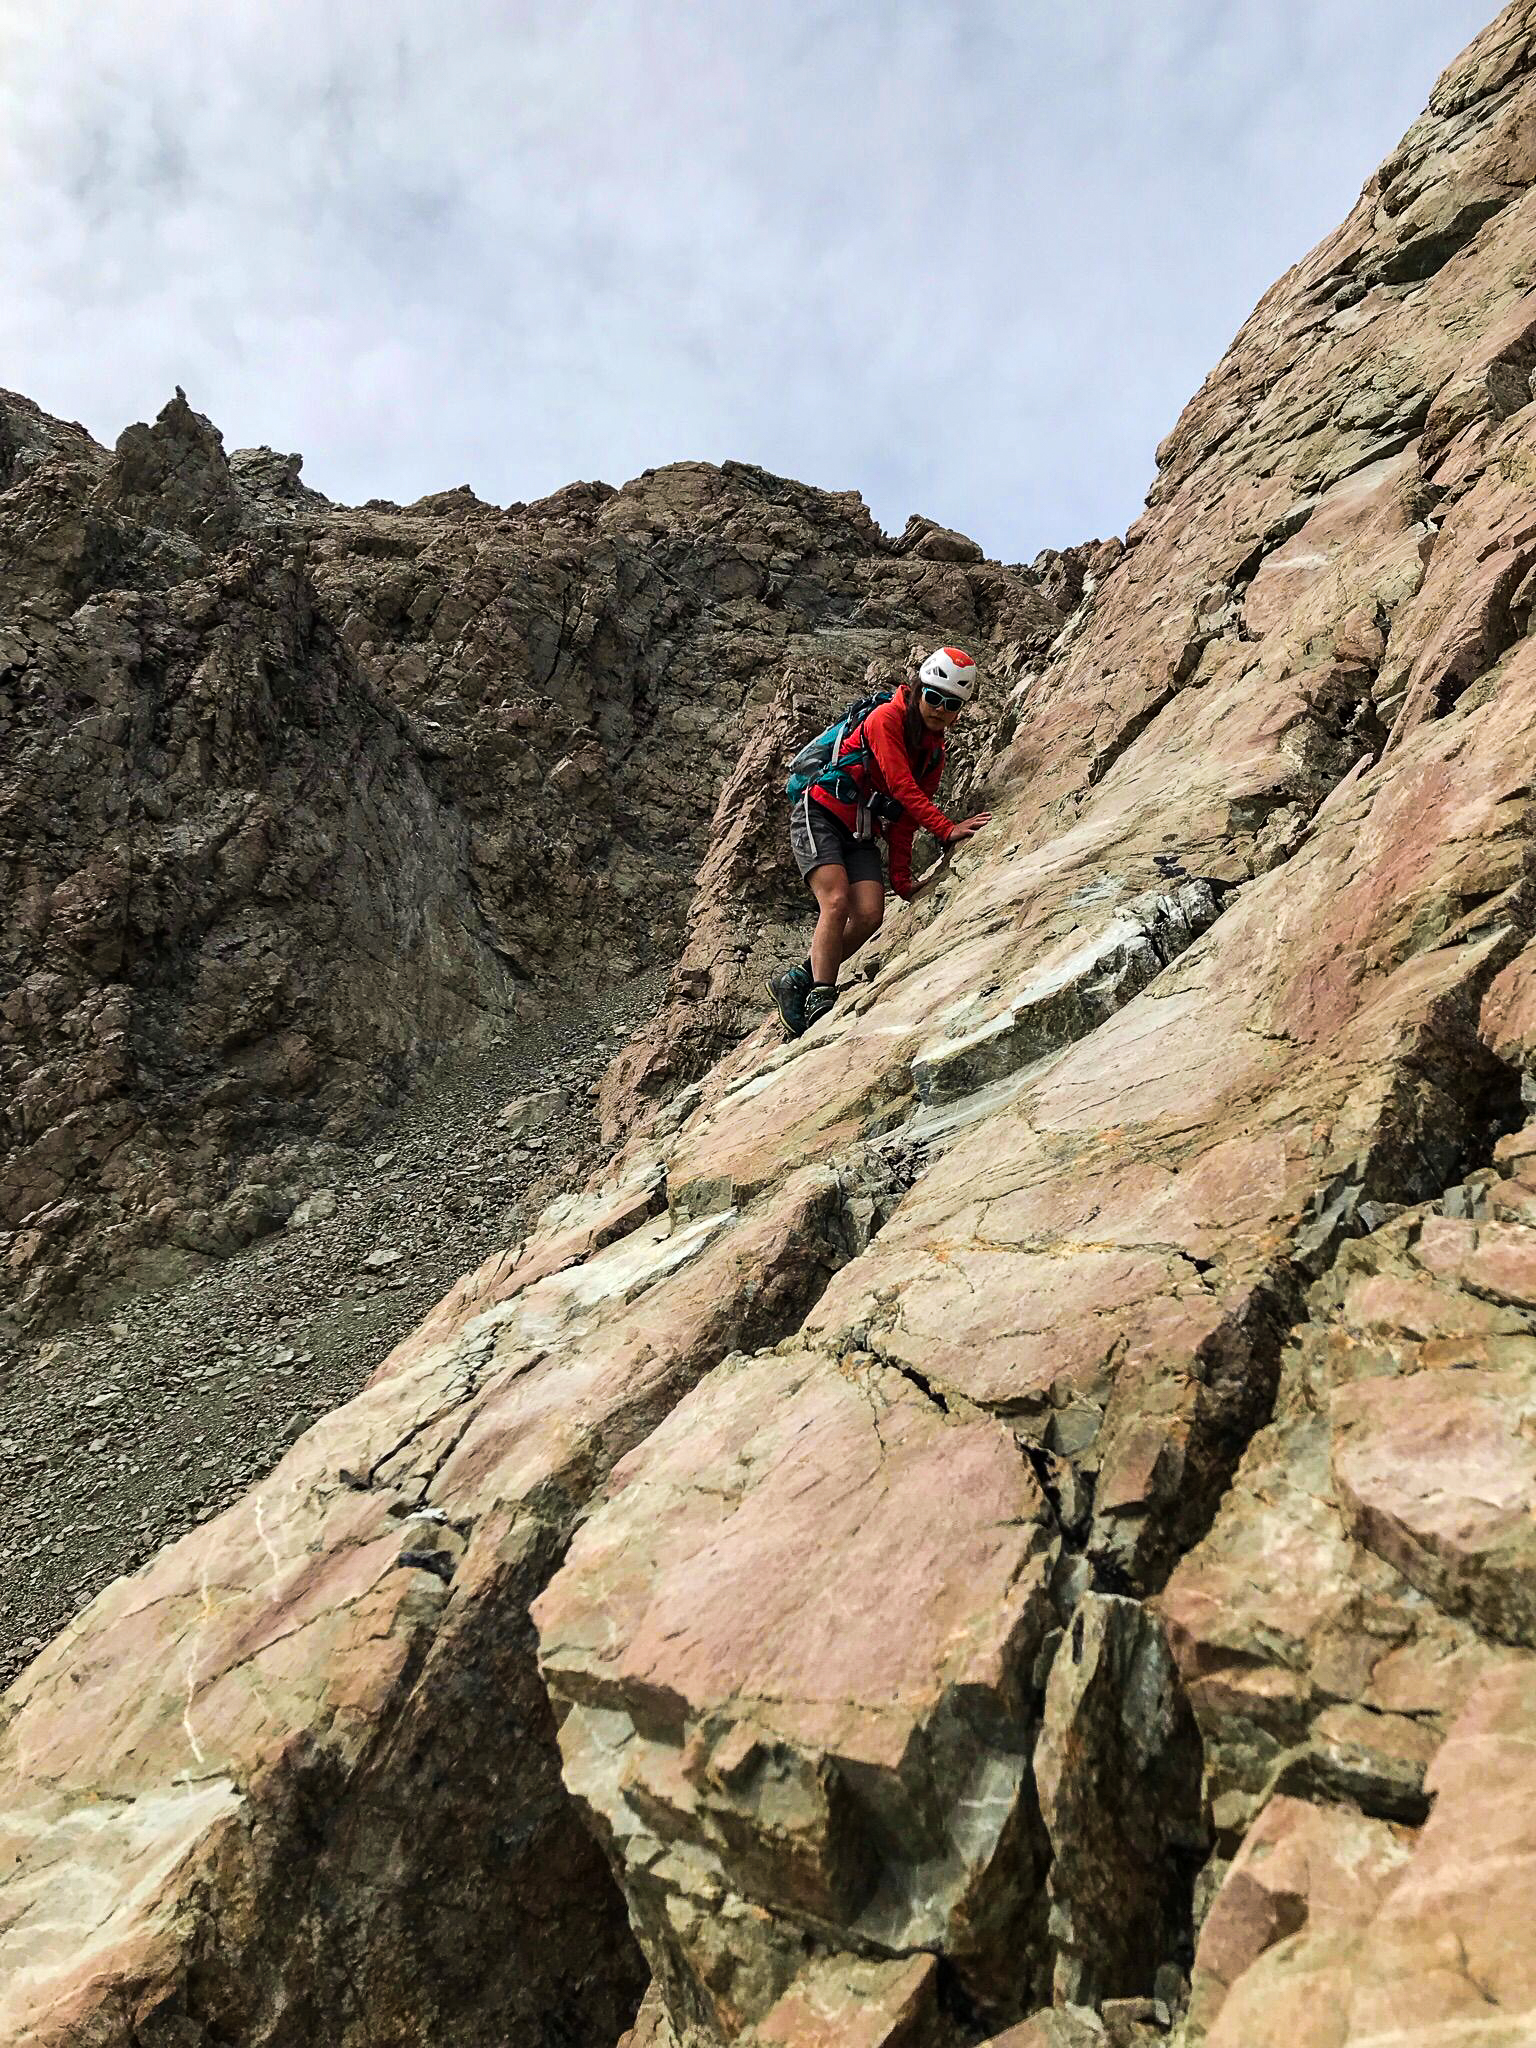
Pitch 5 Phenomenal climbing up finger cracks, stepping round a square block and then trending right around the corner just to the left of the large orange block at the corner. This puts you on a ledge with a bunch of rap tat for the descent. But its a bit too soon to build an anchor here – turn left and head up the face until the drag gets too much. 50m, Grade 17
Pitch 6 Trend up and right to the summit. Another amazing fist crack that trends right up to a roof feature of a few overhanging blocks. Easiest to get through on the right, onto flatter ground with a load of large loose blocks. Spike belay from which we rapped. 60m, Grade 15
descent
Real risk of getting ropes stuck – lots of blocks and cracks and not vertical ground so be very careful. Rap back down to the tat you passed on pitch 4. We got our rope stuck pulling on this first rap but thankfully only 10m above the anchor so had enough rope to lead back up to it and free it. From here there’s a steep gully down to the left which is pretty clean (and was full of snow when we were there) which we rapped down and put us back to the snow about 80m above the start of the route. Some good spikes here to rap down the snow gully back to the start of the route / your gear.
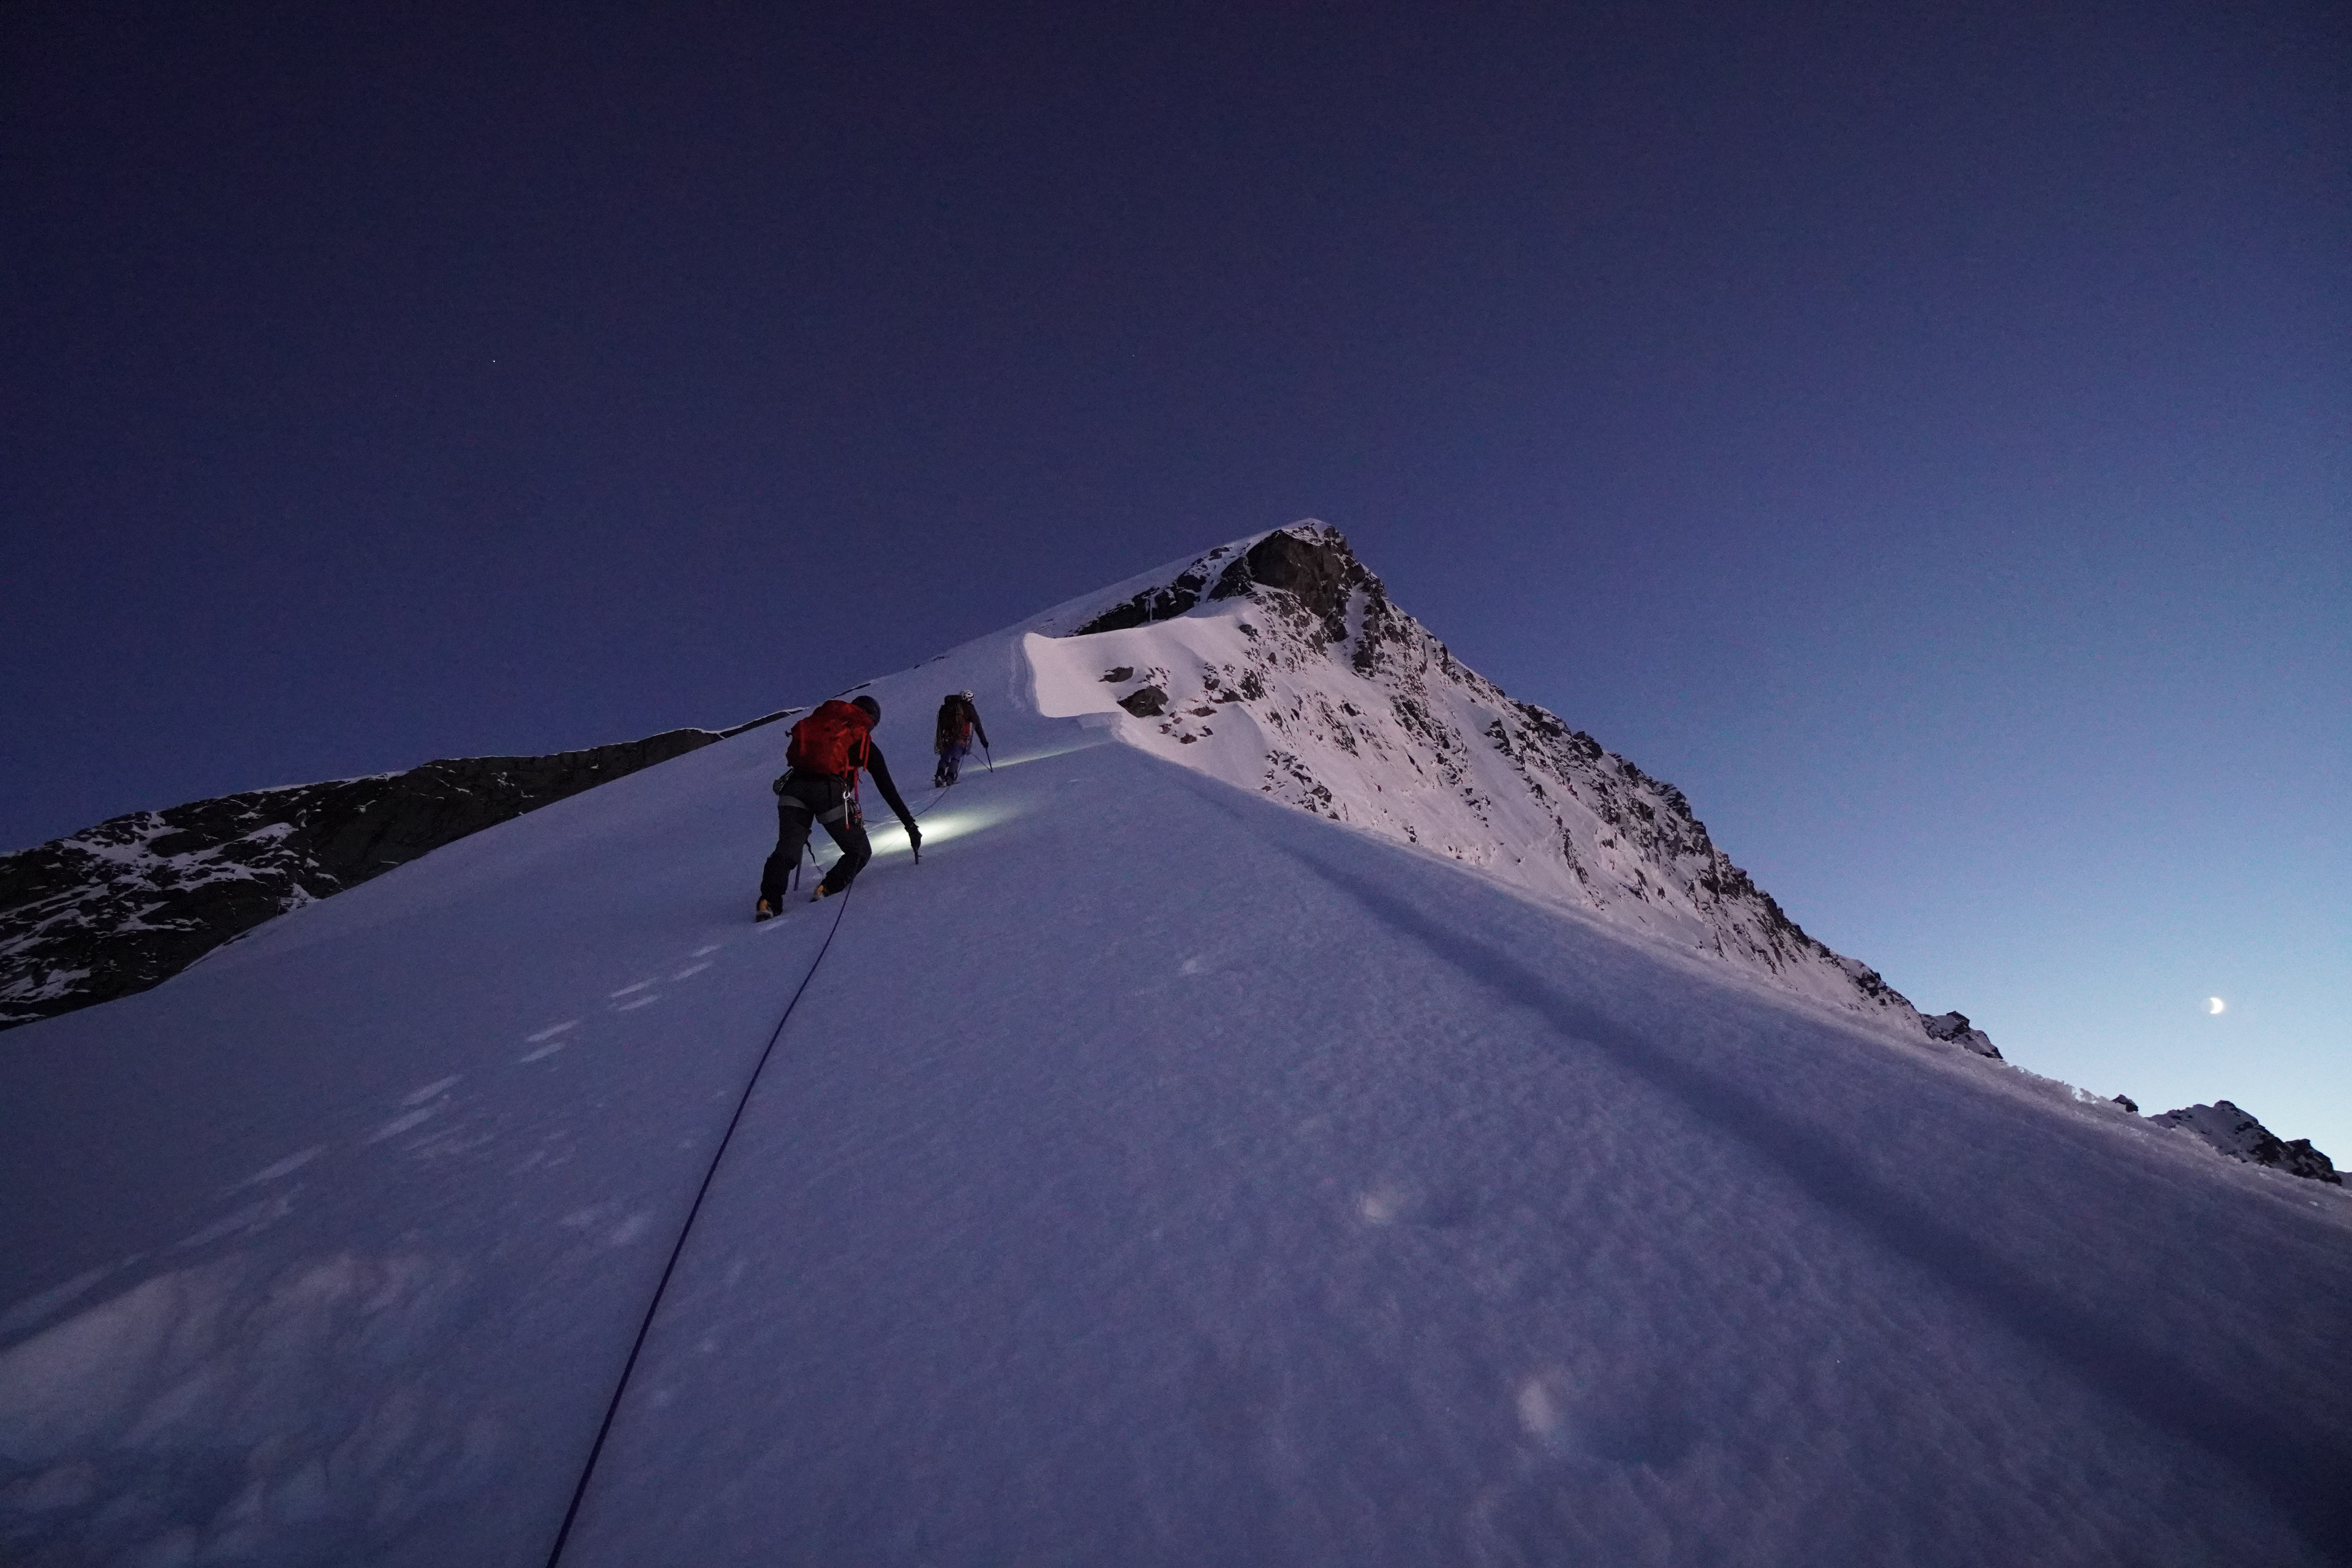
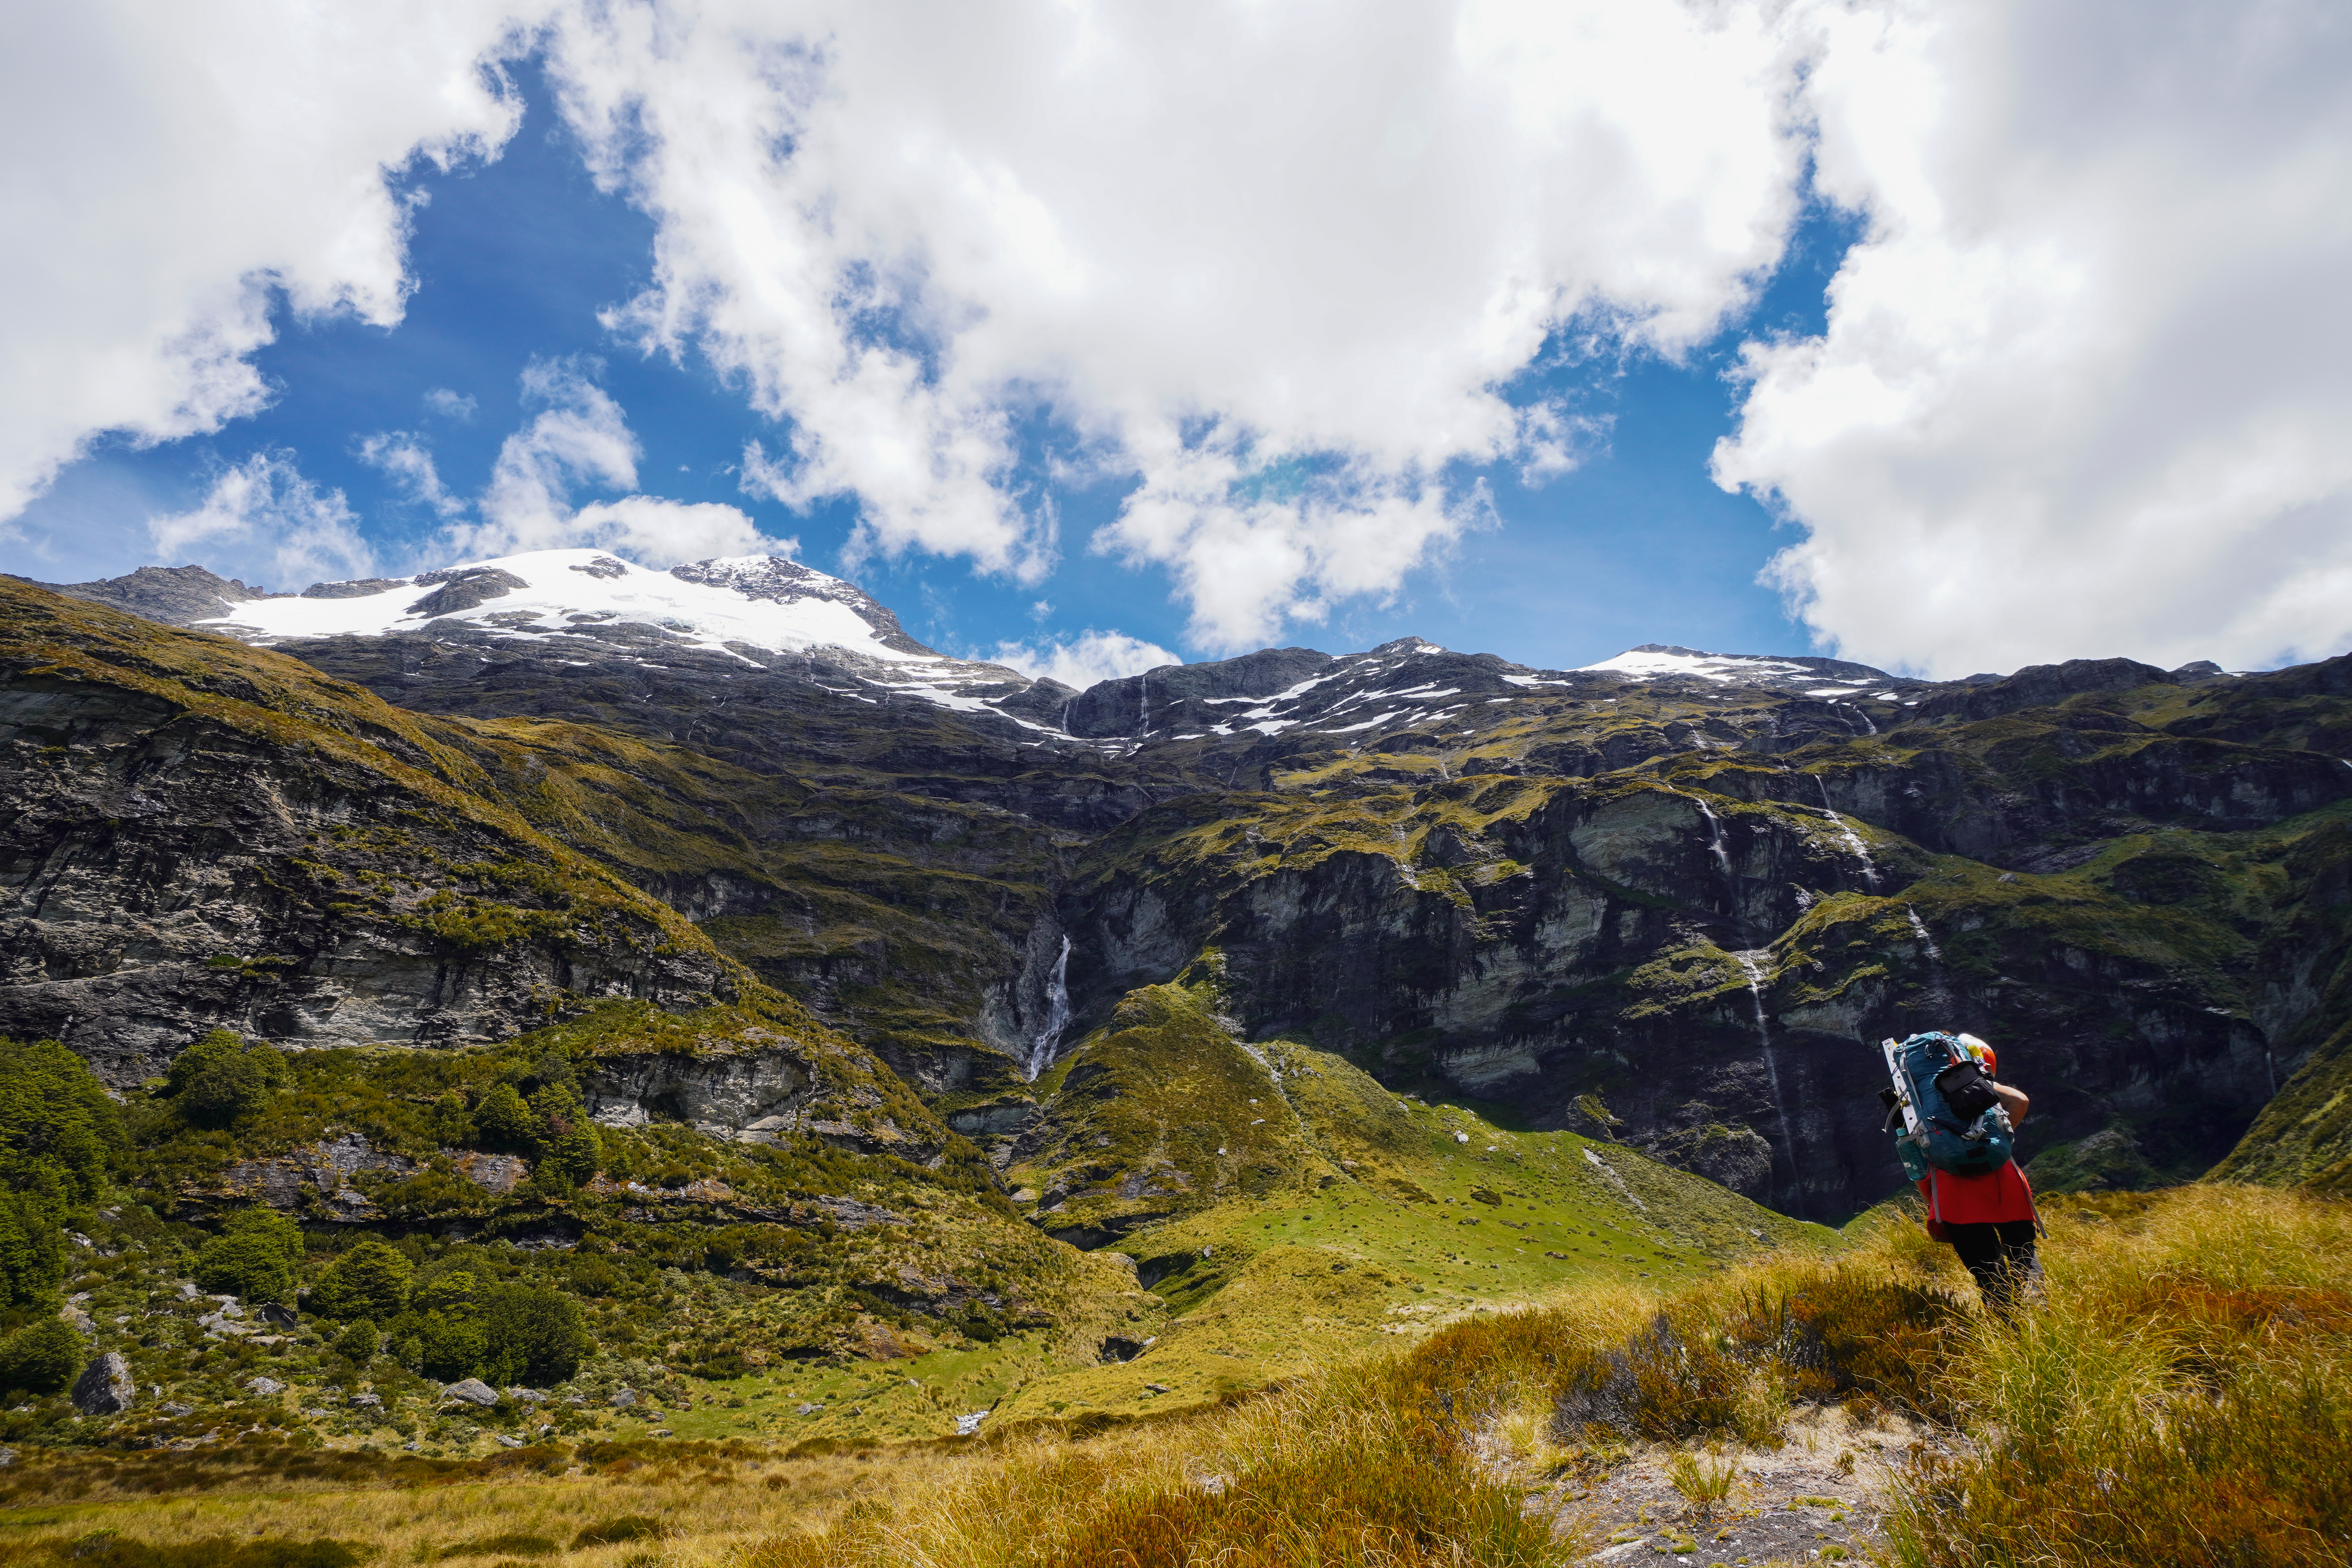
The highest peak in Arthurs Pass. It had taken us 5 years of living in Christchurch to get around to climbing Murchison. It had always been on the cards, but with a long riverbed approach, it was always bumped down the list as a lower priority. But winter 2024 – what a doozy! With no snow and most of the ski fields shut, we decided it would make for a great weekend mission. Of course, Joe wanted to bring his skis and so we set forth as a team of 4 (2 climbers / 2 optimistic skiers).
Grade : II, 2 (but condition dependent – crux section felt more like III, 3 )
Equipment : 1x 30m rope, lightweight rack (handful of nuts, couple of screws), glacier travel equipment
Time :
9h from O’Malleys Track to Barker Hut (1500m elevation gain, 24km)
1.5h from Barker Hut to Mt Murchison (1100m elevation gain, ~6.5km)
Season : in mid July, white glacier was already pretty well filled in, although we were cautious as there had been minimal snow so far in the season
Team : Climbers Sean & Maria, Skiers Shona & Joe; 13-15/07/2024
Approach
Straightforward but a slog. Park at trailhead for O’Malleys Track – but this carpark is notorious for break ins; we took a risk but otherwise leaving the cars at Klondyke corner campsite is an option. Alternatively you could ask Bealey Hotel permission as it is much closer.
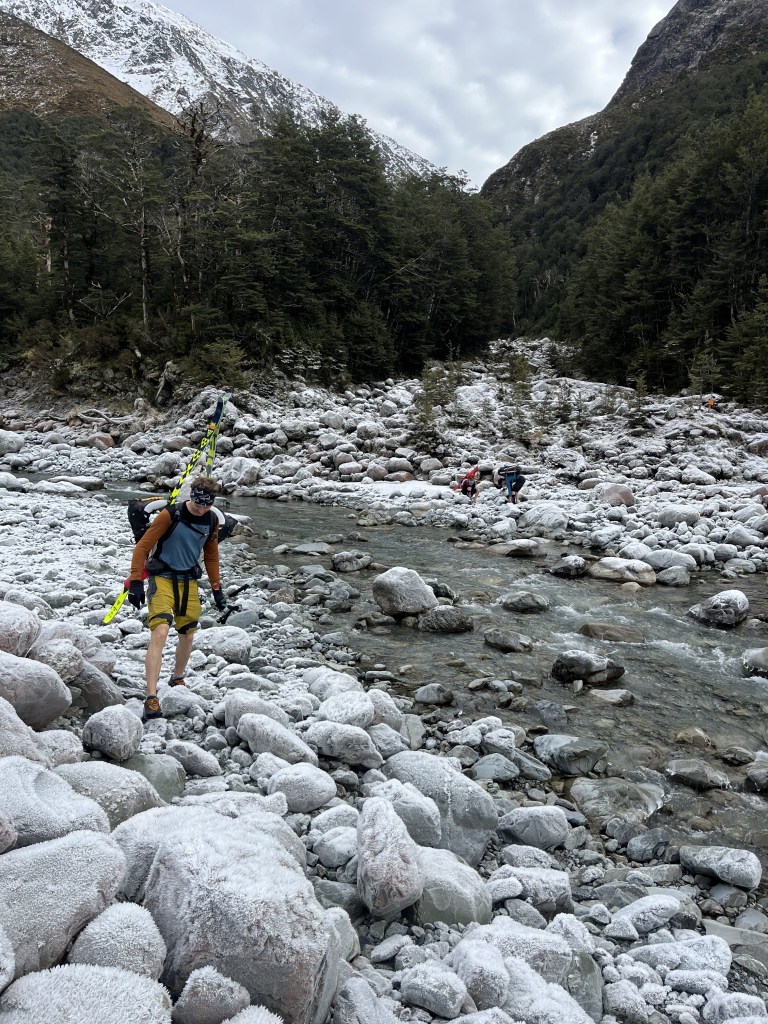
We thought we’d fly across the undulating / largely flat section all the way to Carrington Hut, but heavy packs slowed us and we were about 5h before we got to the hut. The next section involved some slippery boulder hopping due to the thin layer of hoar frost that covered the riverbed (beautiful – but time consuming!). We crossed the river where the cableway once was, and where the White / Taipoiti rivers merge into the Waimak. River levels were super low at the time, (involved just wading up to about knee depth) but worth checking before the trip, as this can become uncrossable.
Beautiful morning frost giving a pseudo blossom effectCrossing at the confluence of the waimak
From here pick your way up the path on the river’s true left. We were losing the light at this point and missed the “trail” which is very well trafficked with cairns and even some marker poles en route. The easiest way is to stay in the river bed until you reach the steep walled gorge, then climb up the tussock slope to get past the gorge and then drop back down again into the river bed. We sidled the whole way to the marked trail on topo maps which was pretty slow – on the way out in the light, the lower track was obvious.
Barker Hut is one of the warmest I’ve stayed in. Well insulated, double-glazing, solar lighting, USB charger (no cable)… A 5* hut! Thanks CMC.
Climb
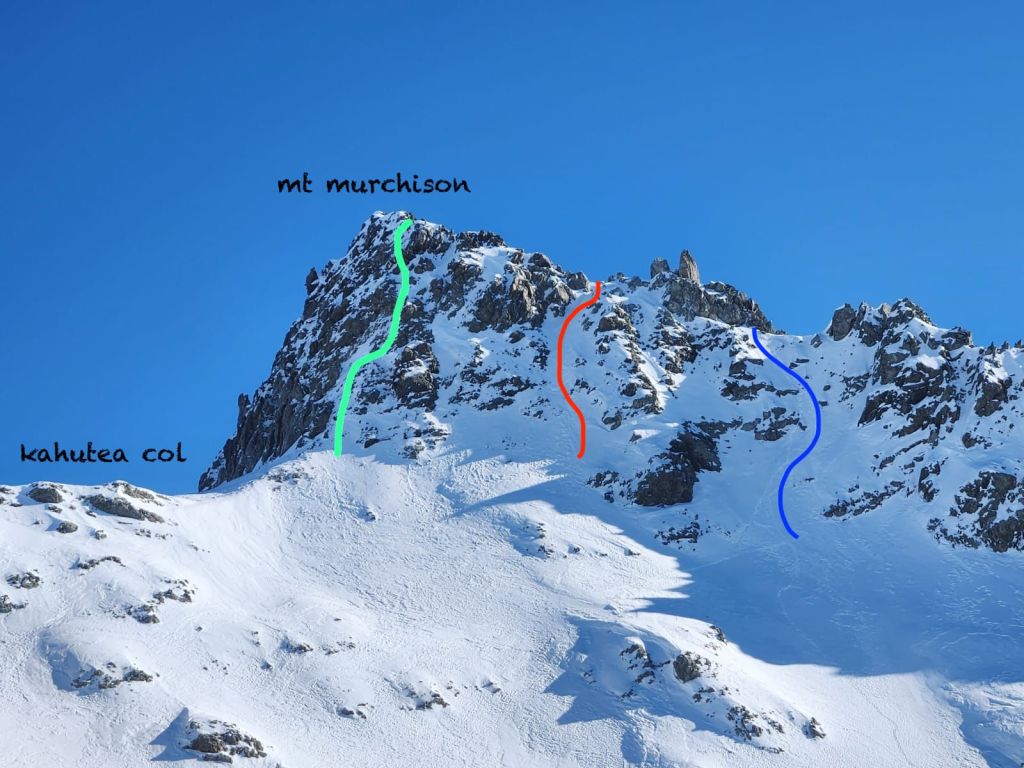
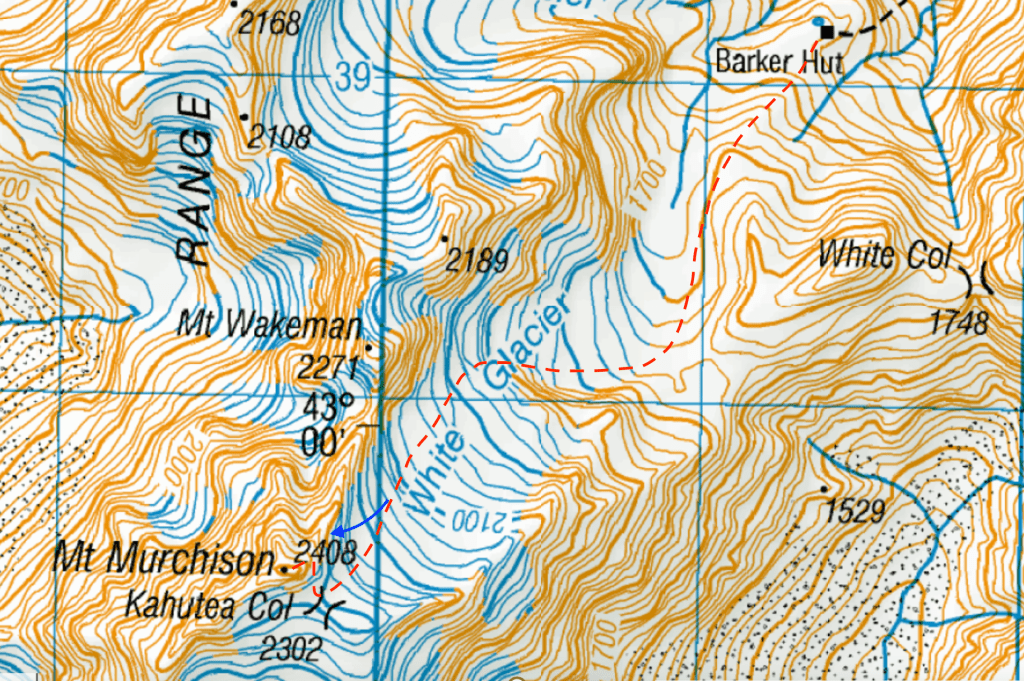
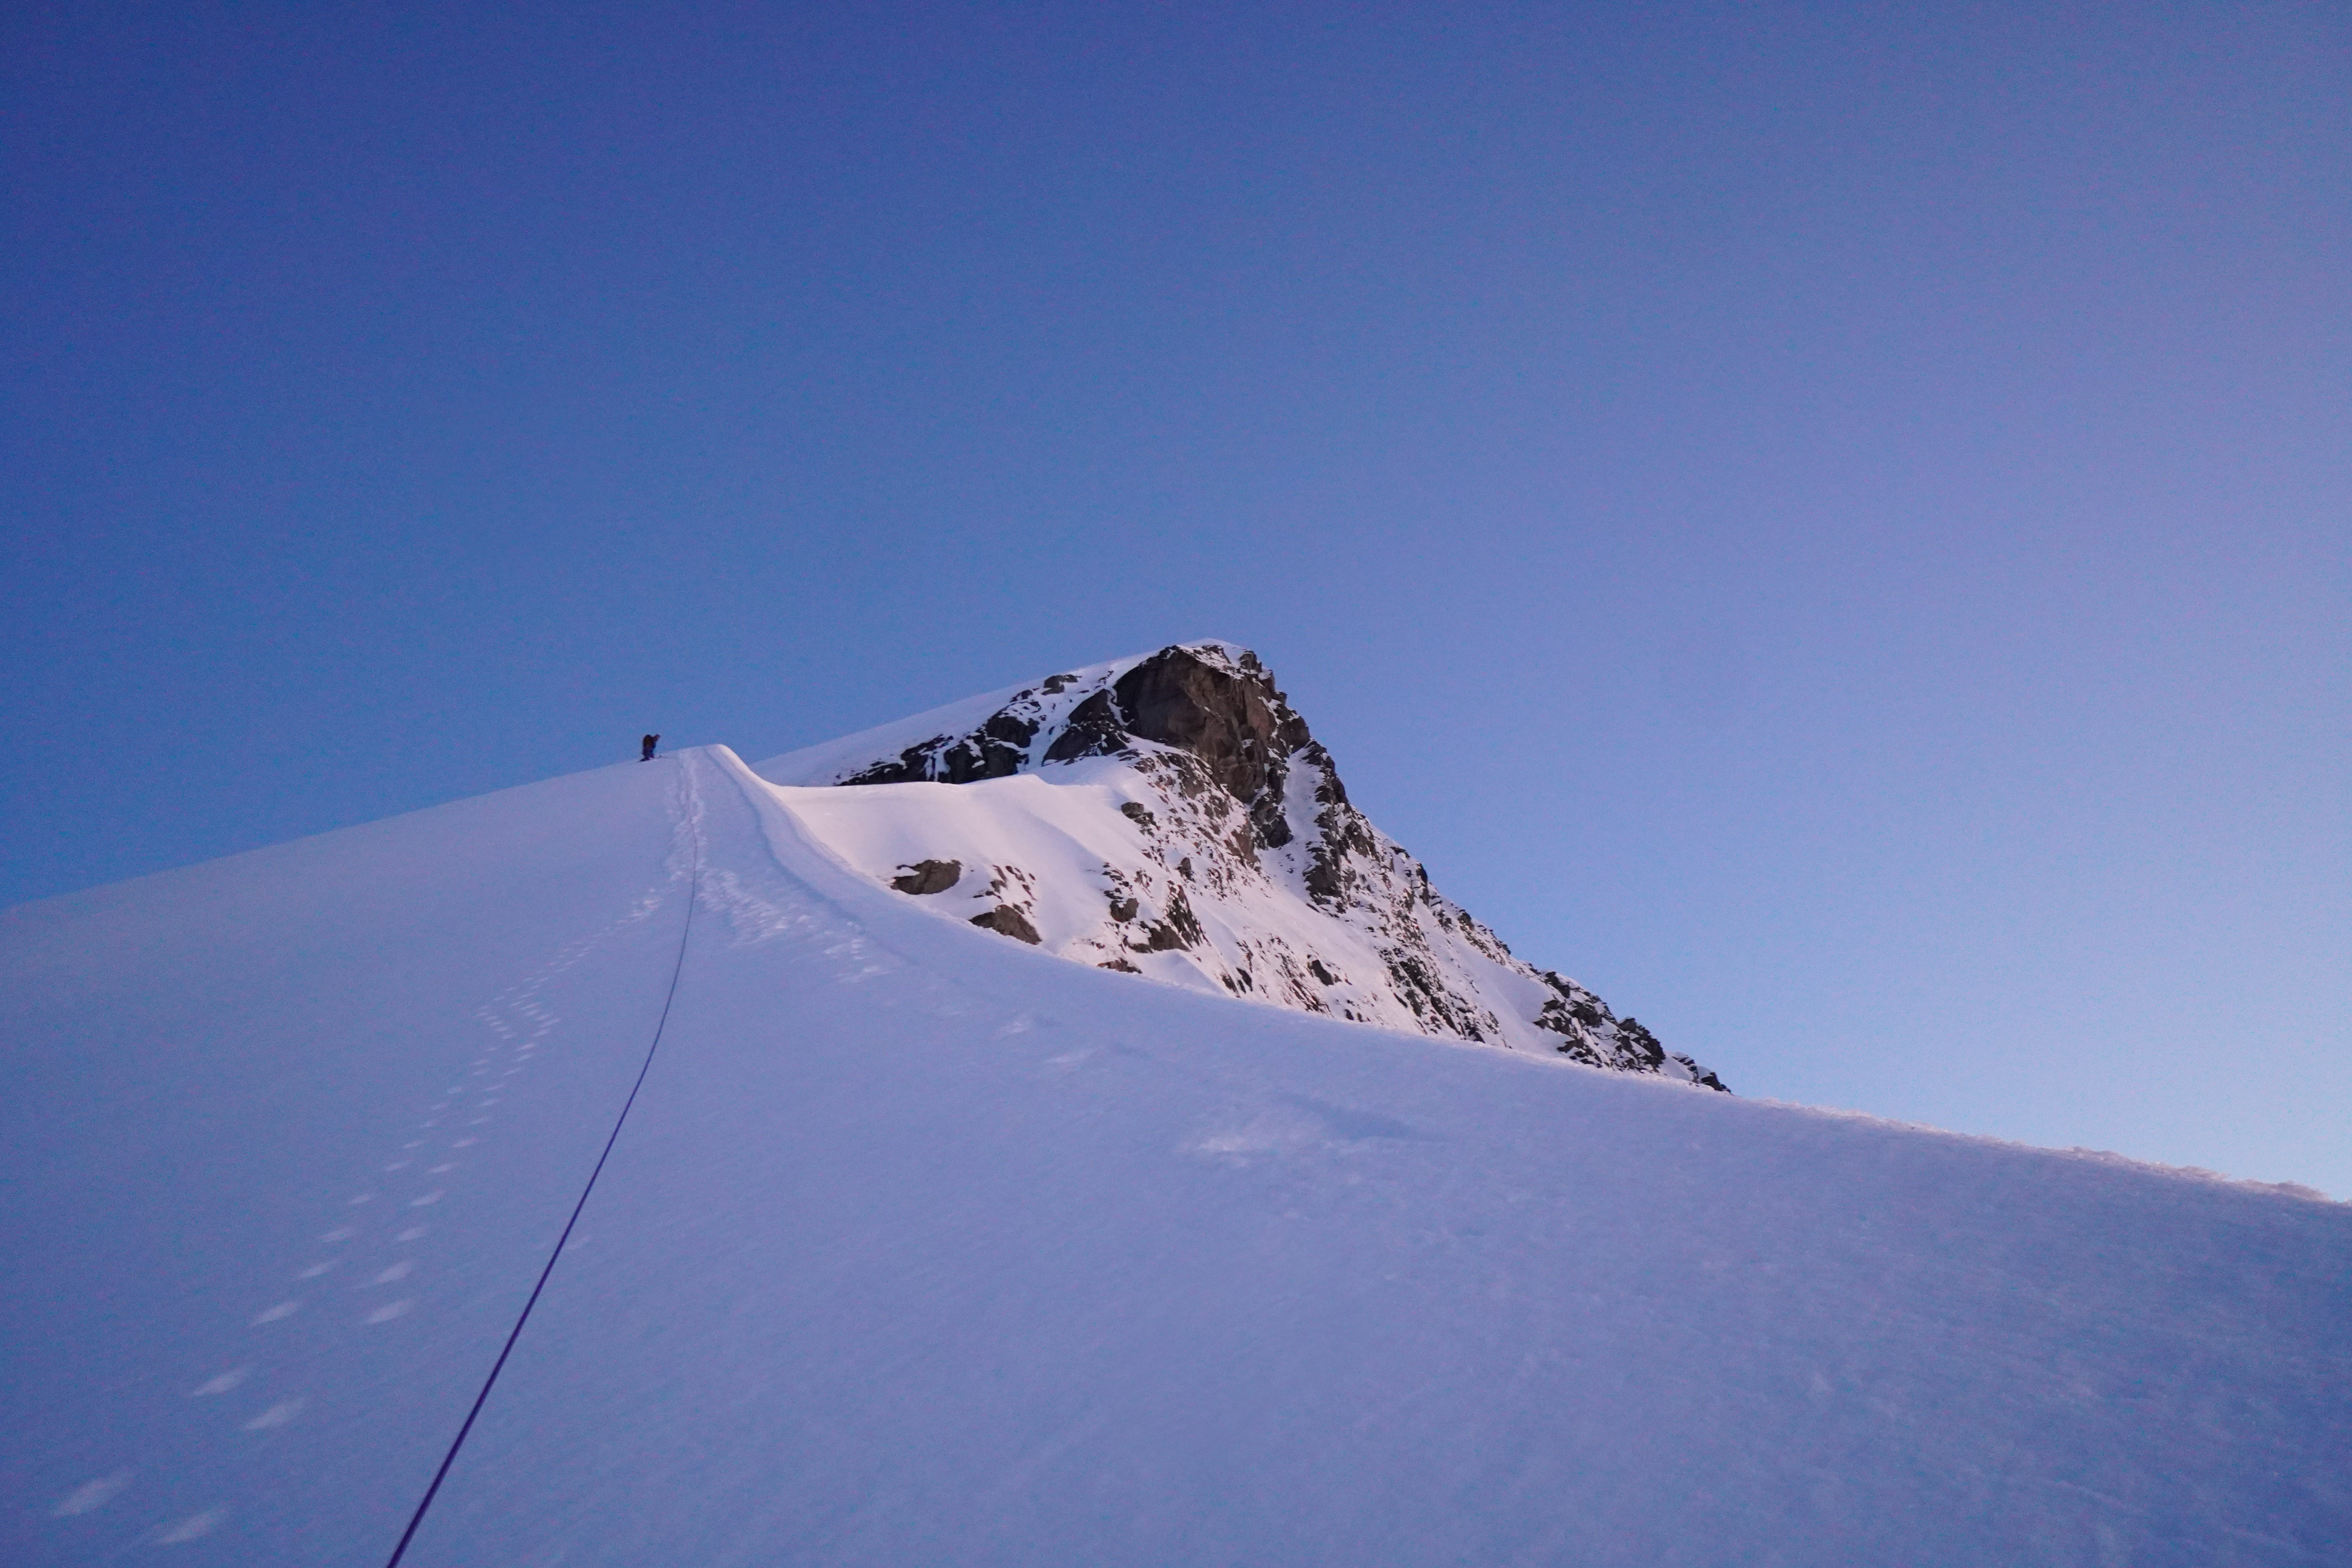
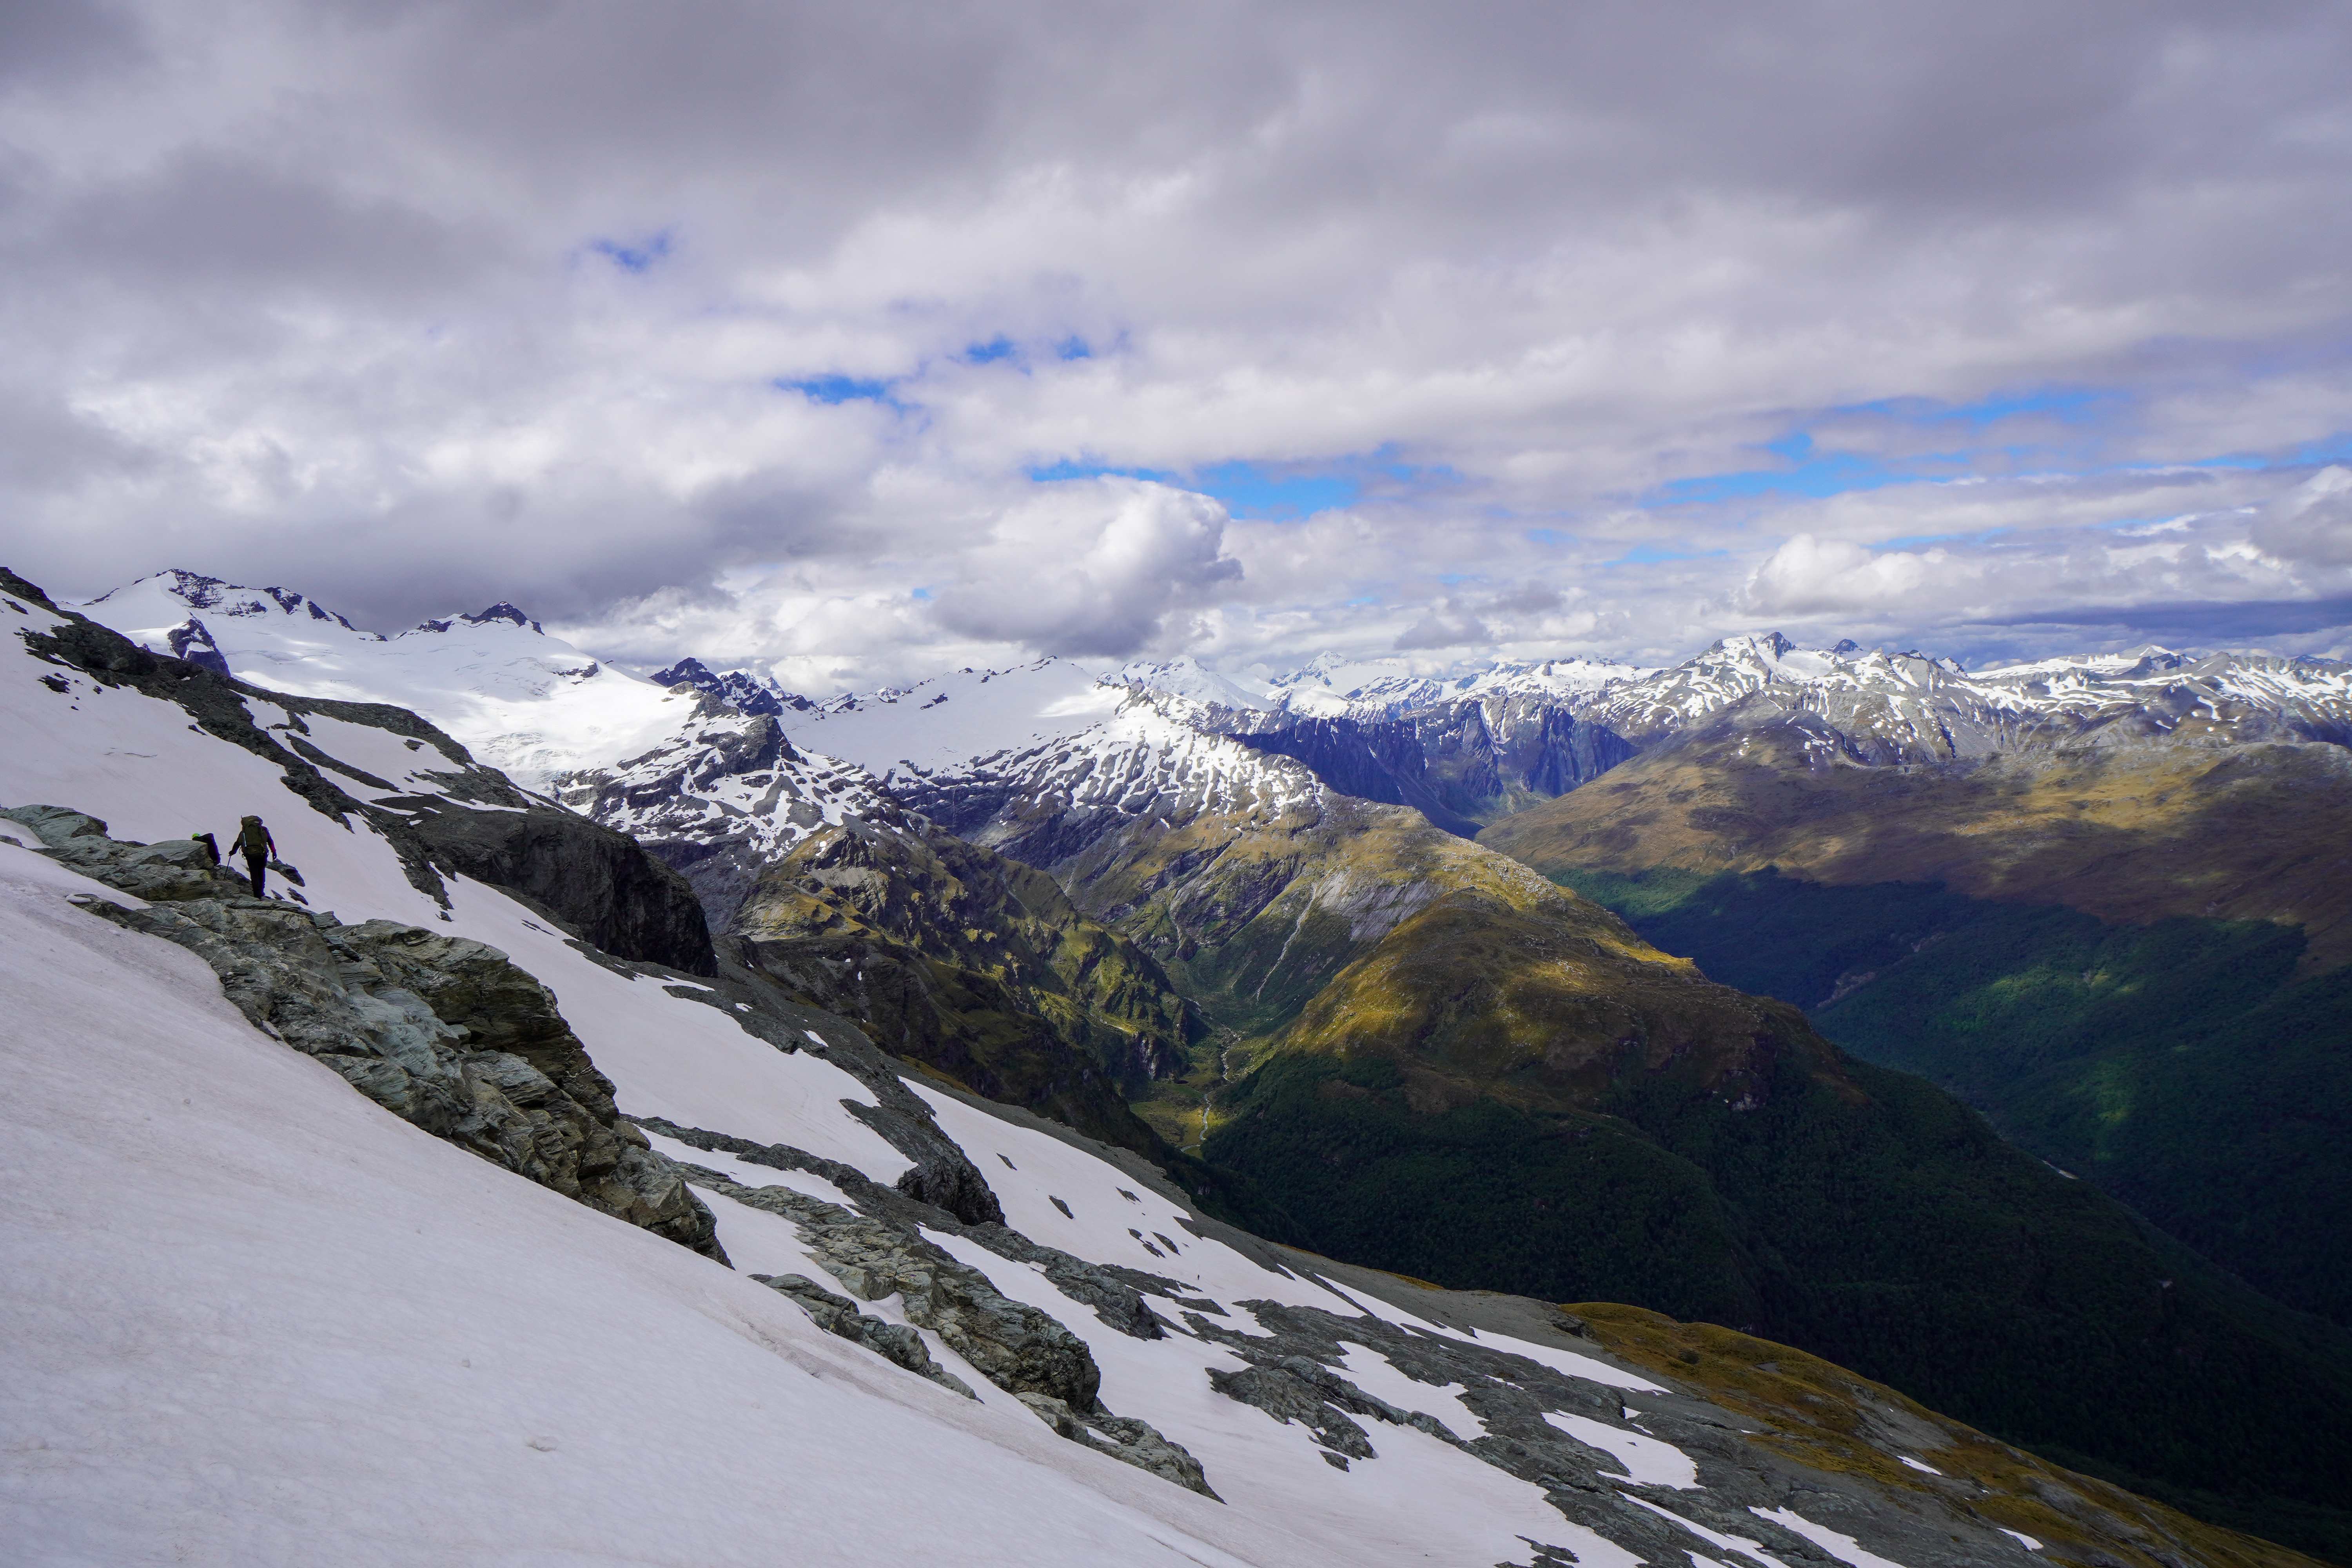
A leisurely 7.30am start. We followed the usual route up the white glacier as per the guidebook – heading up the steeper ramp on lookers right, beneath point 2189 then zig zagging our way to Kahatea col. There were only a few visible crevasses, but we were wary any snow bridges were likely to be thin on the ground and kept our ropes on until the col.
Sean coming up the ramp beneath point 2189Ridge leading up to the summit
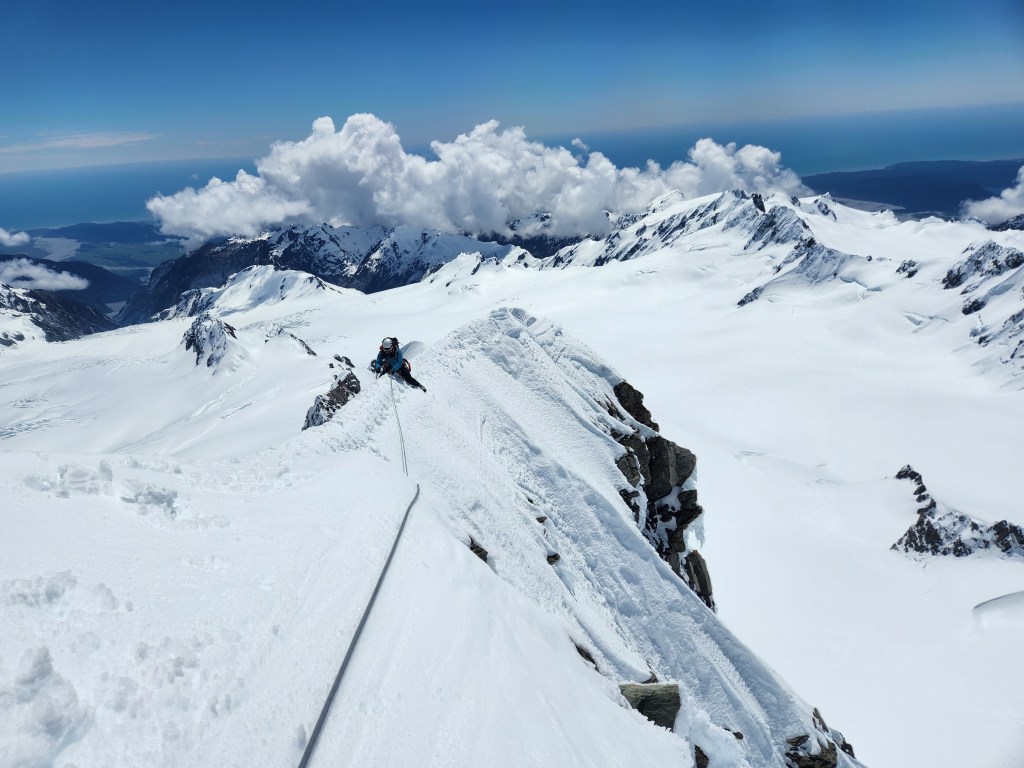
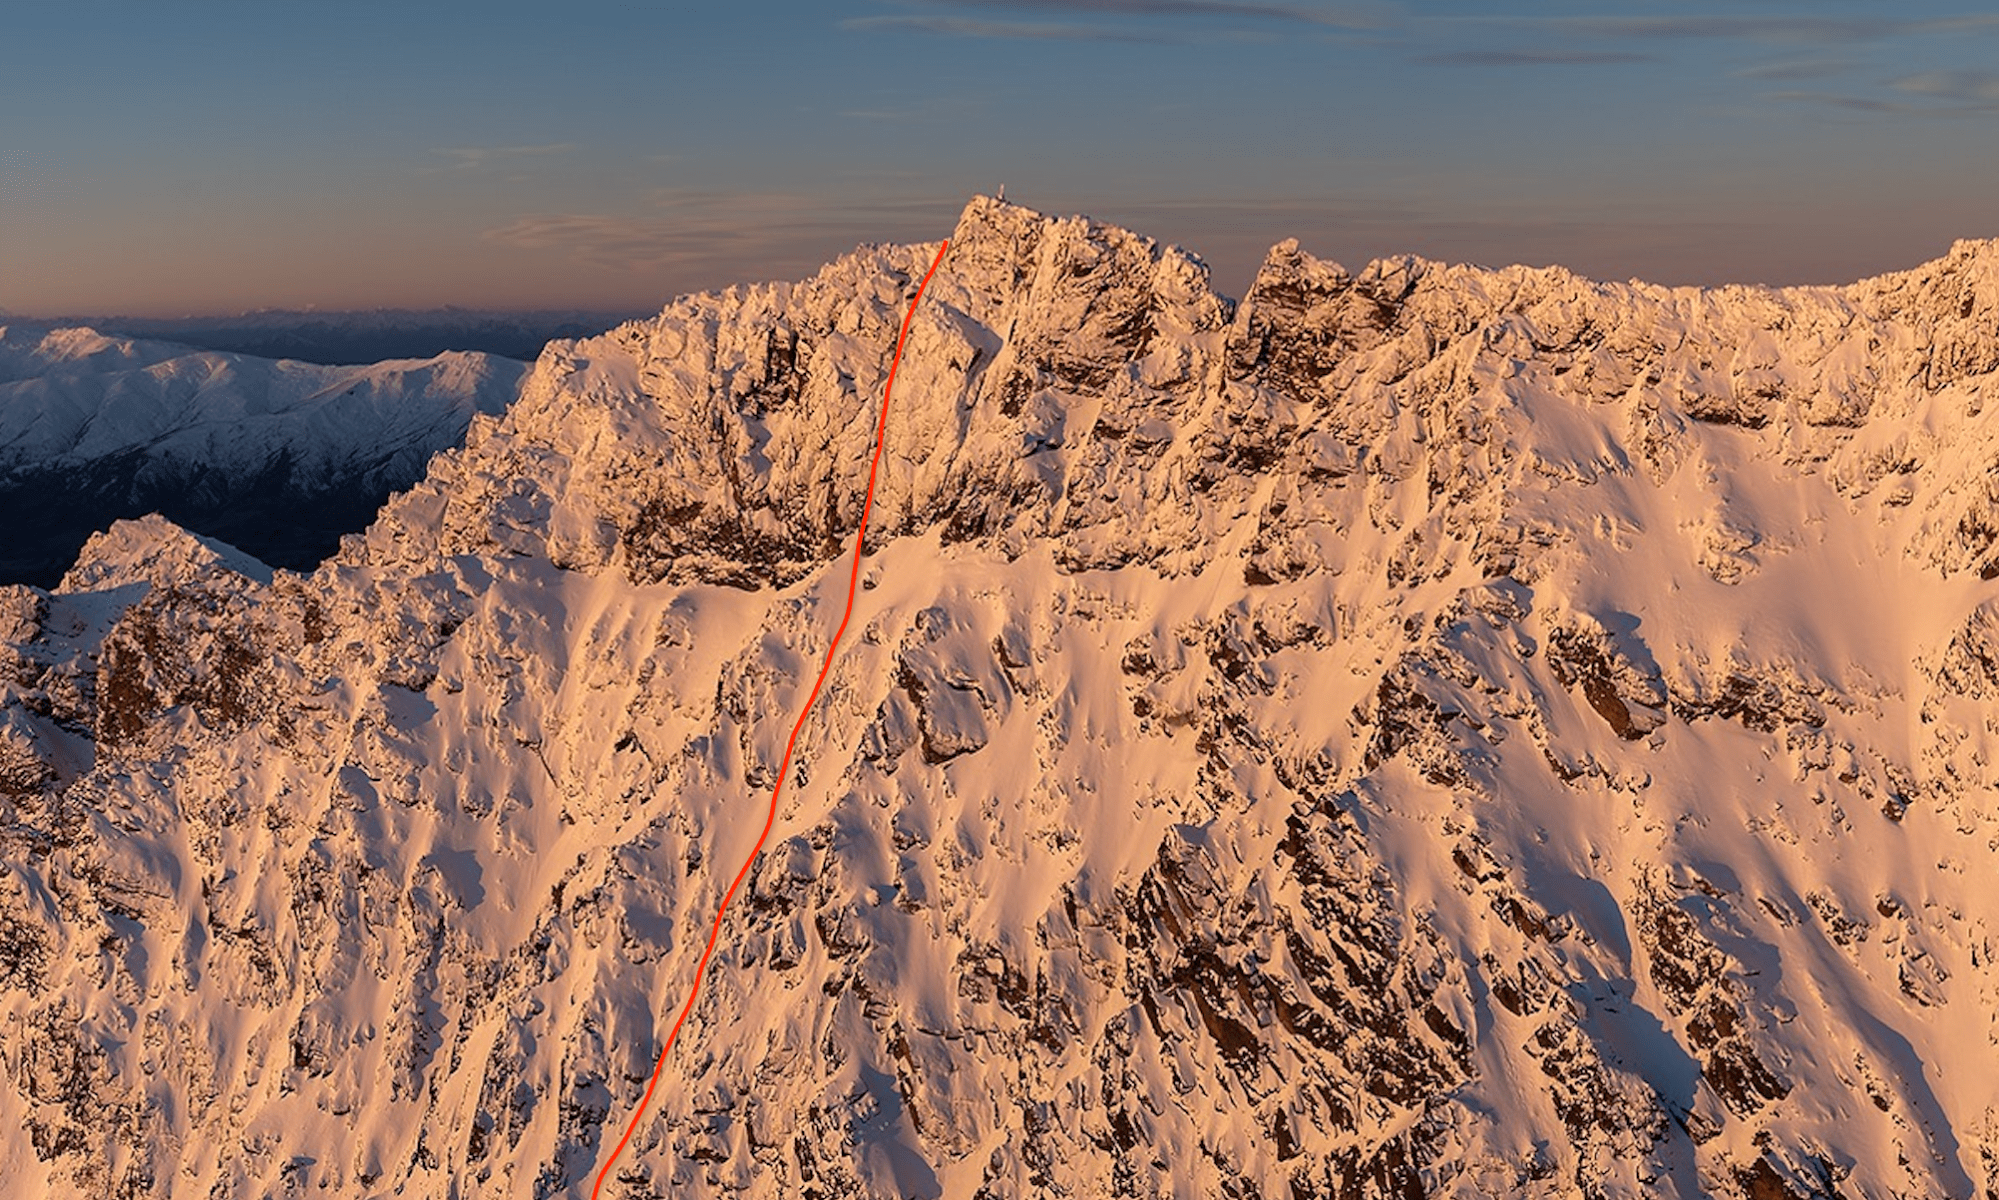
There are a couple of options to the summit – the easiest way is to sidle NE from the col and climb the 45deg ish snow ramps up the E face of Murchison, which lead to a ridge and a short downclimb and then easy snow slopes up the N face to the summit. We chose a more technical looking option up the S face from the col, with some ice and rock steps. We simul-climbed – the gear was sparse but we found a few reasonable nut placements/slings.
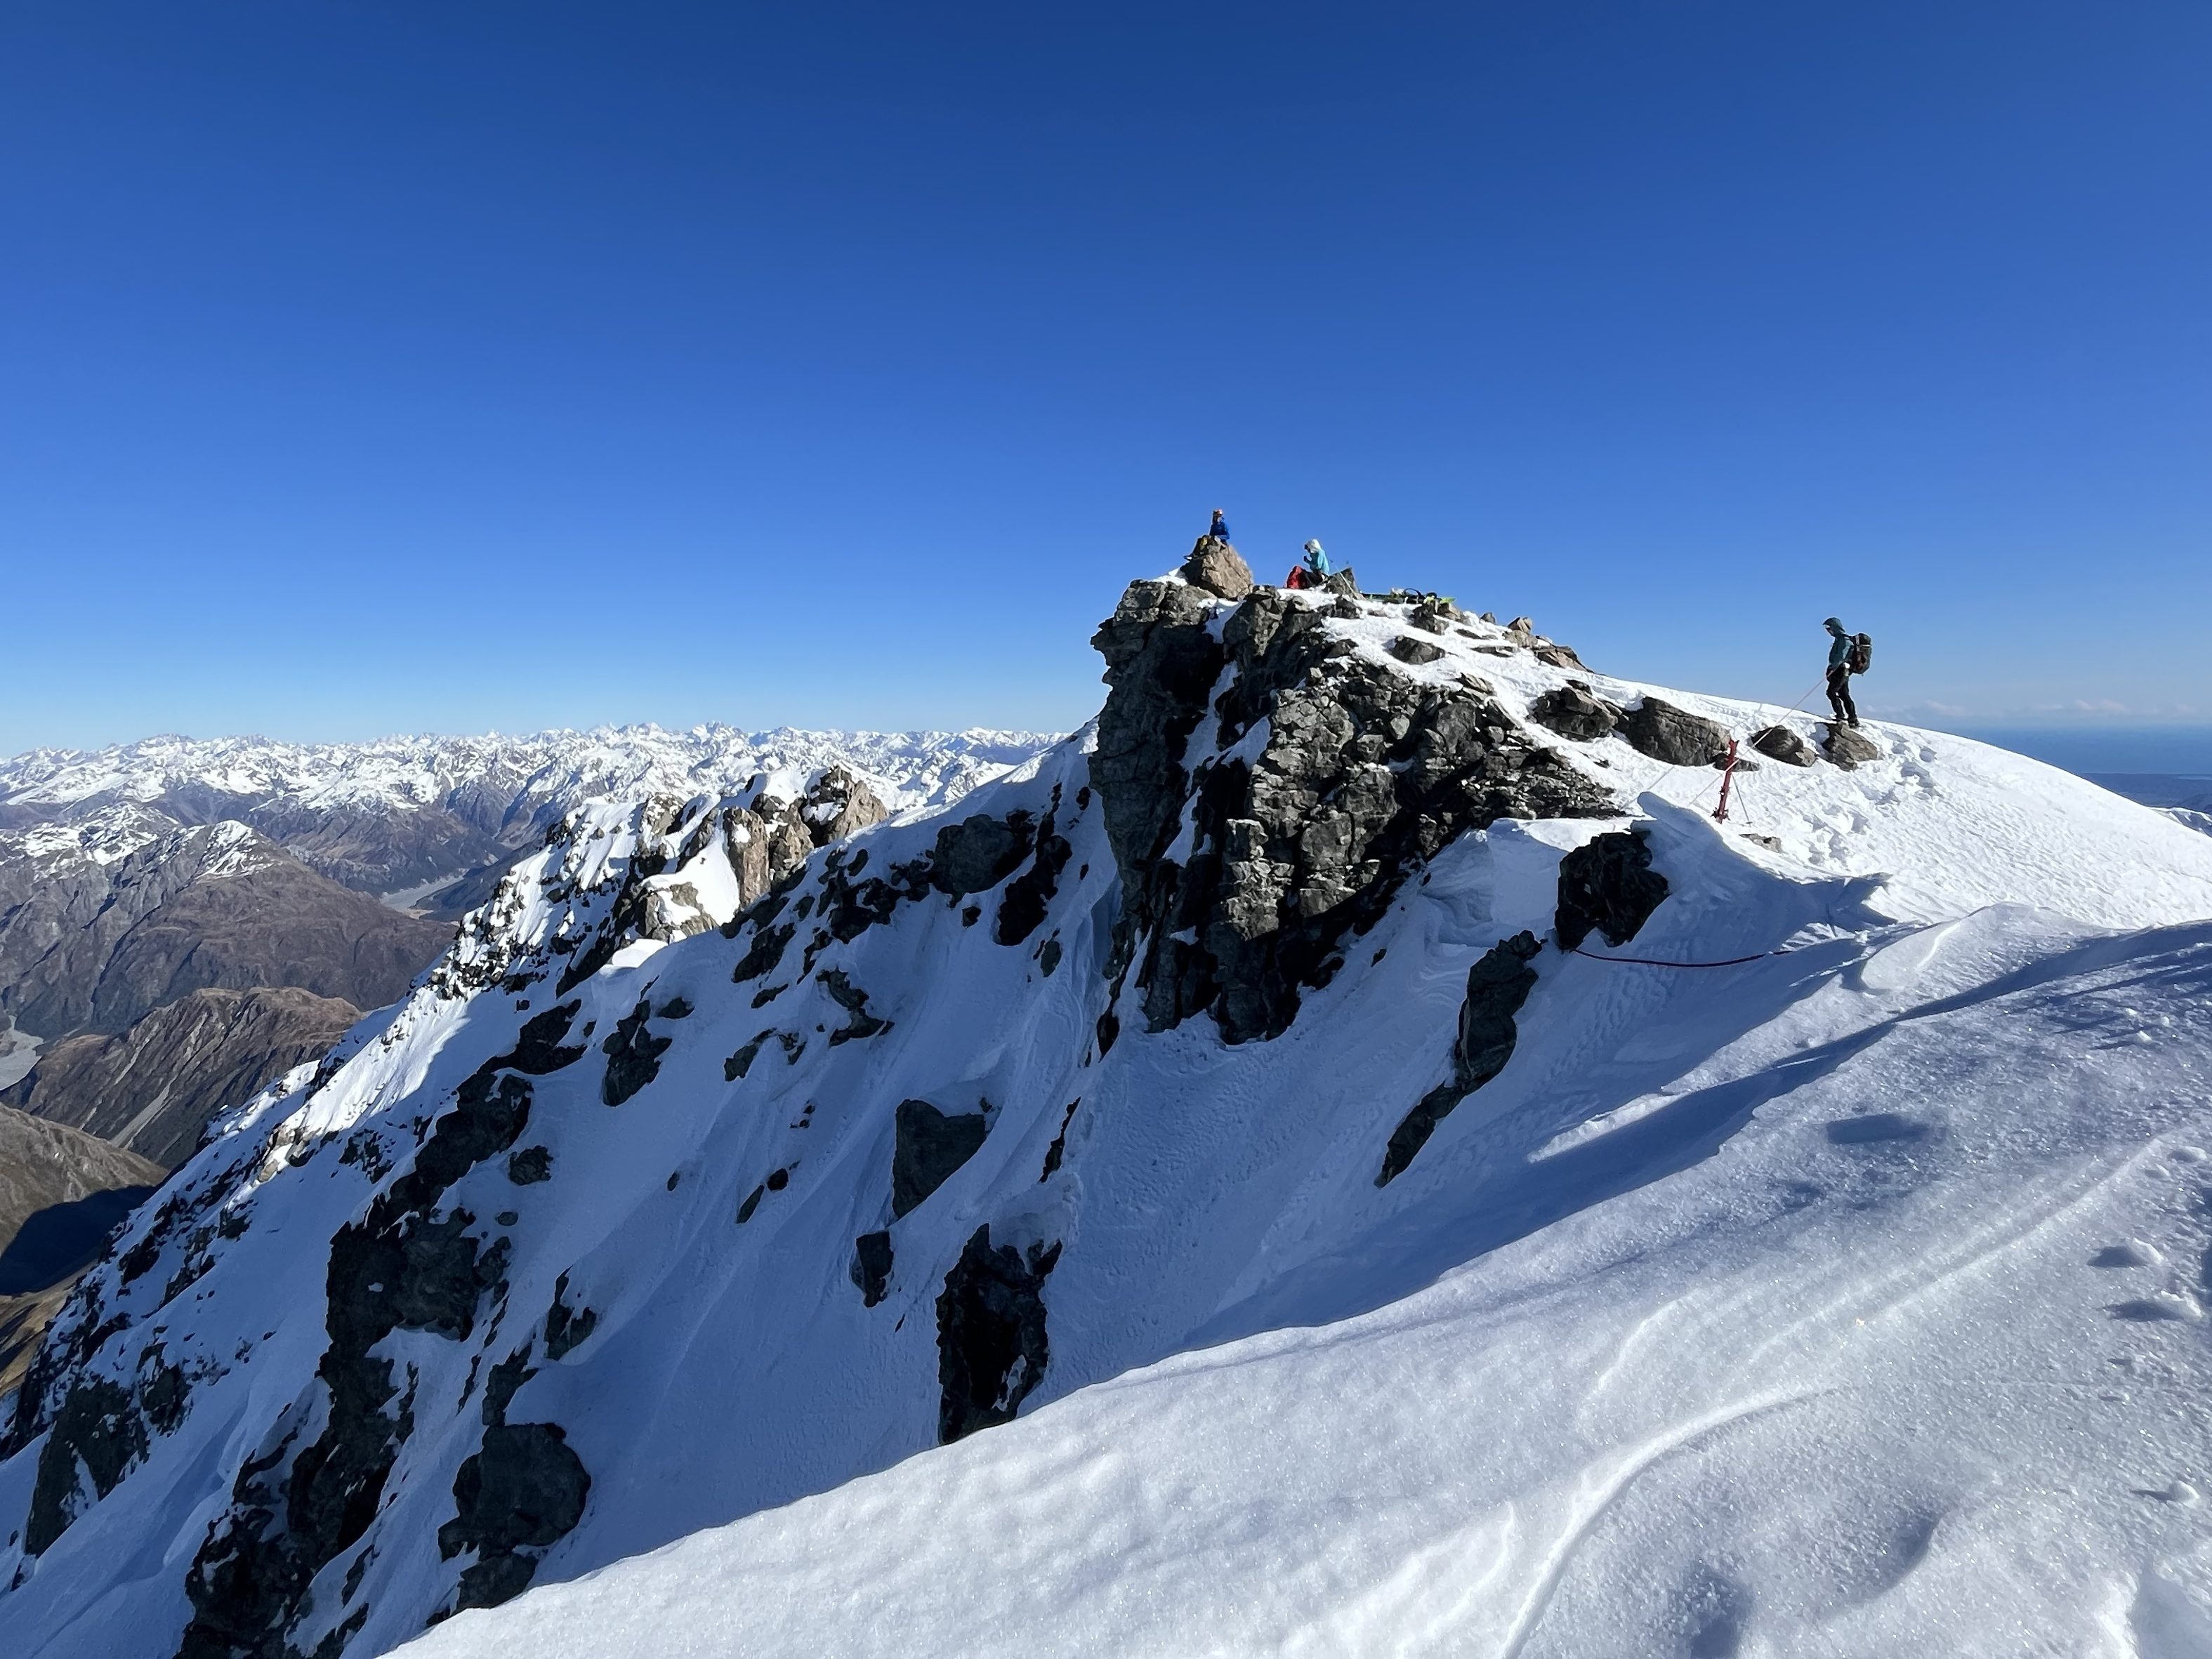
A straightforward 50m west along the ridge led to the summit, where by pure chance we found the skiers (who had taken the easy route!) had beat us to it! After a brief regroup the skiers skied down a chute to the north before rejoining the ridge to ski the east face. Sean and I descended via the same way, although we picked a mellower snow chute on the east face, around 100m north of the col.
To avoid pitching, head up one of the snow chutes along the west face. Requires dropping down to the other side, sidling round to then gain another snow ramp to the summit ridge. Although a little spicier than what Sean and I had expected “too hot, TOO HOT!” – we were pretty stoked we got to do a bit of technical climbing amidst all the plodding. Besides – it justified carrying all the gear we brought!
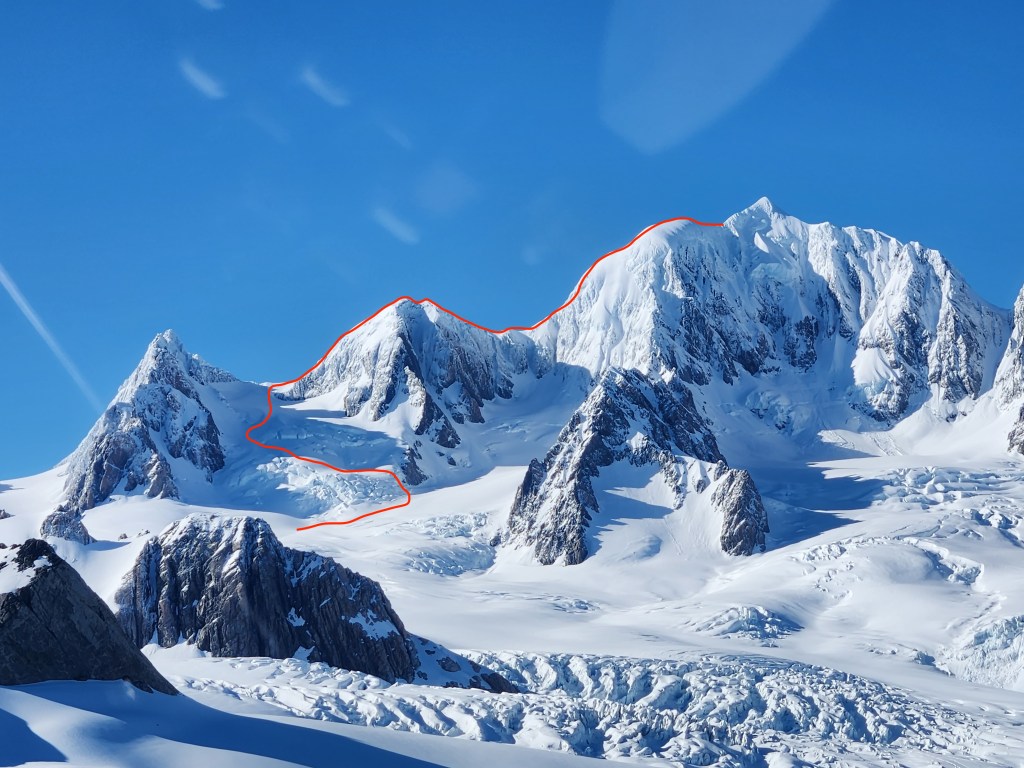
Sean and I climbed green; Joe and Shona skied red; alternative route up (and our route down) in blue Blue arrow roughly shows alt route up on west face
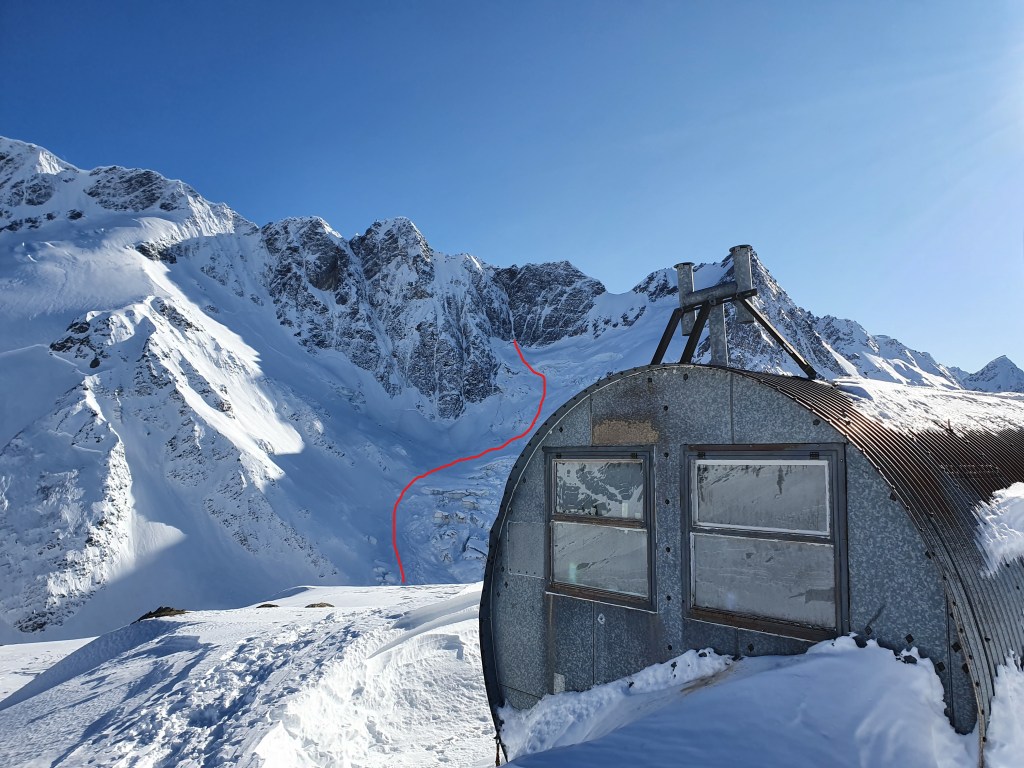
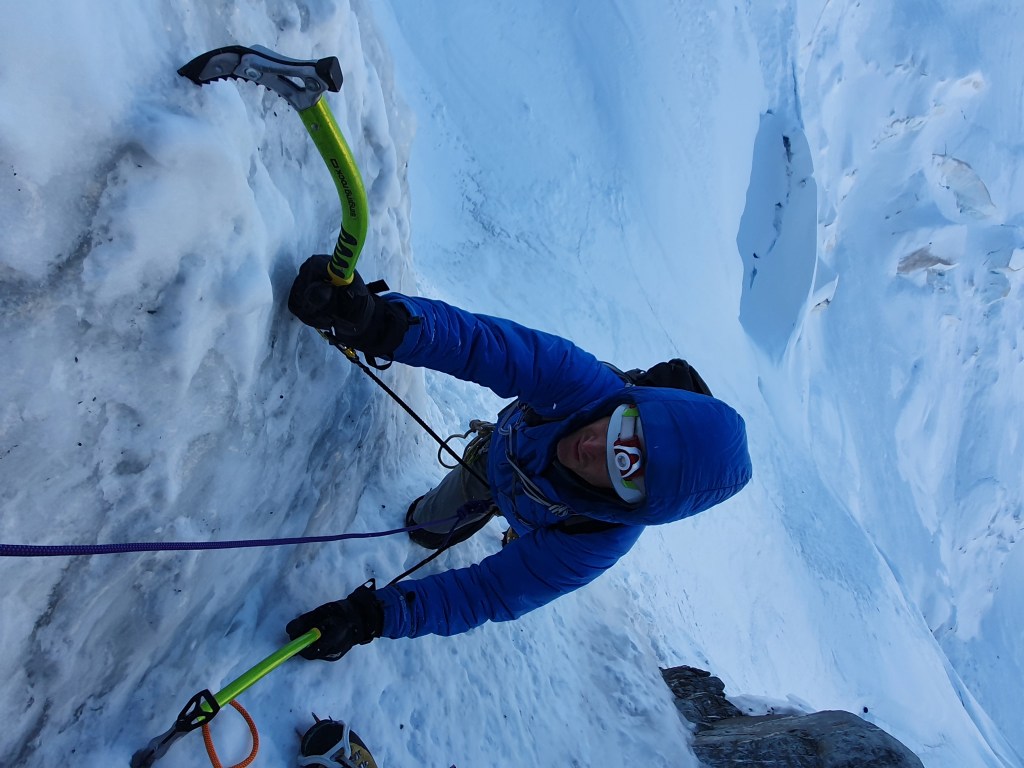
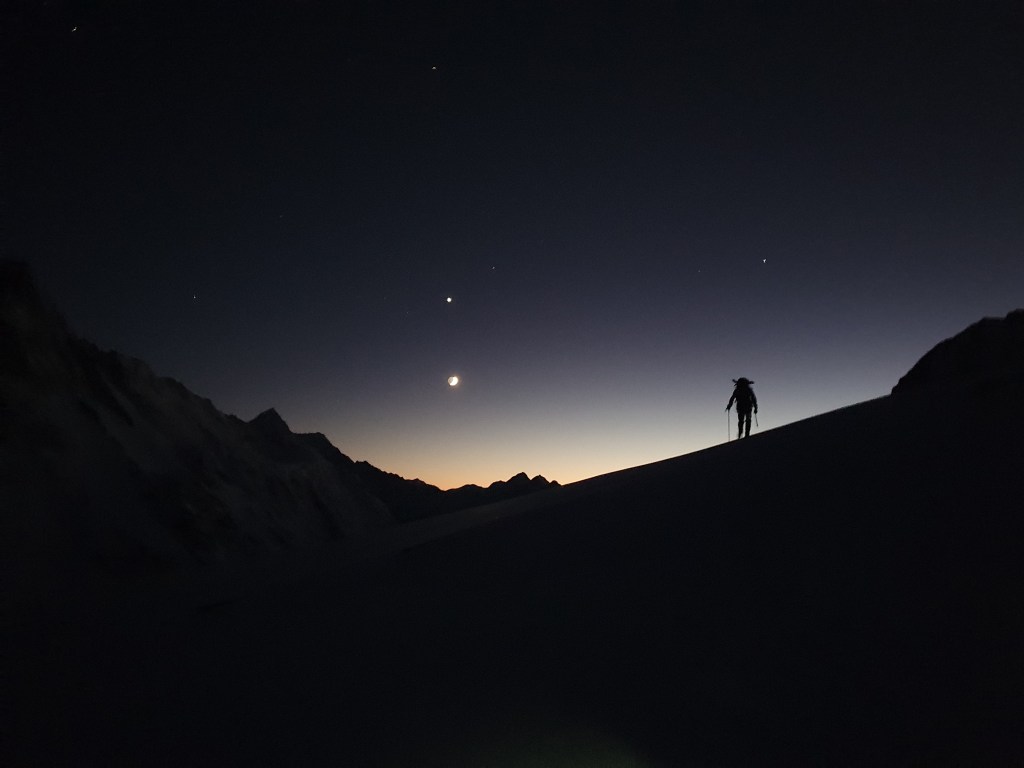
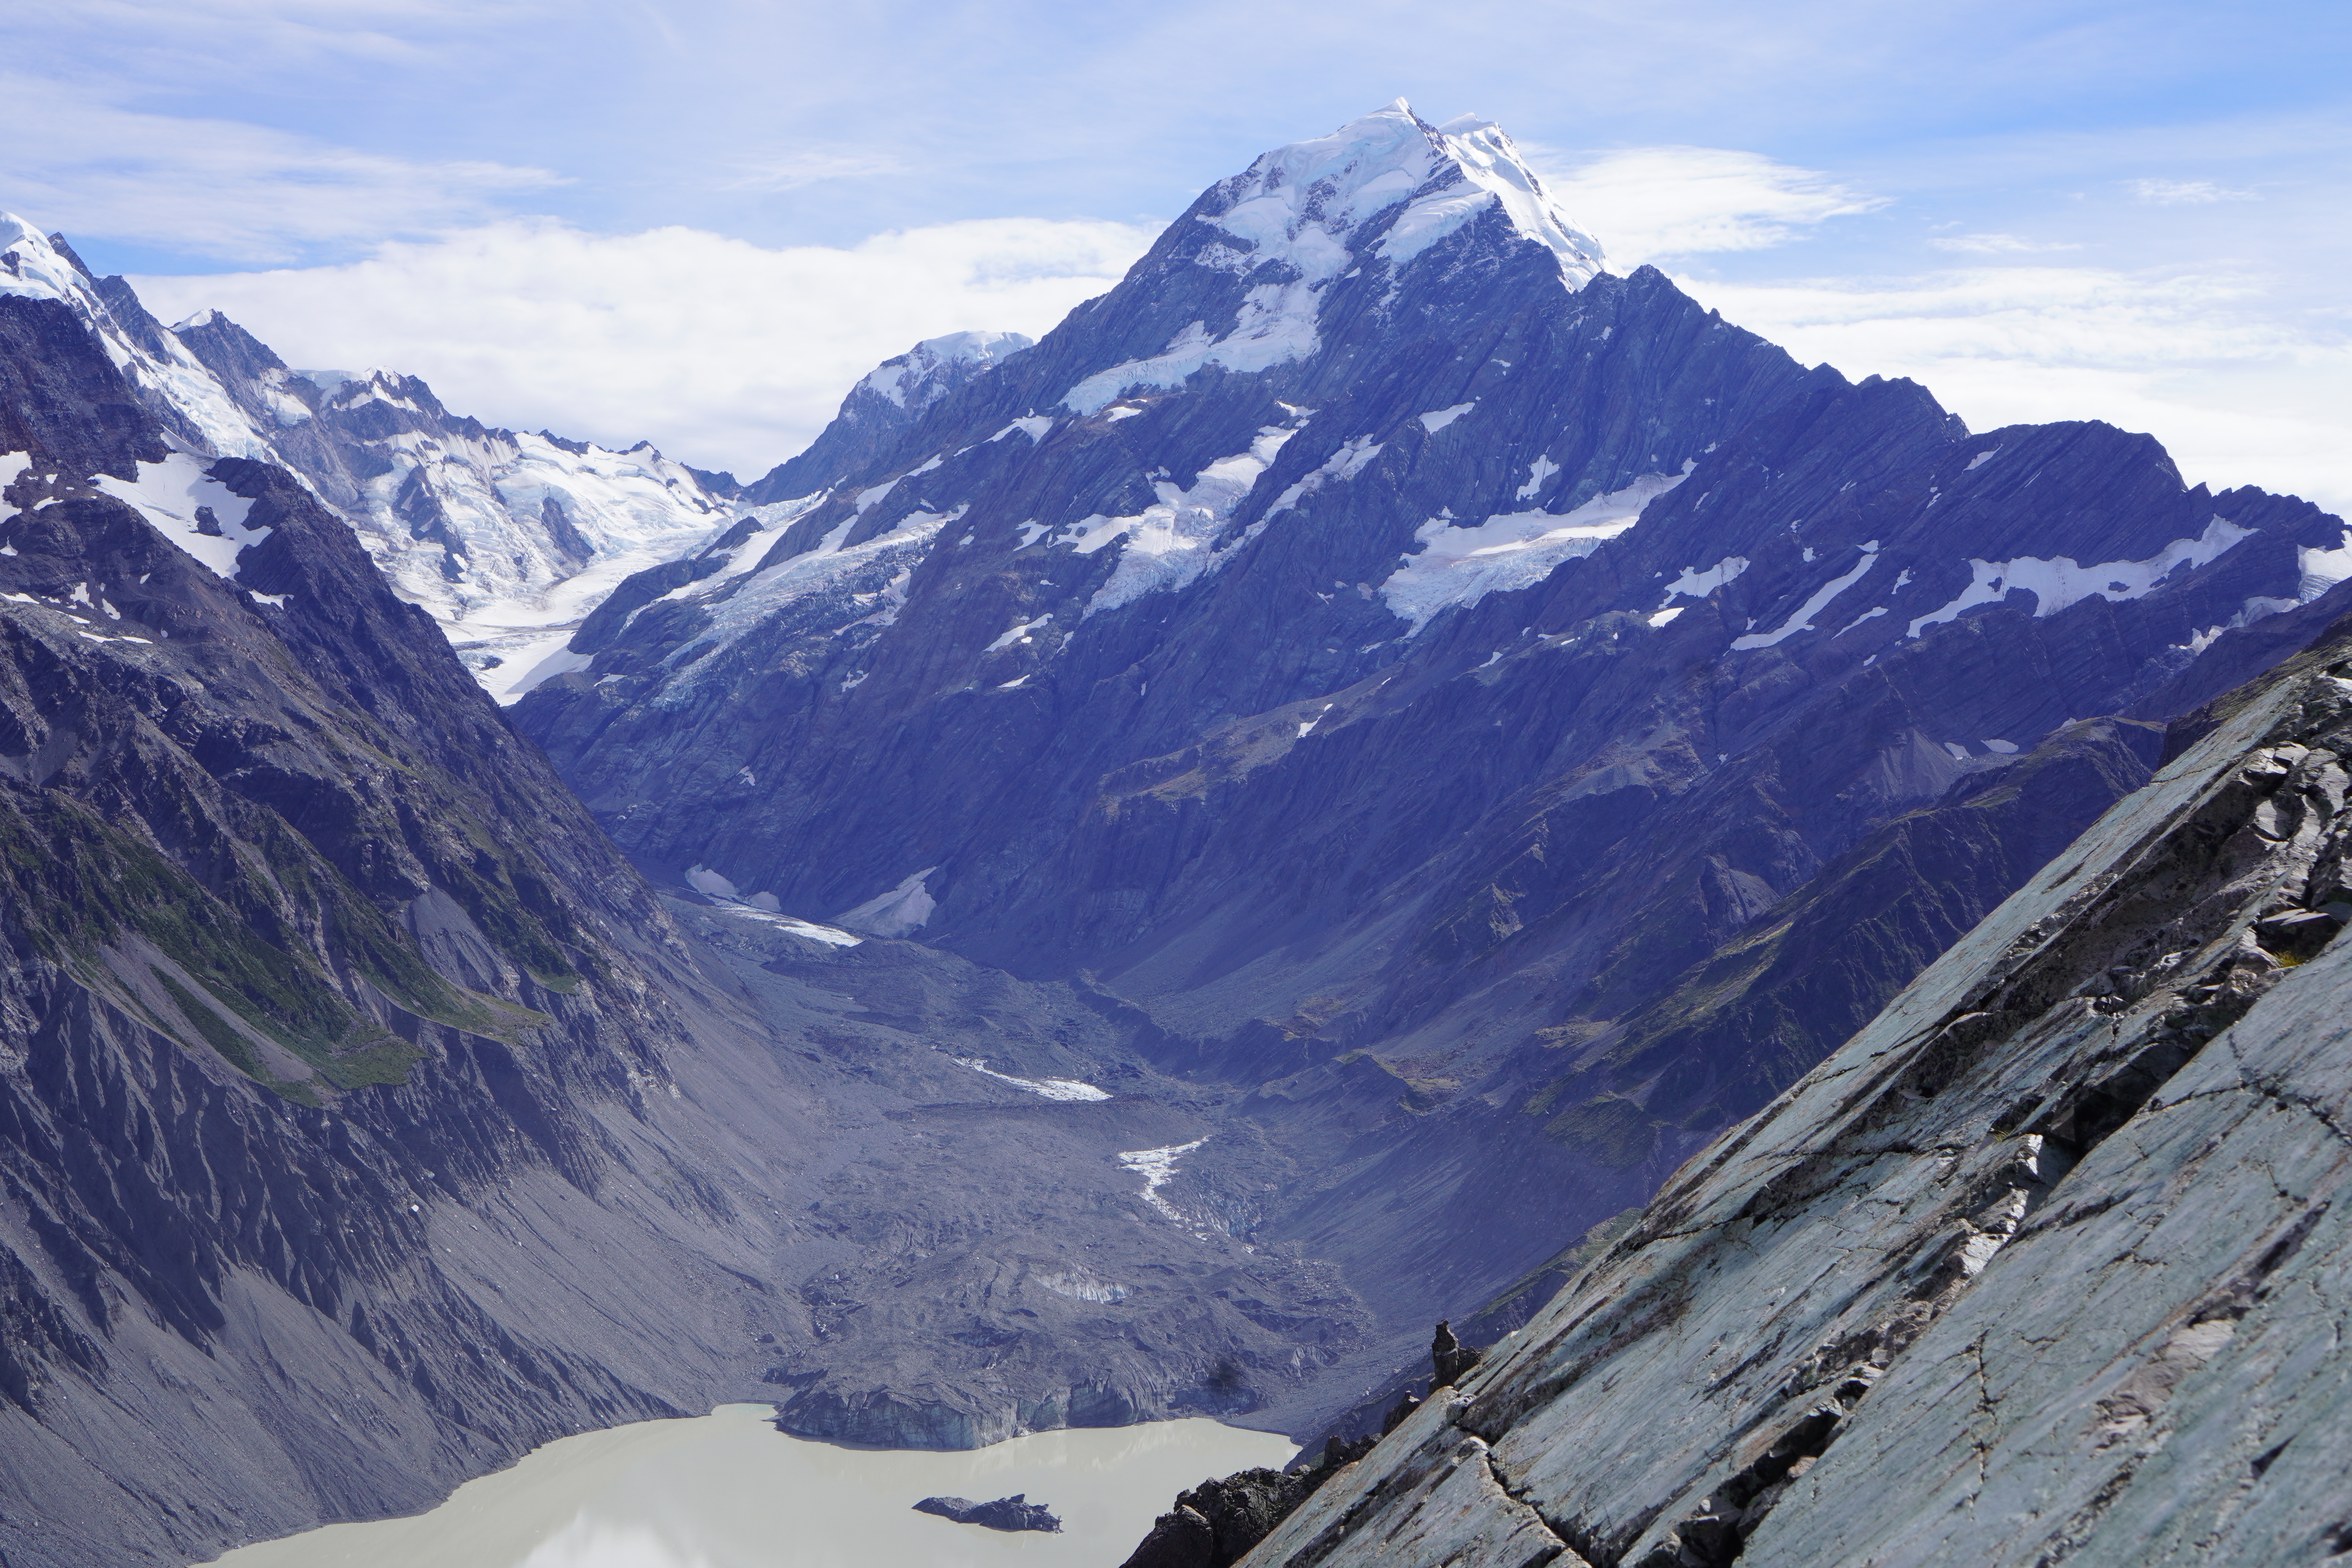
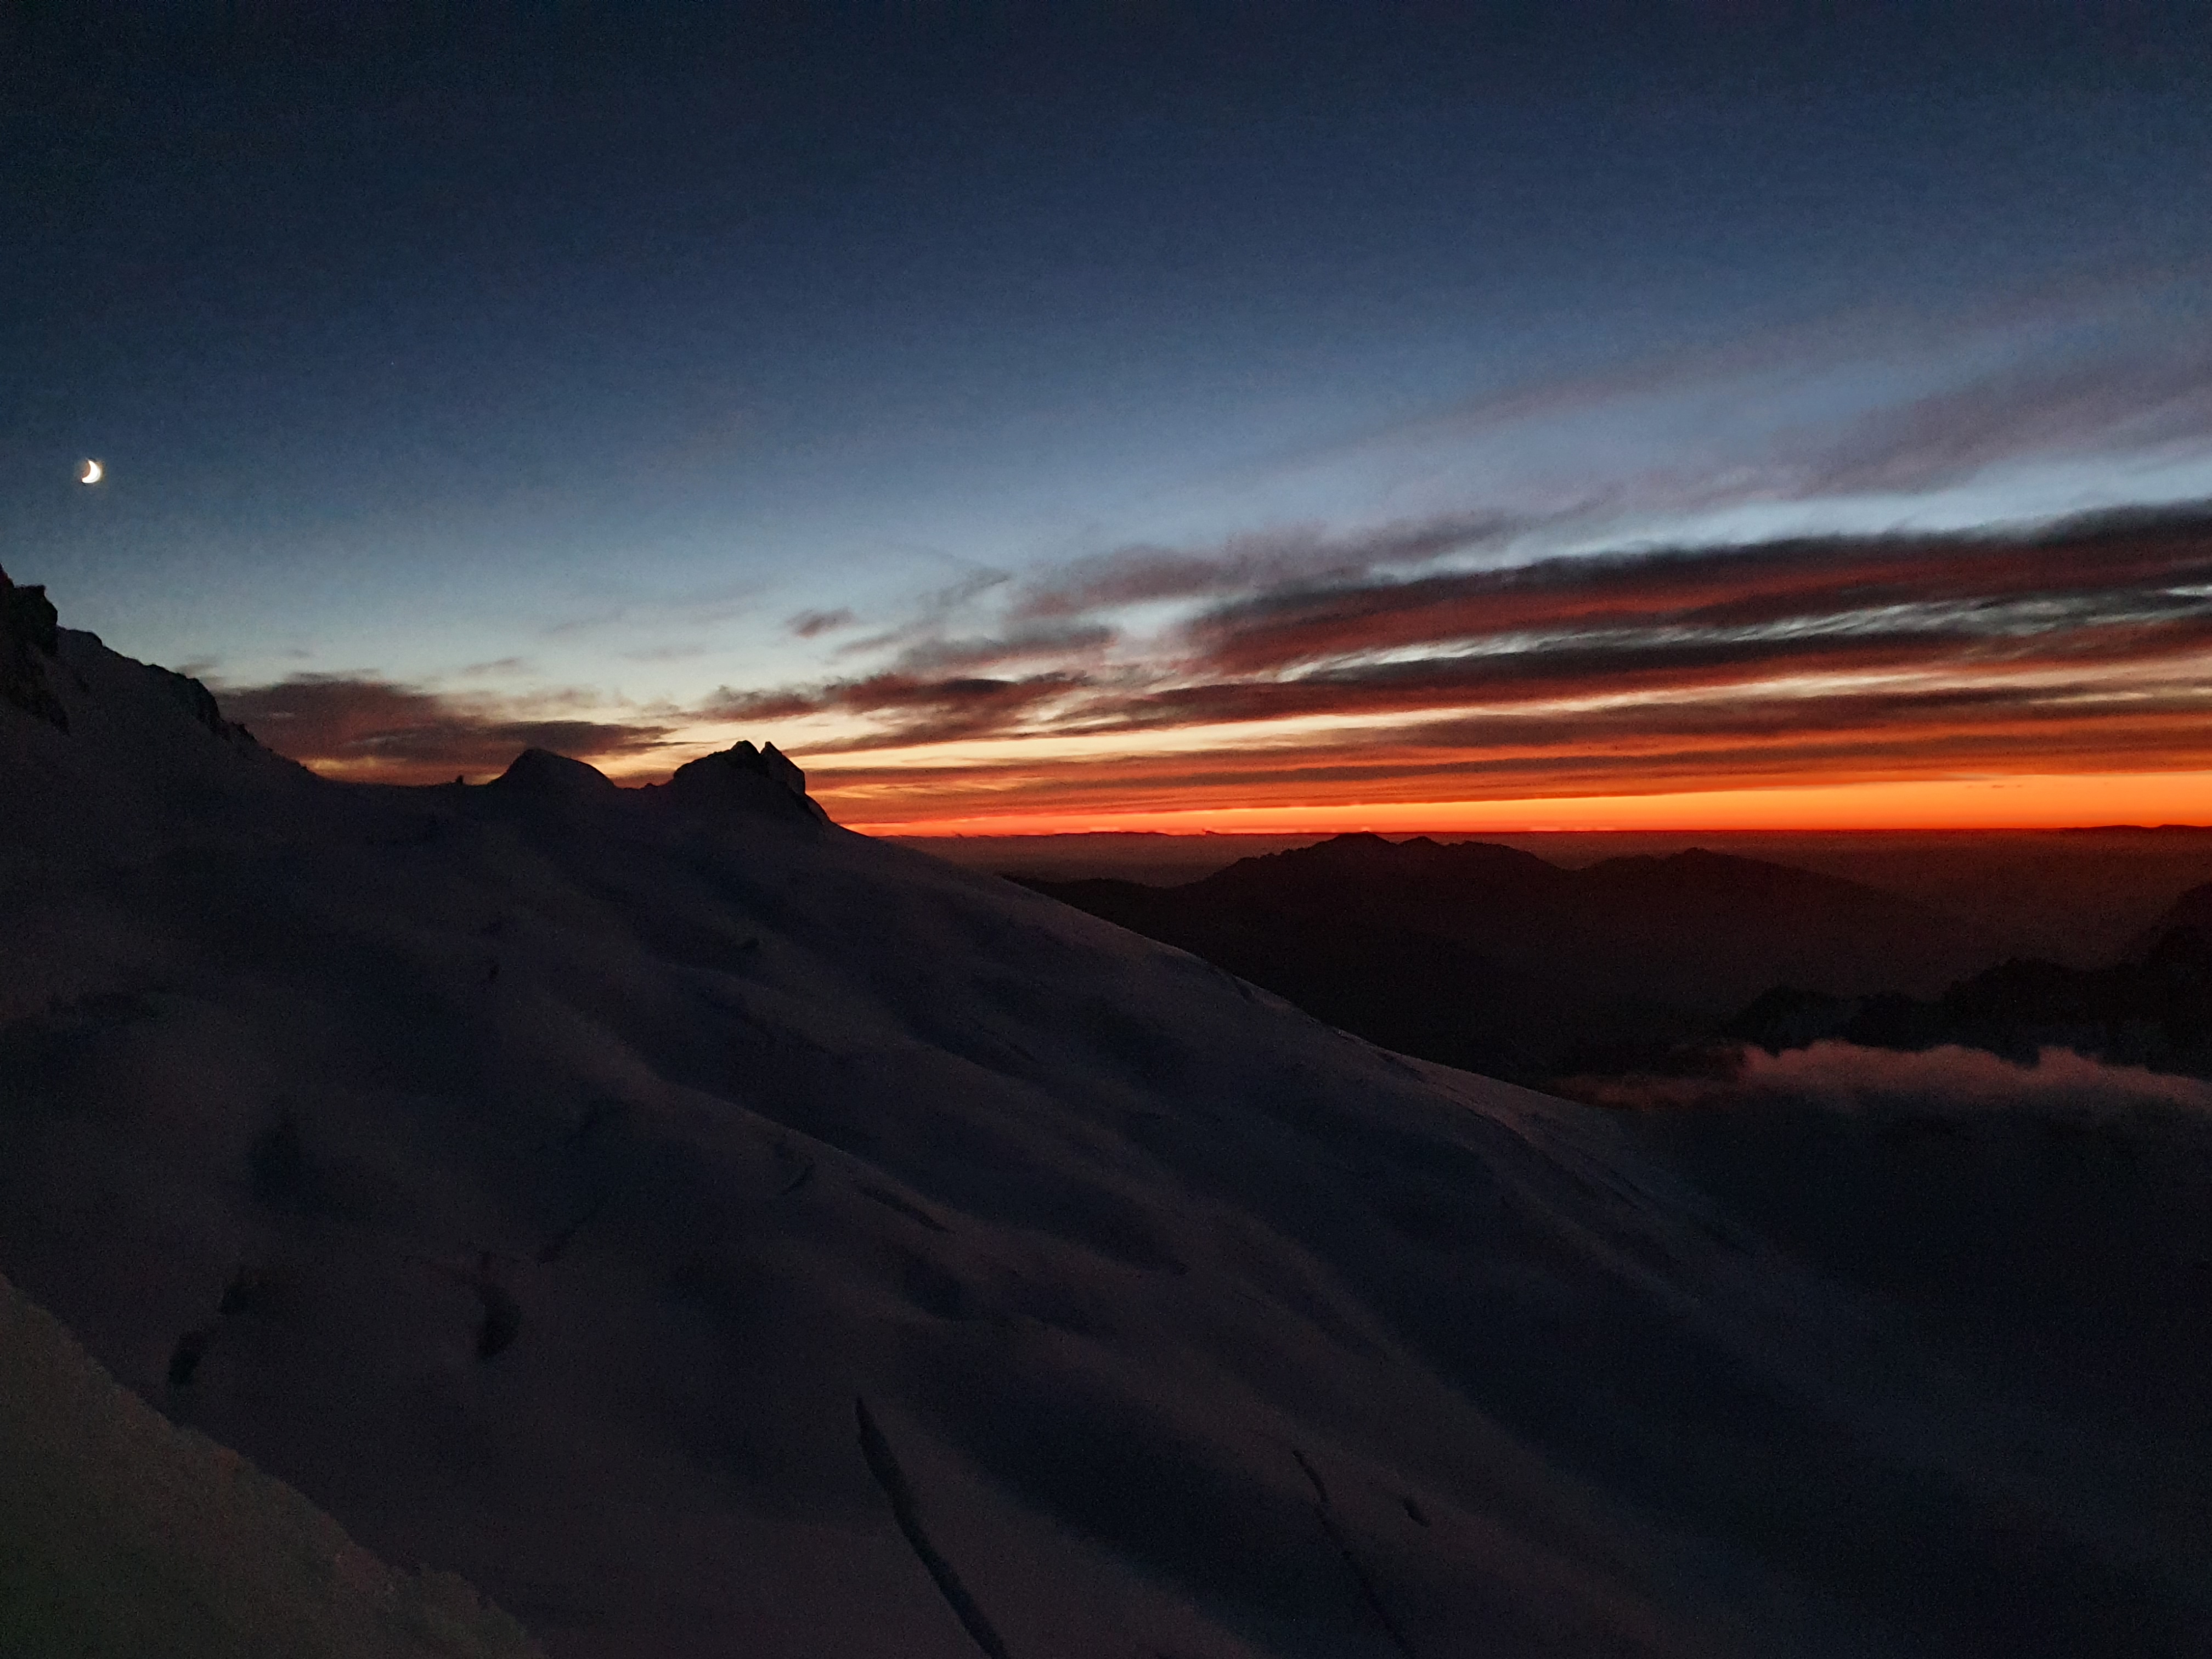
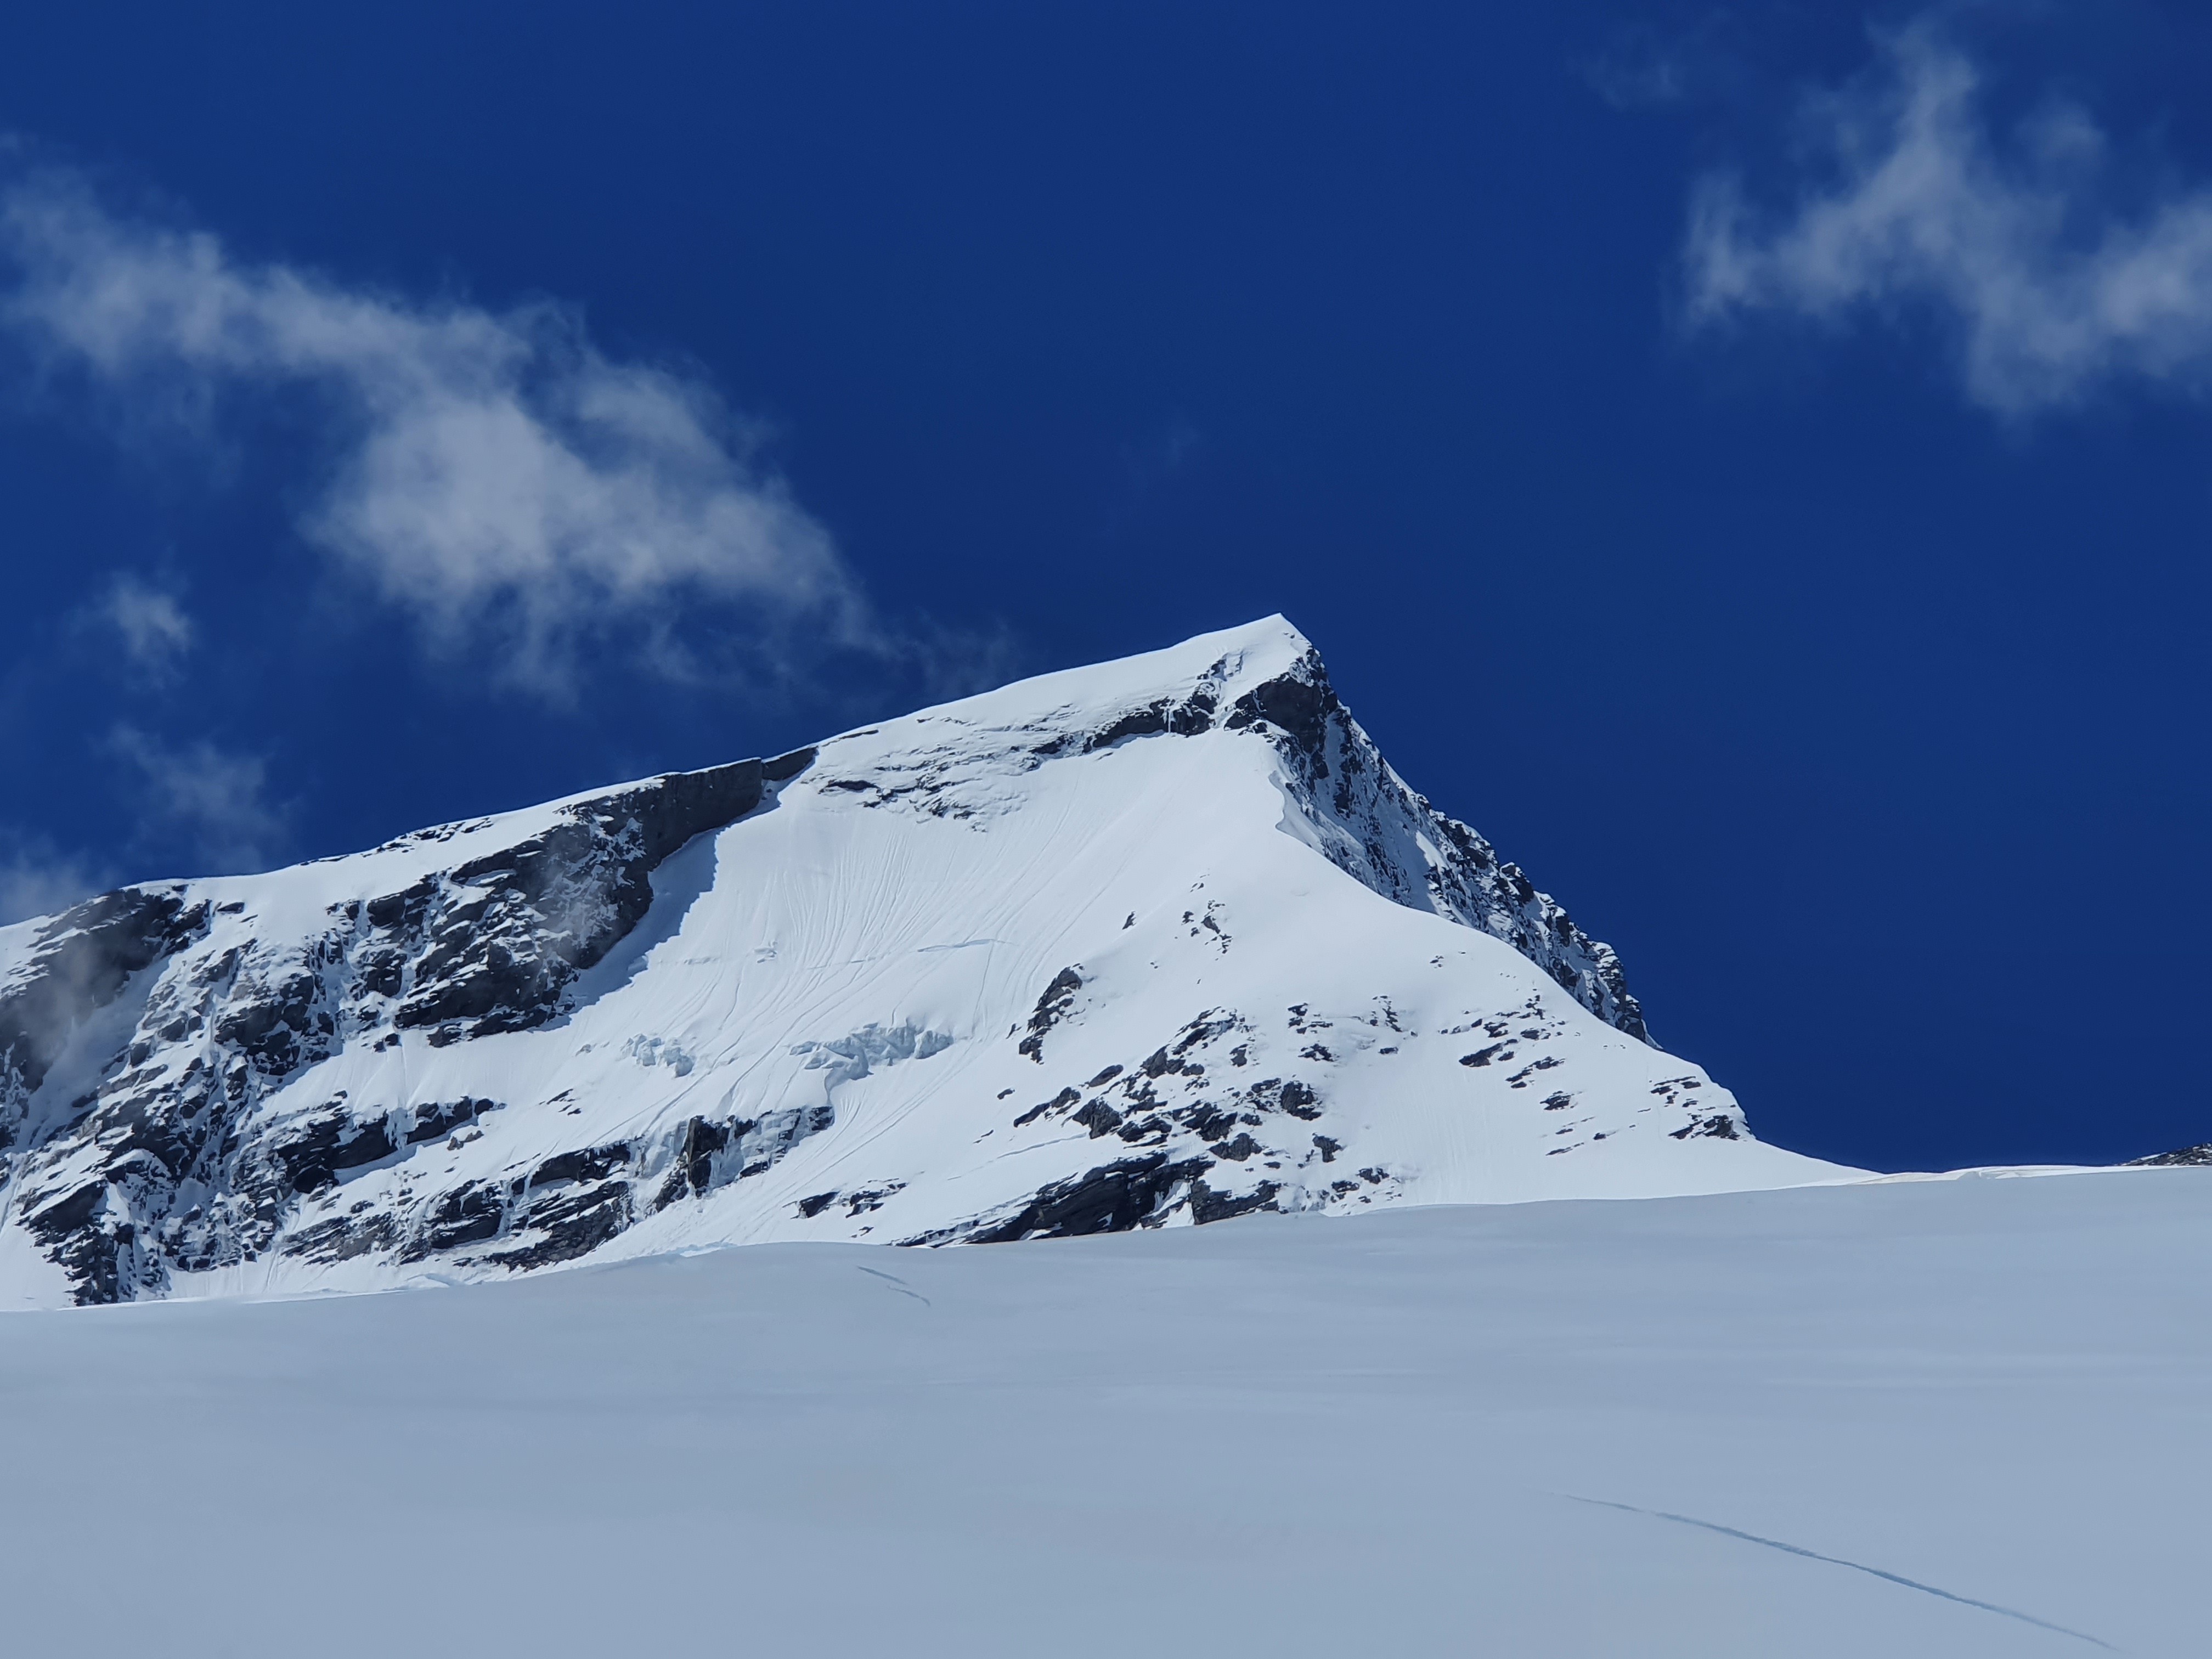
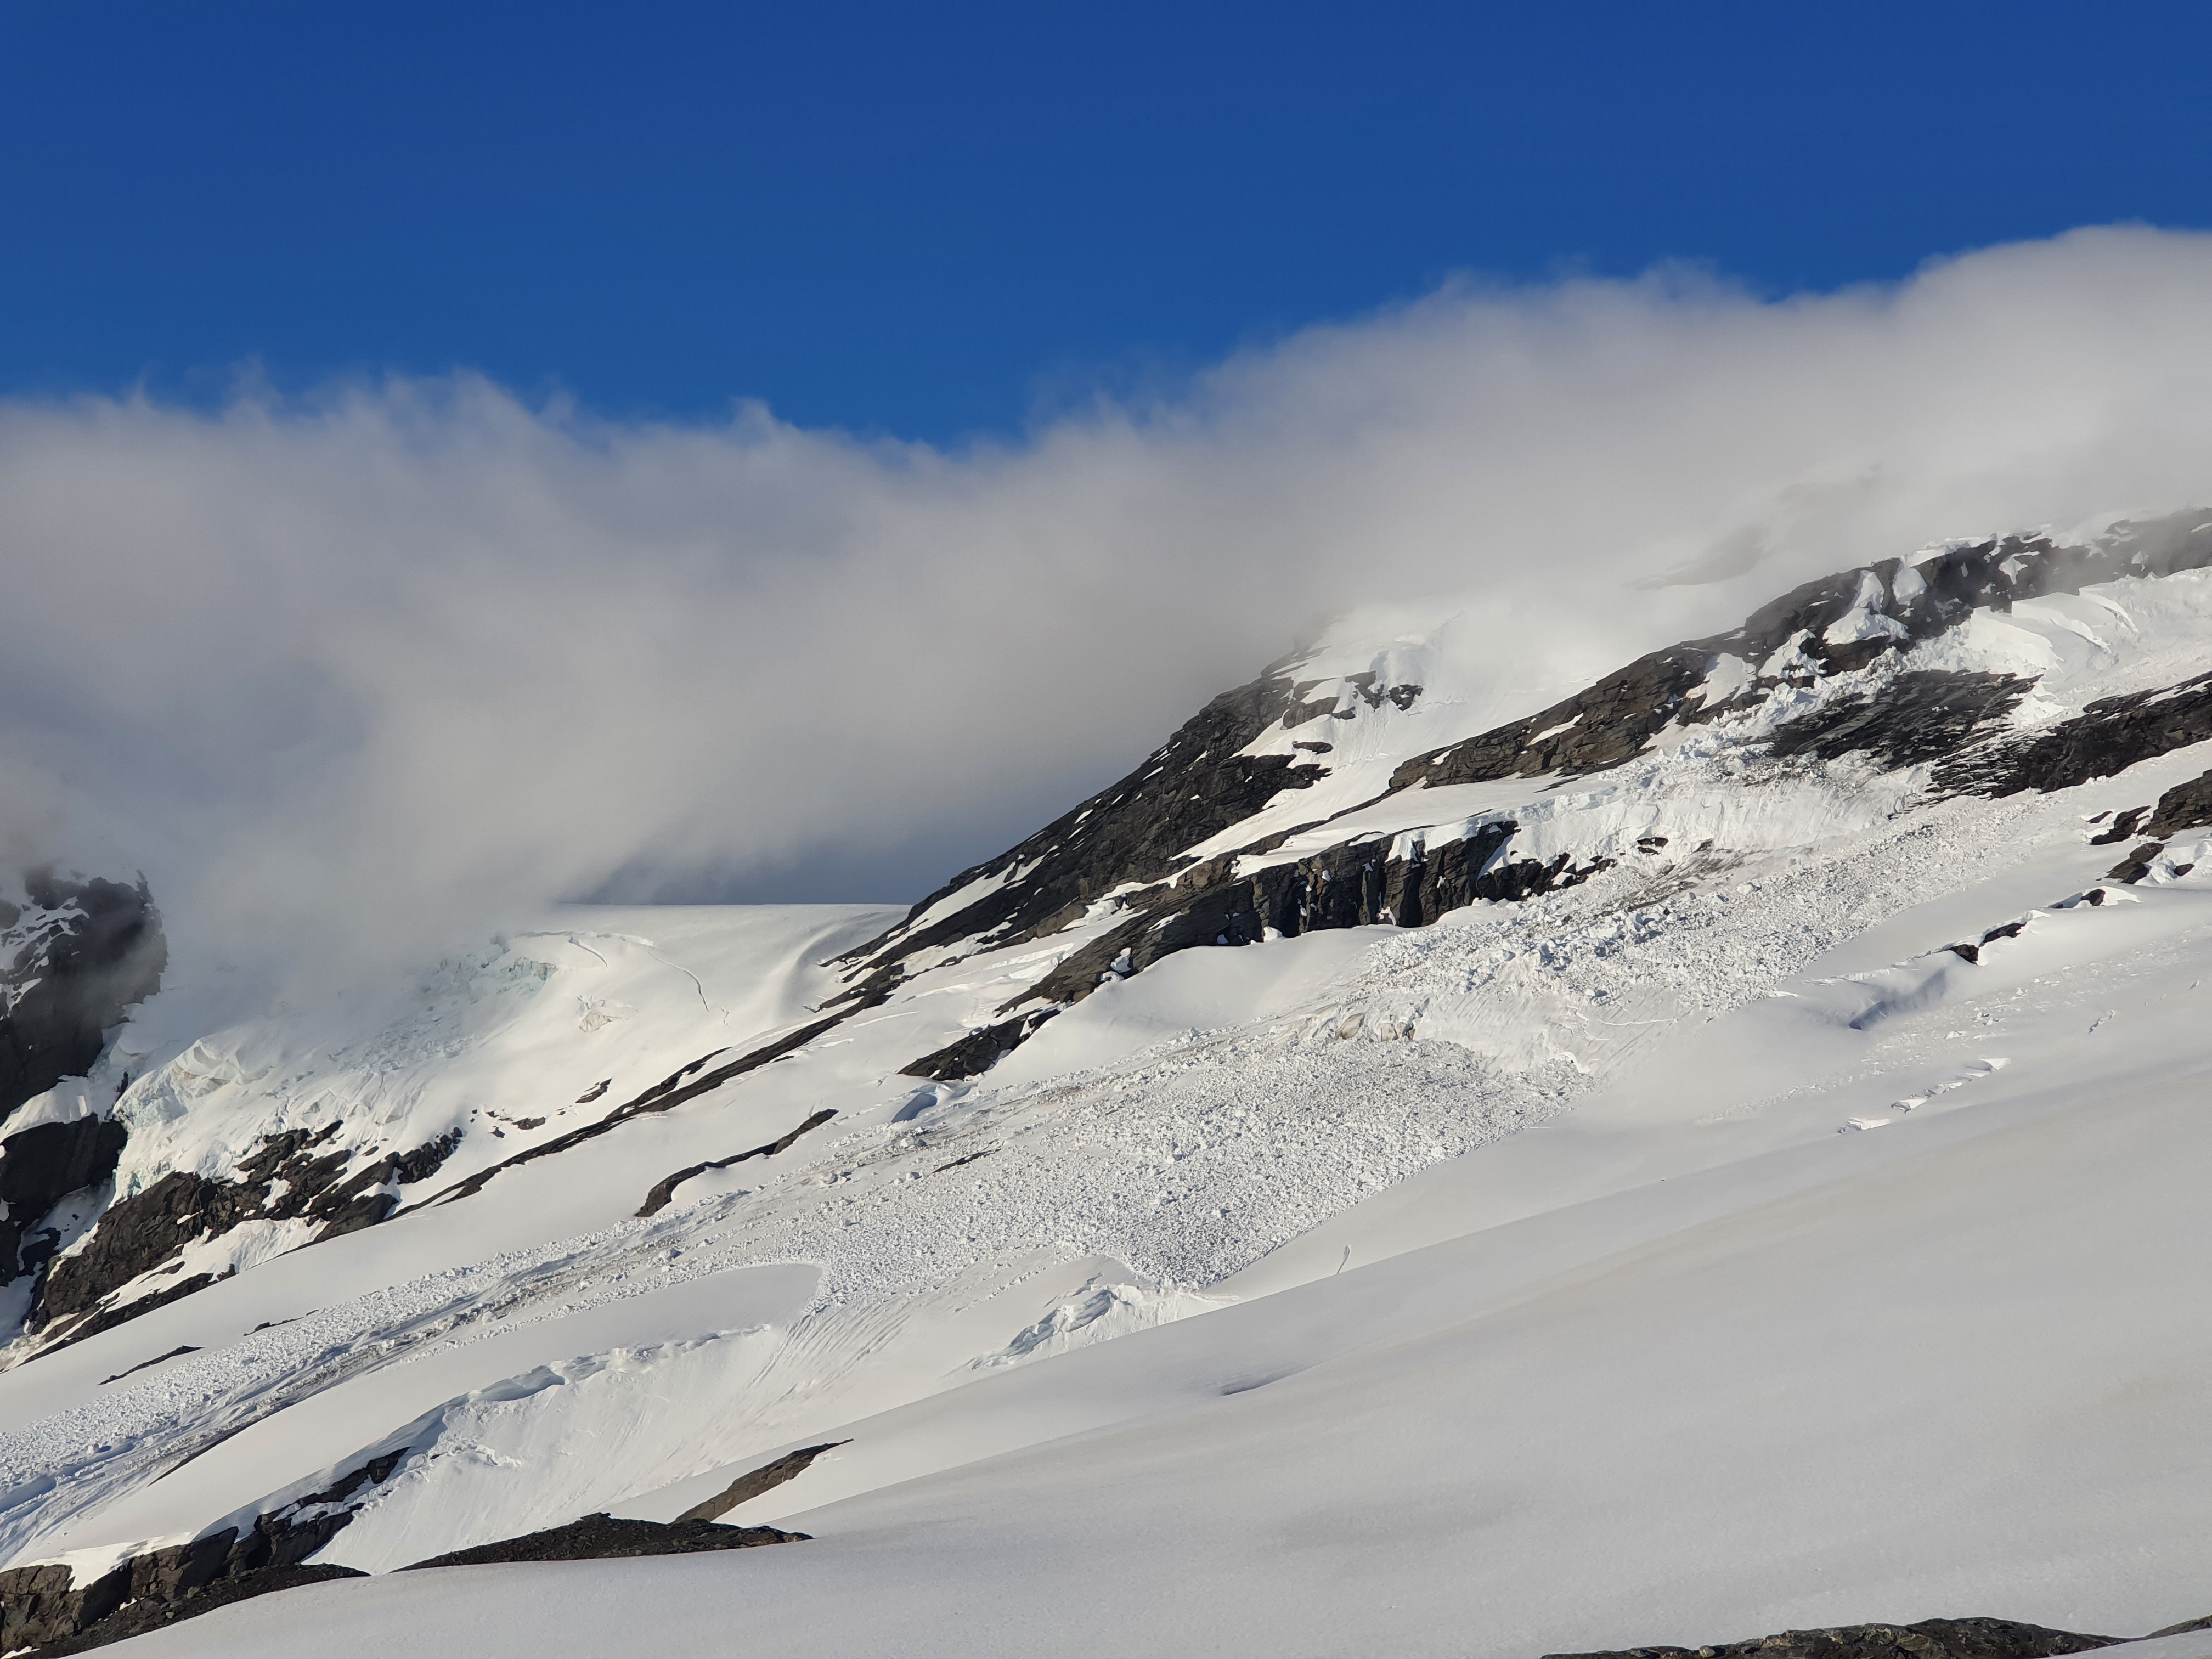
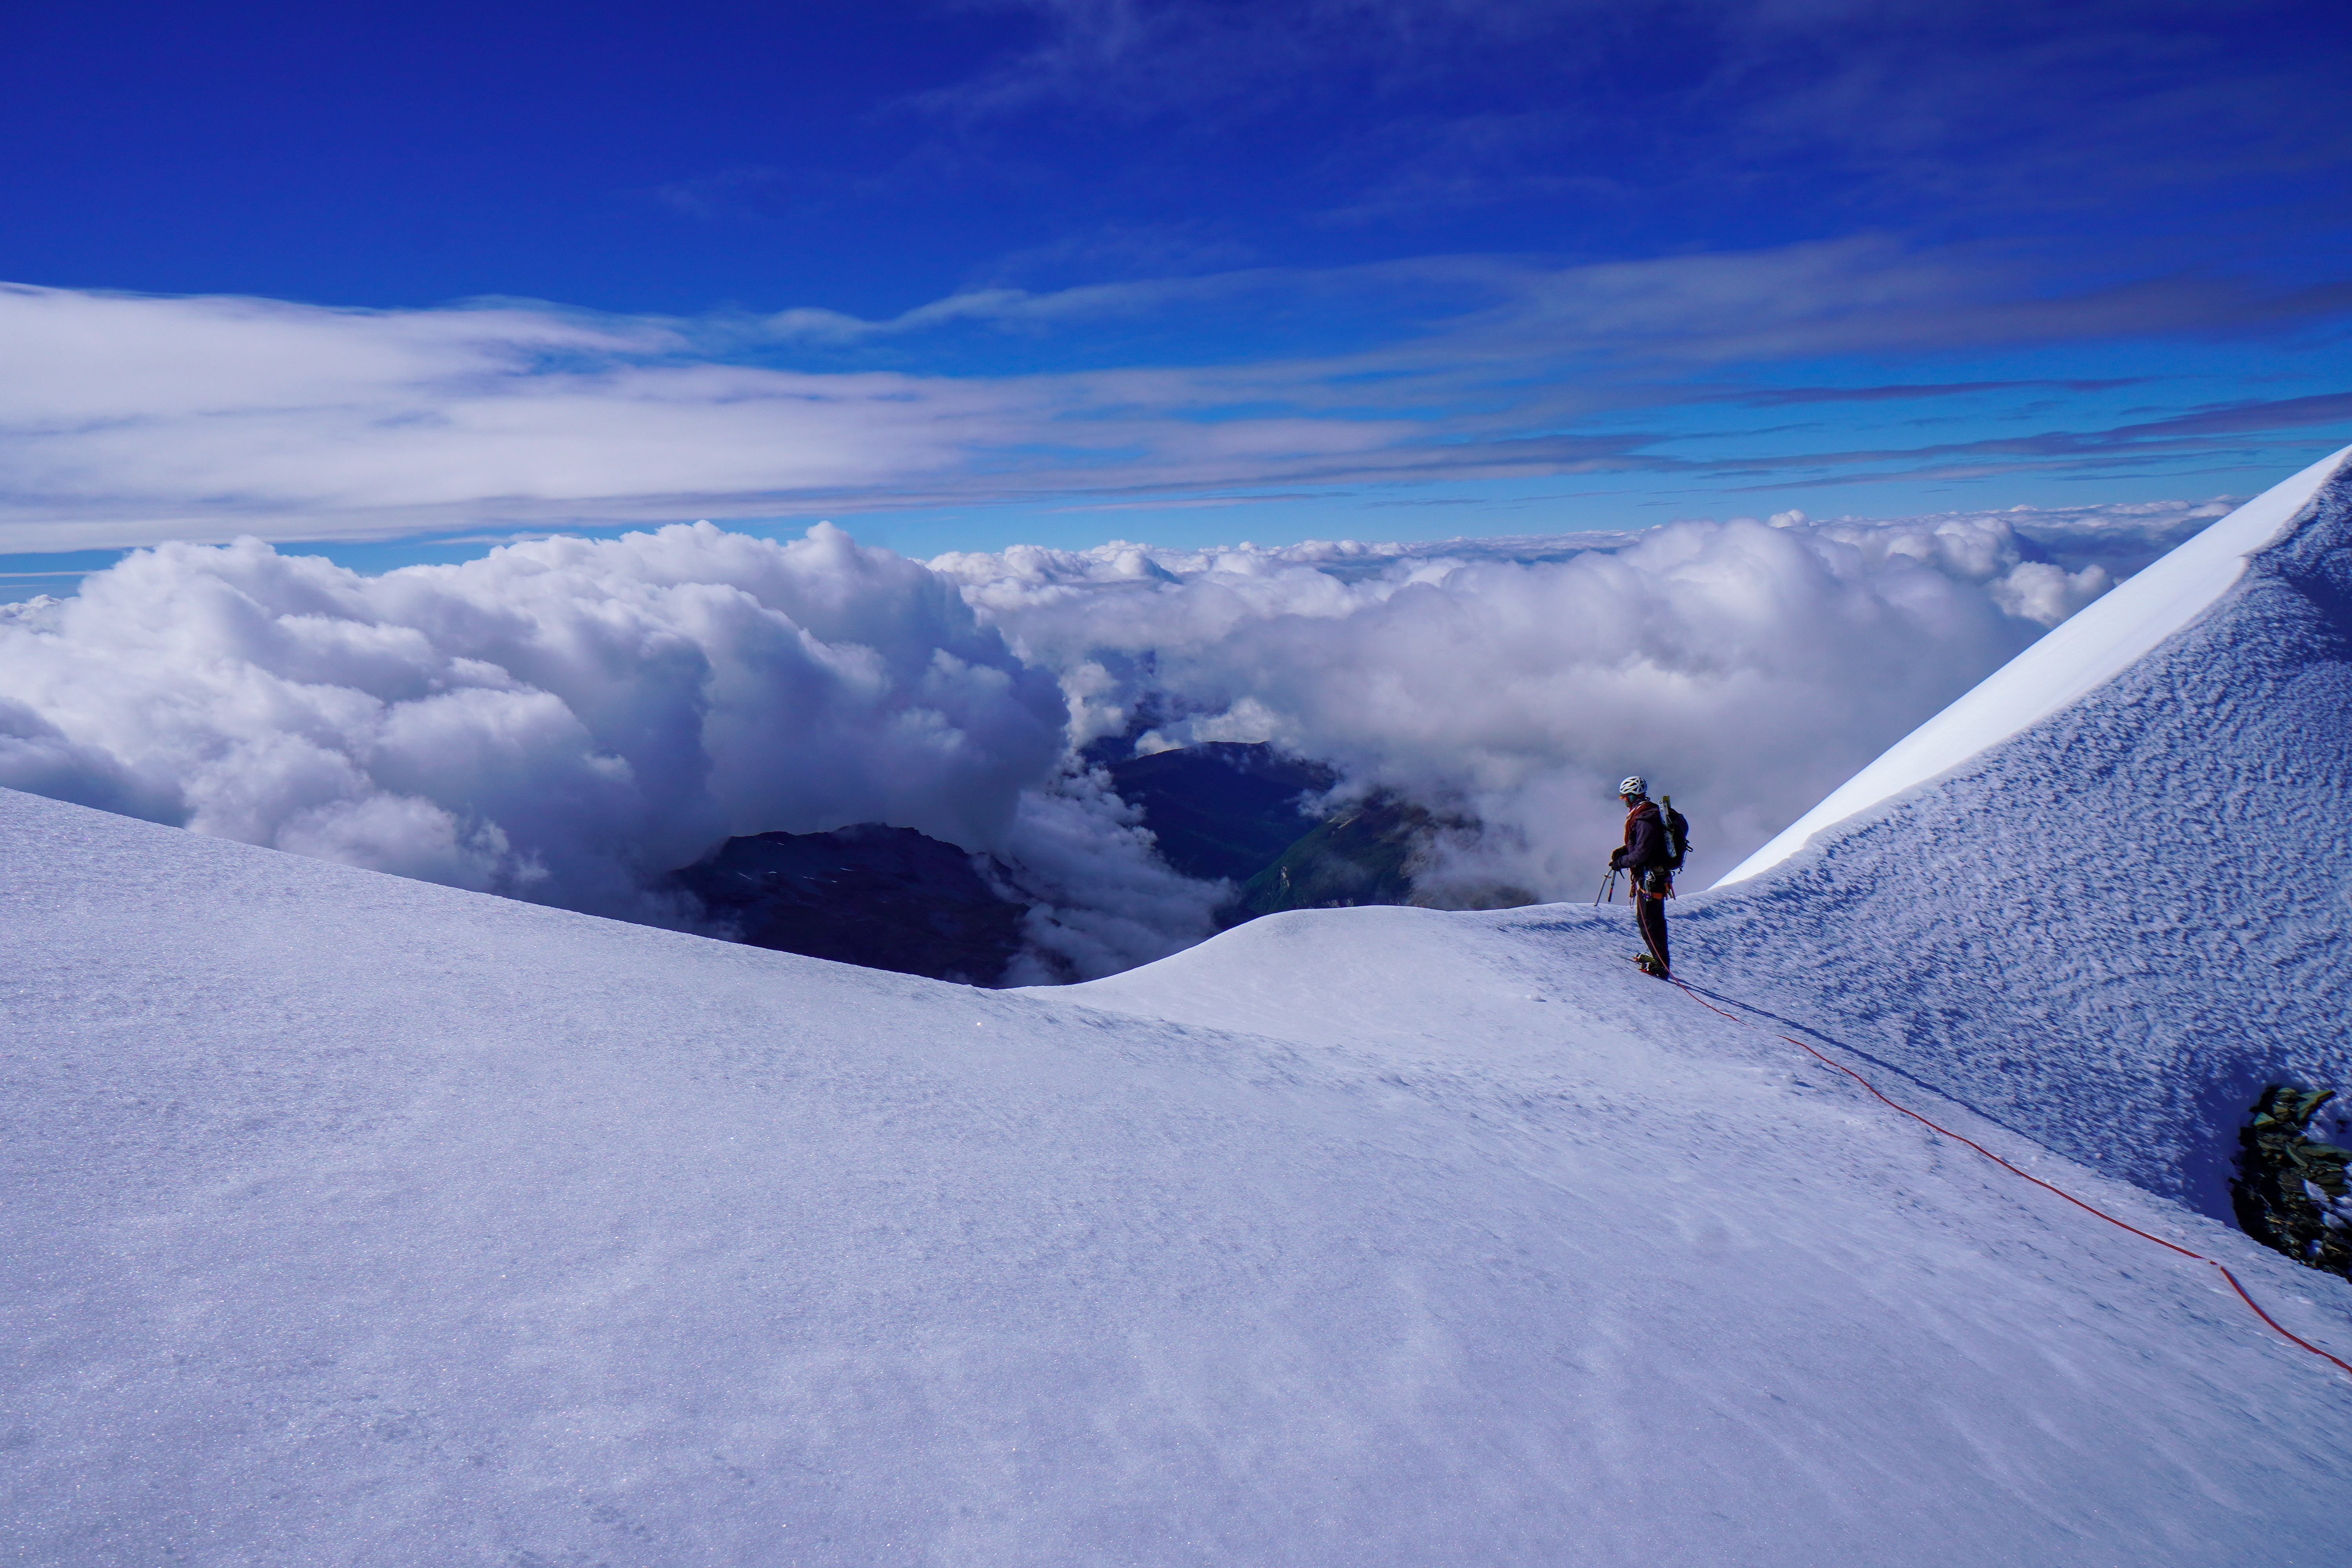
A huge day, stoked to have climbed this one! Decribed in the guide book as ‘one of New Zealands great ice climbs’ and ‘a perfect line on a beautiful face’, we had to see if it lived up to the hype. Not only is its reputation enticing, but its an incredibly aesthetic mountain and (provided you heli in to Pinoeer) is only an hour approach from the hut. Despite being only slightly taller than neighbouring 3000-ers Haidinger and Glacier peak, due to its sheer, forboding near vertical south face it dominates the surrounding skyline, appearing to overshadow everything nearby.
Ice is nice, but it ain’t rock so Joe took one for the team, taking on all the leading. Thanks Joe!
In terms of difficulty, the main issue is the long length of the route, especially if pitching the whole thing. You need to be efficient and confident at the grade to get off the face in time. Technical difficulty varies depending on the conditions but expect back to back pitches of sustained WI3, and when we were there short but delicate vertical sections, edging more into WI4.
Summit stoke! Ridge behind that we had to shuffle across to get to the summit.
Grade : Technical grade = 5, Seriousness grade = IV
Equipment : 2x 60m ropes, 12 screws with long runners, small rock rack (didn’t end up using). 2 x snow stakes. Tat for V threads.
Approach : 1 hour from Pioneer hut on skis, 30 mins on skis.
Climb time : time on route around 12h (we pitched it all); round trip via glacier peak was 18h
Season : 19/11/2023
Team : Joe and Maria
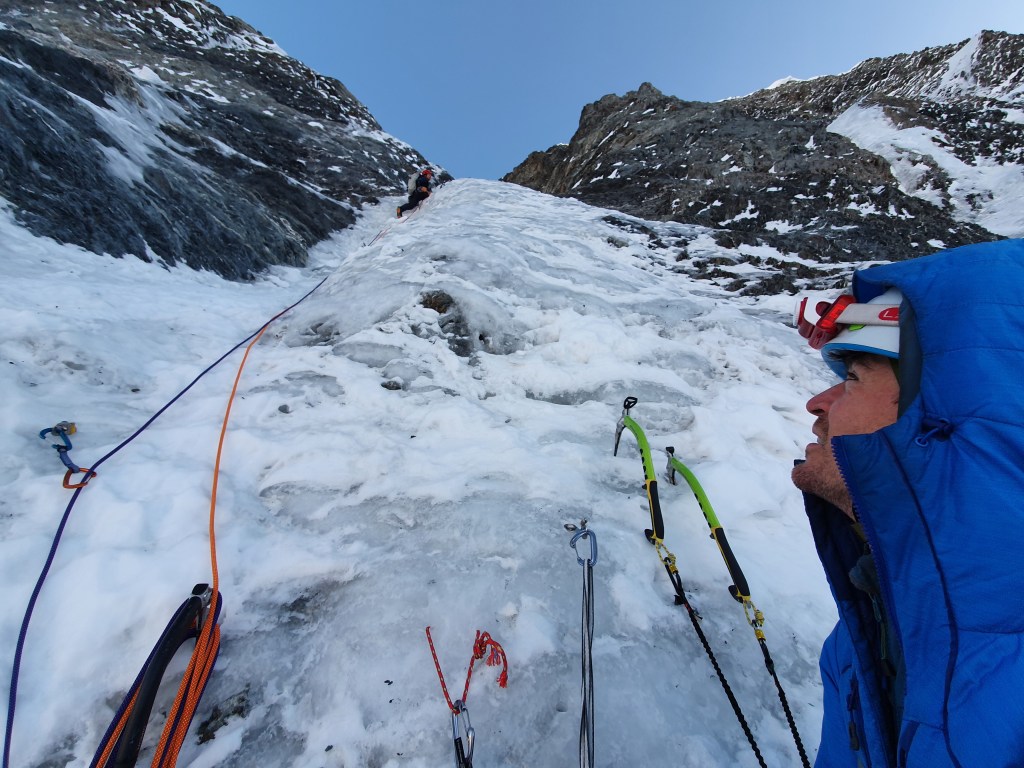
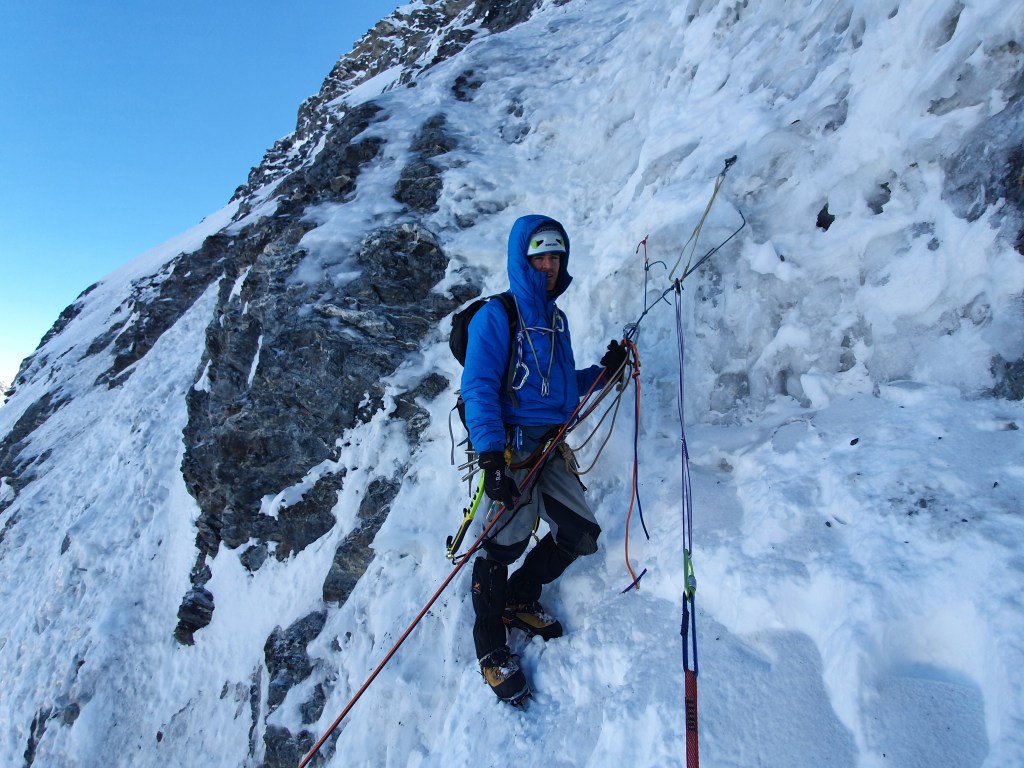
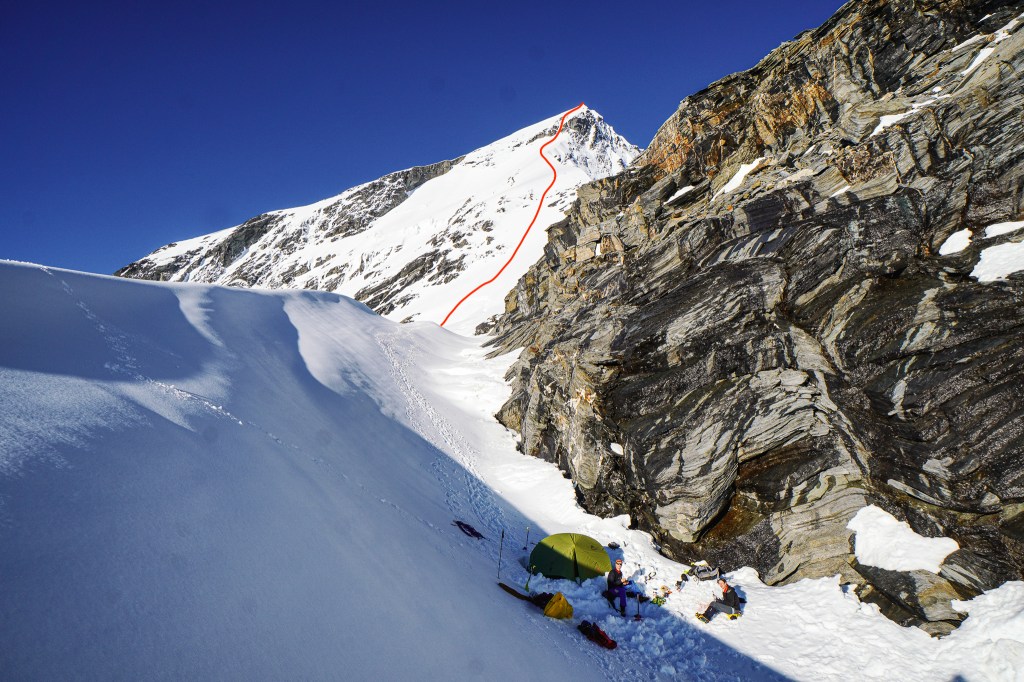
Coming up the lower snice pitches before the crux section. The conditions here were excellent, with confidence inspiring placements with a single swing and decent screws. Sometimes this section is snow.
Approach
Stayed at NZAC’s H.E.L Porter Memorial Lodge the night before. Flew with Heliservices, linking up with 2 other climbers making it $525 between 2 of us (770 on the way out between 2). We have never walked in or out of the west coast neves. It is still possible and reguarly done, but it looks increasingly gnarly and difficult as the glacier recedes leaving unstable moraine walls. Horror stories abound, and it certainly seems more dangerous objectively that anything you would experience on the route.
We landed at the hut mid morning, so went to scope the route out to plan for the next day. It’s an easy approach from Pioneer hut, giving you a full view of the face without having to get too close. We could see the route was looking fat, but also that by midday it had turned into a shooting gallery. The sun hits the final headwall around then, and all the debris gets funnelled directly down the route. Options are to either climb in the winter so it stays cold and a few days after a storm so there is less ammo at the top, or aim to be off the route by around midday. Factor this in if you’re planning to rap the face. We stashed our gear at the base of the route for a cruisy approach the next day and headed back to the hut.
Onto the water ice! Beatuiful ice climbing over blobby bulges with short body length near vertical sections and bomber screws. As is often the way we didnt get any photos of the crux
We had always planned on descending via glacier peak as a round trip always seems like a more complete day out, and the afternoon icefall confirmed that this was the way to go. If your planning on descending this way, its vital to walk round and make sure the descent from Glacier peak onto Explorer glacier isnt cut off – this only takes 30min from the hut.
The hut book showed the route had been climbed a couple of times in the last week, and that the conditions were generally good but with poor quality ice at the top. This cemented our decision to avoid rapping the route if possible. It seemed like there had been some epics in the previous week, with one team getting benighted – we aimed for an early start and to move fast to avoid the same.
Back at the hut, we almost had to call the whole trip off after #bootgate when someone else staying at the hut knocked one of Joe’s boots that were drying outside off the platform they were on – a platform perched out over a 50m cliff with a big shrund at the bottom. Miraculously, the boot and footbed both landed on seperate little ledges on the cliff just shy of the crevasses below…!! A good lesson to not leave stuff out drying over a cliff!
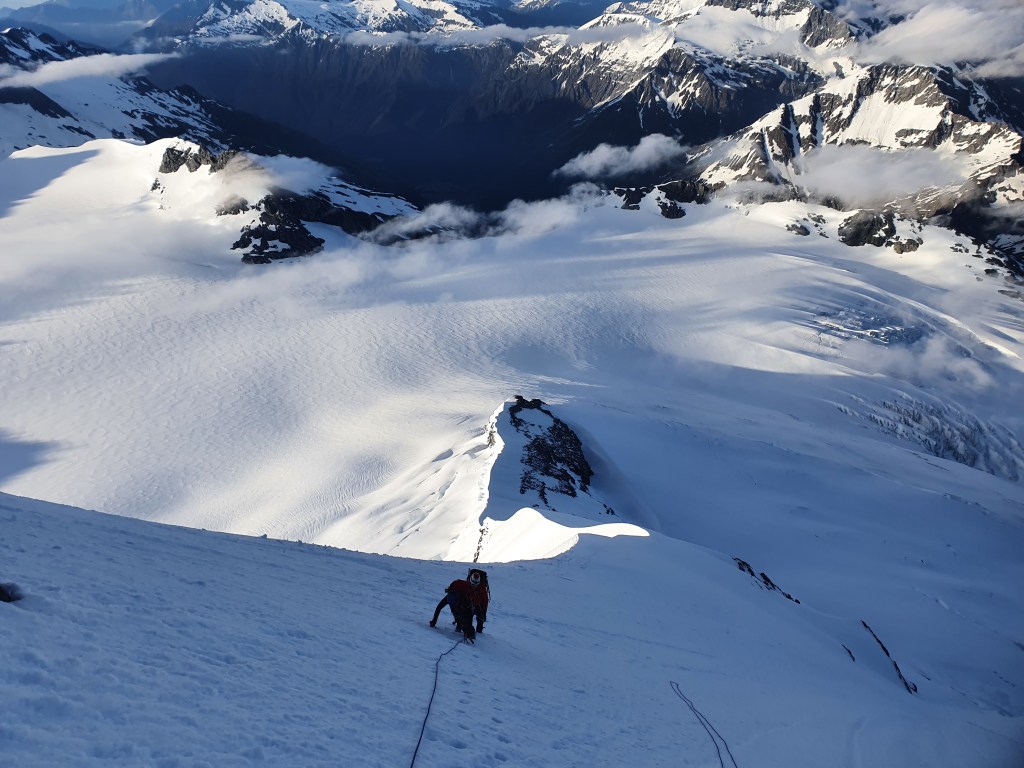
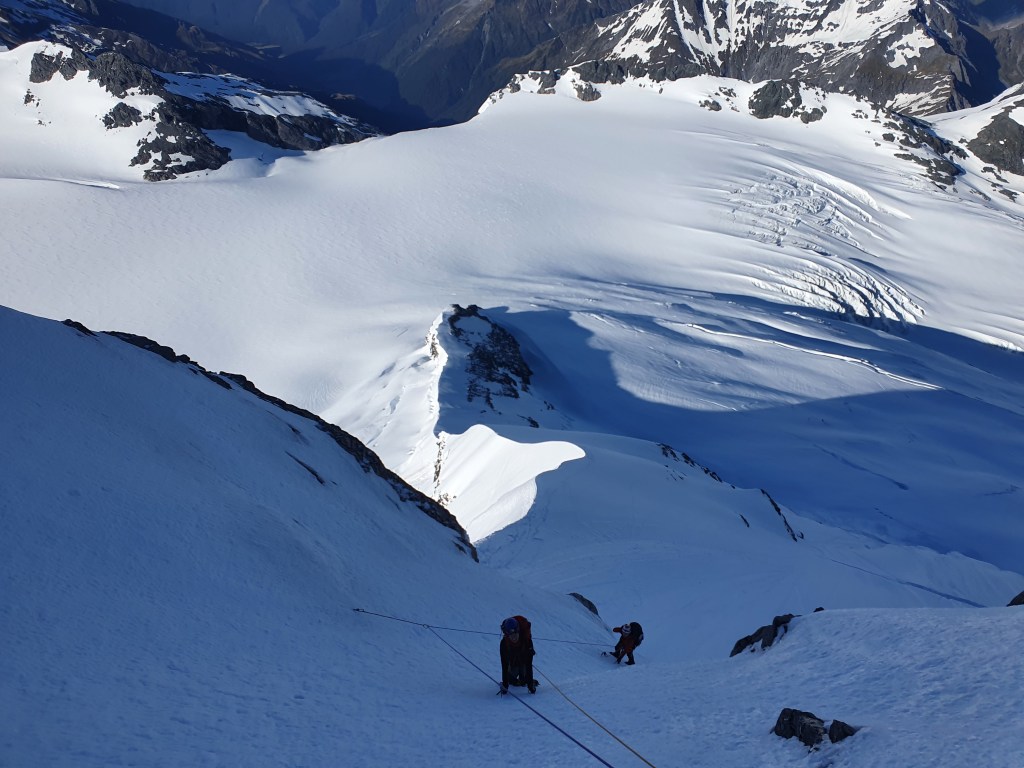
More snice cruising
climb
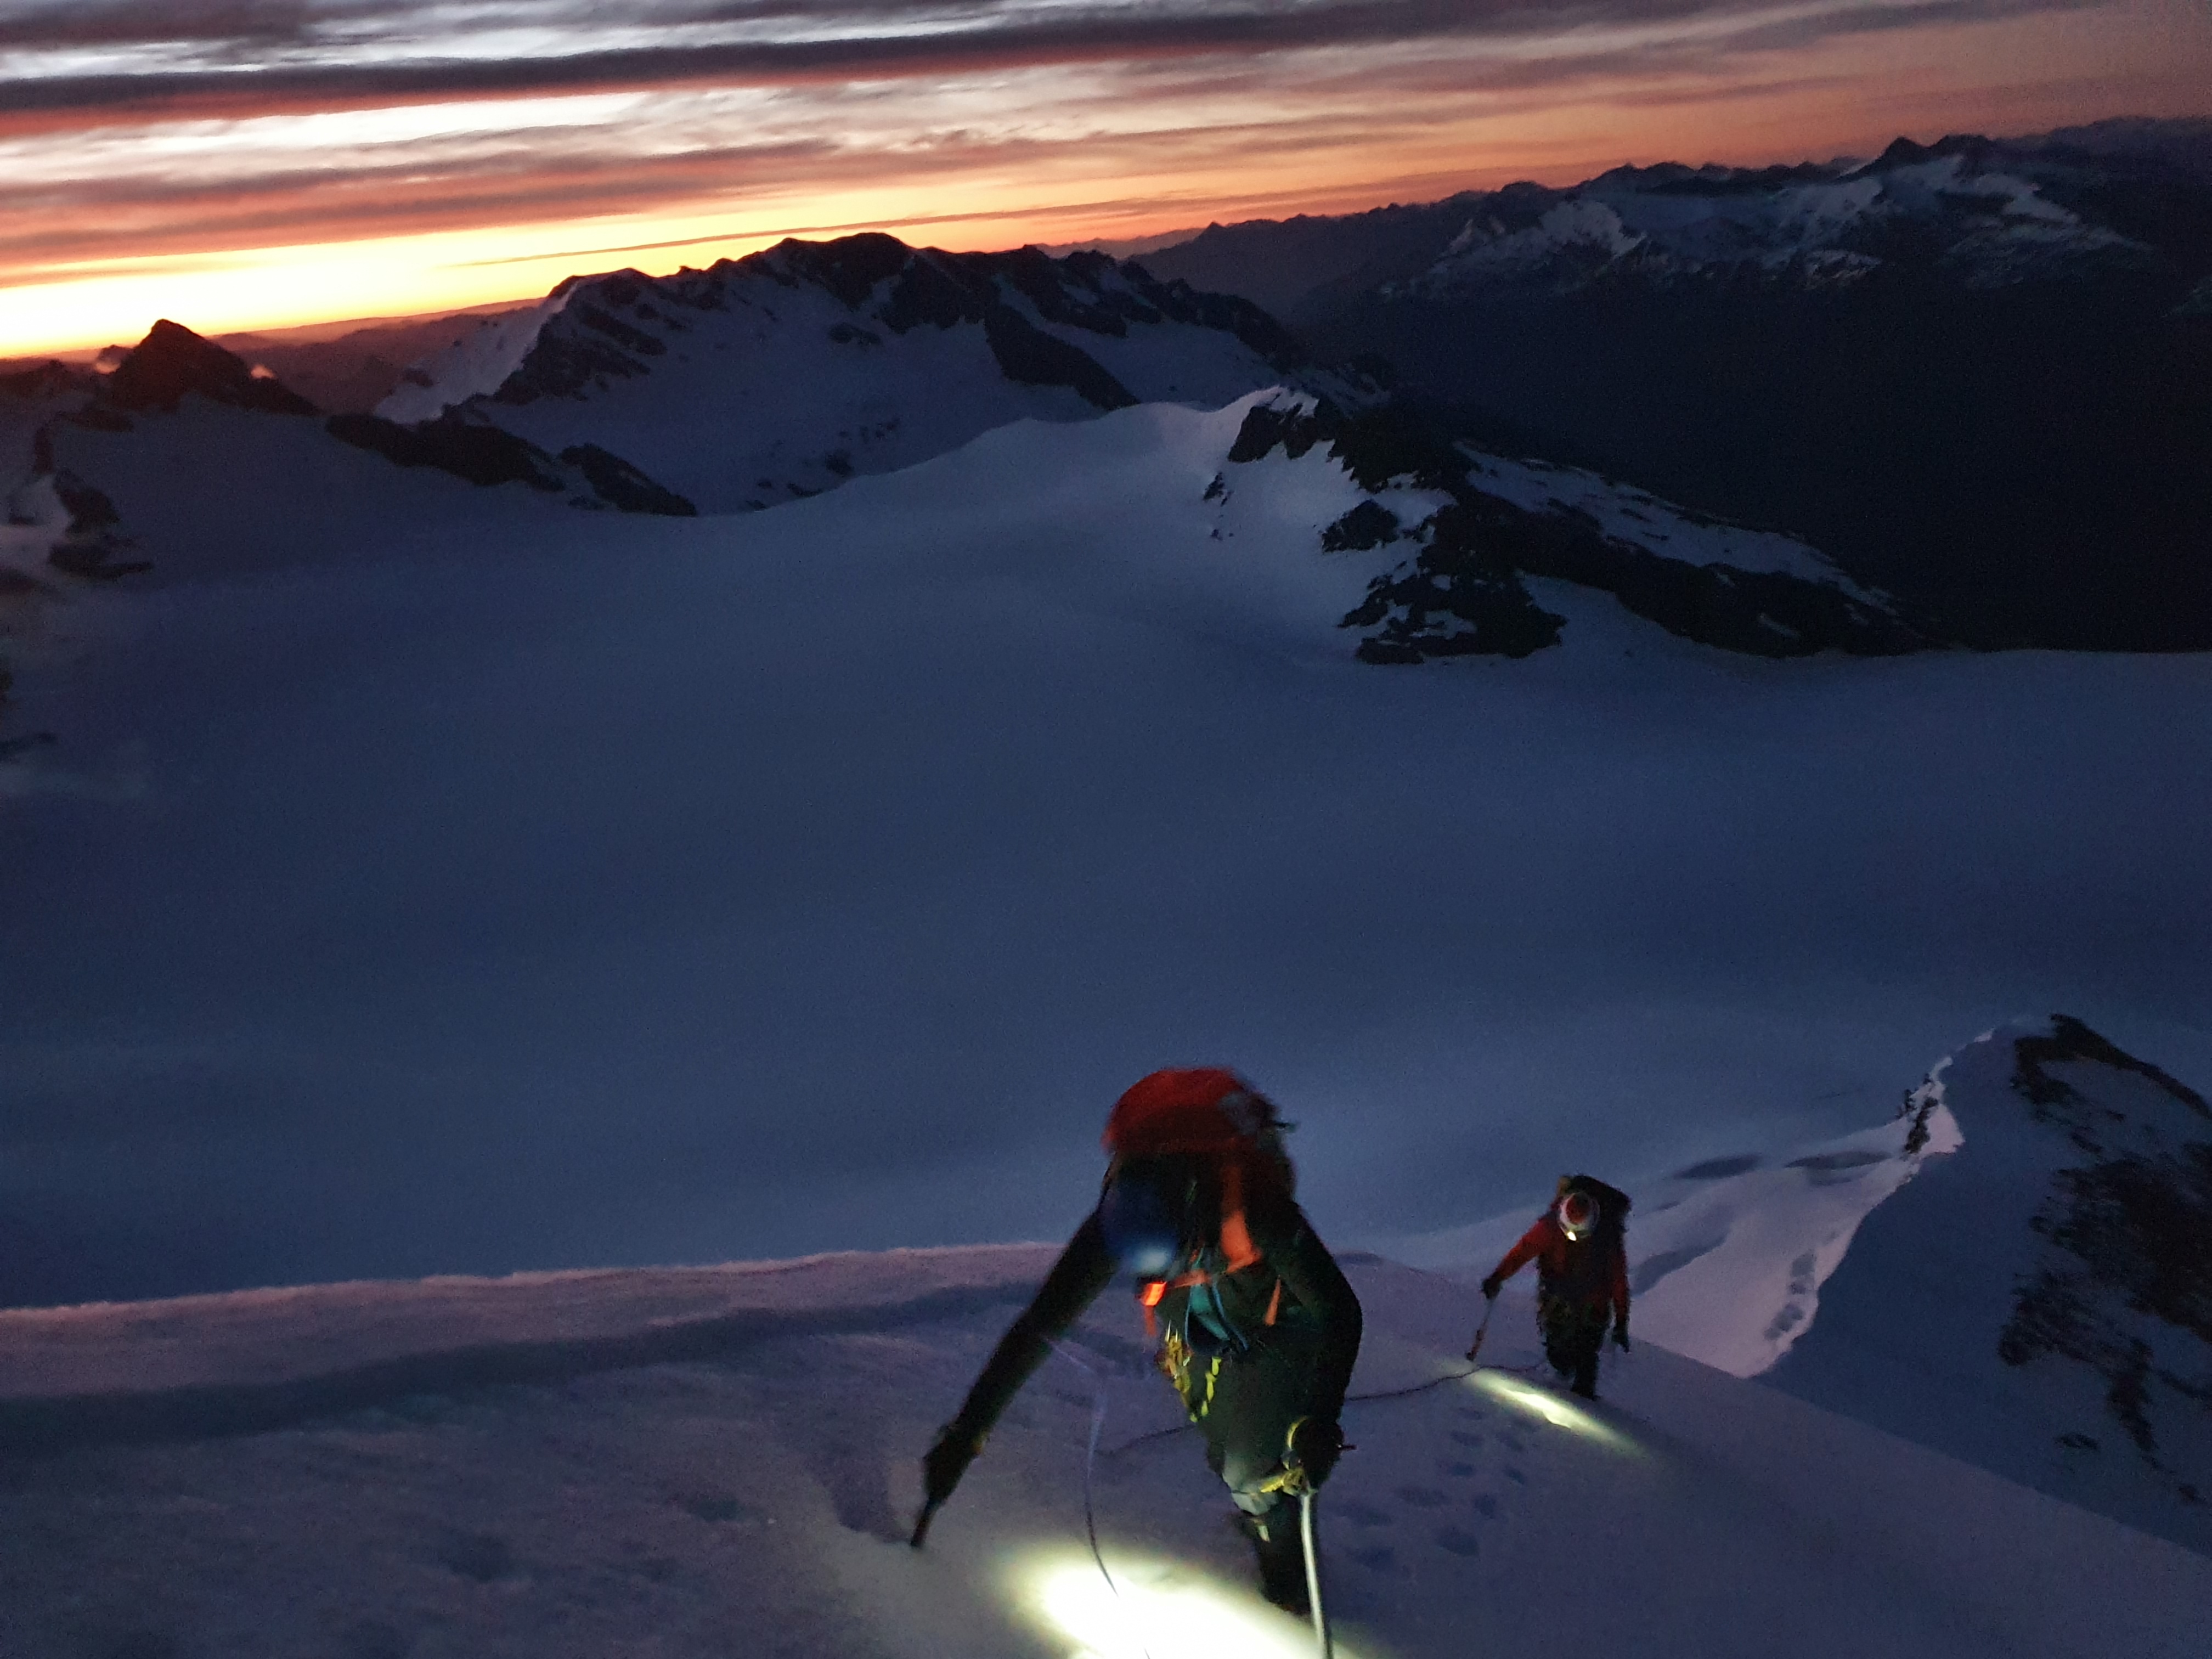
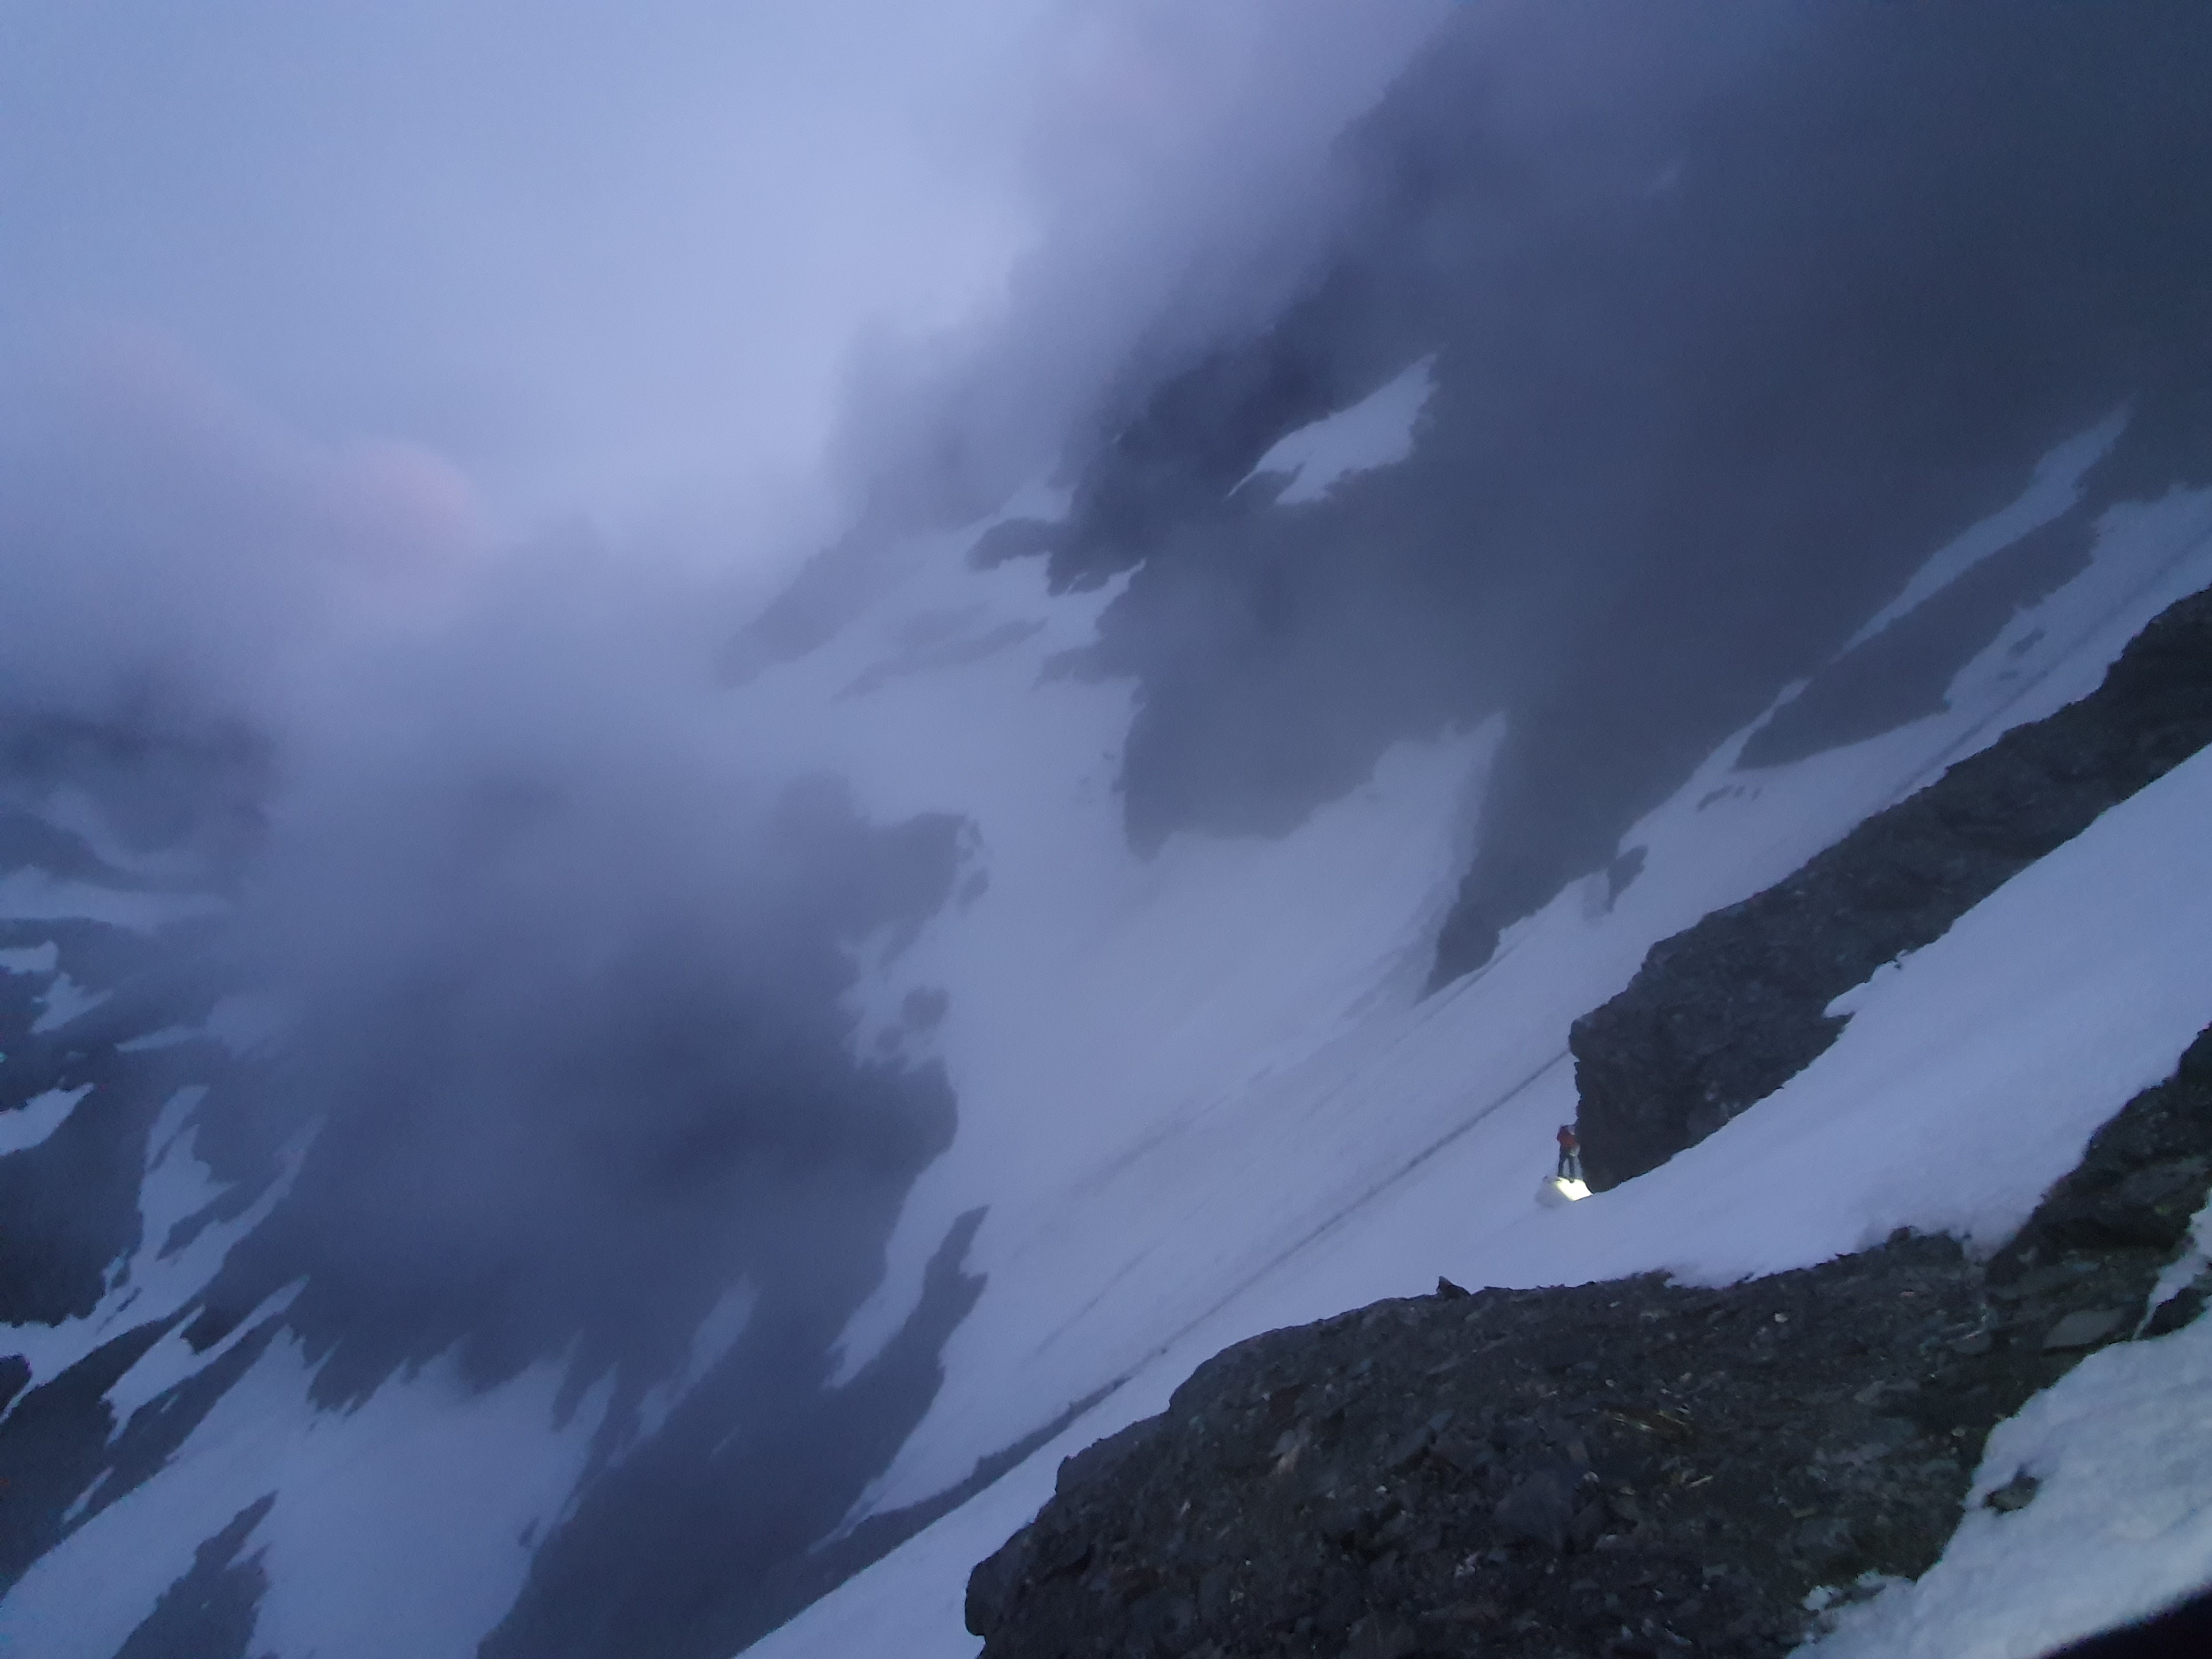
We were up at midnight, and left the hut at 1am.
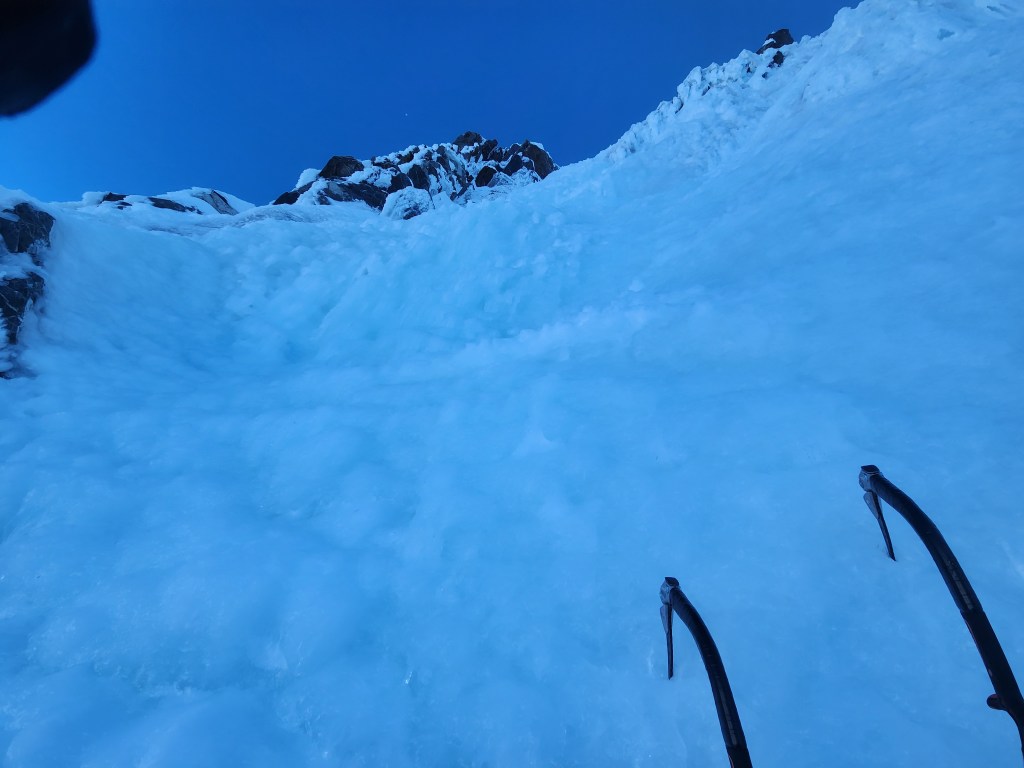
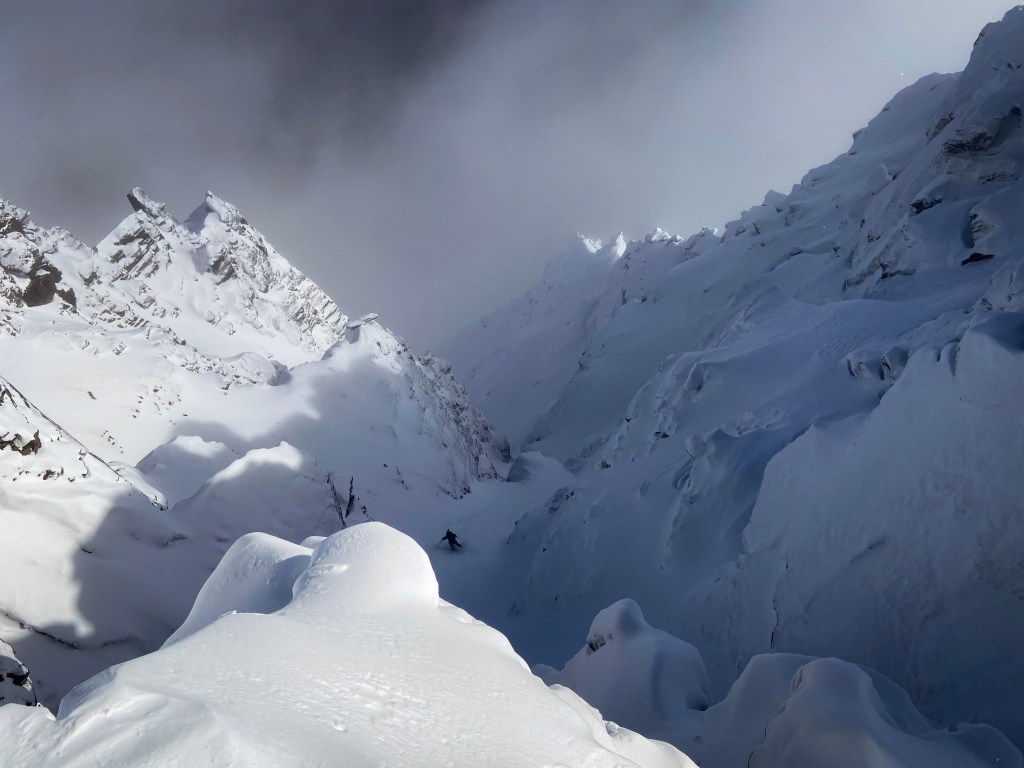
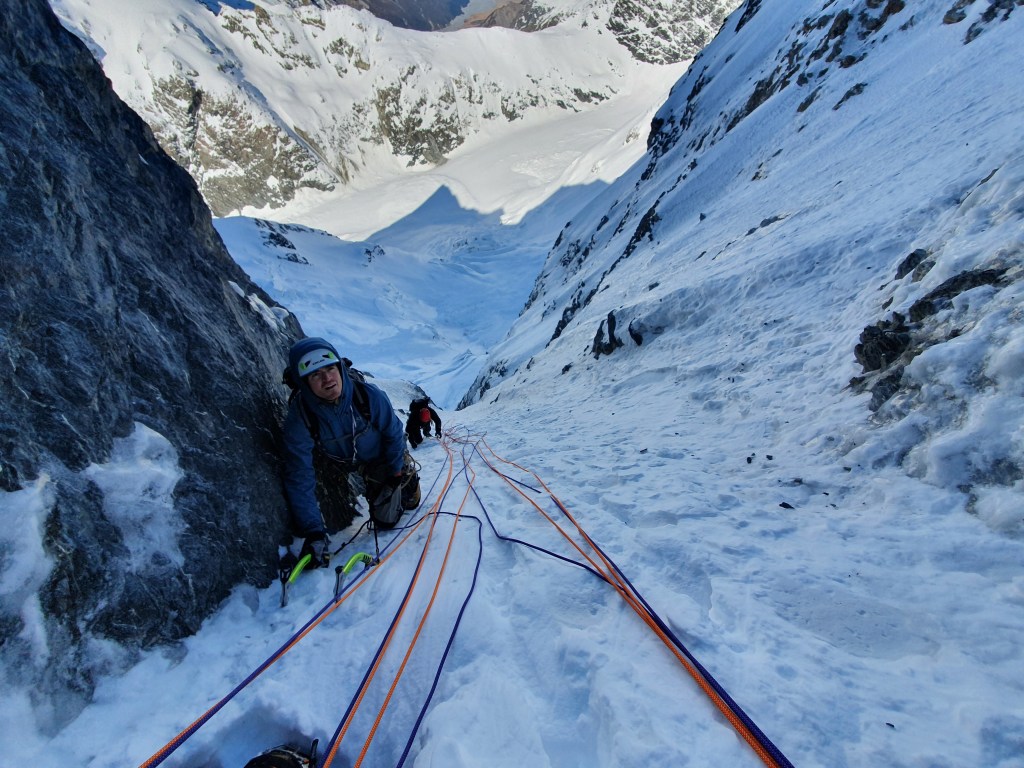
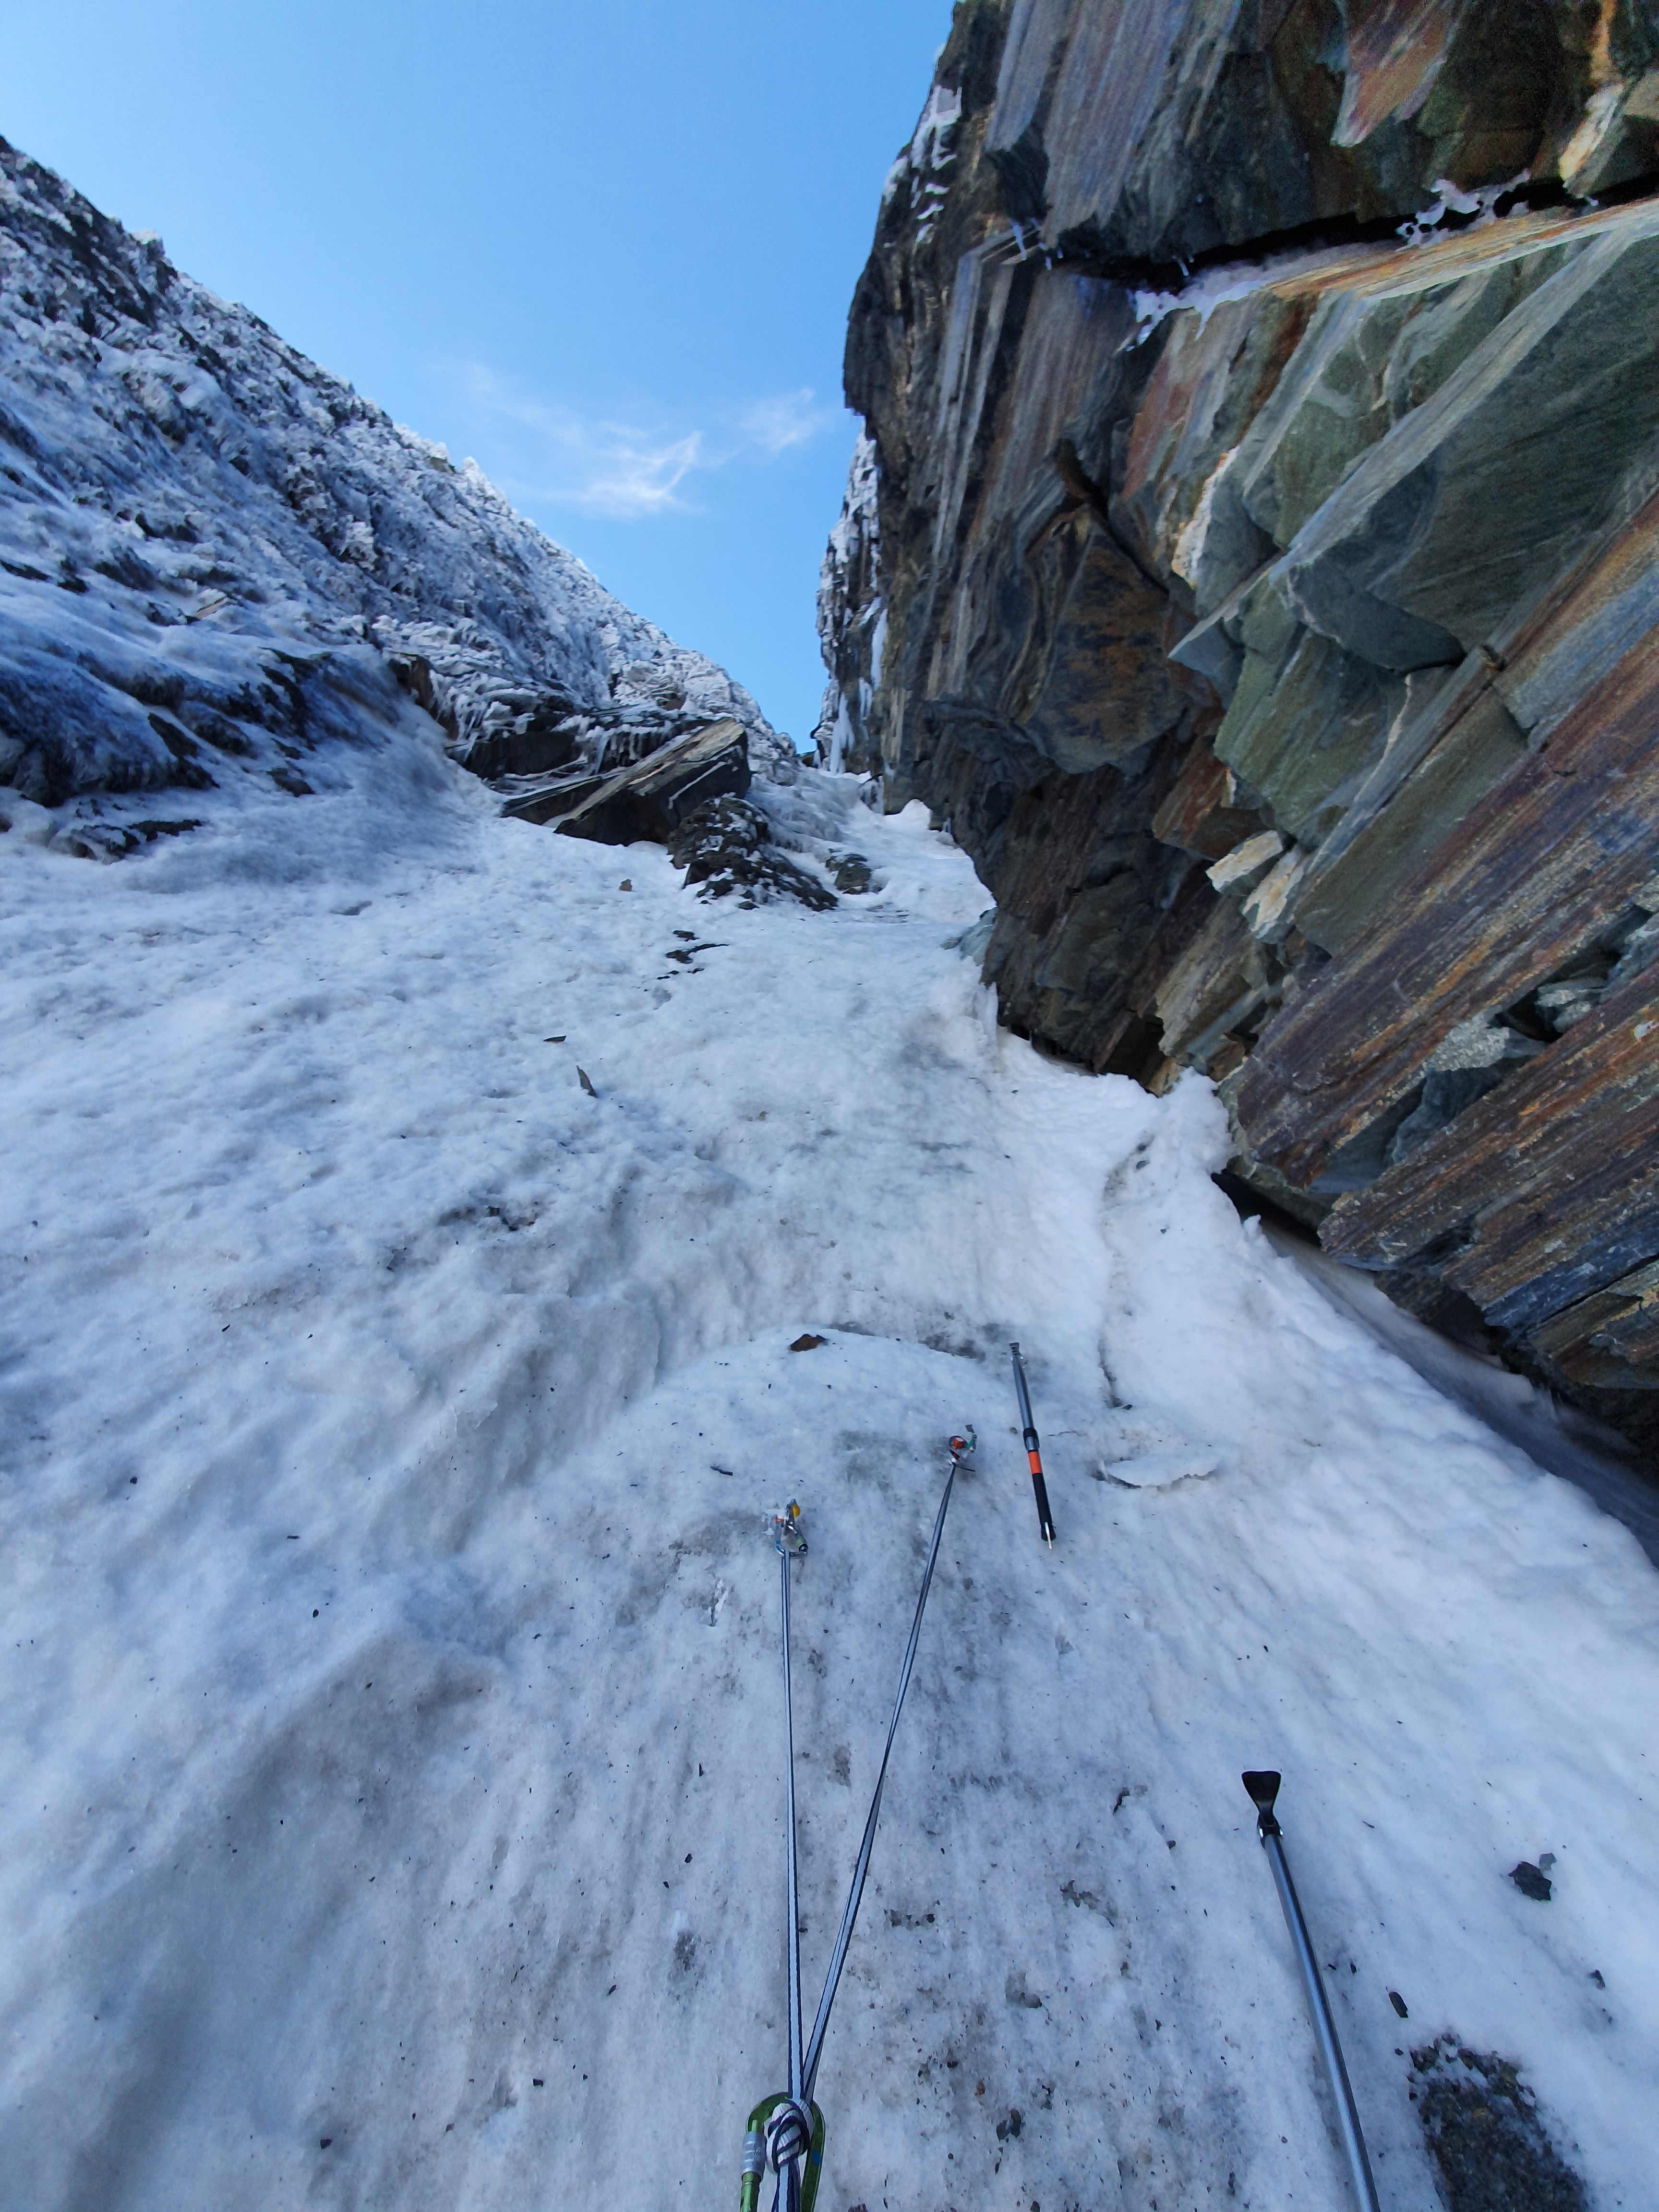
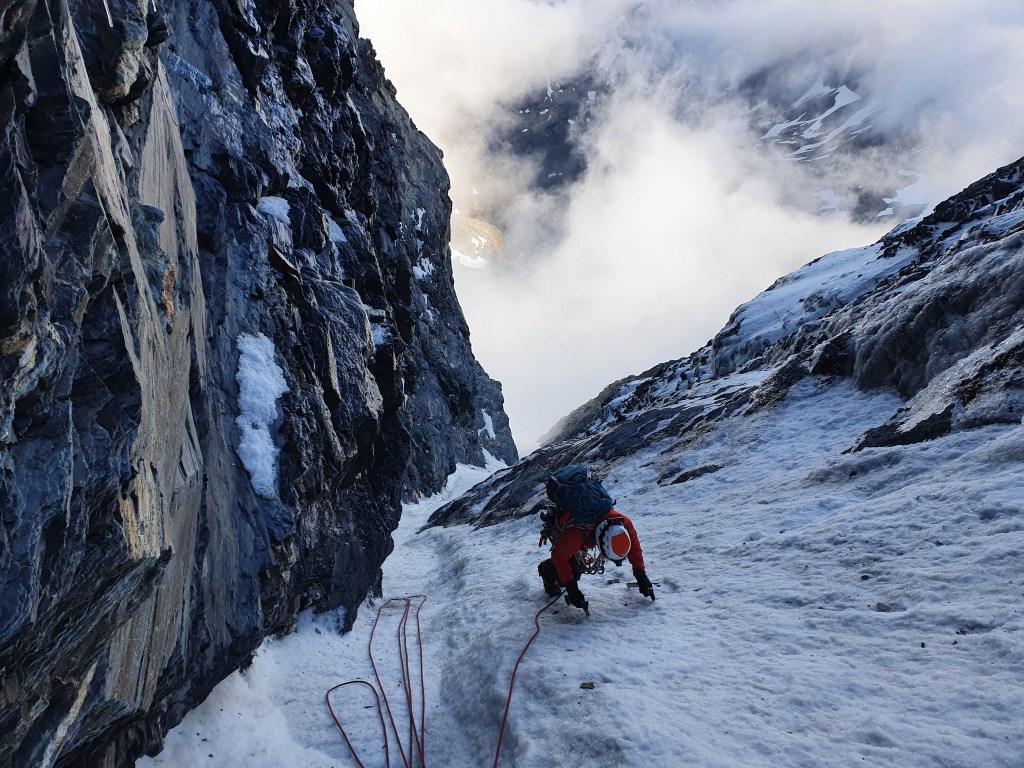
From the base of the route, there are 3x relatively low angle (50ish degrees?) pitches to get you warmed up. Some parties solo or simul this section to get to the water ice, especially it this section is snow. For us this section was hard snice, littered with small rocks and with a waist to overhead deep runnel straight down the middle where a fridge sized boulder had plowed its way down the bottom of the route. You definitely don’t want to be here when the rockfall starts! We pitched this whole section, but were able to move pretty quickly.
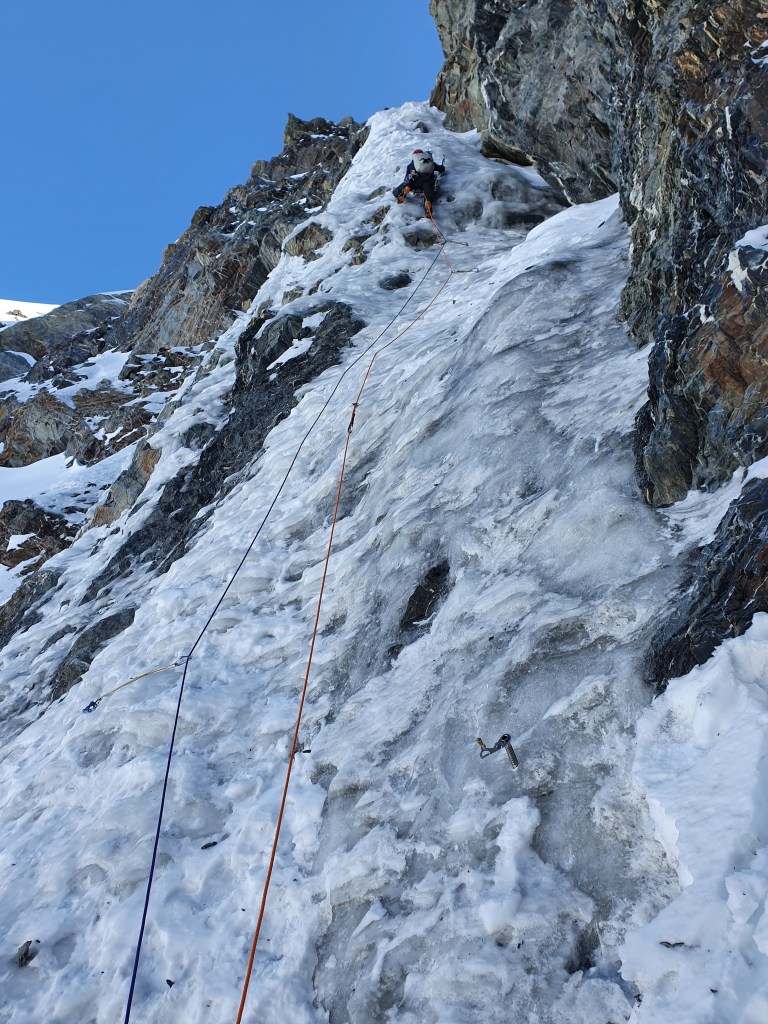
Pitches 4-8 were phenomenal – full pitches of fat water ice climbing, taking bomber screws at a sustained WI3. Multiple blobby bulges mostly in the 70-80 deg region. Pitch 6 was the definite crux (the 11.62 section in blue in the guide). Here the ice steepened up to just below vertical and became more technical, but this section was short, 20-30m. After the crux its back to the hero blobs for a couple more pitches until reaching the final headwall. The angle drops off to around 70 deg to the summit – we made a total of 12 pitches but these were all rope stretchers so could easily end up being a bit more than that. This time of year the sun effect on the top pitches was affecting the ice quality, but could still make reasonable picket anchors. If you were rapping the route this late in the year you would need to be leaving pickets for several raps as it was too soft for threads.
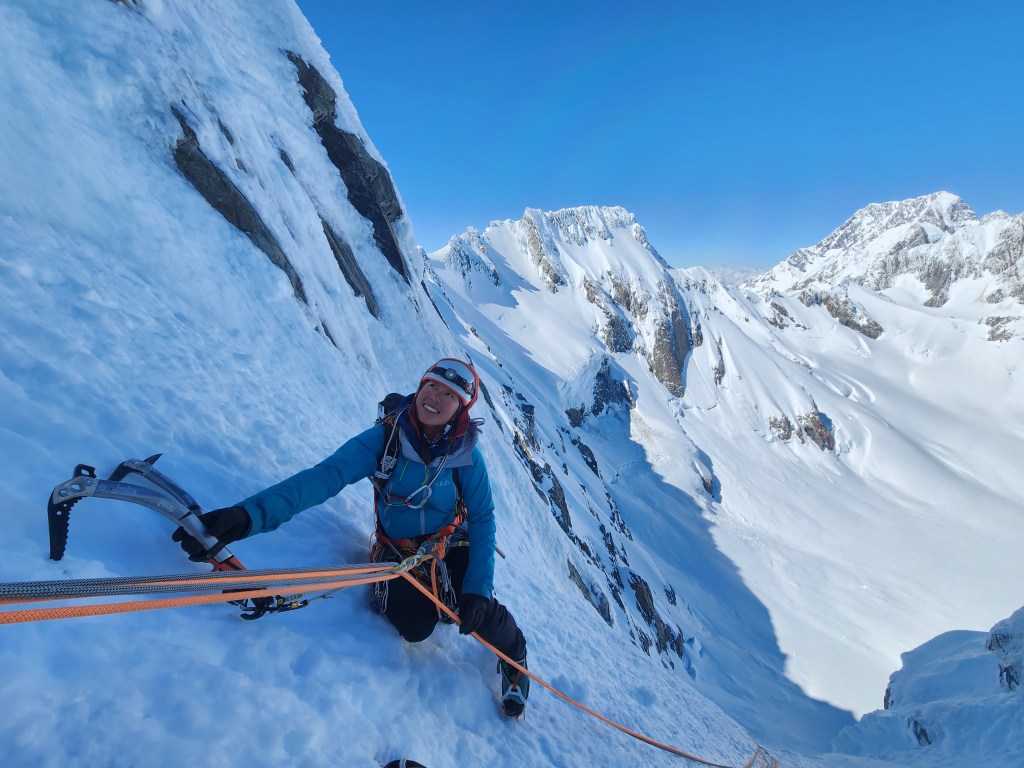
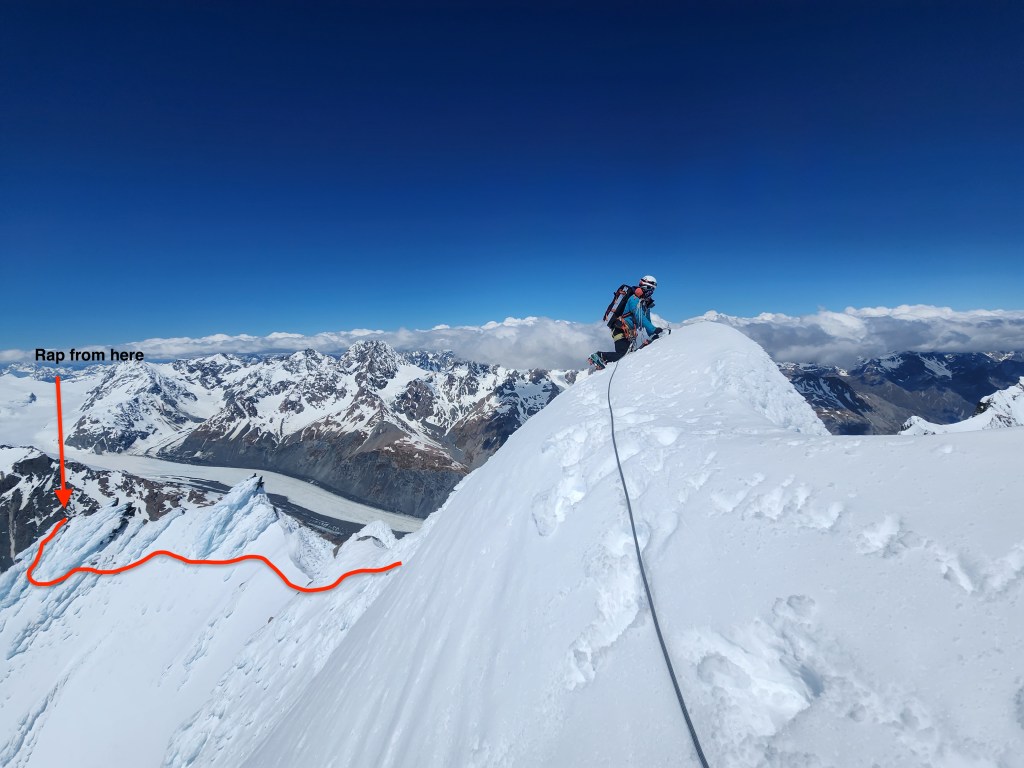
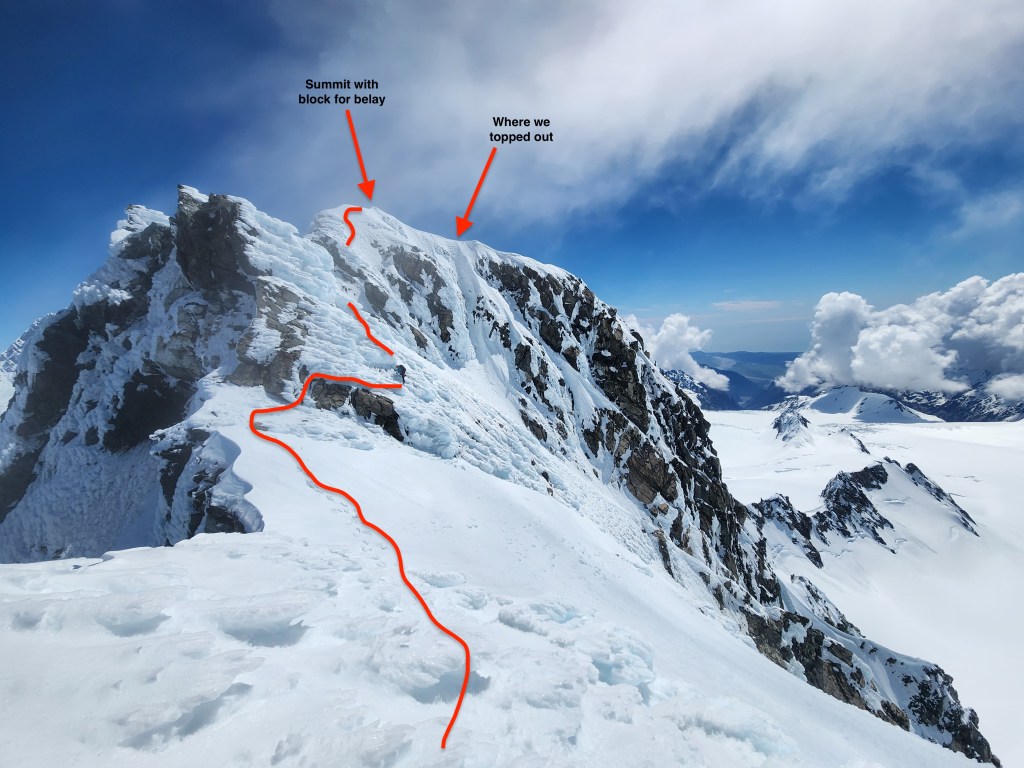
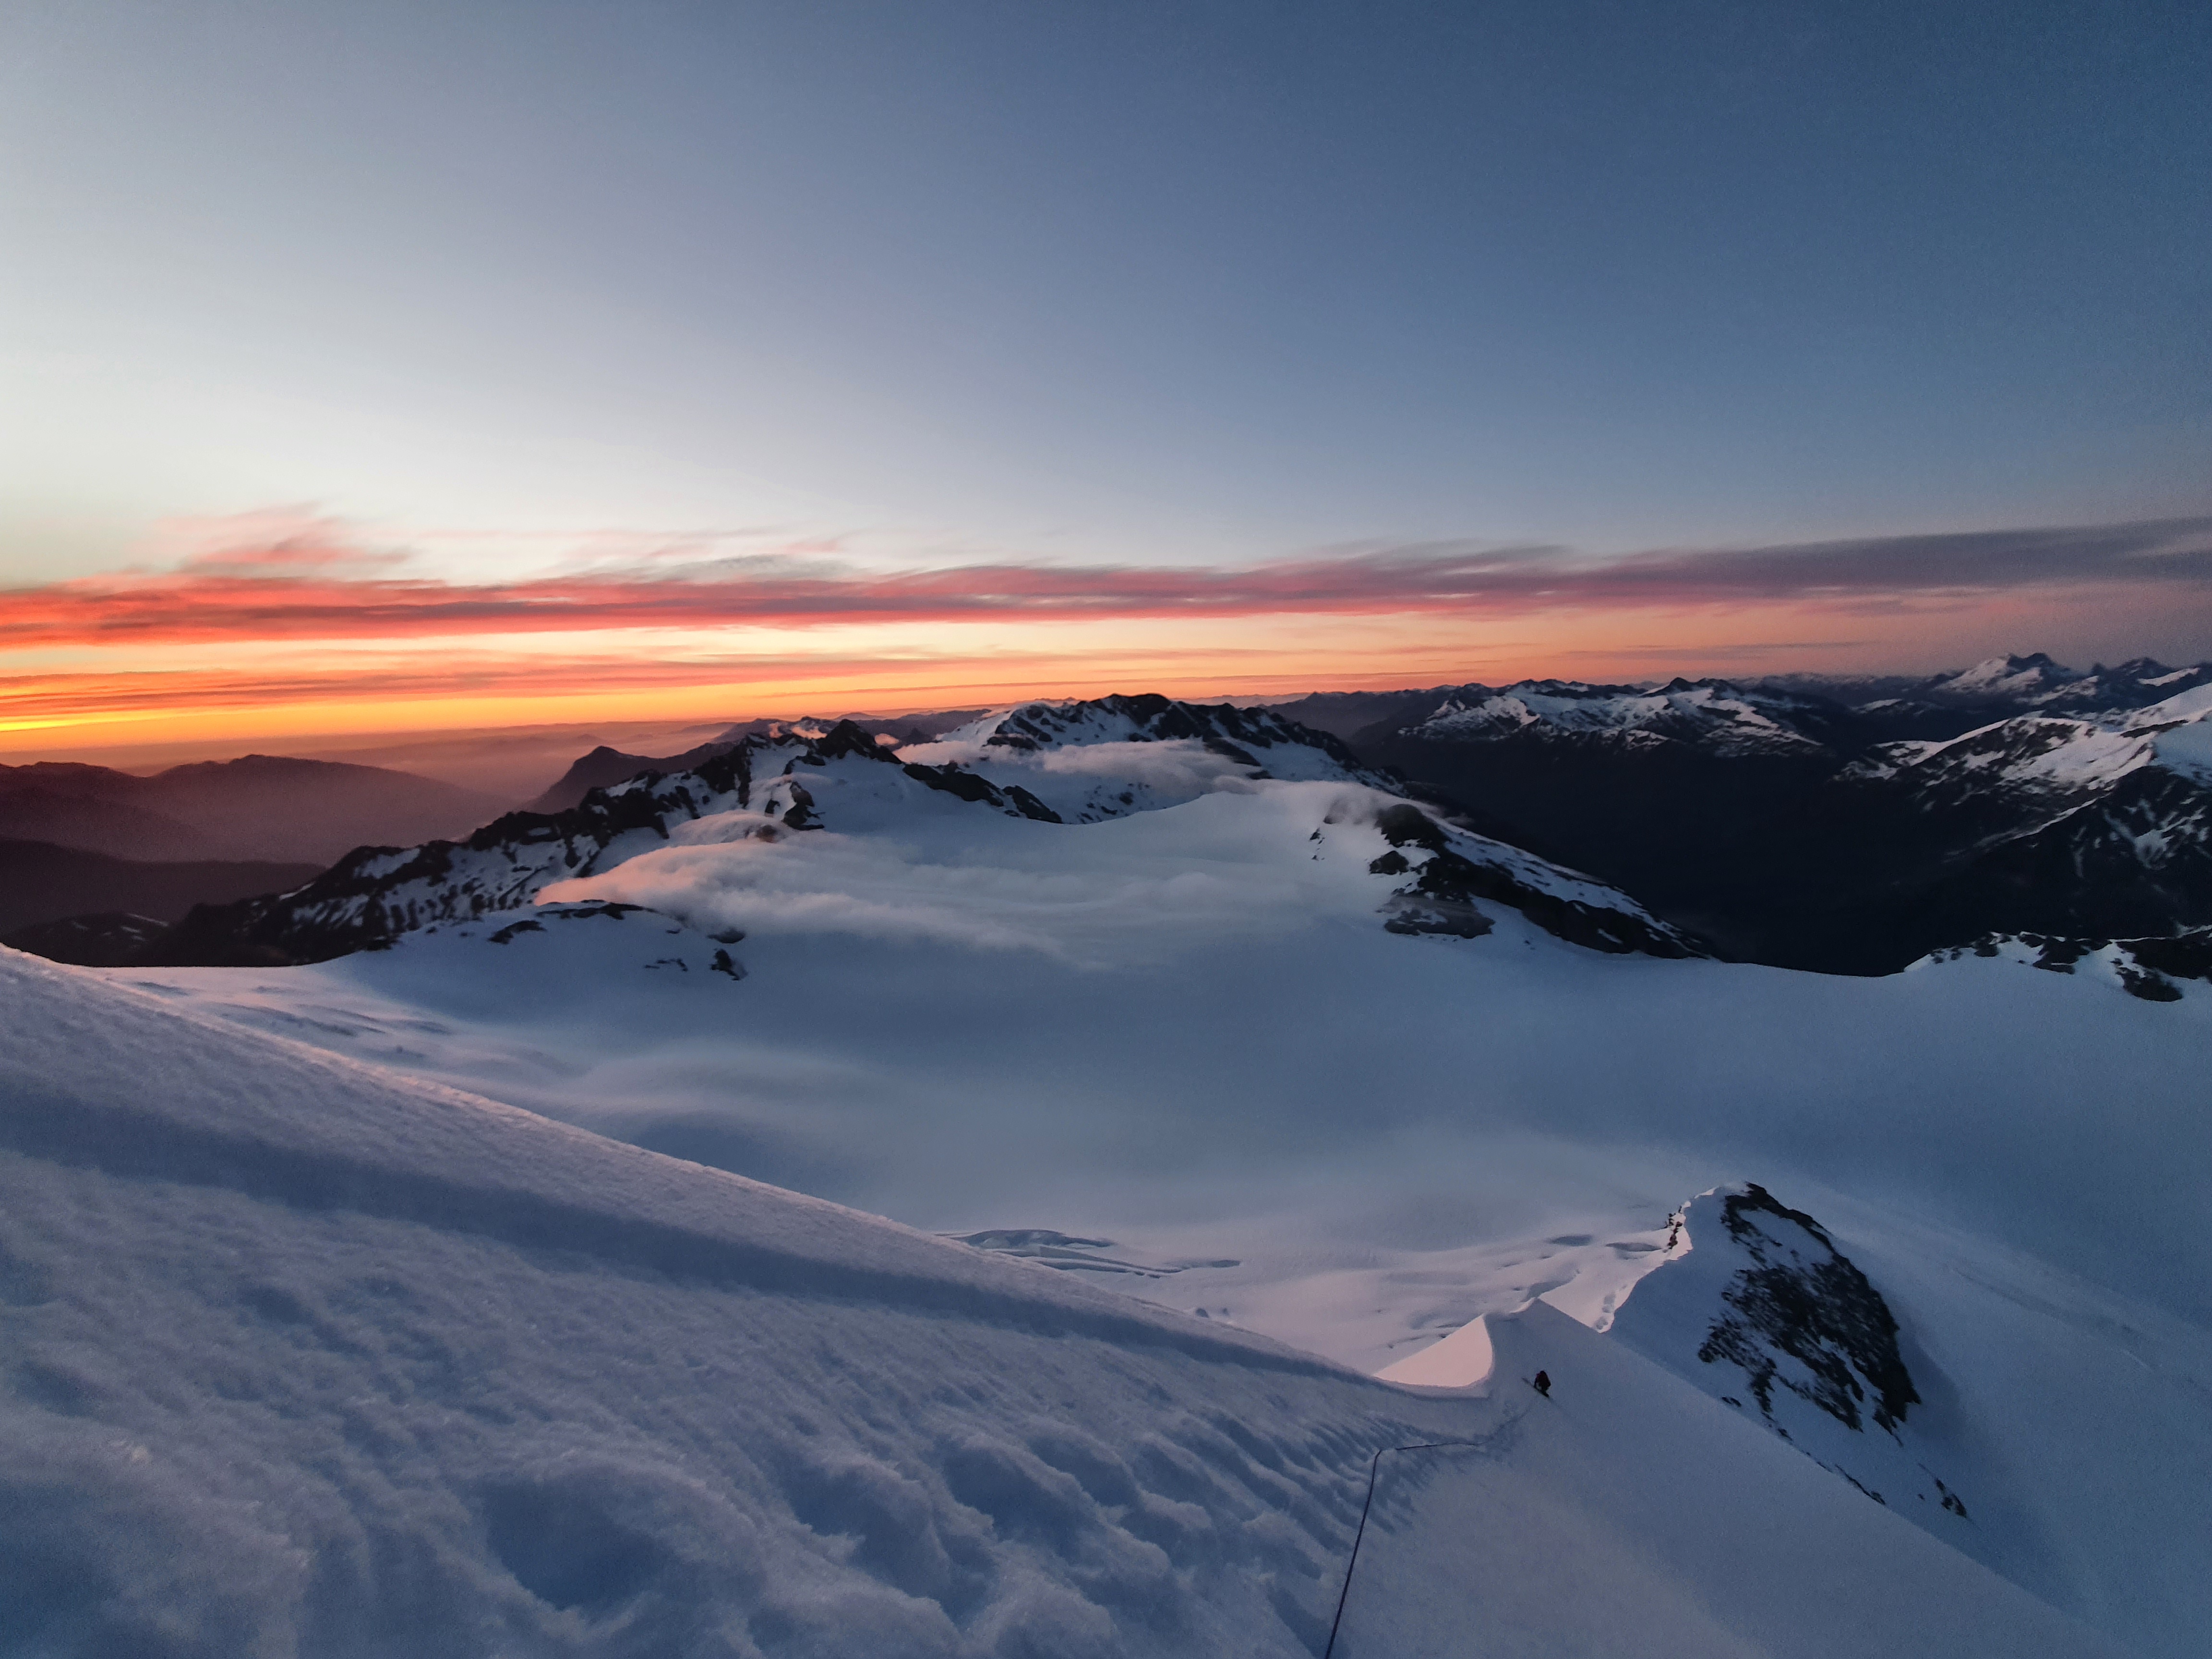
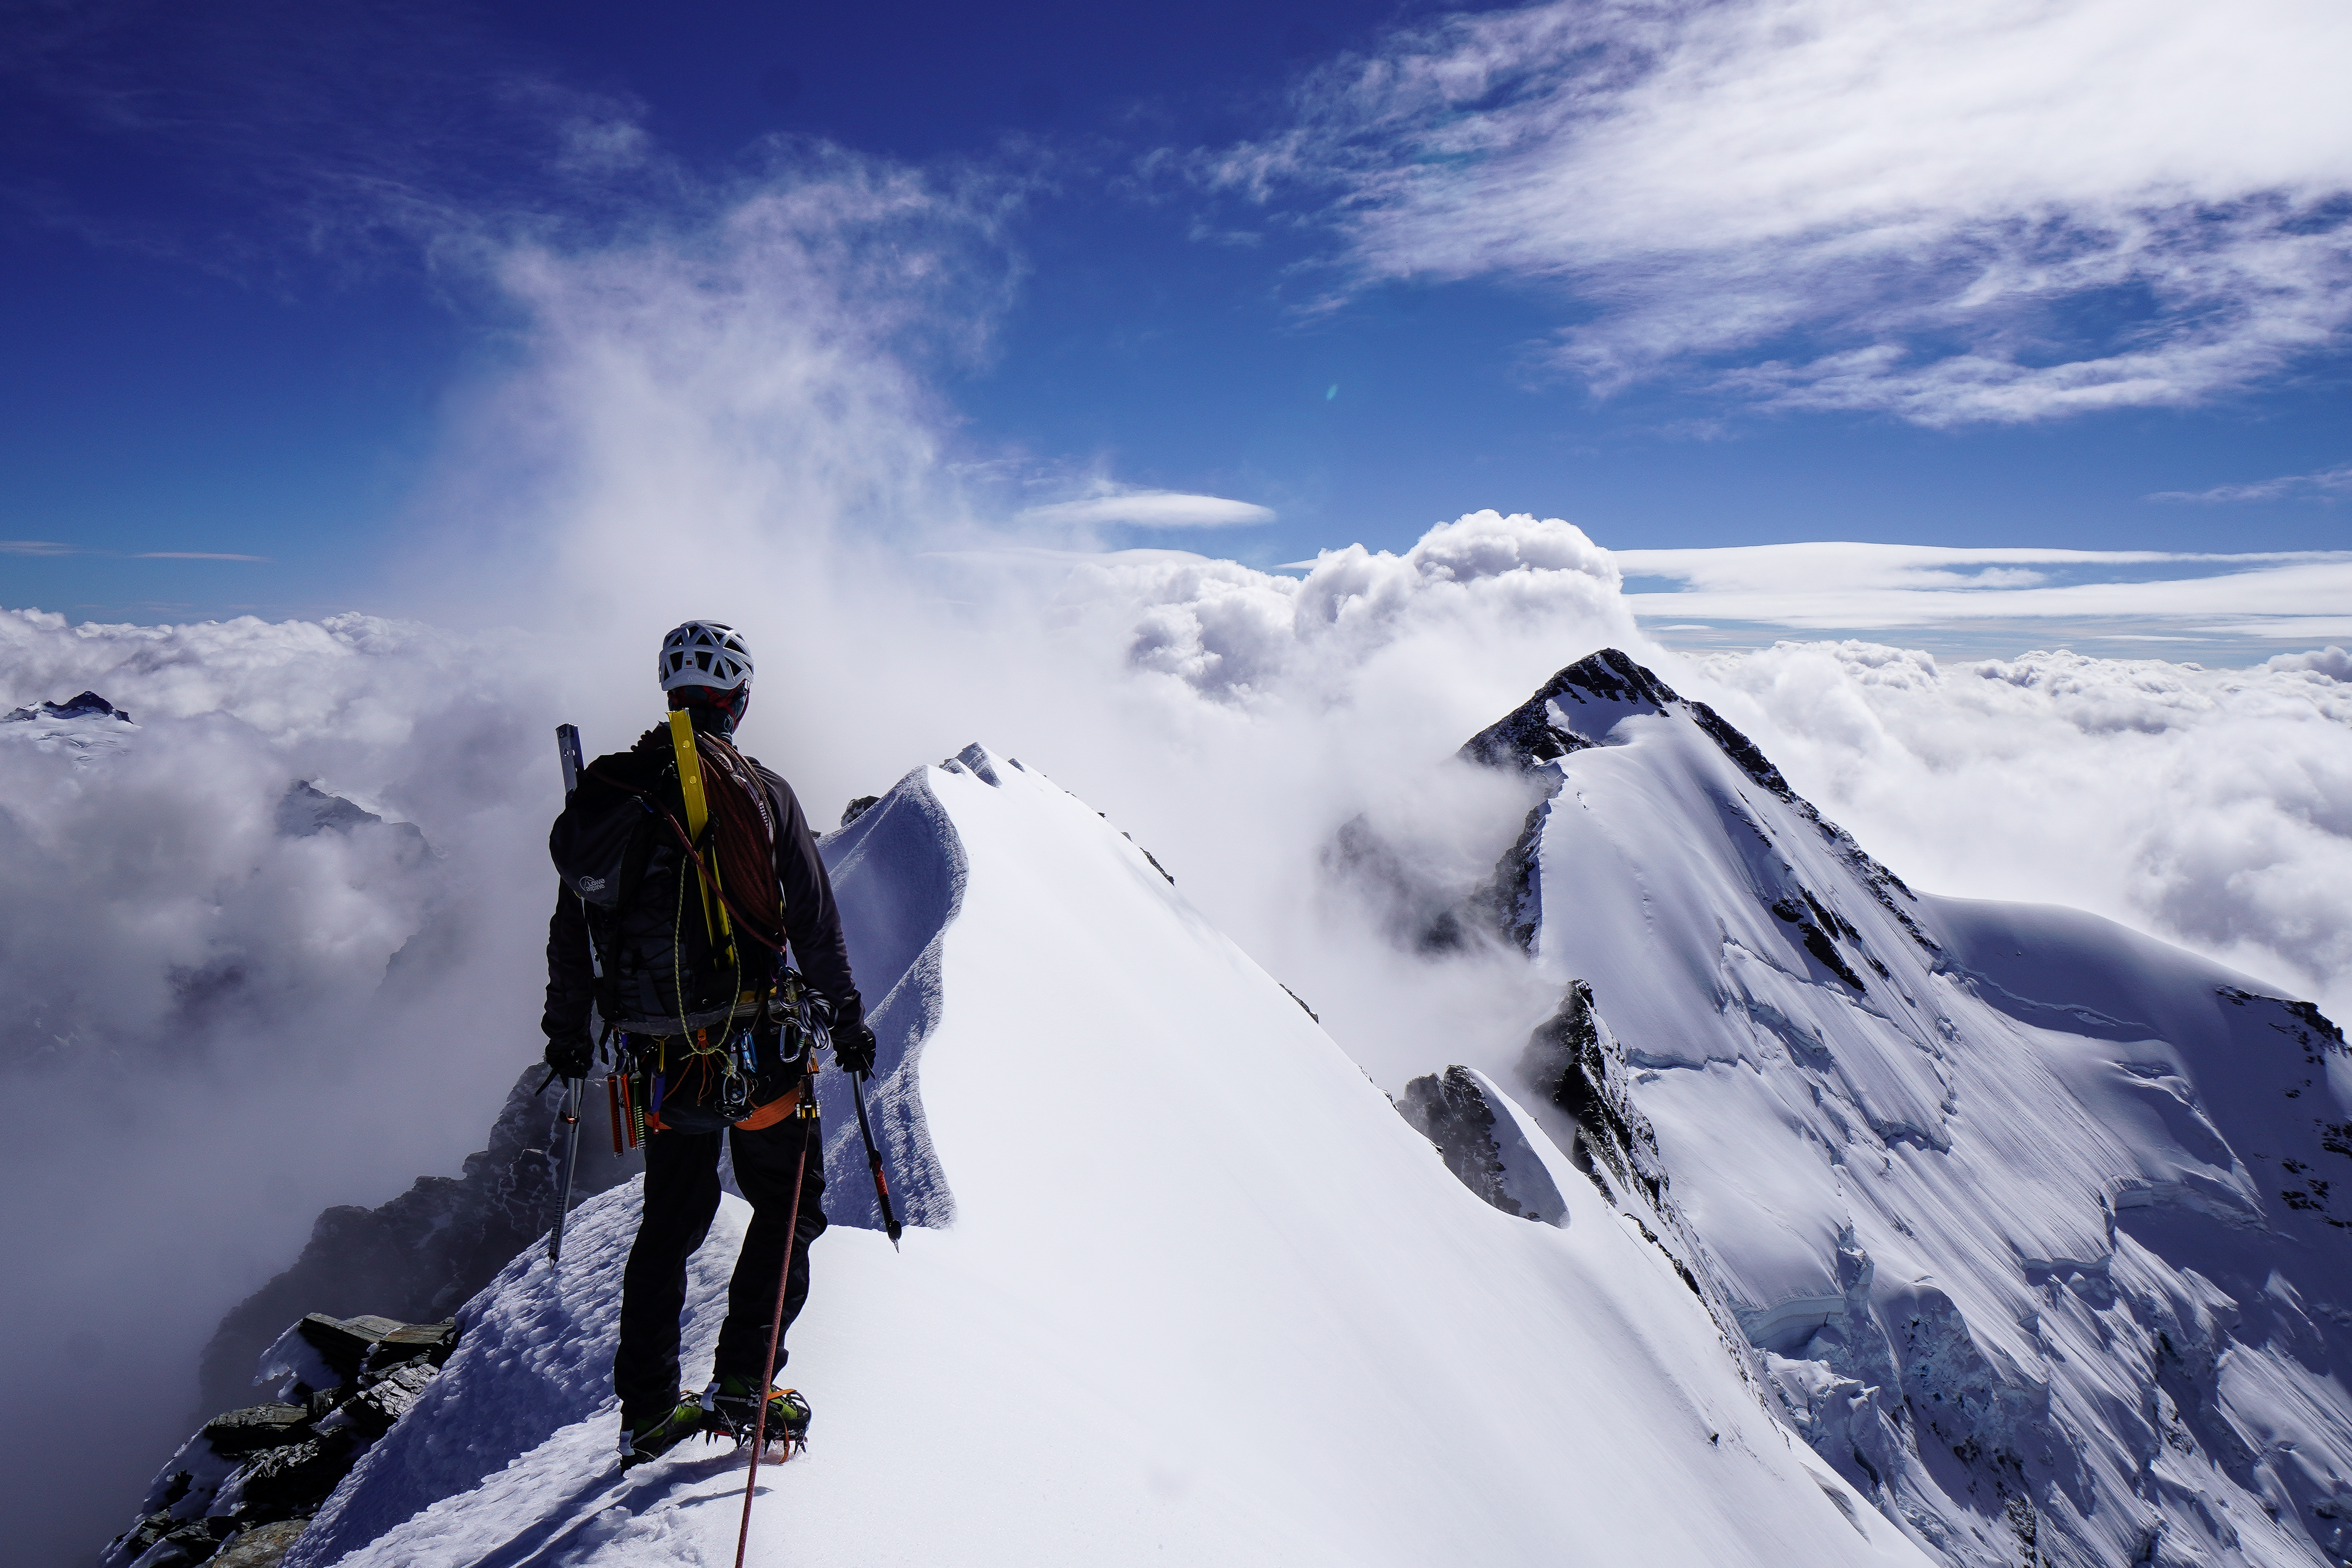
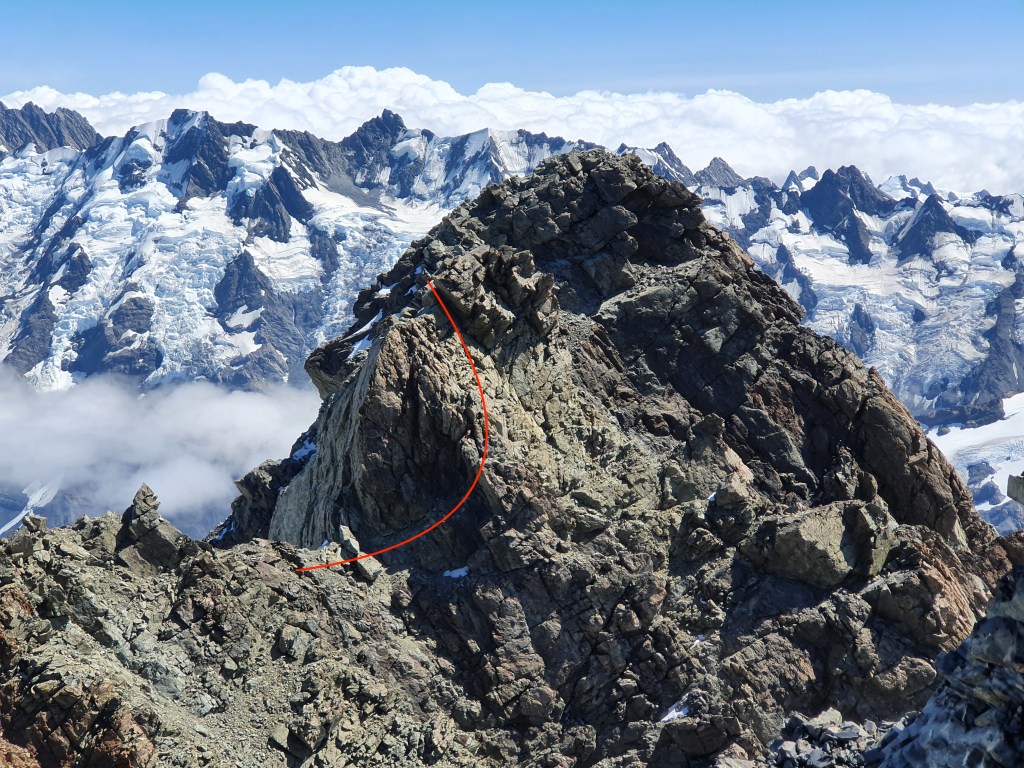
The summit is a knife edge ridge that extends towards a large block at the far climbers right side of the face, which is the true summit. The topos mostly show the route aiming up to the far climbers left of the face which is the route we took – this is a bit awkward as making a belay on the ridge is not the easiest. Genuine knife edge ridge with a lot of exposure on both sides, and the sun is blasting the other side of the ridge so going down there to make a belay wasn’t going to work for us. The top of the south face also catches sun so the snow / ice quality if pretty poor here – we made a 2x picket anchor just below the ridge, but there was a bit of messing around from me going up and down figuring out where best to make the anchor which wasted a bit of time. We then chevalled across the ridge to the true summit where theres a good belay rock you can sling. If we were doing the route again, on the final pitches would just trend climbers right to just top out at the block / true summit and avoid the messing around on the ridge.
On the upper snowfields above the crux. The sun effect meant the ice was softer, quick and easy to climb but not taking screws without a lot of digging. Pickets were good.
descent
Rapping the route – a popular option, and espeically good in a team of 3 where one person can be equipping the threads as your going up. However probably wouldnt recommend it this late in the year unless you can move fast enough to be off the face by around midday or 13:00 due to icefall. Another party climbed a route to the left of us at the same time as us and ended up rapping through the heat of the afternoon, and it sounded like a fairly terrifying experience with a constant bombardment of ice and rock.
Me on the summit, Maria on the sub summit. You have to traverse a fair way to get to the rap, wouldnt be obvious in poor weather / the dark.Looking back towards Douglas summit from the North. If you aim for the climbers left of the face you top out at the wrong side of the ridge and need to traverse. Sticking right puts you right at the summit / good belay spot. After short downclimb (first red line) we did a short rap to the snowfield then traversed around to the rap station
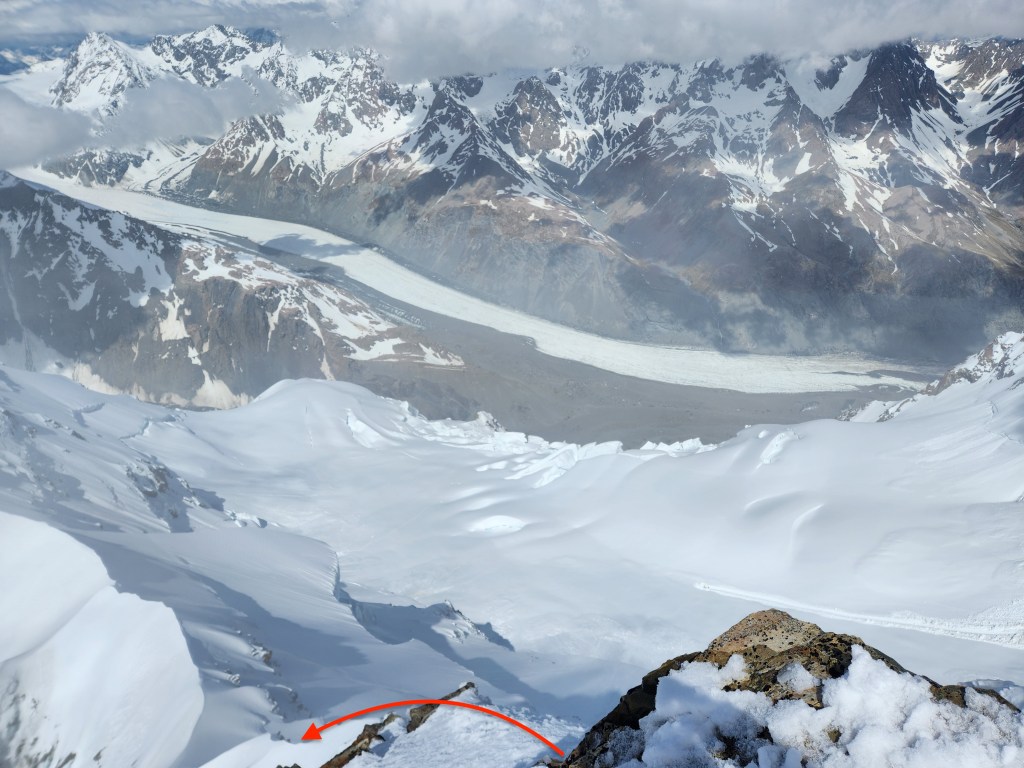
Standing at the rap station, Tasman glacier below. Go off the north side of the ridge to get to the Glacier Peak ridge
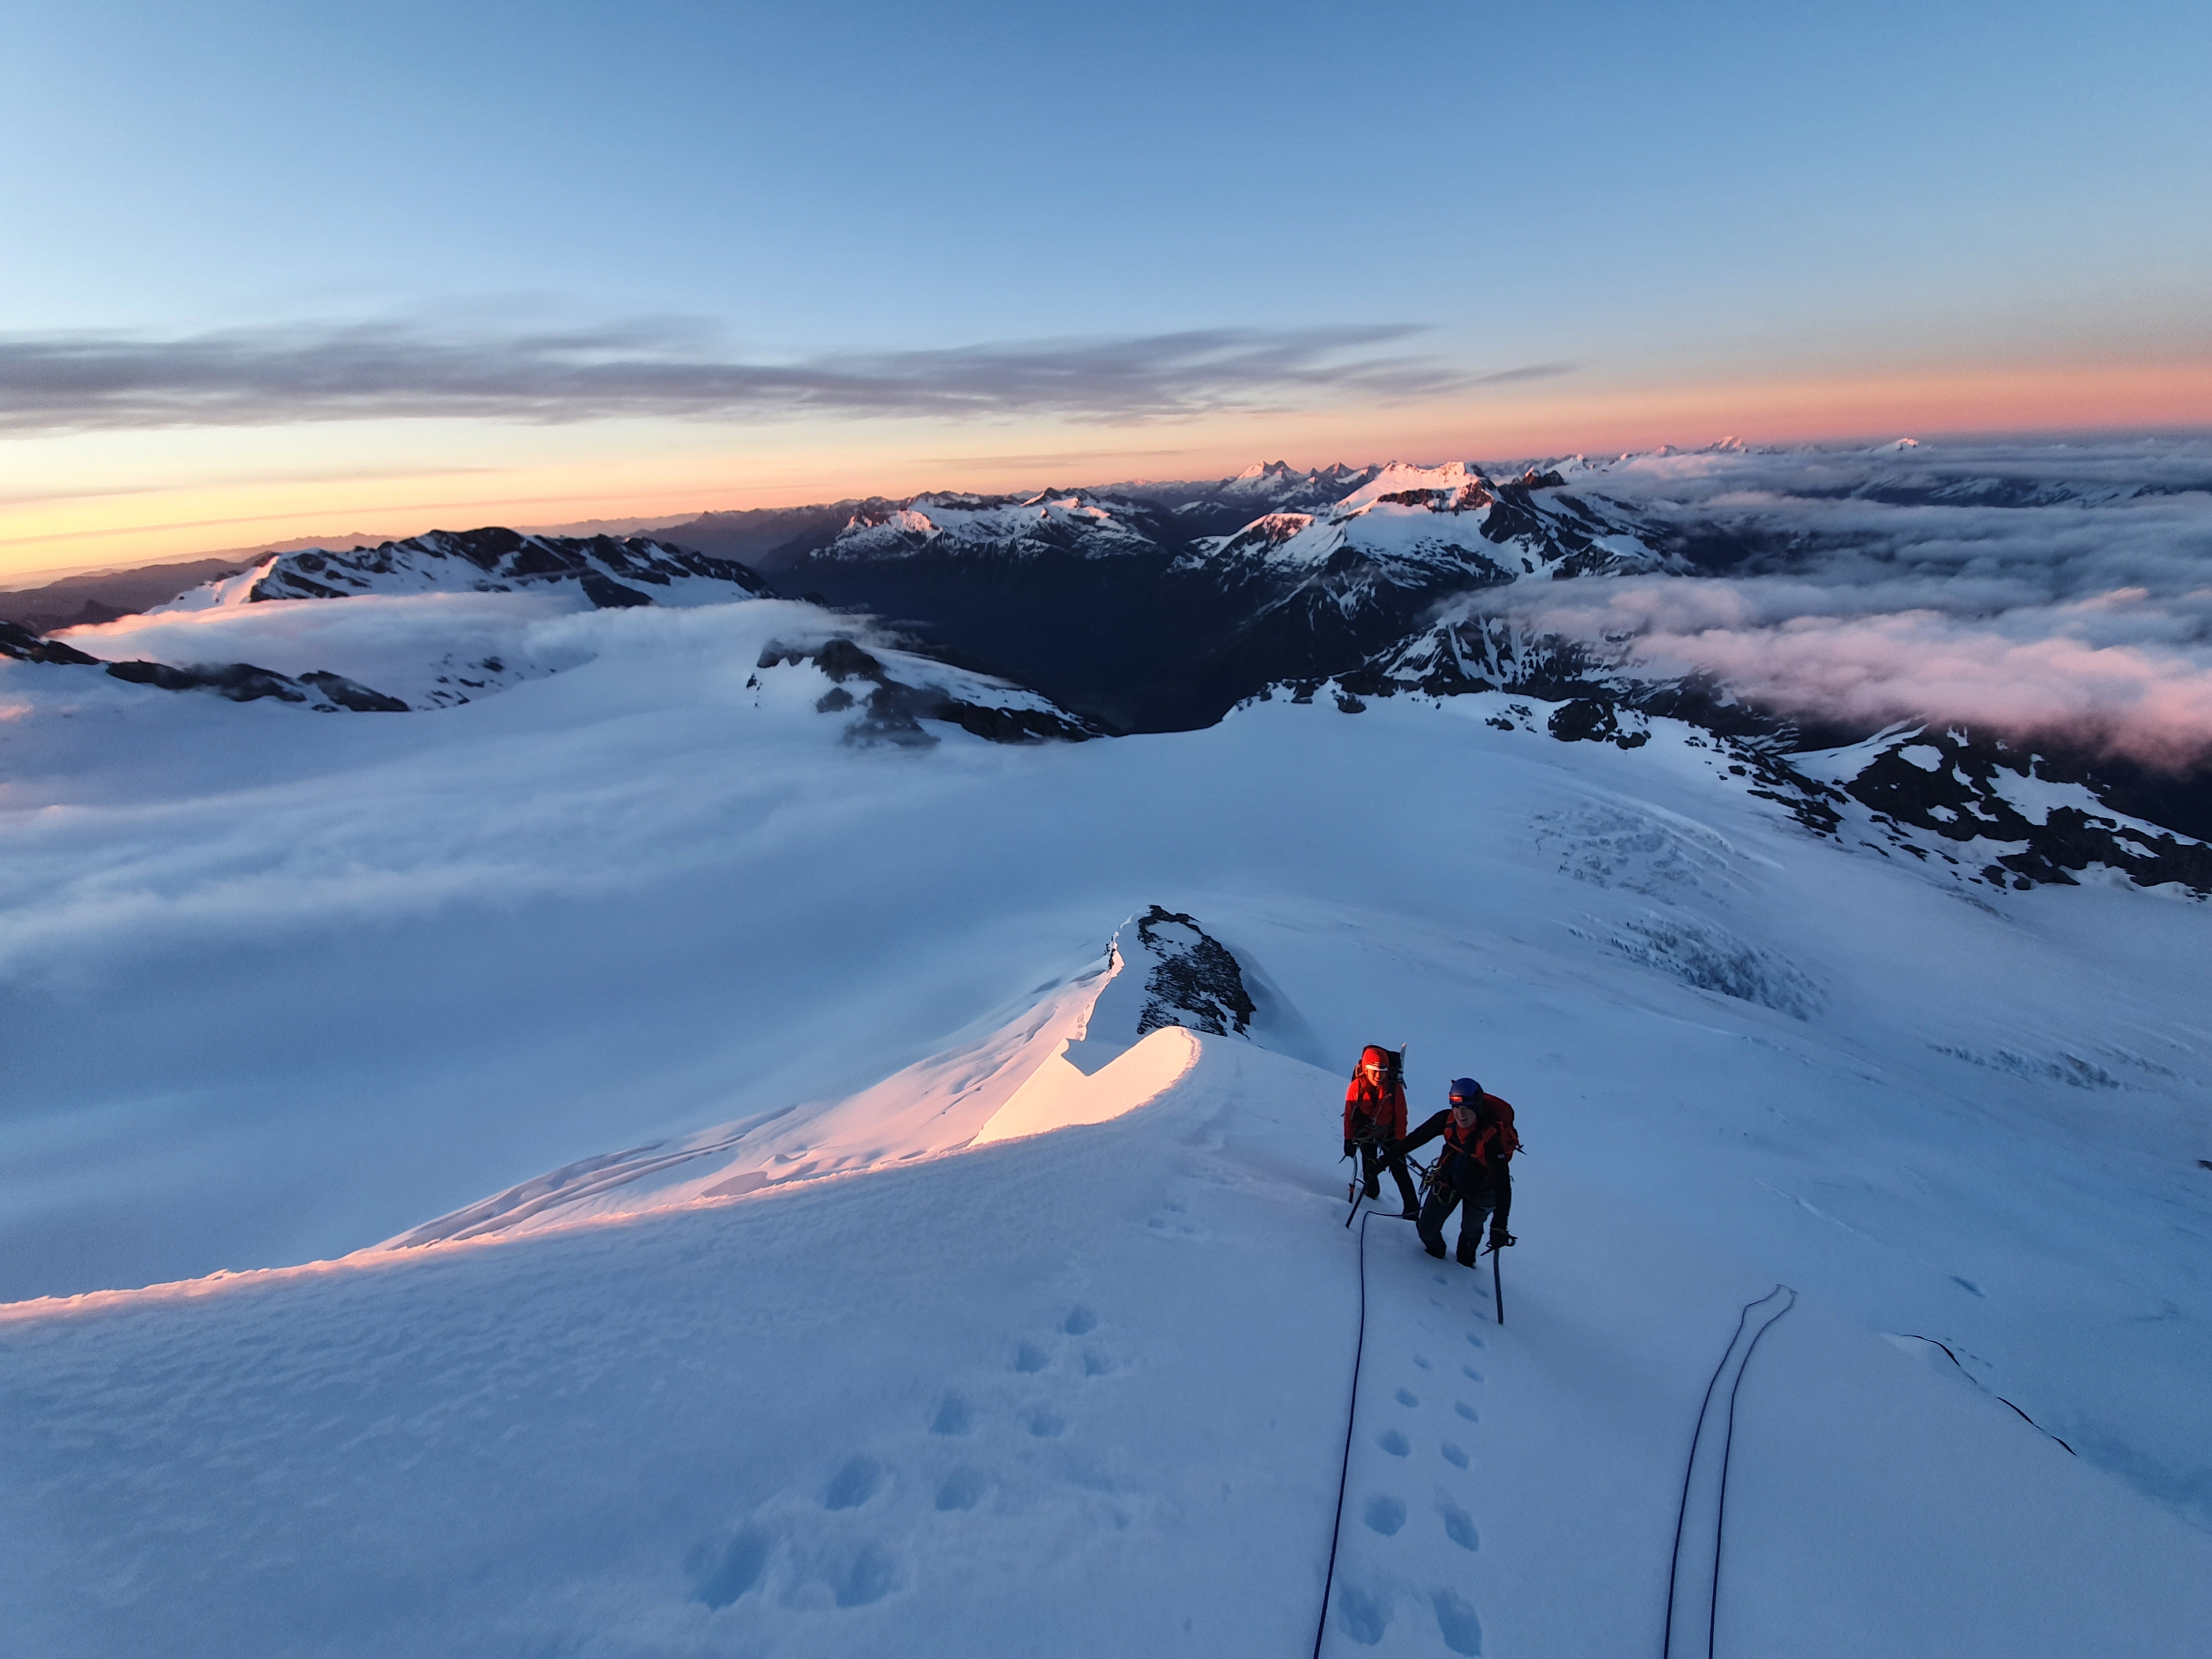
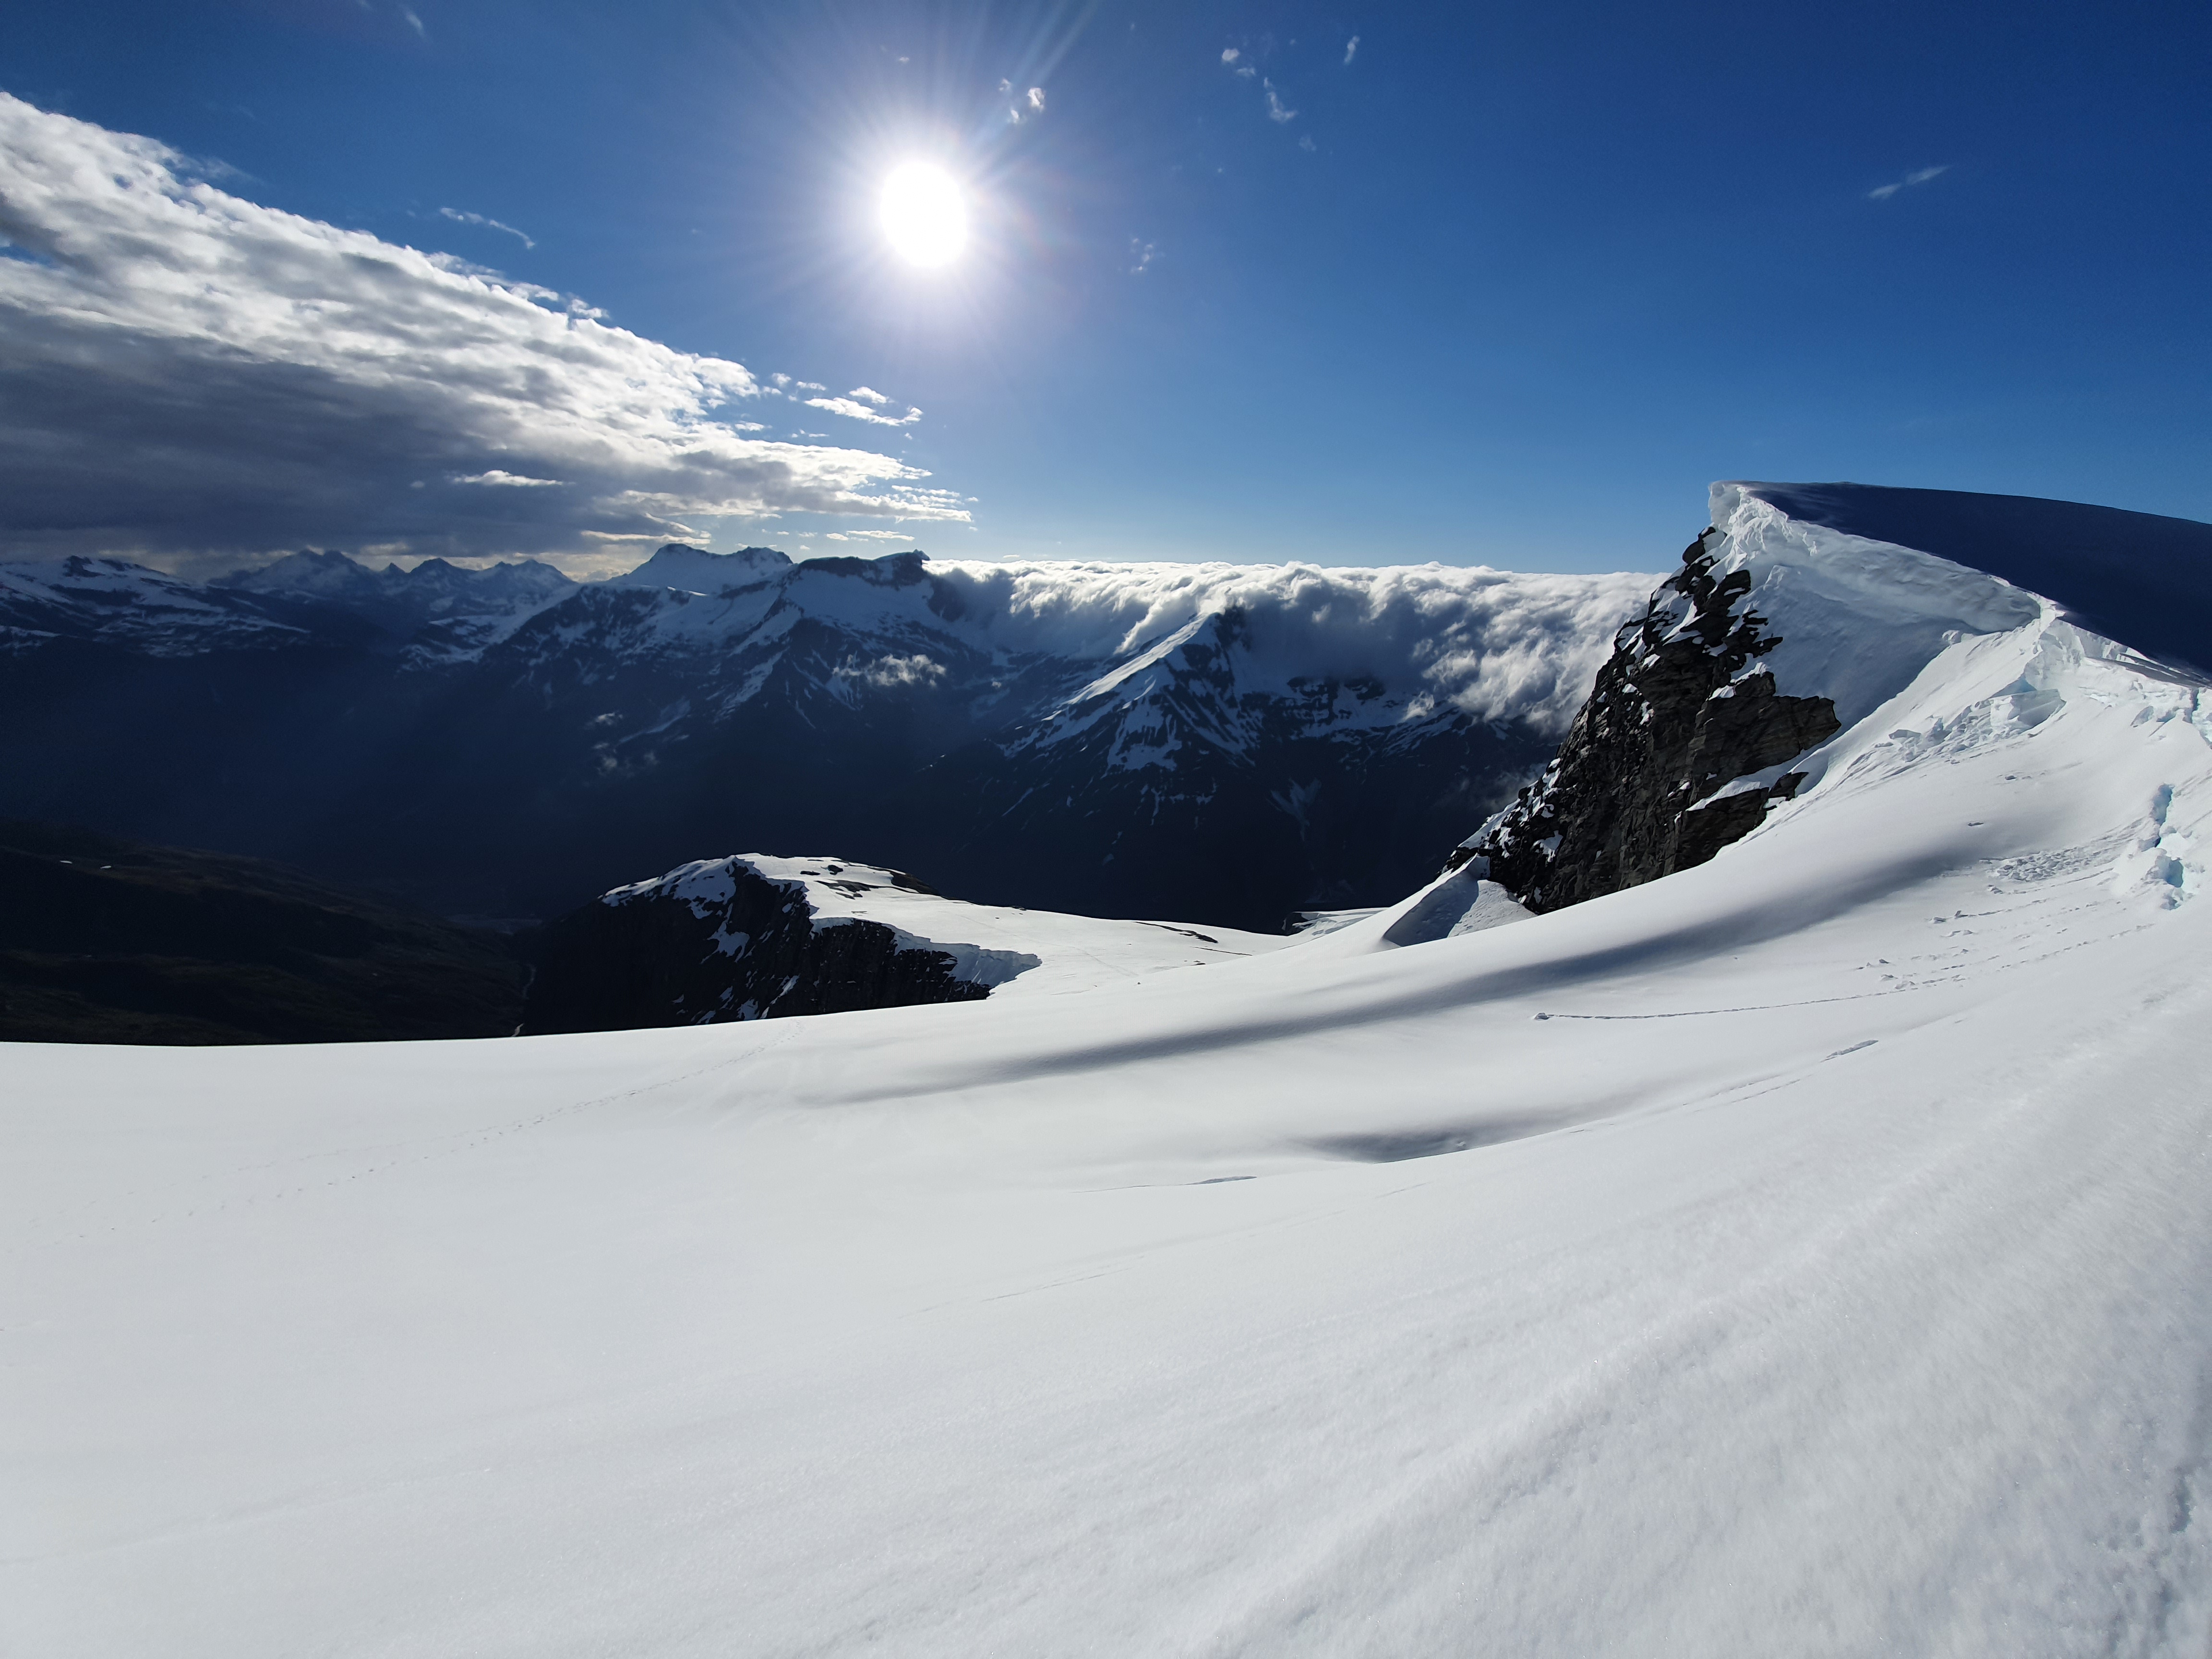
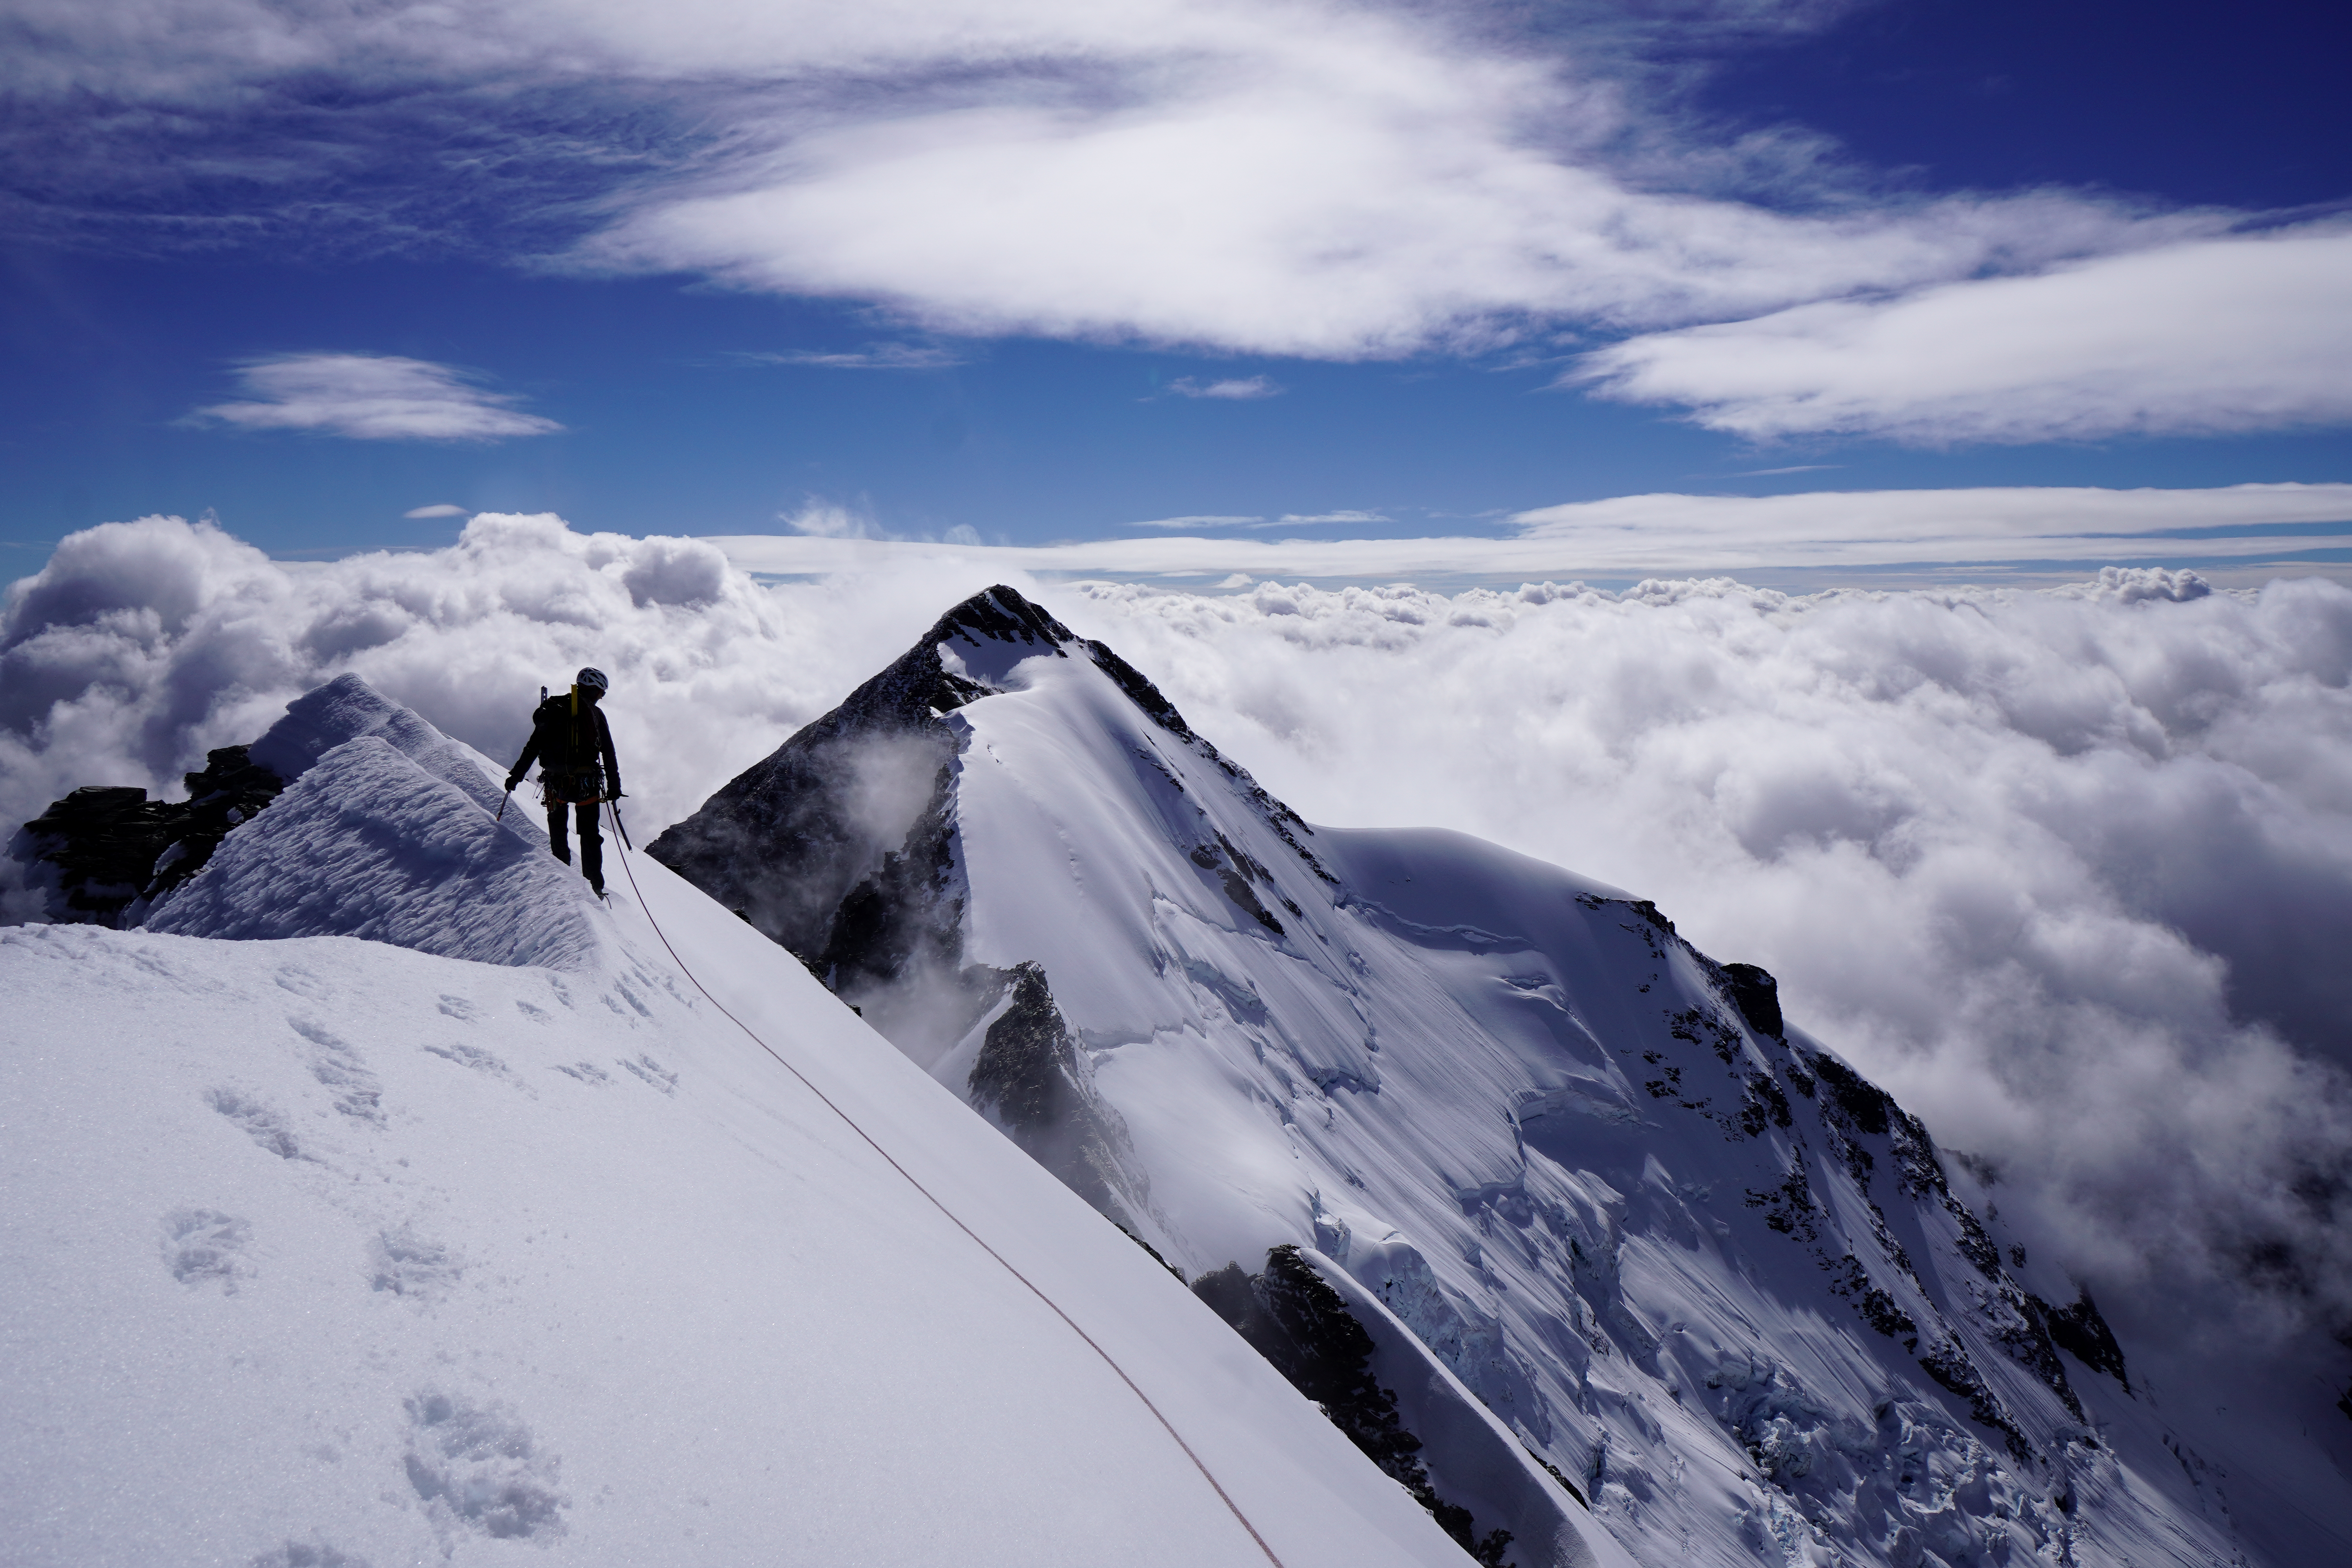
Preferring a loop, and because we had topped out after midday, we opted to descend via Glacier peak. On the summit of Douglas there is a decent rock that you can sling for an anchor. The first section of the traverse towards glacier peak is a little involved – we made one 30m rap from just below the summit to get to the lower snow field, and then traversed on the North side of the ridge around 2x large rime covered blocks for around 100-200m to get to the main rap. Stay on the north side of the ridge and go as far as you can until the ridge forms a point to find the rap station which may well be hidden by snow. From the end of the ridge aim to rap on the north side, around 50m, putting you onto the main ridge connecting to Glacier peak. See photo below.
Looking back up at the main 50m rap down to the Glacier Peak ridgeThe route along the Glacier Peak ridge and down onto the Explorer Glacier. Big crevasses towards the bottom that can get cut off
Then it’s a straightforward walk to the lowest point of the col between Douglas and Glacier peak. We descended from there onto Explorer glacier, and were glad for the photos we had taken the day before of the route down through the crevasses. By now it was 6-7pm and the snow was soft. We post holed once or twice along the way back, so again, we didn’t hang around and boosted back to the hut. The others at the hut spotted us returning, so the water was pre-boiled and ready – hallelujah.
A very special day out amongst the mighty maunga of the Southern Alps. Having just summited Mt Douglas 2 days prior, our bodies were still recovering and we still had some outstanding sleep debt. We had one more good day of weather before a storm was due to come in. If we attempted Mt Tasman, we would have to return early enough to catch a heli out or commit to being stuck in the hut for a few days to sit out the storm.
It wasn’t too hard a decision – we weren’t sure if we’d get a chance to come back this season so we settled in for another early night and early start to give it a go.
Initially, we wanted to go via the Stevenson-Dick couloir and down via the N shoulder which would make for a nice loop. We had recce’d the access a few days earlier, as theres a schrund at the base of the couloir that can cut the route off, but it looked negotiable. This route was going to be more committing however, as reversing the rockfall prone NE facing gully after the sun was up didnt sound particularly enticing if we needed to bail for whatever reason, and in the interest of getting a flight out before the storm we opted to try the N shoulder via Lendenfeld.
Grade : IV, 3+
Equipment : 1x 60m rope, 10 screws with long runners, 2 x snow stakes. Tat.
Time : 12.5h return (from turn around point) ; 1340m elevation gain, 12.6km
Season : Late spring/early summer – late summer may see access cut off
Team : Joe and Maria, 21/11/2023
approach
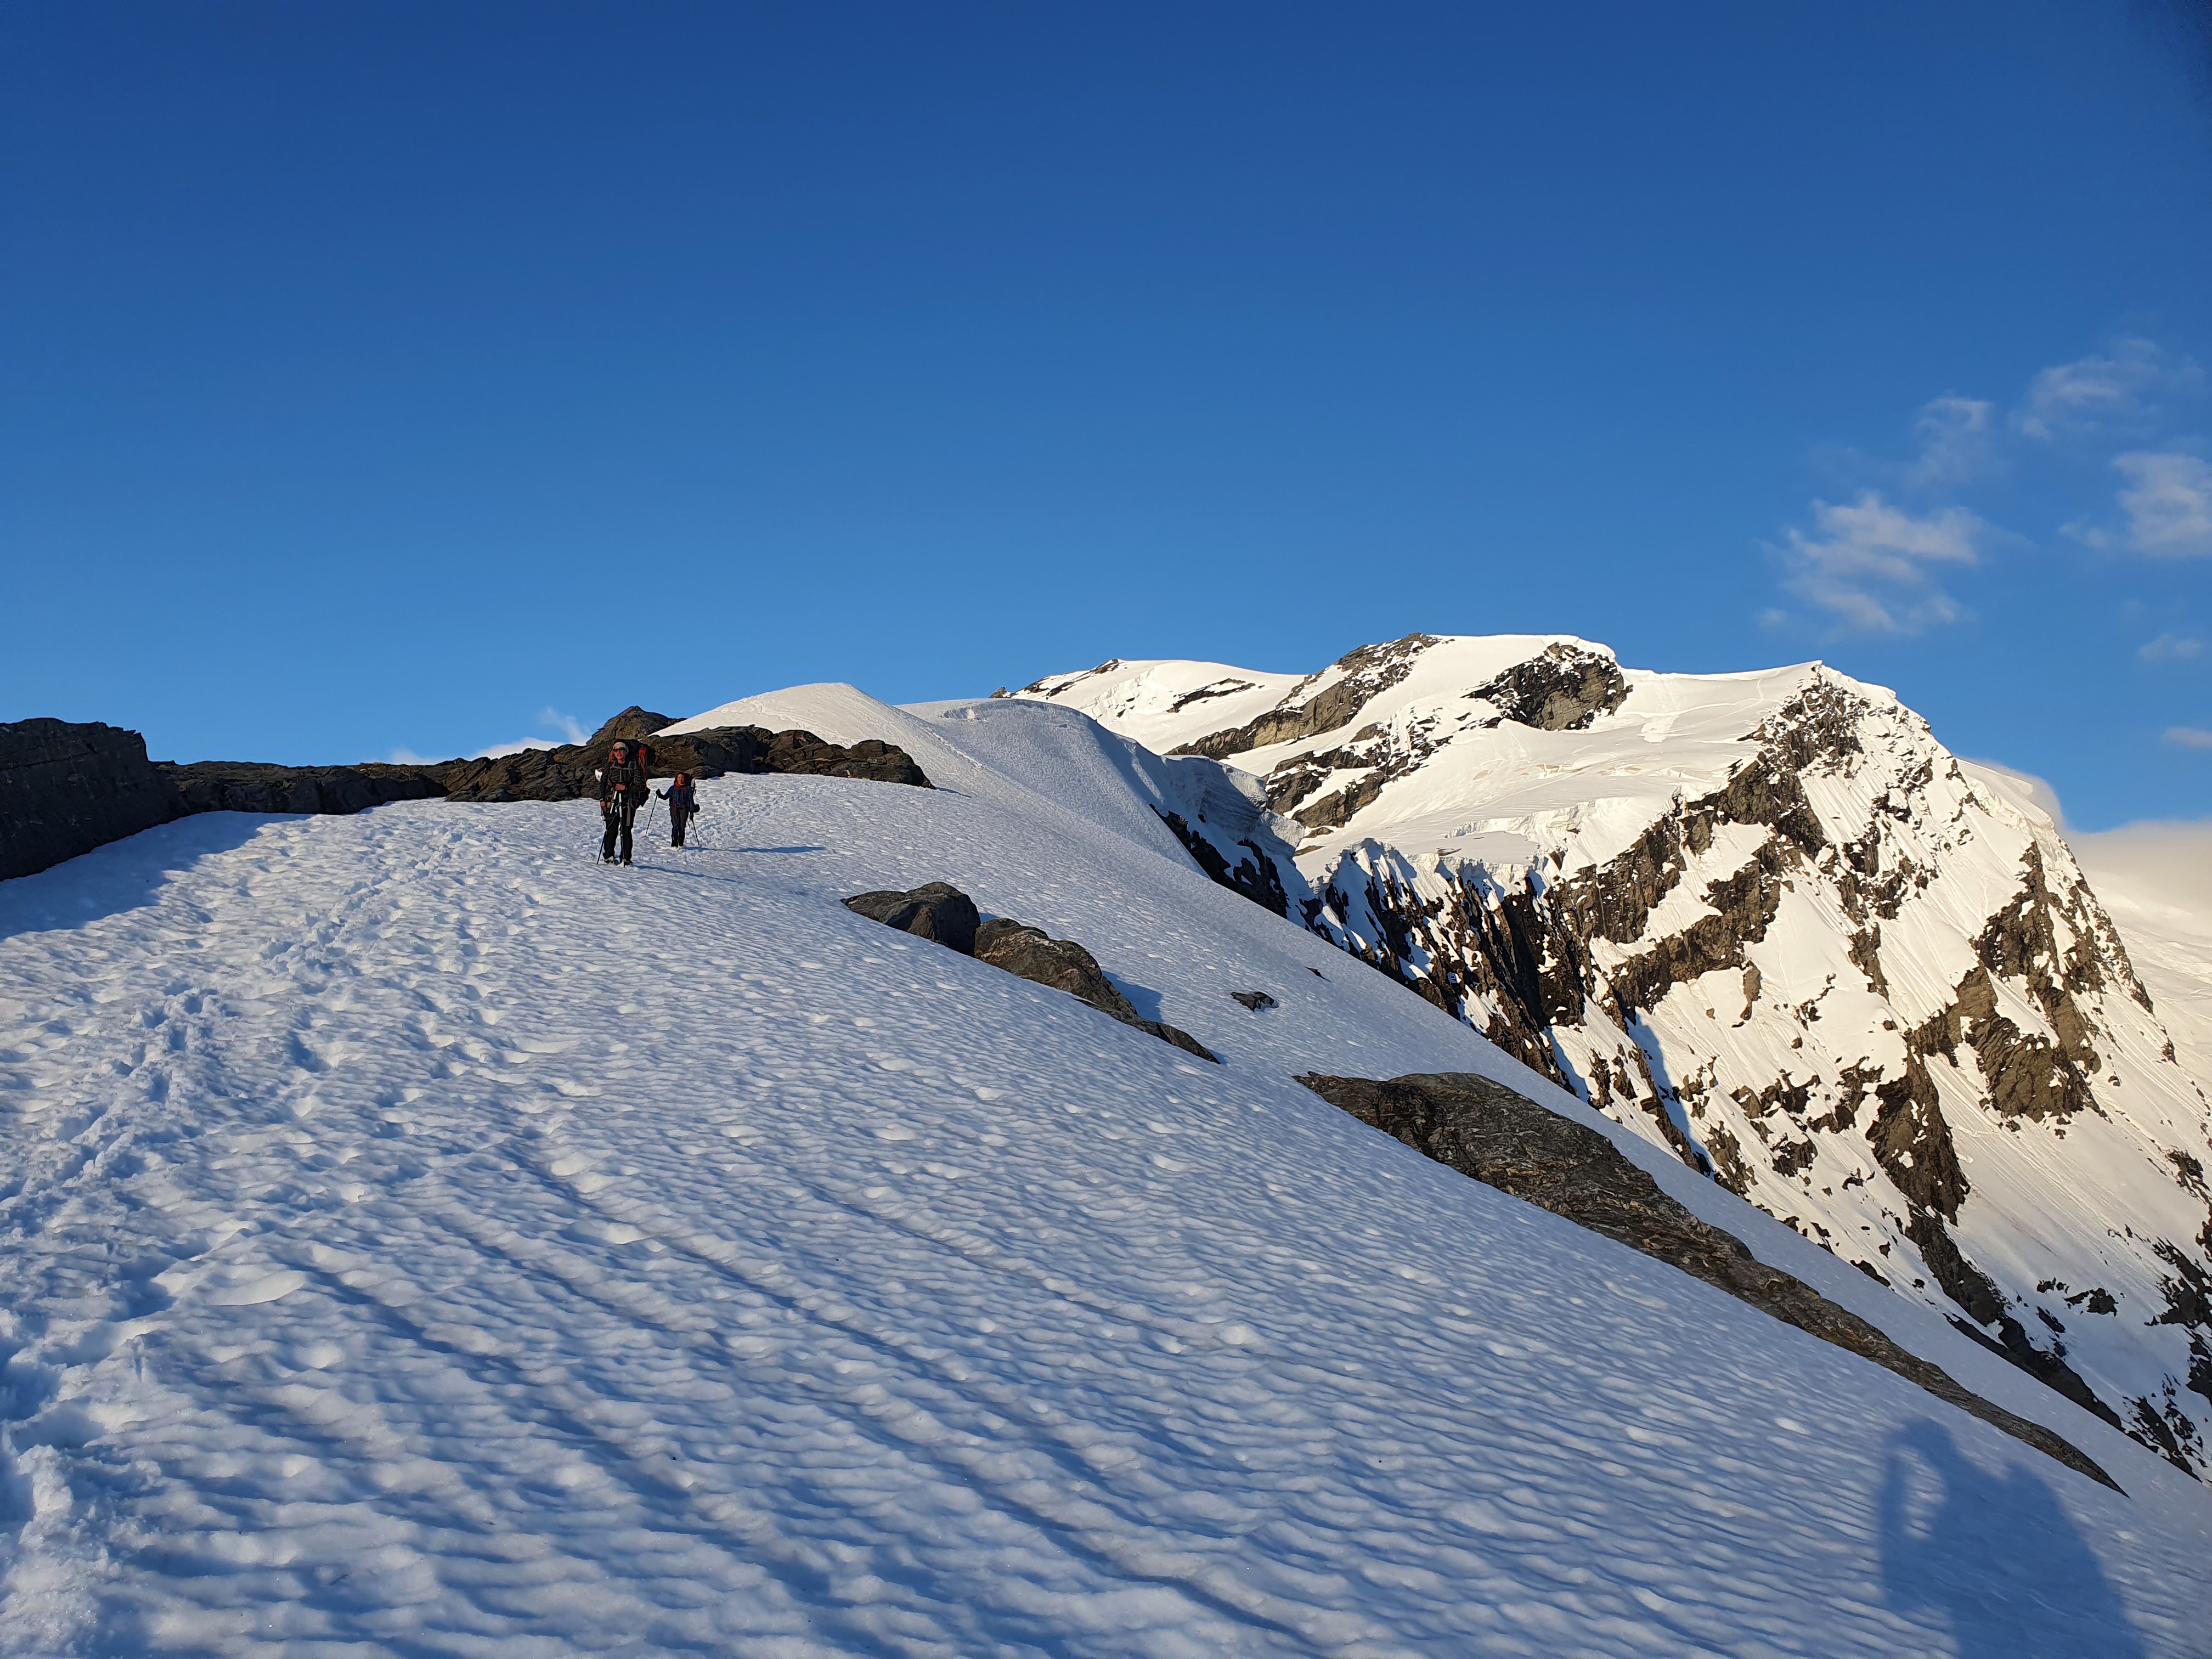
Leaving the hut around 2am, we found a decent freeze overnight made the walk across the Albert glacier cruisey. Towards Marcel col, you need to navigate a bit of a maze of crevasses and seracs – worth taking a photo of from the heli in as figuring this out in the dark would be hard. Luckily for us a party had climbed Lendenfeld the day before so we could just follow their tracks.
Photo of our route from the heli
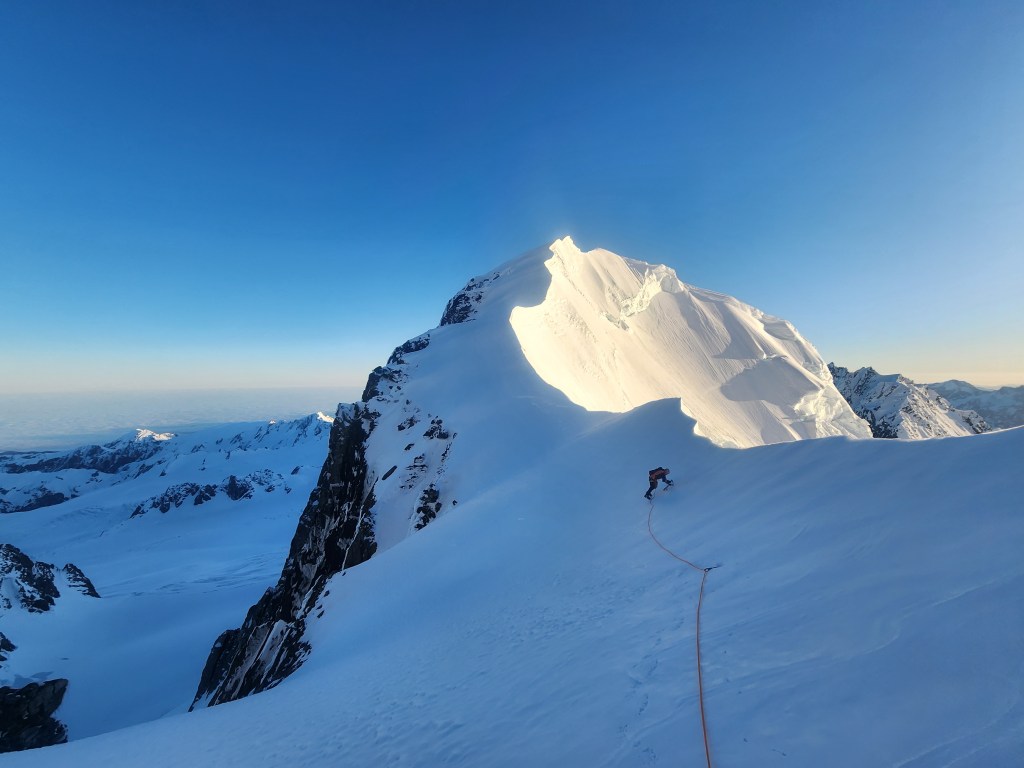
Easy ground on supportive neve made fast progress to Marcel col, which steepens to around 40-45 degrees to the summit of Lendenfeld. It took 2.5 hours from the hut to the summit. Heading up to Lendenfeld, we were treated with a gorgeous alpine sunrise, illuminating the entirety of the southern alps and the ocean on the horizon too, with Plateau hut a tiny dot 1000 vertical meters below you to the south.
Sunrise on Lendenfeld – primo!
On leaving Lendenfeld the climbing gets considerably more technical and progress slowed down. You’re onto the kind of ridge travel that is typical for this area – big undercut cornices hanging over the south faces and wind stripped ice on the north. The ice makes for solid tool placements, and the angle is not very steep, but you are constantly above serious exposure so full focus is required for the traversing the downclimb to Engineer col. We ran a running belay between us for this section – the ice was taking bomber screws and we crossed in 2x blocks. If you’re planning on using a rope for this section, I personally think bringing a full rack of screws is well worth the small extra weight in your pack to allow extra long simul pitches.
Traversing from Lendenfeld (middle of shot) towards Engineer col (behind photographer)
The section from Engineer col is often the crux of the route as it can be cut off by a large schrund, requiring some shenanigans to traverse onto the East face of Tasman to gain Syme ridge. Luckily we found it completely filled in and we could stick to the North side of the ridge which connects the col to the top of Syme ridge. Easy but exposed 45ish degree climbing, we simulclimbed with good screws and a couple of microtraxions taking around 90 minutes to get to point 3300m, the flat spot just below the summit. If pitching this whole section it would have taken significantly longer.
Our route from Engineer col up to Syme ridge. Can often be cut off requiring a traverse onto the East face of Tasman. Subpeak at 3300 on the right, with Tasman summit peaking out just to the left
Joining Syme ridge however gave us our first taste of the conditions on the East face: 5 days earlier there had been 25cm new snow that was well into a melt freeze cycle, and the E face was still plastered. While there had been a solid freeze overnight, the sun was absolutely blasting and by 7am when we were leaving Engineer col it was already starting to soften. Along the ridge itself where the wind had stripped everything back, there was a strip of good ice so we could avoid touching it all the way to the 3300m flat spot.
From here, there is another short (roughly 200m) traverse to the final snow ridge to the summit. More classic Aoraki ridge travel – hard ice on the north side with 1000m of air under your feet down to the Janszoon glacier. Except this time covered in large, fragile lumps of sastrugi and rime ice. We started simul climbing again, but the sastrugi made this impossible with the rope constantly getting snagged and tugging at the leader doing more harm than good, so the rope went away and we soloed to the the final snow slope. This was slow going and mentally taxing, and we got to the base of the final ridge at 0900. From here the north side of the ridge is plastered with with monstrous rime blobs and so the standard approach is to traverse onto the east face for the final section to the summit. If conditions are good this is an exposed but fairly straightforward section of the route to the summit. Reaching over the icy safety of the ridge and punching into the snow on the east face it was clear this wasn’t happening – even by 9am it was totally cooked, with my arm disappearing almost to the elbow. Setting off any size of loose wet from the summit of the east face of Tasman would definitely be the end of you, so the decision to turn around was easy – even though we were only 100m or so from the top.
We retraced our steps, following the strip of ice down Syme ridge to avoid the increasingly scary looking snow. We had originally planned to make threads and rap this section above Engineer col, but even this ice was starting to soften by the time we got there just after 1030, so we downclimbed the whole thing. Once past Lendenfeld the progress was really fast and we got back to the hut by 1430. It was hotter than forecast, and the heat crossing the Albert glacier back to the hut was hard to handle – we got back and immediately downed a litre of water each. We got back to the hut in time for one of the last heli flights of the day – with only 20 minutes notice, this was the fastest turn around we’ve achieved for packing up!
Reflecting on this day, we were caught out by higher temps than expected. We had 9.30/10am in our heads as a turnaround / summit time, on a forecast of 3000m FAFL in mid November with a solid overnight freeze, but we were a few hours late. It was also the first time we had done one of these ridge routes together, with sections of easy but unprotectable (due to the amount of rime) terrain with terminal consequences for any small mistake. We talked a lot about whether the risk to enjoyment ratio is worth it, especially compared to a route like S face Douglas which we had done a few days earlier and while technically much harder, is well protected the entire way, especially for the second. Ultimately, the summit is not everything and being able to bail even when you’re just half an hour away if it’s not safe is the key to avoiding accidents in the mountains.
A classic moderate M3 mixed climb on the west face of the Remarks, previously unskiied. Back in July 2021, Maria and I had taken some friends there a few days earlier for an intro to mixed climbing, and as we were wallowing up the route through knee deep powder I got thinking this would be a great ski line. Luckily I was off work the next day so came back with the skis to open the line. Farily hectic line : short but technical and exposed at the top, with a mandatory air into the steepest narrowest part of the gully, just above another cliff band. High pressure stuff! Bumped into Grice who was working patrol and told him my plans and was keen to join me, but sadly couldn’t get out of work duties. But it did mean he was at the top of the line to take these rad photos! Chur!
Skiing the top section of MK gully, above the mandatory airStanding at the entry to MK gully. Block to the right is good to rap off
Length – The climbing route to Queens Drive is 150m. But you can keep going beyond there until the snow runs out, I made it about another 300m.
Steepness – Initially around 40-45. After the air its steep (around 45-50) and you havent got long to control your speed before the next drop
Exposure – Critical in the top section. Gets its M3 grade from several vertical rock steps which are linked by snow ramps. Once your through this your cruising
Aspect – West
Difficulty – 5.2 E3. Difficulty really all comes in sticking the air and controlling your speed in the narrow and steep mid section before the next cliff. Falling on the landing would cause a really nasty tumble through the next cliff band
Equipment – 60m rad line. Crampons and 1x tool. Picket and rap tat
Got the rope out right at the top to get into the main part of the line.
As with all of these climbing lines, its critical to check theres nobody coming up the route before you start skiing it.
Start by going up Shadow chair and head up past the chutes across the top of diangulator all the way up to the ridgeline. The top of MK is just in front of you at a flat section. The climb has several different topouts – the furthest skiiers left is the most skiiable. The large block in the above photo is the best landmark to ID it, and also works well as a rap anchor. I rapped about 5m over the rocks at the top – after getting through it and seeing the snow on the other side, it totally would have gone to just jump the rocks. Maybe next time!
The line is in 2 distinct halves – above and below Queens Drive. Above is the climb – steep, narrow, and tight with several rock steps you have to either air or rap. The very top section from the ridge takes you diagnoally down and right to the main fall line, and the first rock step. Roughly 2-3m high into the steepest and narrowest part of the line, with only about 20m or so after to control your speed before the next cliff. I went off the skiiers left of the block where the drop was smaller but you land in a really narrow part of the gully. A more heroic option would be straight off the end of the block, but you really dont have long to stop before the next cliff, and falling through it would be seriously bad.
If you were going to rap this middle cliff a picket would be the way. Unusal to get good ice just there and scraping around for rock pro would be a pain.
The next cliff is a similar height, but had ice on the landing when I was there so I put the crampons on and downclimbed. But again I reckon it would go late season in a big snow year!
Once the skis are back on the pressure is off and its type 1 fun – blast down through Queens Drive and down the gully until the snow runs out! I then just hiked back up to Queens Drive and out to the ski field. I would definitely NOT recommend carrying on down the West Face – did this on a previous trip down Morning Glory and it turned into the quest of all quests
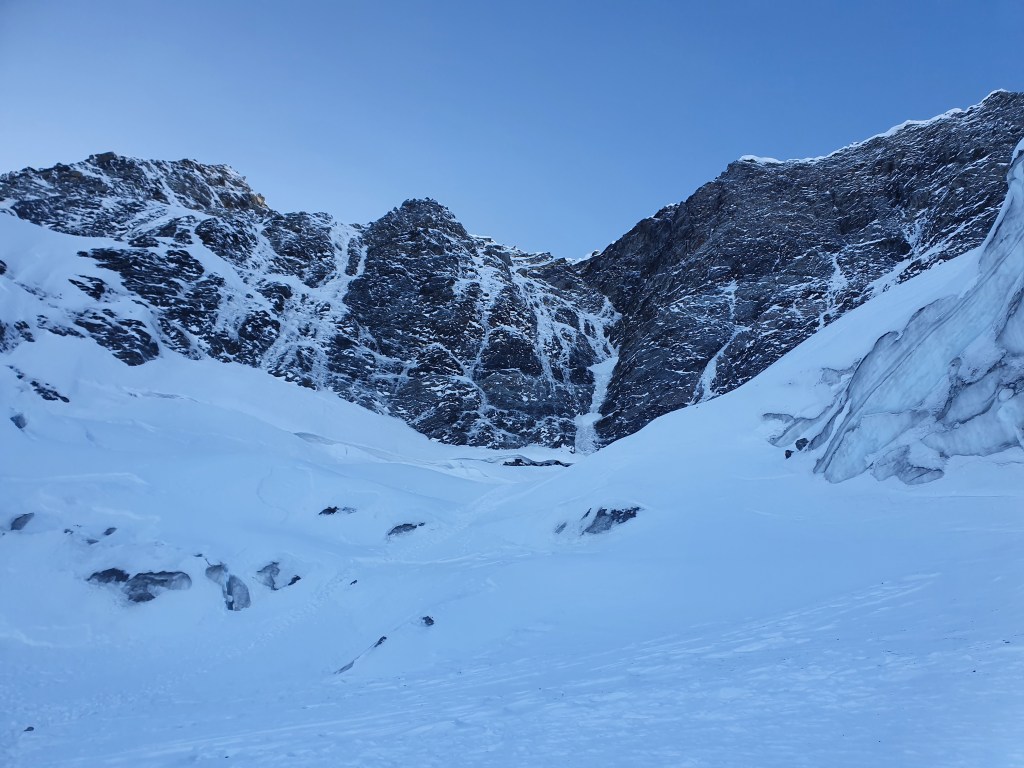
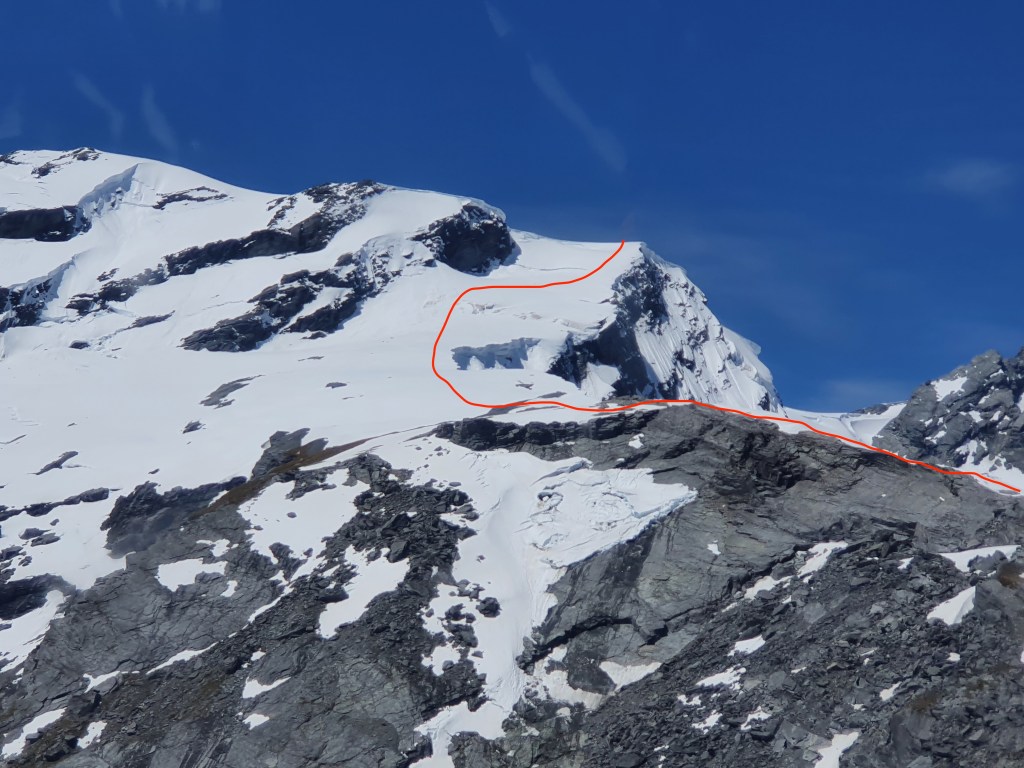
A high quality 350m WI3/4 ice route with easy access from Baron Saddle hut. Unfortunately a large rockfall has affected the South face of Vampire since we were there and I havent heard of anyone going up there since so I have no idea how stable the rock is or if the line is even still there. Hopefully it will be climbable again as the whole zone is awesome
The climbing line with approx belays marked with yellow crosses. We linked the first 2 pitches into 1, but meant we needed a short simulclimb to get to the good belay ledge
Approach
Base yourself at Baron Saddle hut. Access either via the Sealy Tarns track and Mueller hut then across the Metelline, Sladden and Williams glaciers, or a 5 min heli ridge from Glentanner. We flew in an hiked out as we only had a couple of days off work to get the trip done. I would avoid access via the Mueller glacier – the access around the Mueller terminal lake looks terrible, and then the glacier itself gets unrelentingly pounded by rockfall from above.
Baron Saddle hut with Vampire in the background. The approach to the route in red
Barron saddle hut is a compact little barrel with bunks, but no gas or cooking equipment so bring everything.
From the hut we headed to Barron Saddle and then across to the Bannie glacier. From here its a simple 3-400 vertical metre plod to the start of the route. We went up the night before to figure out the route in daylight, and left a bunch of gear at the base of the route. Skis would speed things up significantly but Sean was between skis at that point so we were booting it.
Climb
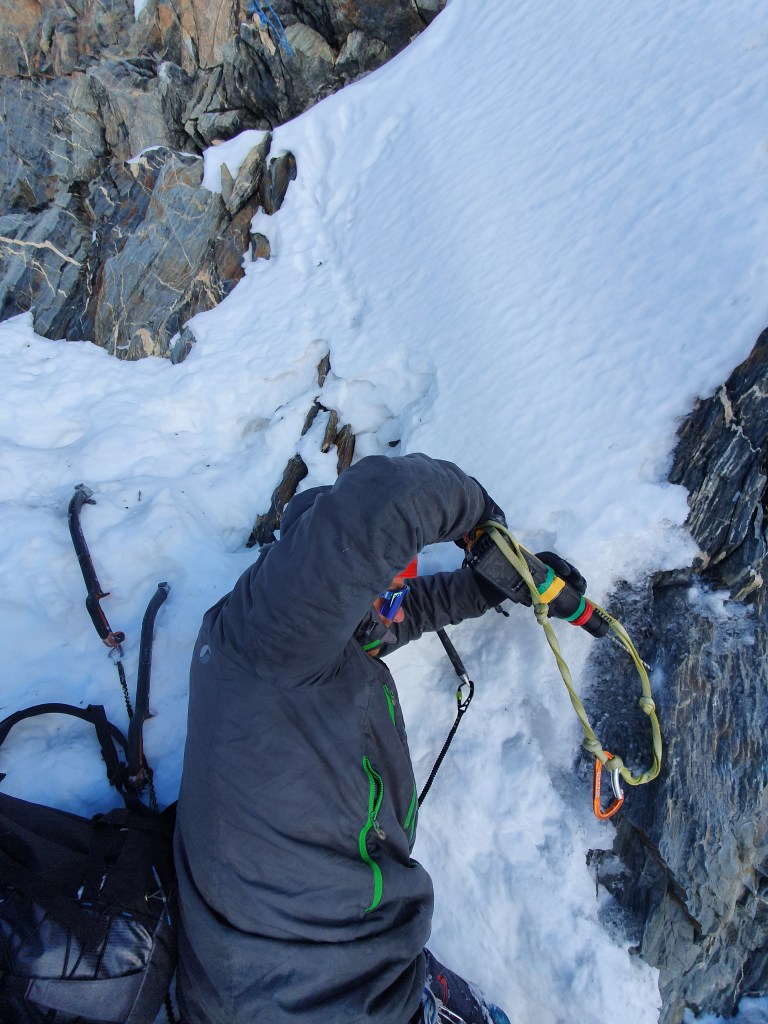
Crossing the shrund was a bit tricky and involved so traversing out to the west before sidling back in under the route.
Bottom of the 1st pitch
Pitch 1 : 2x 25m sections joined by a short low angle snow ramp. The first was WI3 but the second was near vertical for the second half, at WI4. Tubbs led this first pitch and did both sections in one long pitch. We ran out of rope and so had to simul a few metres to get him up to the snow ramp above to build a belay. To avoid the simul you could turn this into 2 pitches
Sean coming up the 1st pitch
Pitch 2 : Snow ramp into WI3 ice traversing right up to a screw belay and the start of the next section of steep ice
Good ice climbing up the third pitch of Swiss Virgins, Vampire
Pitch 3 : Steepens up for the next WI4 pitch. The ice was a little thinner here with a few mixed moves thrown in. Culminated in a near vertical 2m pillar to get onto the low angle snow field
Pitch 4 : Another 40m of WI3 to another good screw belay
Mark leading up the crux 4th pitch.
Pitch 5 : 20m of WI3 into a steep snow gully up to the summit
Descent
Good V threads all the way up, except right at the very top where we threw in some bolts
There were excellent screw anchors the whole way up, and a team of 3 is ideal for prepping the V threads on the ascent to maximise efficiency on the descent. However when you reach the very top anchor options are slim. The unconsolidated loose snow meant a picket was no good and the ice runs out so threads arent an option. There is a big rock at the top which has a thin crack in it that can fit a knifeblade piton, but the direction of pull for the rap was straight out of the crack. We had spoken to a group that had climbed the route a few days earlier and told us about the top anchor situation and we decided to do a bit of a public service and bring a power drill up and install a nice shiny new DBA with rap rings. We were hoping this was going to becoming something of a classic ice route and would get a lot of traffic – after the big rockfall I dont know if these bolts are even still there. Im sure they are still securely in the rock, but the rock may now be at the bottom of the valley…..
Heading home across the Sladden glacier
From the hut it took us around 5 hours to get to the car on foot – would be significantly faster on skis. The section getting to the Sladden glacier (passing under the Williams glacier) was quite thing and over some big exposure – take extra care if crossing this late in the day and a small wet loose could cause a big fall down to the Mueller. The same is true (but to a lesser extent) between the Annette and Mueller hut.
The route from Barron Saddle hut (x) back towards Mueller hut staying high on the terraces. Gets the sun later in the day so go early. Right from the hut it the way up to the routeLooking up the routeIm going to start bringing a power drill on all my alpine outings….
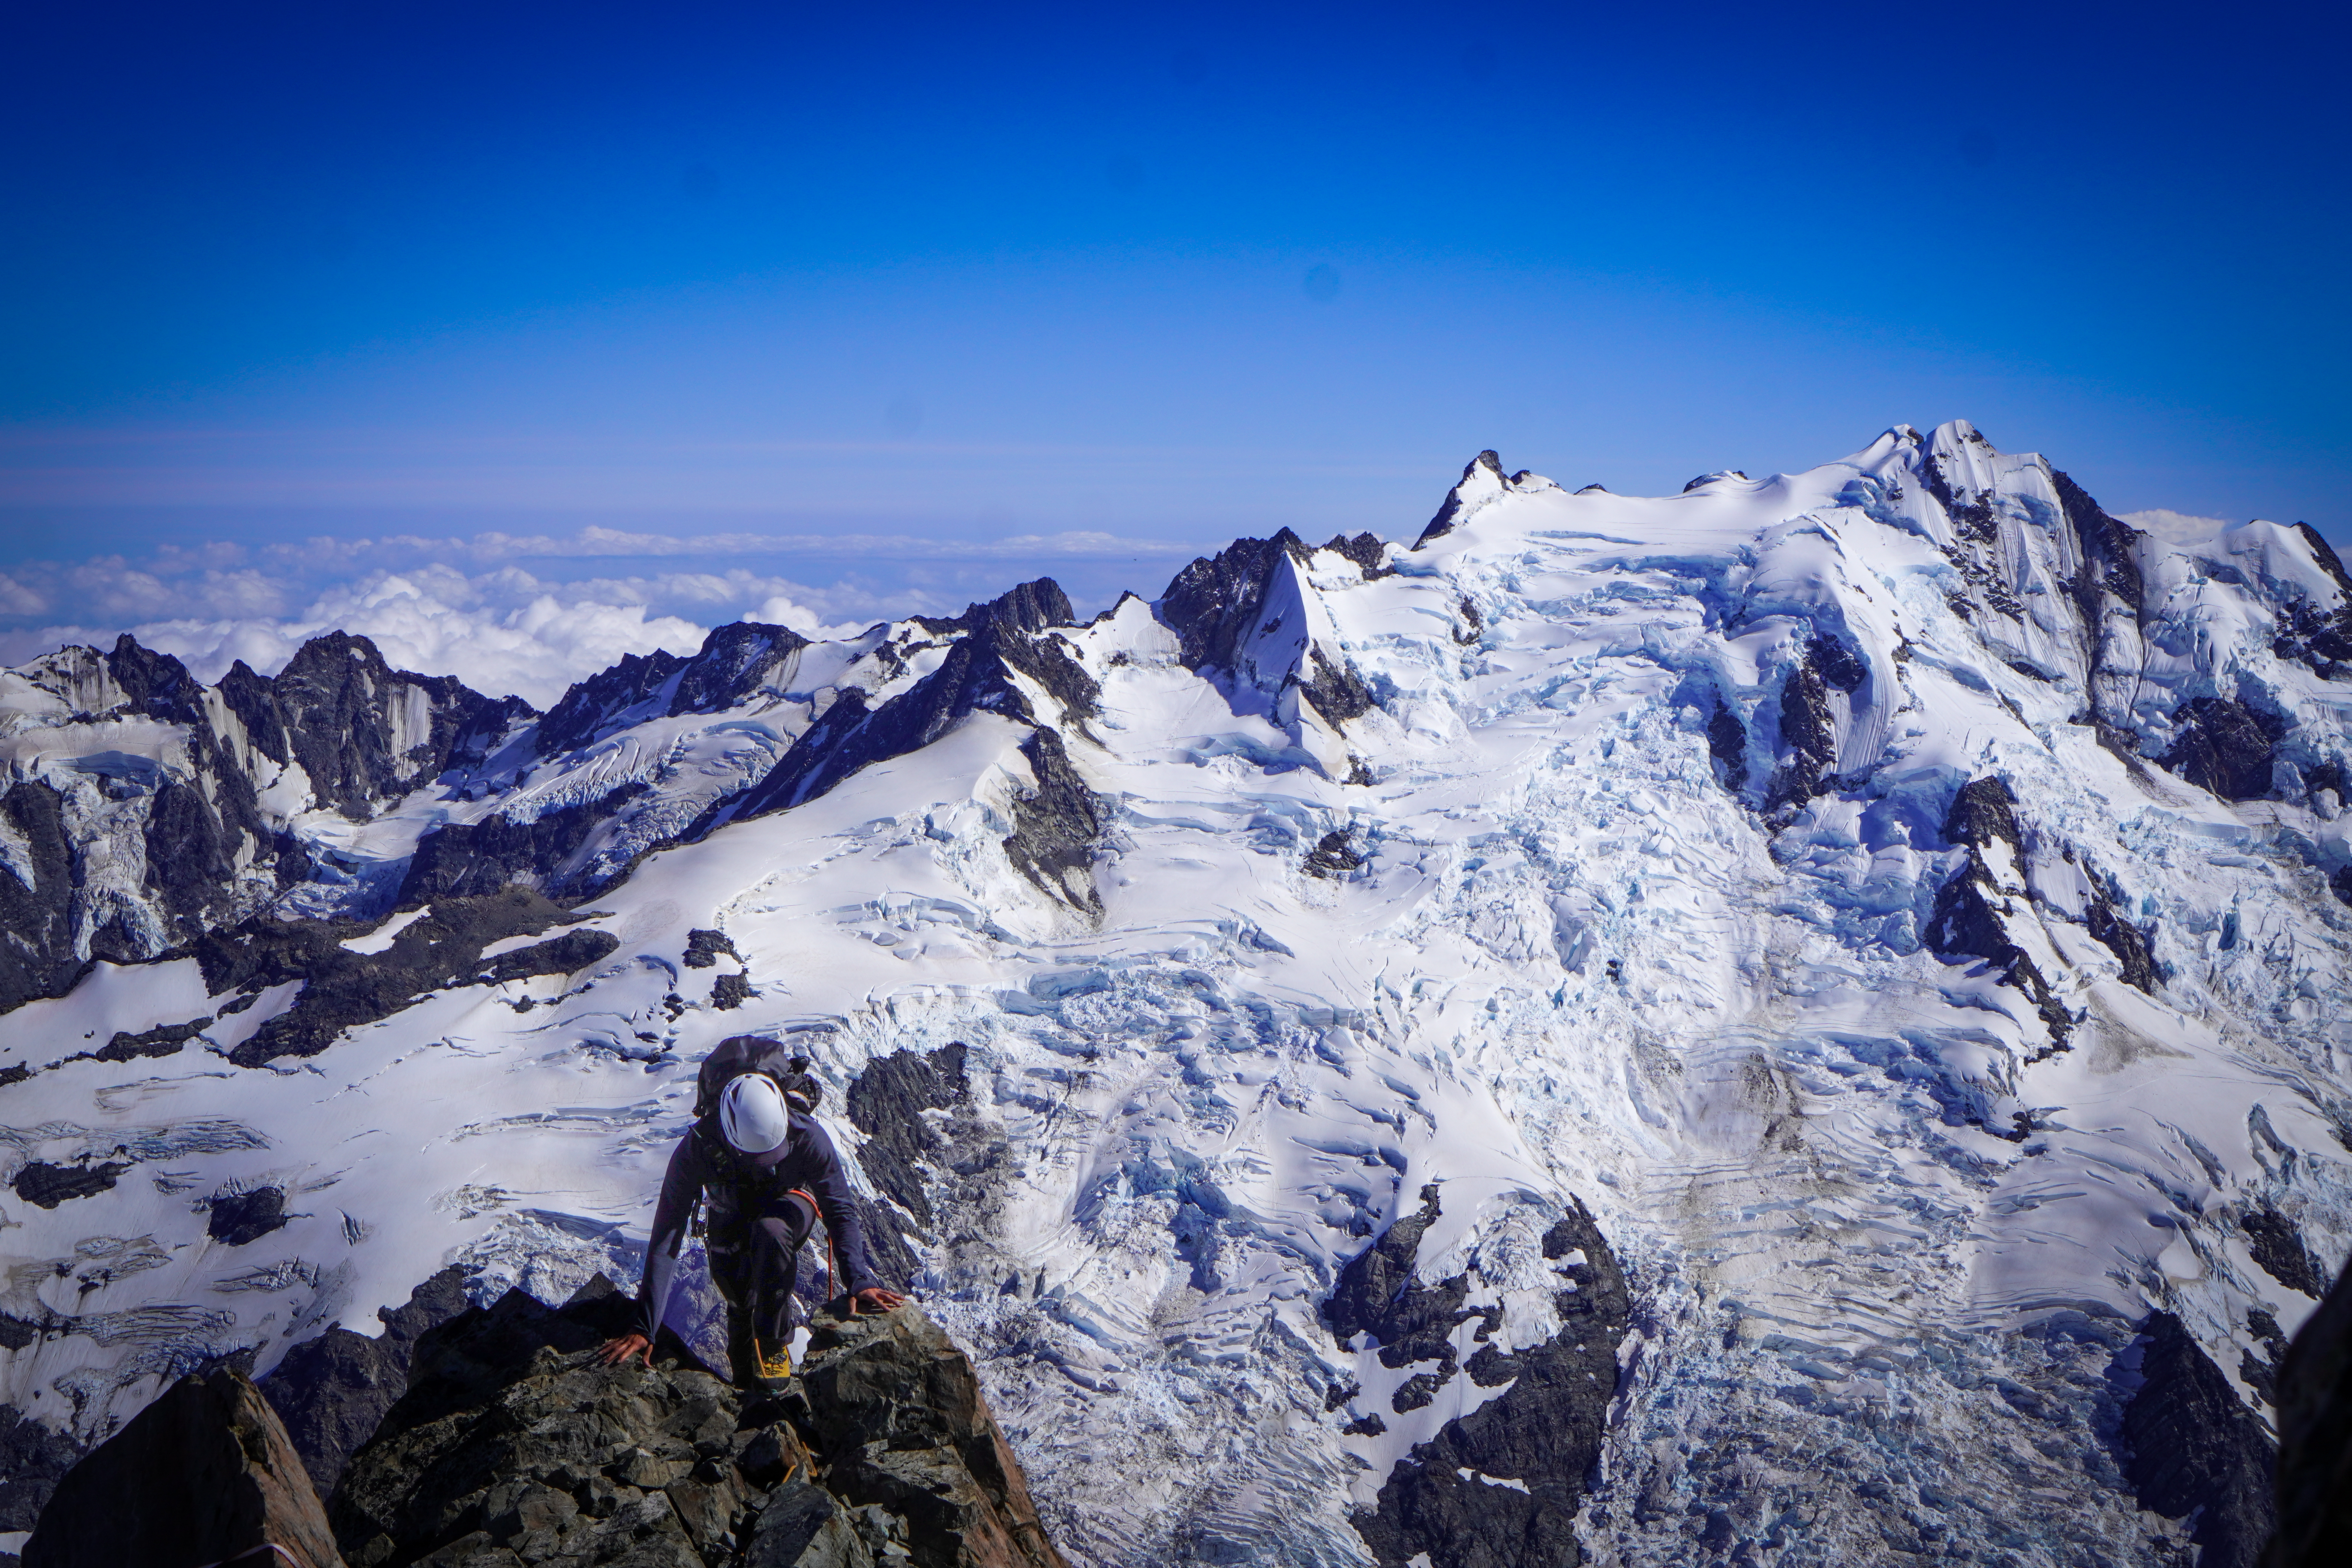
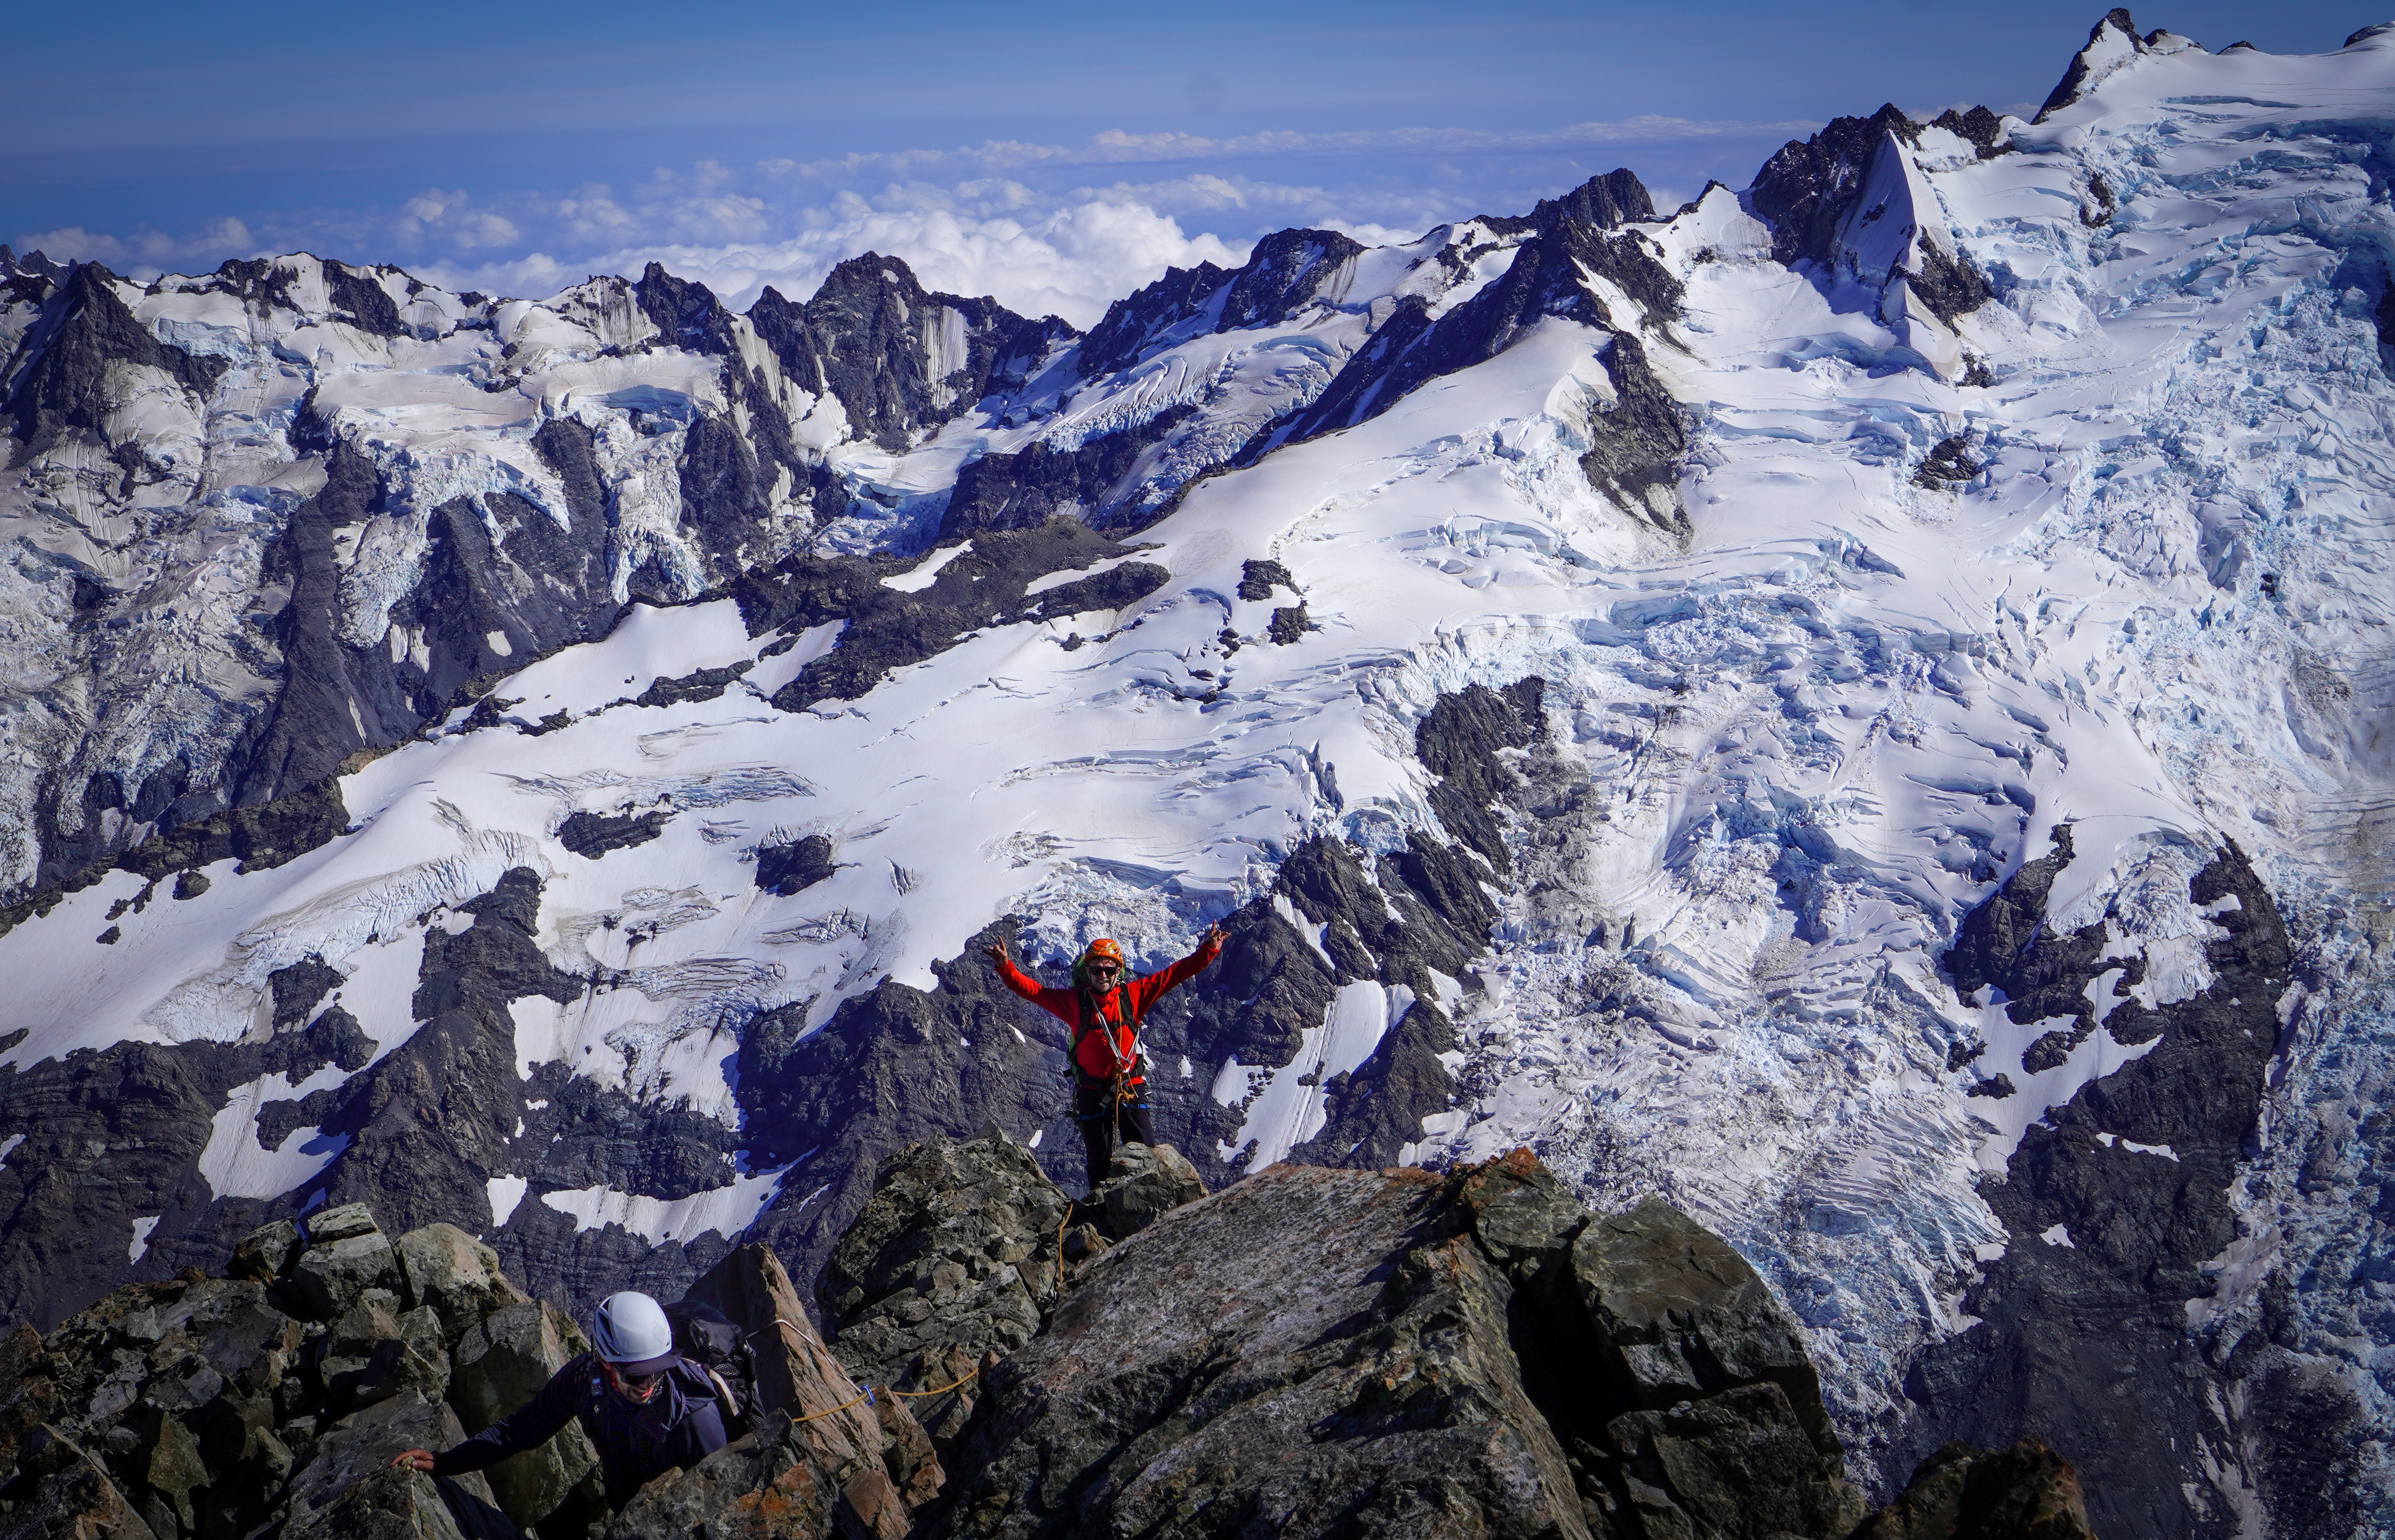
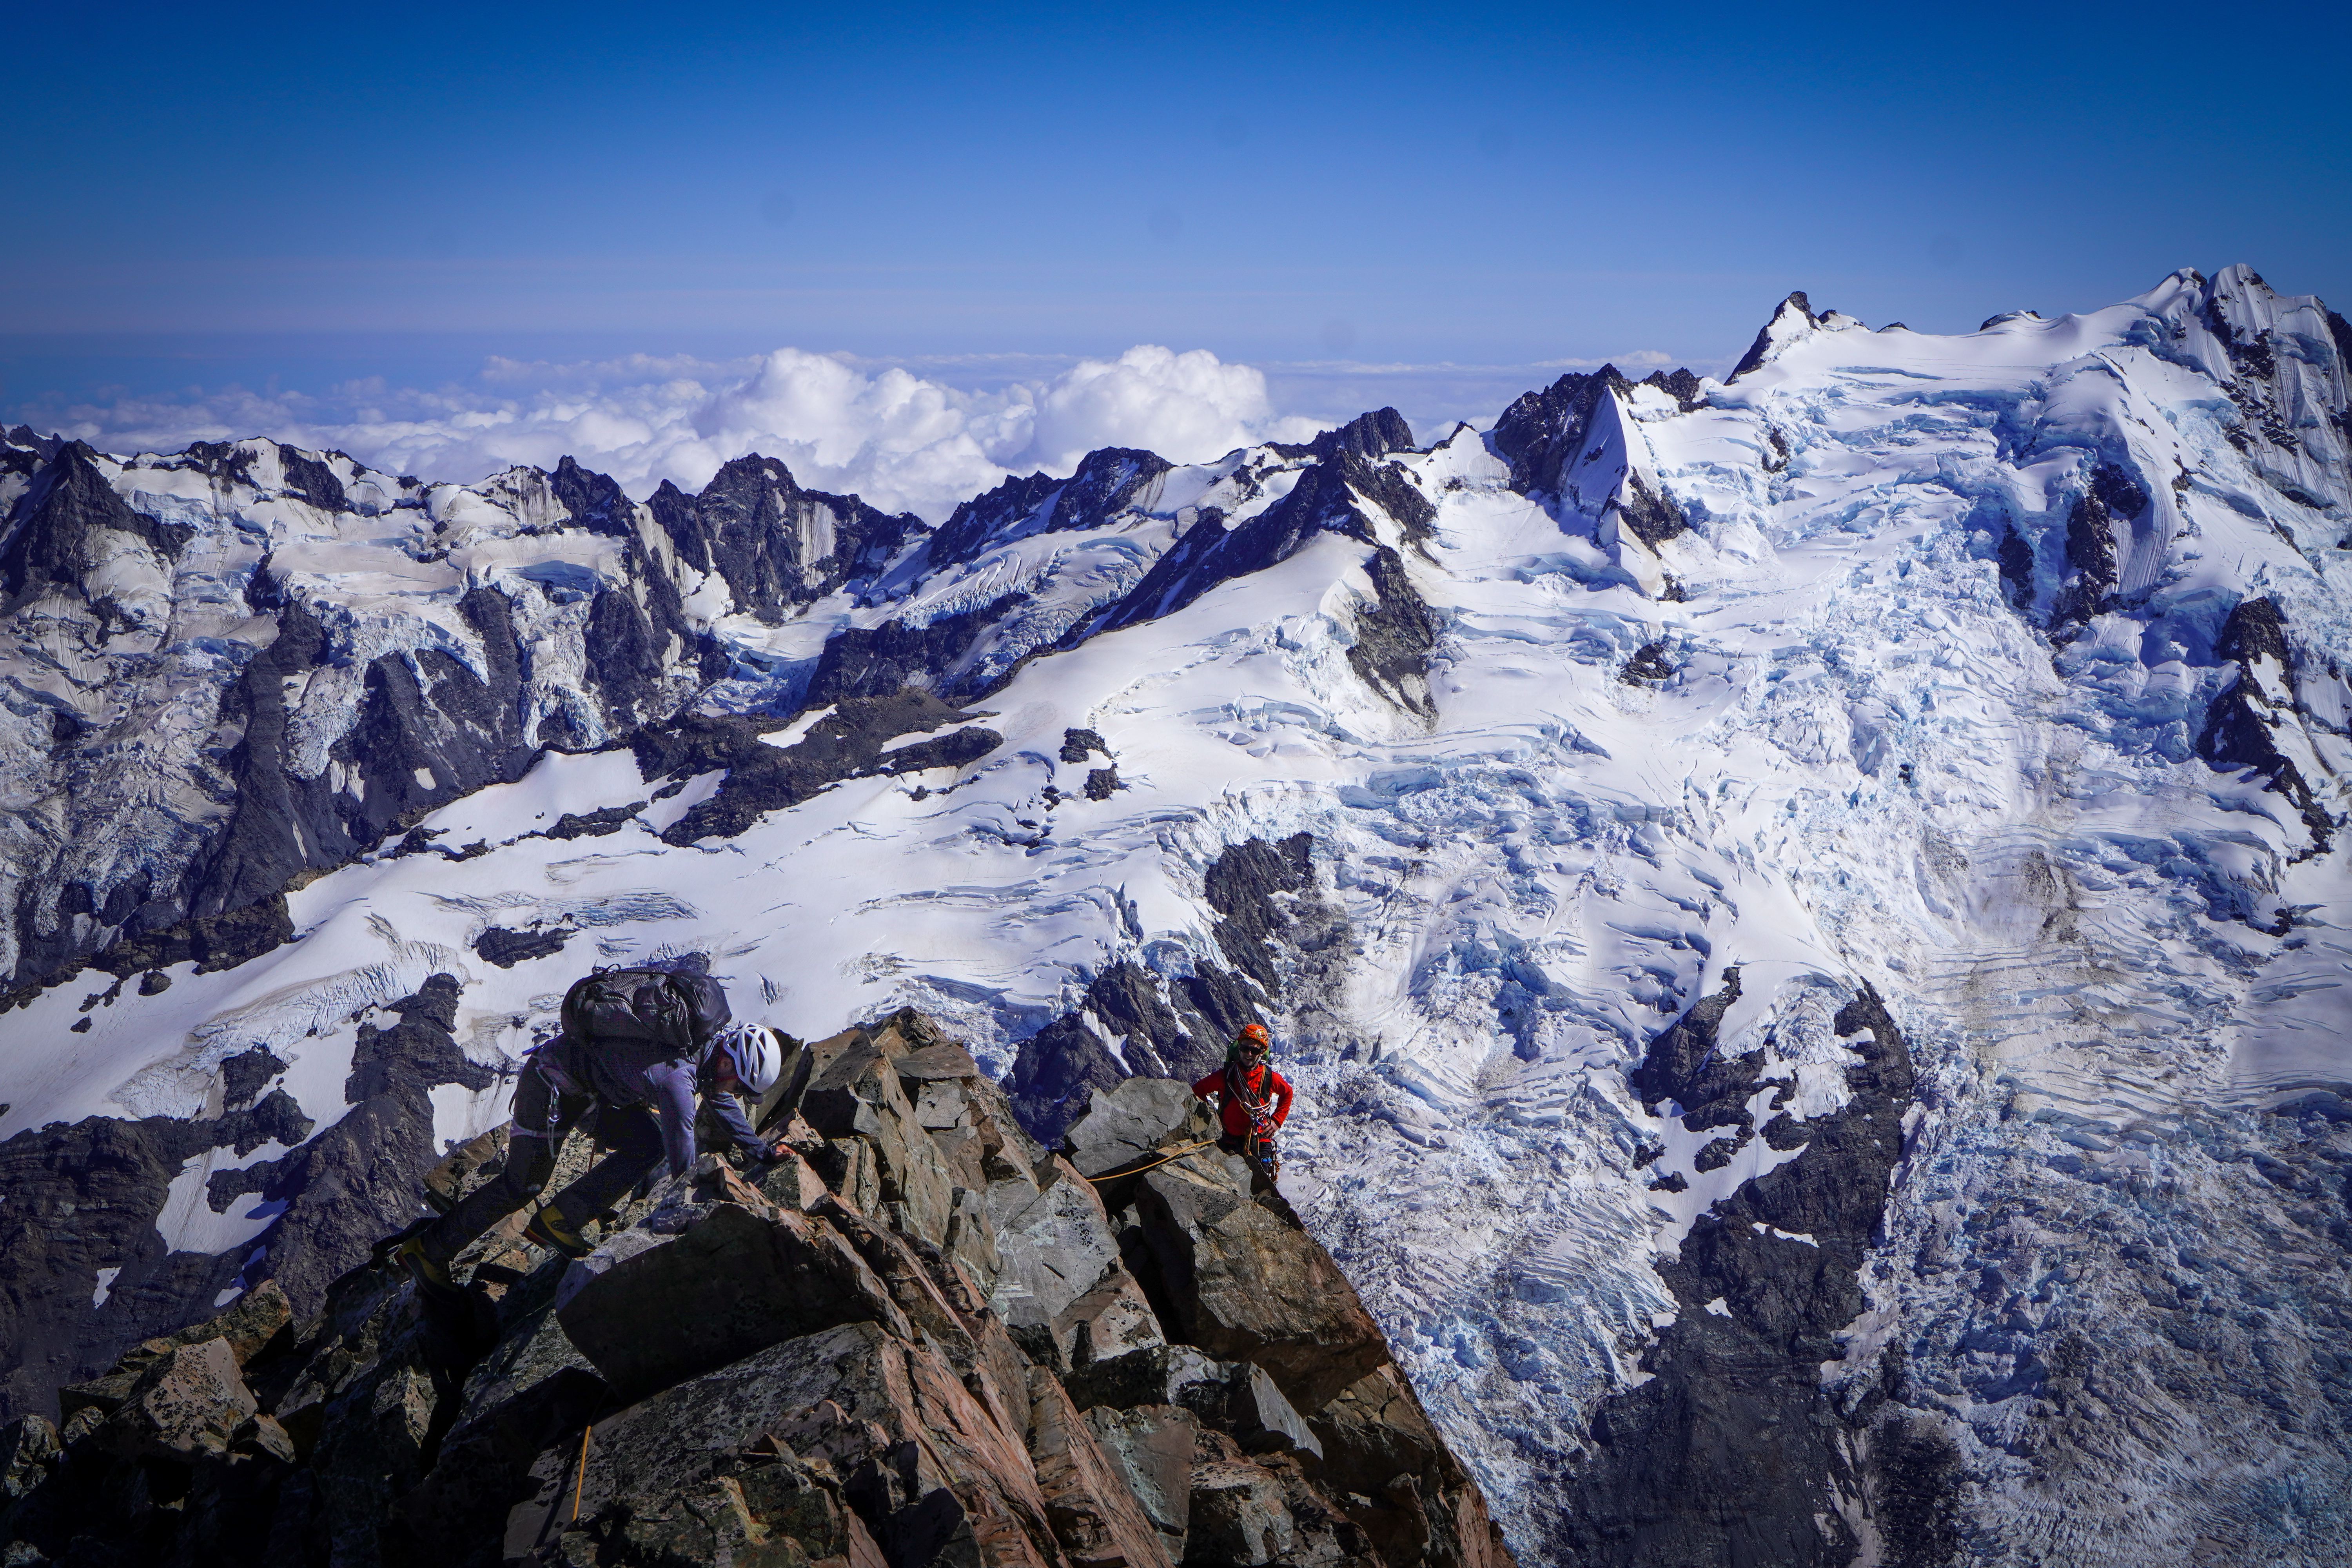
I first heard about this route from my guide on a mountaineering course; he had recommended it as a classic ‘must-do’ for the region. That was 2 years ago, but I finally got round to it in March 2022. A really great day trip from Cook village. Easy access, long route (800m), non committal. And the rock quality was pretty good! She says, surprised.
Very solo-able. Some parties may want to take a rope but expect a long day if that is the case; it is an 800m route! As a frame of reference, it was more exposed than the Phipps Temple Traverse, but similar in parts to the access to Moir’s mate.
Grade: III 3, crux 8
Equipment: we took a 30m rope and a minimal rack just in case
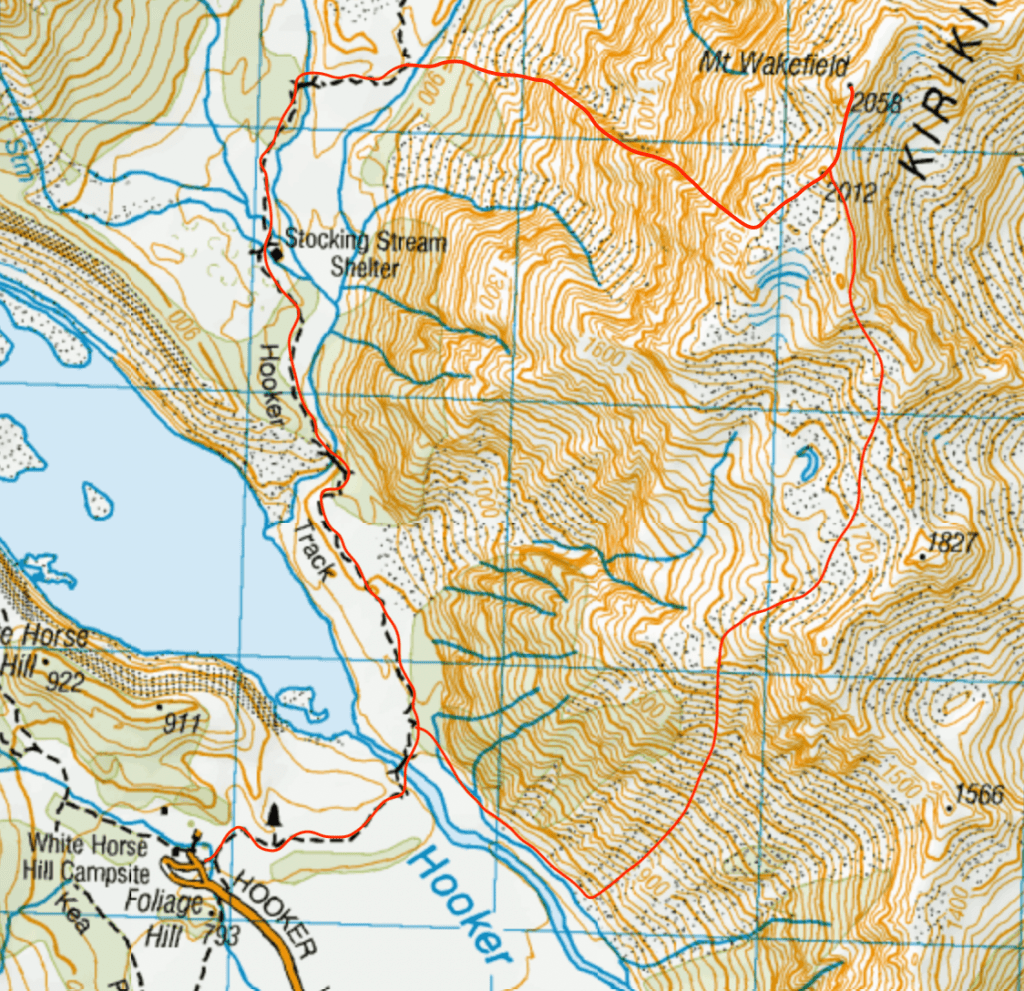
Approach: 2h up the Hooker Valley track from White Horse Hill Campground
Climbtime: 4h to top ridge then further 1.5h scrambling up to Mt Wakefield
Season: best in summer/early autumn when dry rock is guaranteed
Team: Jack, Maria 5/3/22
approach
Woke up at the very reasonable time of 7 after driving down from Christchurch the night before to stay at the NZAC’s Unwin Lodge – email ahead to book a spot and bring cash for fees.
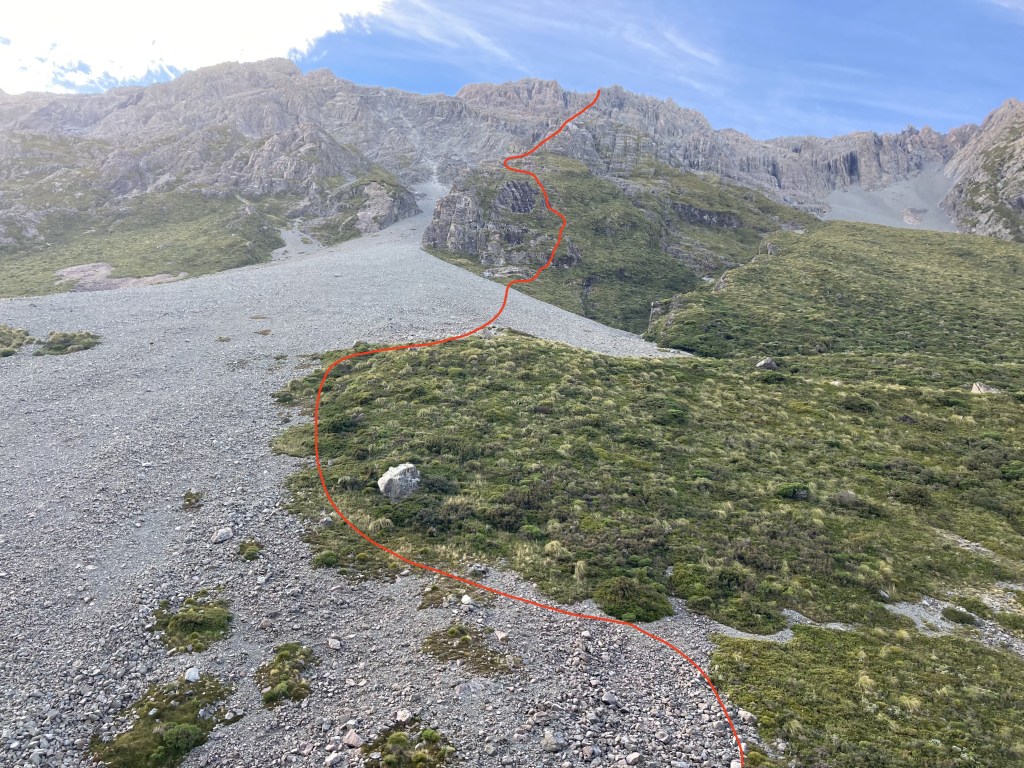
Easy walk along the marked Hooker Valley track. Cross all 3 suspension bridges. Just nearing the end of the track, turn off the path right towards the scree field. There are two large scree fields, it is the one closest to the Hooker lake. Fatmap has a really handy route overlay.
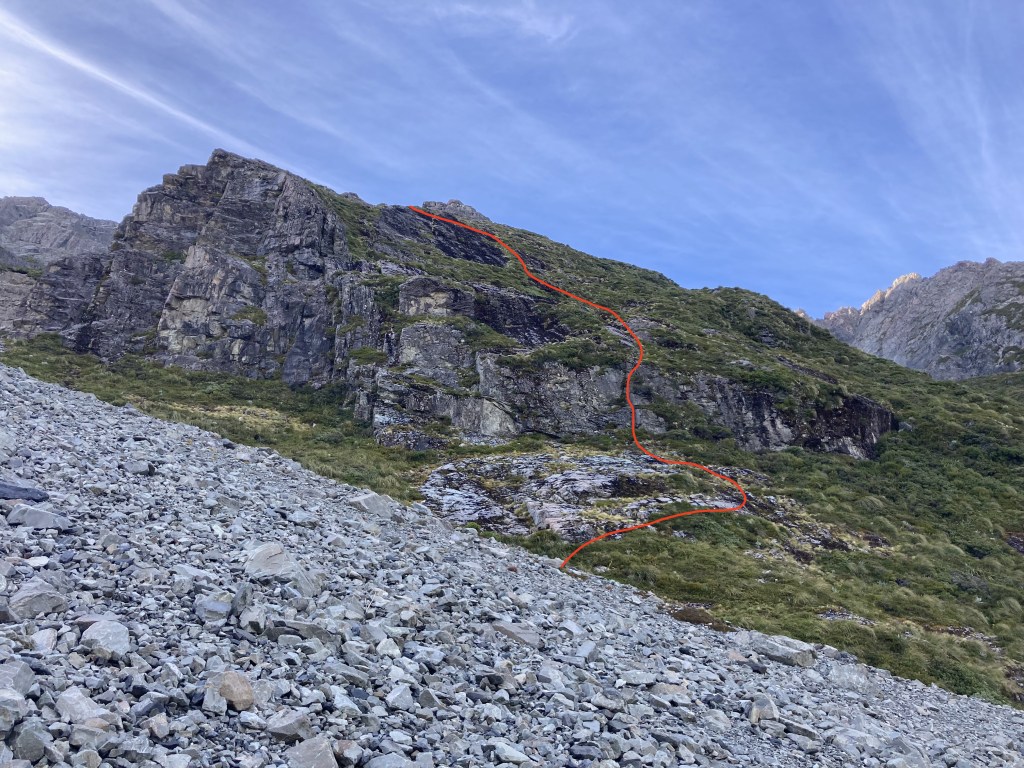
From here scramble up to looker’s right of the scree field. The direct start (18/19) is on the left sticking to the arete. We started further right. Initially a bit vegetated (I was in head high bush briefly), but the route comes into its own the higher up you go. Soon you’re scrambling over decent rock with stunning views of Aoraki the whole way up. Route finding was pretty straight forward; generally we stuck pretty close to the arete.
Guideless route; direct start (18/19) follows the arete just left of our lineOur route closer up
The route pops you out at around 1960m on to a very Mars-esque plateau. Walk left and scramble up to Mt Wakefield. Soak in the 360 panorama before taking care going down -there was more loose rock on this section than on the actual route.
Ridge South of Mt Wakefield
We initially thought we’d walk south along the ridge until we met the Tasman Valley Road, and had dropped a car off there in the morning, but the ridge looked quite involved (see photo on left) and it was already mid afternoon so we dropped down into the scree field west of 1566m. Scree quality was average but this saved us a good few hours. At the bottom head right and within a km you’ll hit the Hooker Valley Track again.
Type 1 fun all the way. Would climb again, next time via the direct start or via the other Wakefield gullies!
Stoked to have climbed this iconic mountain! It was a strong introduction to the mountain for me, having never climbed it before, but when Joe offers to lead all the ice climbing… Why not? One of my more memorable trips in the NZ alps. It really is a classic climb.
Difficulty: Grade 3+
Equipment: 2x semi technical tools, screws (depends on your tolerance for running it out! we brought 8), 1 x picket each. The amount of rock gear needed depends on the time of year – we didnt need any but later in the season a small set of nuts and set of cams would be needed. Rap tat. We climbed on 2x half ropes as a team of 3 but as a 2 a single 60 would be fine.
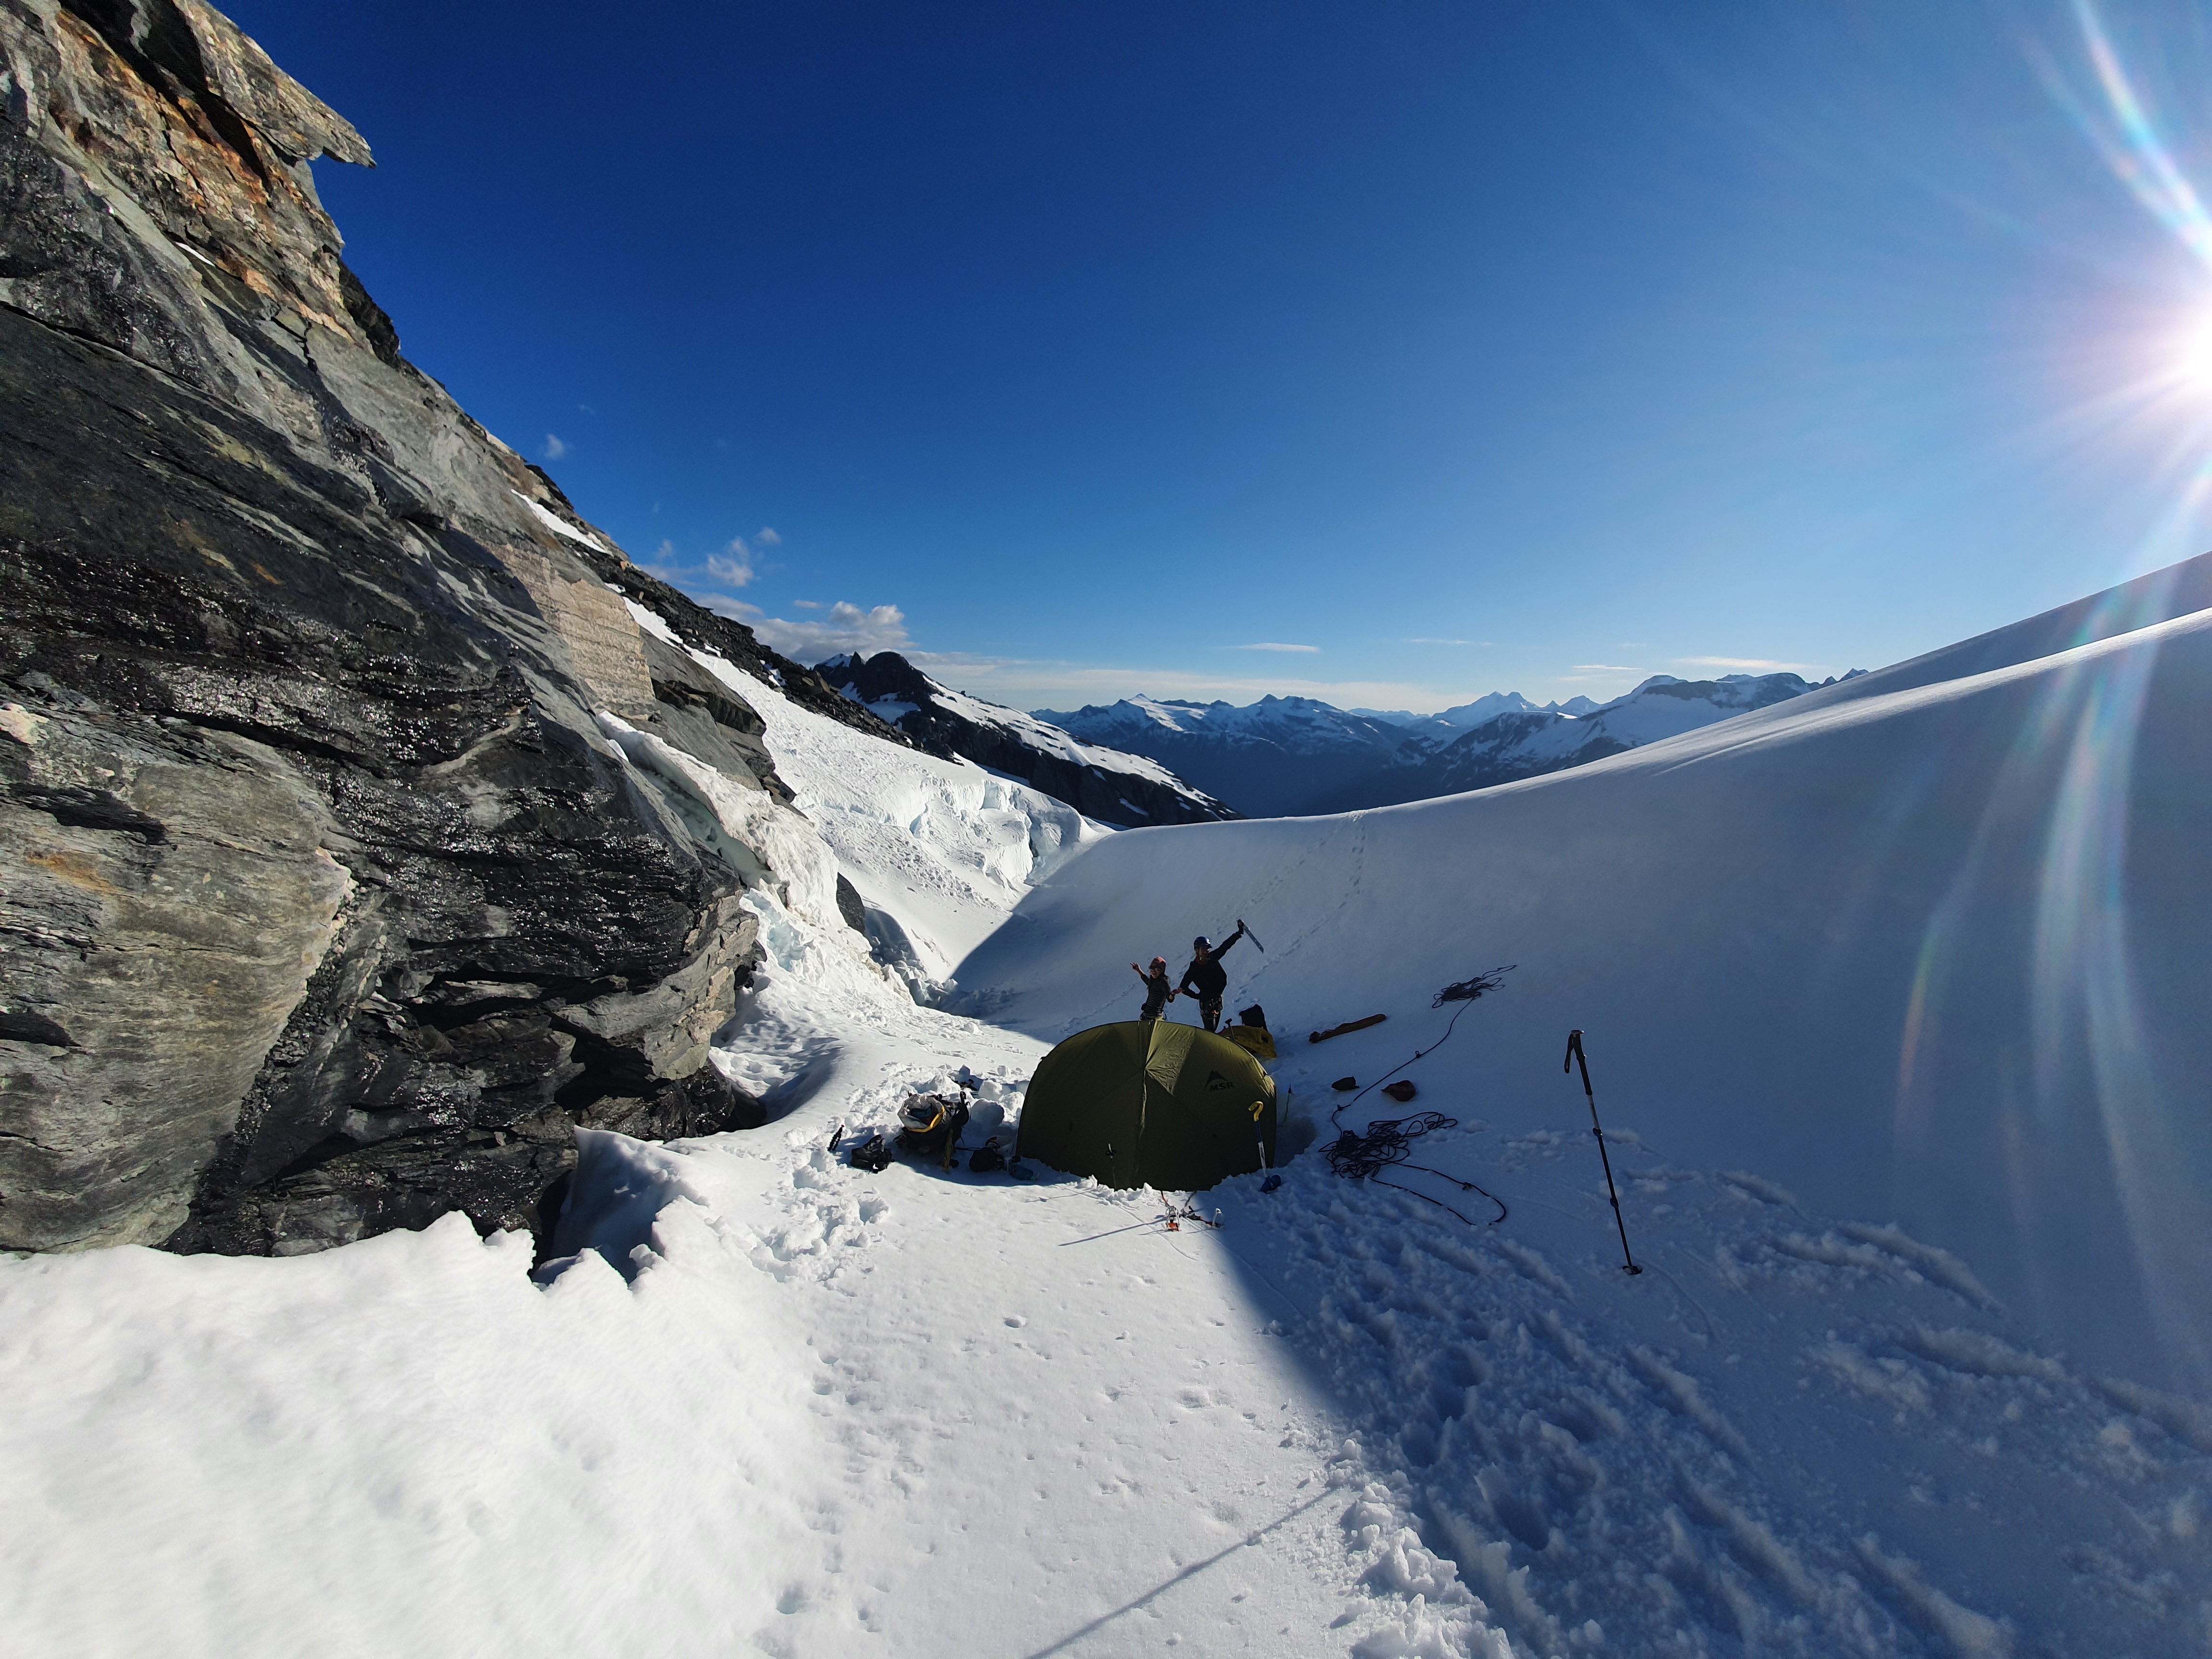
Approach time: with only a short weather window (excuses, excuses) we flew into Bevan Col and set up camp at the base of the SW ridge, at around 2100m – see attached gpx file.
Climb time: 6.5h to summit, 11h descent to French Ridge hut
Season: Summited on 1 Dec and the ice was still fat. Earlier in the year expect ice, once it gets much later though the crux turns into a rock step
Party: Joe, Maria, Maia 30/11/21 – 2/12/21
Approach
An easy drive from Wanaka up the Mt Aspiring road, which is gravel past the TC turn off. Has a couple of fords but unless there’s been a ton of recent rain they are no problem crossing in most veichles (Juicy vans regularly make it to the end). If you’re flying in, Aspiring helicopters is just past the TC turn off. They have a slightly unusual pricing structure – as of 2021 its $1170 for 2 people (585 each) or $1560 for 3 (so 520 each), so getting more people to share the flight doesn’t actually make it much cheaper. After checking in with them you drive down to Raspberry Creek Car park and the Heli lands in the field just next to it so you don’t get stuck without your car on the walk out. The only landing spot possible is Bevan Col. We were limited for time due to driving up after a night shift so went for fly in hike out, but the hike in really isn’t too bad, just time consuming. Generally takes around 3 hours ish to get to the French ridge turn off and 1.5-2 hours up to French ridge hut (path is steeeeep) with very well marked track the whole way. You can shave the first 6km or so off that if you have a decent 4WD and ask permission of the land owners – they often will let you drive as far as Cascade hut (call to ask permission! 03 443 7155).
The two most common approaches are to either stay at French Ridge Hut, or to bivvy at the base of the route on the Bonar. If you’re flying in, I think its a no brainer to bivvy but if you hike in, it may make more sense to get a good nights sleep at French ridge and go from there. Allow 2-3 hours from French Ridge hut to the start of the route. It doesn’t really make much sense to go from Colin Todd Hut, its 1-2 hours in the wrong direction.
It was around 3.30pm when we waved goodbye to the heli at Bevan col. We cruised across the Bonar to the base of the SW ridge. Navigation is easy but take care for crevasses in early season. The Bonar can become totally disorientating in bad weather so if there’s any chance of dodgy weather its worth putting in a few GPS points to get you from the base of the SW back to the Quaterdeck on the descent. The other option from the Bonar to French Ridge is via the breakaway – while we were there the ice cliffs threatening this route were extremely active and this route would have been very dangerous. If the shrund at the top of the quarterdeck is cut off then your only option is to go via Bevan Col.
We found a nice sheltered spot to set up camp at 2220m just under the foot of the SW ridge. It was reasonably flat – once we used our shovels to make it so – and there was even running water off the rocks (this might not be the case earlier in the year). It took us around 4h to get here from Bevan Col. Sacrificed the sunset views for an early night – bed by 9pm.
Home for the night
Climb
Our campsite was where the line starts
Woke up at 2am, packed up the camp and hid everything to keep away from cheeky keas! We were away by 3.30am. Our starting elevation was 2220m. The snow was in good condition for the climb – a solid overnight freeze made for an efficient climb up the 45 deg slopes. It looks quite intimidating from afar but once you’re on the ridge its actually pretty straightforward. Some groups would solo this part especially if the snow is soft and you’re making footprints. With the freeze a slip would have meant a long slide down to the Bonnar so we used running belay with microtraxions on pickets allowing 200m pitches on our 70m ropes. After 2 pitches and 2 hours we were at the base of the crux couloir at around 2800m.
From the colouir was the crux – we made 2 pitches. The hardest climbing is as the start, with 20-30m or so of WI3, with short/less than body length near vertical bulges on a generally 80 degree ish slope. Pretty similar in difficulty to Altered States at the Remarkables. After this the angle eases off to low angle ice slopes, and after another 10m we found 2 fresh shiny pitons that had just been put in the day before in the rockband on the left which made an excellent belay. For us the ice was good enough for screw anchors, otherwise you would need a selection of small to very small rock gear. The second pitch gets you to the summit snow cap, and was more low angle ice sticking just to the right of the rockband which takes small gear.
First section of the crux. 30m or so of WI3. Short less than body height vertical bulges but mostly 80 degrees-ish. Pretty similar to Altered States at the Remarkables.
This crux section is highly variable depending on the season – we got the ice in fat condition and had good screws the whole way.
The second pitch of the crux. Low angled ice
When I skied the line with Sam a few years ago we were there in September and the ice was good but was steeper and harder with less snow built up. Later in the year there is bare rock and some mixed climbing is needed (never done it so can’t comment!). Depends what your preference is but personally I love ice so wouldrecommend getting there early in the year! Try and get some recent beta to work out what to expect before heading up.
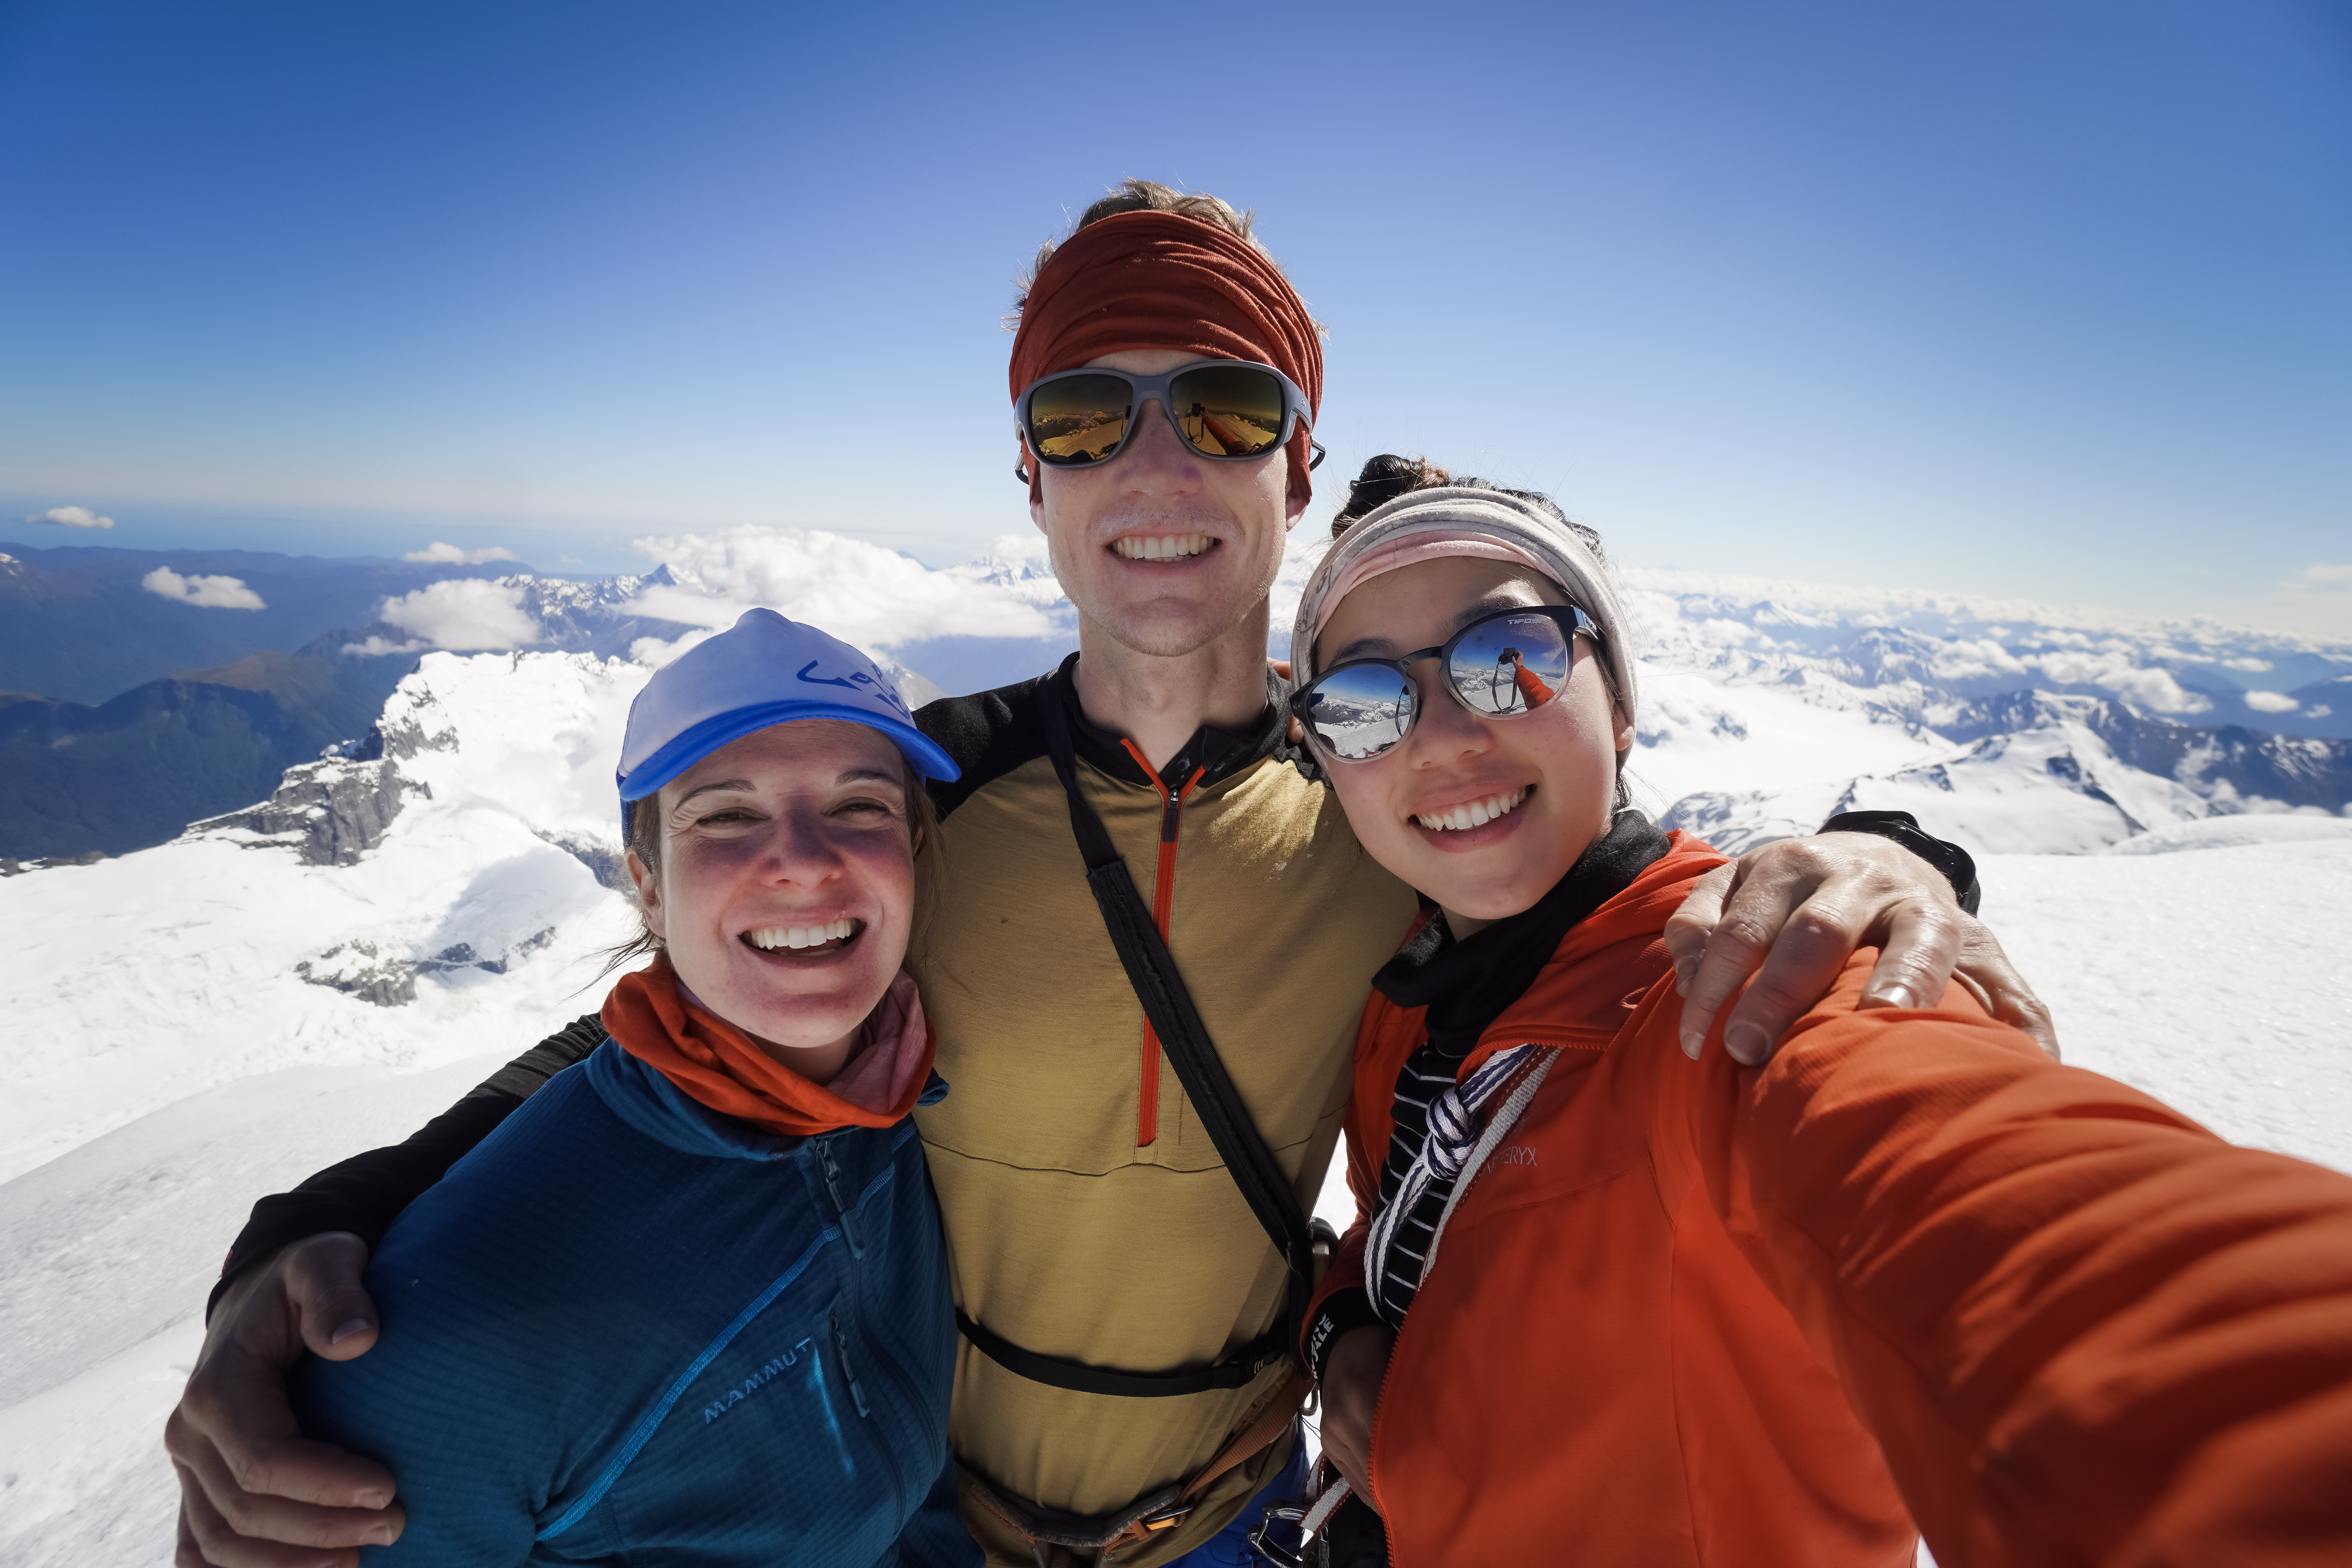
From the top of the crux it was an easy walk up to the summit where we were rewarded with an incredible panorama of the southern alps.
Delicious summit shot
Descent from the summit to the top of the ramp. Mellow snow slopes
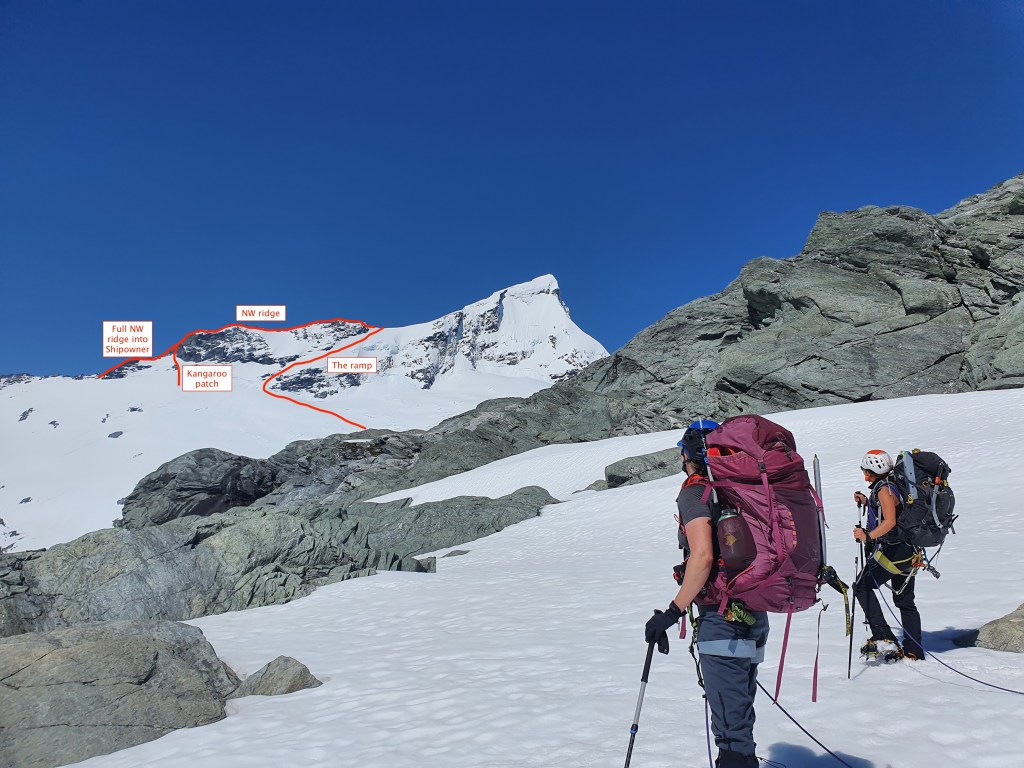
We went down the NW ridge via the ramp. It was cold enough that the snow wasn’t too soft so this was the quickest way down, as it also allows you to cut east at the base of the ramp back down towards the campsite and the Quaterdeck. The other option is to continue along the NW ridge down to the Shipowner ridge, where you can rap down to the kangaroo patch (near the start of the ramp) or continue on to French Ridge hut.
If you take the ramp as your descent route take care – it has been the site of several fatal accidents. It’s prone to wet loose slides and rockfall late in the day, and is exposed almost the whole way. The group on the route the day before us started descending the route but started getting bombarded by rockfall part way down and took shelter in a cave until it got dark and froze up. It was cooler and firmer for us but even so we had a couple of blocks shoot past us as well, and given we were in cloud at this point and couldn’t see them coming this was especially stressful. If its soft at the top of the ramp by the time you start your descent its only going to get worse and is probably best avoided….sticking to the NW ridge is probably overall safer than the ramp and we would probably go that way if doing the route again.
Route from the quarterdeck down to French Ridge hut (another few 100m past end of the line). The shrund at the top was very filled in but the one half way was rapidly opening, we descended the next day and it was a solid metre jump across. Those ice cliffs to the left of quarterdeck were pretty active as well so watch out
The walk along the Bonar glacier to Quaterdeck felt like a long slog. We went back towards the SW ridge to pick up the camping gear we’d stashed 12h prior. Here, we had a soup stop – never underestimate how much a salty beverage can boost energy levels. Feeling rejuvenated we headed towards Quarterdeck – the clouds were coming in thick and fast at this stage, making the vis terrible, but we just followed our GPS points from the previous day, and were lucky enough that there were footprints of a prior party heading in that direction! From the quarterdeck there is a large shrund right at the top – its generally easiest to pass on the far skiers left, and also means you avoid the ice cliffs threatening the other side. There are a couple more crevasses on the way down to French ridge hut – try and get a look on the way in to establish if this way will go before committing to it as its a long long way to walk back round to Bevan Col. If you fly in you get a great view of it, or take a peek from the Matukituki. By the time we were walking down French ridge, the snow was pretty soft and we were aware not to linger. We saw a huge cornice collapse from the ice cliffs between the Breakaway and Mt French – the ensuing wave of debris including car sized chunks of ice that came thundering down went on for a good 45 seconds.
When the iconic red French ridge hut came into view, I was beyond relieved – soon I could stop moving!! It was 8.30pm when we reached the hut. We chatted to other hut stayers in good
spirits, and when they saw Joe licking the inside of his dehy packaging, kindly offered up more food to us.
The next day it was a cruisey walk out the Matukituki. With the sun beating down certain members of the party stripped down to undies – giving the day walkers a show! We went for a dip in the river en route and were back to the car within 5.5h. And as all good trips should end finished with a feed at the Big Fig.
The different descent options. The ramp can be fastest and lets you cut back towards the SW ridge earlier but can be dangerous in the wrong conditions. NW ridge has less objective hazard. Once you get to the big steep buttress, there easiest down climbing is on the north side, and you can usually make a rap down to the Kangaroo patch. The full NW ridge route takes you along the shipowner ridge on the skyline back towards Colin Todd Hut
The weekend warrior’s grand traverse! One of the most fun 2 day trips I’ve had in the NZ alps – 4 pitches of WI2 ice up to West peak onto a spectacular knife edge snow ridge high above the Whakatipu, followed by exposed rock scrambling along the 1km long ridge to East peak. Big mountain terrain just a few hours from Queenstown with no heinous moraines to cross like in the bigger ranges. If you’re fast you can get it done in a weekend and be back in Queenstown for a beer on Sunday night. Highly recommended!
Grade: 3+
Equipment: 3 season mountain boots. 1x 60m rope. 2x ice axes each. 2x snow stakes, 6x ice screws, 1x set of cams up to yellow, small set of nuts, long slings, tat to rappel. NB. Later in the year, you probably wouldn’t need ice screws.
Approach time: 9h to esquilant bivvy (6h on the way out!)
Climb time: ~10h biv to biv
Season: conditions will be highly dependent on time of year. We went late December and it was perfect, good ice up to W peak and clear rock on the summit ridge
Team: Joe, Maria 28/12/2022
Approach
The boggy Rees valley
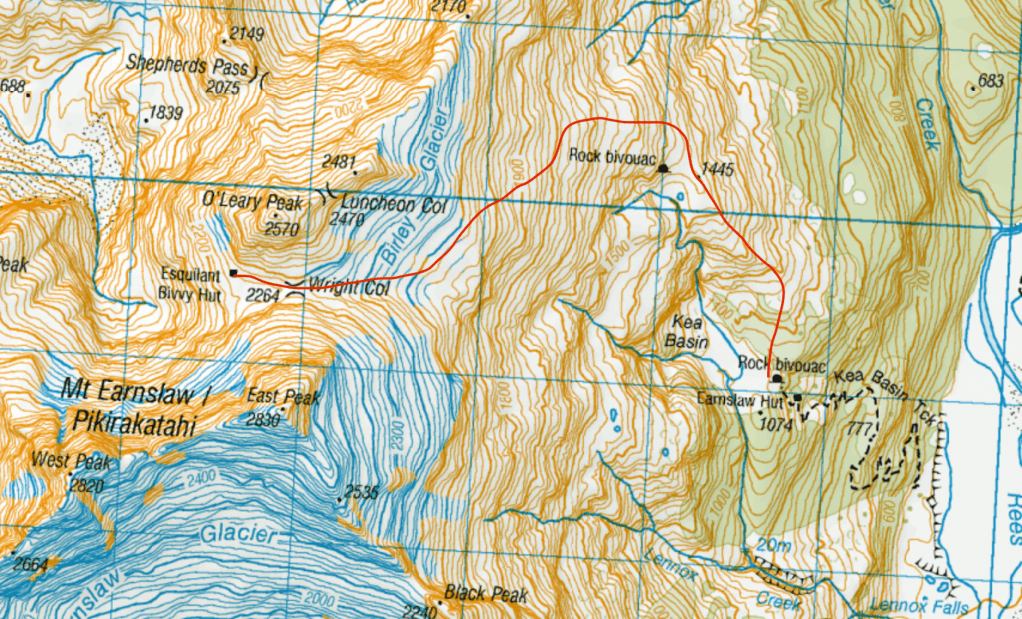
Drive from Queenstown to Glenorchy and head up the Rees valley track. Theres a car park just under cone hill but you can get a fair bit further that that (you will be glad on the way out!). As far as Fords Fall is easy (saw a Hiace make it there), but further than that requires a proper 4×4 plus snorkel. Access all the way to base of kea basin track is possible with a 4×4. Make sure you ask the land owners permission before driving up there! The Rees track is marked with orange poles all the way up on the true left of the river. After the first couple km we found it super, super boggy (wading through shin deep slop in bare feet, not a lot of fun). The valley is much drier and higher on the true right (near where the 4 wheel drive track is) and we came back this way and found it much easier ground. Be aware its a working station so don’t cross anywhere you’re not meant to! Cross at 663, there is an obvious orange marker at the top of a grassy bank marking Kea Basin track. Follow this up to the rock biv. From here on up, it’s really easy to lose the track and find yourself bashing up steep, horrible tussock which is time consuming and tiring – have attached our gpx file and photos to help keep you on track. From the 1st rock biv trend right onto the ridge which takes you to 1445 above a tarn. You should be approaching point 1445 along the ridge from directly south. Go round the 2nd rock biv staying NE of it then curve back round SW until you gain the Birley glacier and Wright col. Total of 2,339m vertical and 16.8km, took us almost 9 hours (but only 5-6 on the way down).
The hut is very cool – tiny and perched in a totally epic spot! Small though – has a top and bottom layer with mats provided, 3 people on each level. Little cooking area. No water tank – had to go hunting for water, ended up having to go all the way back to wright col and up to the slabs on the S face of E peak to fill up. Multiple flat areas in the scree that have been cleared out to pitch tents on
Climb
We set off at 4am. From the biv, traverse around under East peak to the bottom of the couloir at the base of West peak. This is a roughly 40 degree slope which as you can see from the photo has some serious exposure under it. Even a small avalanche would be bad news and when firm, a trip would result in you sliding down off the cliff so be careful. The exact route across depends on the state of the snow – the route we took is marked in red below.
Once you get to the base of the couloir start heading straight up. 40 deg steepening and narrowing up to 45ish at the top. For the final 250m we had 4 pitches of good quality solid WI2 ice up to the top, protected with a combination of screws and rock pro on the couloir wall on the right.
We were surprised how good the ice was in there at this time of year, but the couloir is so deep it obviously never gets the sun. That being said, the walls and the top most definitely do get the sun and once it started getting warm the gully turns into a shooting gallery and was filled with old rockfall so aim to be out of the couloir by then.
Also bear in mind if you decide to bail and come back down this way, you’re going to have to wait until it gets cold again and freezes up before you descend. We left the hut at 4am and were at the top of the couloir by 9:15, which was perfect. From the top of the couloir turn left and scramble up the rocky ridge to West peak and soak up the epicness of the views.
Popping out the couloir onto the West peak
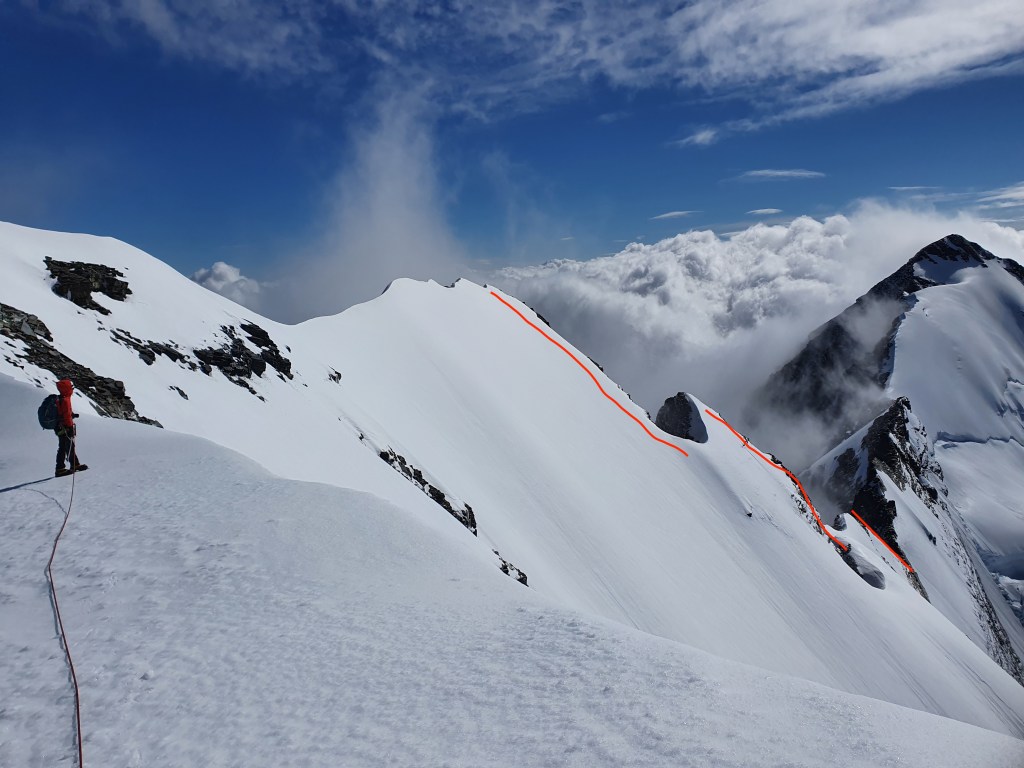
We wandered SW from here to point 2664 (partly because it looked cool but mainly because we got confused and thought that was the way to East peak… Which sounds pretty dumb but is not as obvious as you might think). Cruise along the snow ridge from West peak until you get to a col where you need to descend around 100m to the rocky part of the ridge. This is slightly E facing and so it catches the sun – was bulletproof first thing but had slightly softened so was a nice easy down climb for us but has some serious exposure so be careful – this spot is also very prone to avalanche. Some good bollards to rap if the conditions are more difficult.
Maria contemplating the ridge along towards East pk
Now onto rock for the next km. Generally sound rock (but some very loose, very big blocks) around 3 large gendarmes. Really fun section of the route – easy scrambling which we simulclimbed with a running belay, but needed a couple of raps to descend several sections, especially from the first 2 gendarmes. From the 3rd gendarme, it’s a cruise to the final snow slope up to East peak. Soak up the views from East peak before descending the south face.
Descent
The descent can be tricky from a route finding perspective if you haven’t gone up that way. It pays to take a good look at the face from the hut and take some pics before you set off to avoid getting bluffed out. There’s a big gully in the middle of the face that you come down with bluffs on both sides. From the summit, stick to the ridge to the east of the summit and follow this down heading NE for around 100m before turning to head north down the face. Keep some spare tat for if you go wrong and need to make an extra rap here.
We had a dirty soup/noodle stop at the biv before bracing ourselves for the walk out. By the time we got down to Kea basin, our boots were not our friends so we hiked the rest of the way out barefoot!
To do the traverse and the walk out to the car took us 17hours 30 min.
Our GPS track available below in GPX format to download!
A New Zealand Southern alps classic route! Got a brief weather window in late Feb 2022 to sneak up this route. Popular with good reason – easy grade 10-12 scrambling on solid (by NZ standards) rock up to the west ridge, then a spectacular ridge traverse to the summit over the famous cheval.
Highly recommended. Would be especially good for a first foray into this kind of mountaineering – the Bonney rib is fully equipped with high vis rap stations with 2 rings every 30m, so a retreat is very easy, lowering the level of commitment.
Difficulty: Grade 3 Rock crux 12
Equipment: 3-season mountain boots. 1x set cams up to blue, small set nuts. 8-10x runners, plenty of 120cm slings. Microtraxion if simulclimbing. Tat for raps on the top section (before the bolts).
Approach time: time was short so we opted to fly in and out to Darwin corner. A back flight between 3 people was only $150 each – maybe less than the damage to your equipment from walking over the Moraine?
Climb time: we took 12 hours tent to tent, but pitched all of the route to the cheval. Much faster if simulclimbed.
Season: late summer. You want all the snow to be off the route, and even at the end of a long dry summer in 2022 no issues crossing the glacier.
Team: Joe Collinson, Alex Bewick, Tom Brown 28/2/2022
Riding the cheval – Tom (front) and Alex (back)
Access
Access from Darwin corner to the Turnbull. Steeper / sketchier the further right you go
From Darwin corner, access the Turnbull glacier by first ascending the moraine wall. Probably the most dangerous part of the trip (especially the descent). Steep and loose with lots of large unstable blocks to knock down onto yourself or your partner. As of March 2022 the moraine wall is less steep the further lookers left you go, with the area to the right divided into a series of steep and scary looking gullies. We ascended almost directly under Mt Turnbull and then traversed to lookers right across the scree slope above.
Lake at point 1906 with Turnbull glacier above left, Mt Turnbull on far left, pt 2350 of Rumdoodle in centre and Malte W ridge on the right
You pass a lake near point 1906 and then there is some boulder hopping onto the Turnbull. The Turnbull glacier has receded significantly and gave us no problems, although at around 35-40 deg, be careful of avalanche risk especially when getting warm. Where the Turnbull joins the Bonney there are a few crevasses to negotiate but even at the end of Feb 2022 which was especially hot and dry there was no issue crossing these to get to the campsite.
Turnbull glacier. Snow slope the whole way (tucks in behind the rock band)
Don’t be tempted to go up the Malte Brun glacier – the moraine access at the bottom looks pretty terrible and the glacier is much more broken. Also the final bit up to the Bonney is a steep pile of horrible cross. Took us 4 hours from Darwin corner to campsite.
Camp
On the rock rib at the top of the Malte Brun glacier there is a good bivvy spot. Two flat areas in the rock have been cleared out which are about the size of a 2 man tent each.
Campsite at top of Malte brun glacier. You can see the two small rock areas cleared on the ridge. The glacier is more airbed friendly
We opted to sleep on the snow just next to the ridge as we thought our inflatable airbeds wouldn’t stand up to the sharp rock. There was no water near the campsite so don’t forget the jetboil (like I did… The risk of packing straight after a night shift!). We were able to find running water across the schrund at the point marked in the photo, which saved the trip but it was a real faff and took forever. Another option would be to camp down by the lake if you don’t want to melt all your water – allow an extra 1-2 hours to get up to the start of the route.
The Route
We took the classic Bonney rib but many variations are possible! From the campsite, follow the snowfield up staying just to the left of the large gendarmes. Cross a schrund and climb a 40 deg snow slope up to a small gully with a boulder wedged in the top of it. The climbing starts from here.
This route doesn’t follow the DBAs – they step out to the lookers right after the second DBA
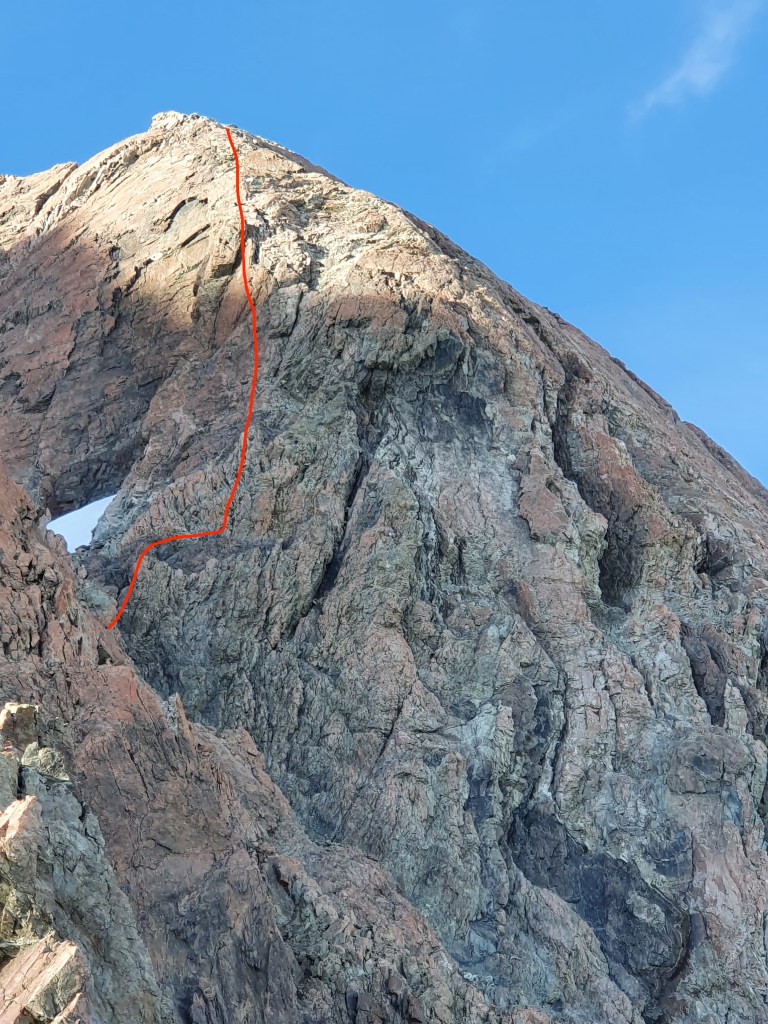
The first DBA is 60m above the boulder and then every 30m to the ridge. The first 2 are in a fairly straight line, but then after that they step out to climber’s right significantly and then meander round a fair bit. The most simple and least committing option would be to follow the DBAs all the way up, but the climbing is more interesting and on more solid rock if you follow a more direct line up the face. The DBAs can also be pretty difficult to spot from below, but there are high vis reflector strips drilled into the rock above each station so finding them on the descent even in the dark / bad weather is super easy. 5x 60m pitches to the ridge. Climbing is around grade 12-14 but obviously varies depending on which exact route you take. We pitched the whole thing as some members of the group hadn’t spent much time on rock, but could save some time simulclimbing in a confident party
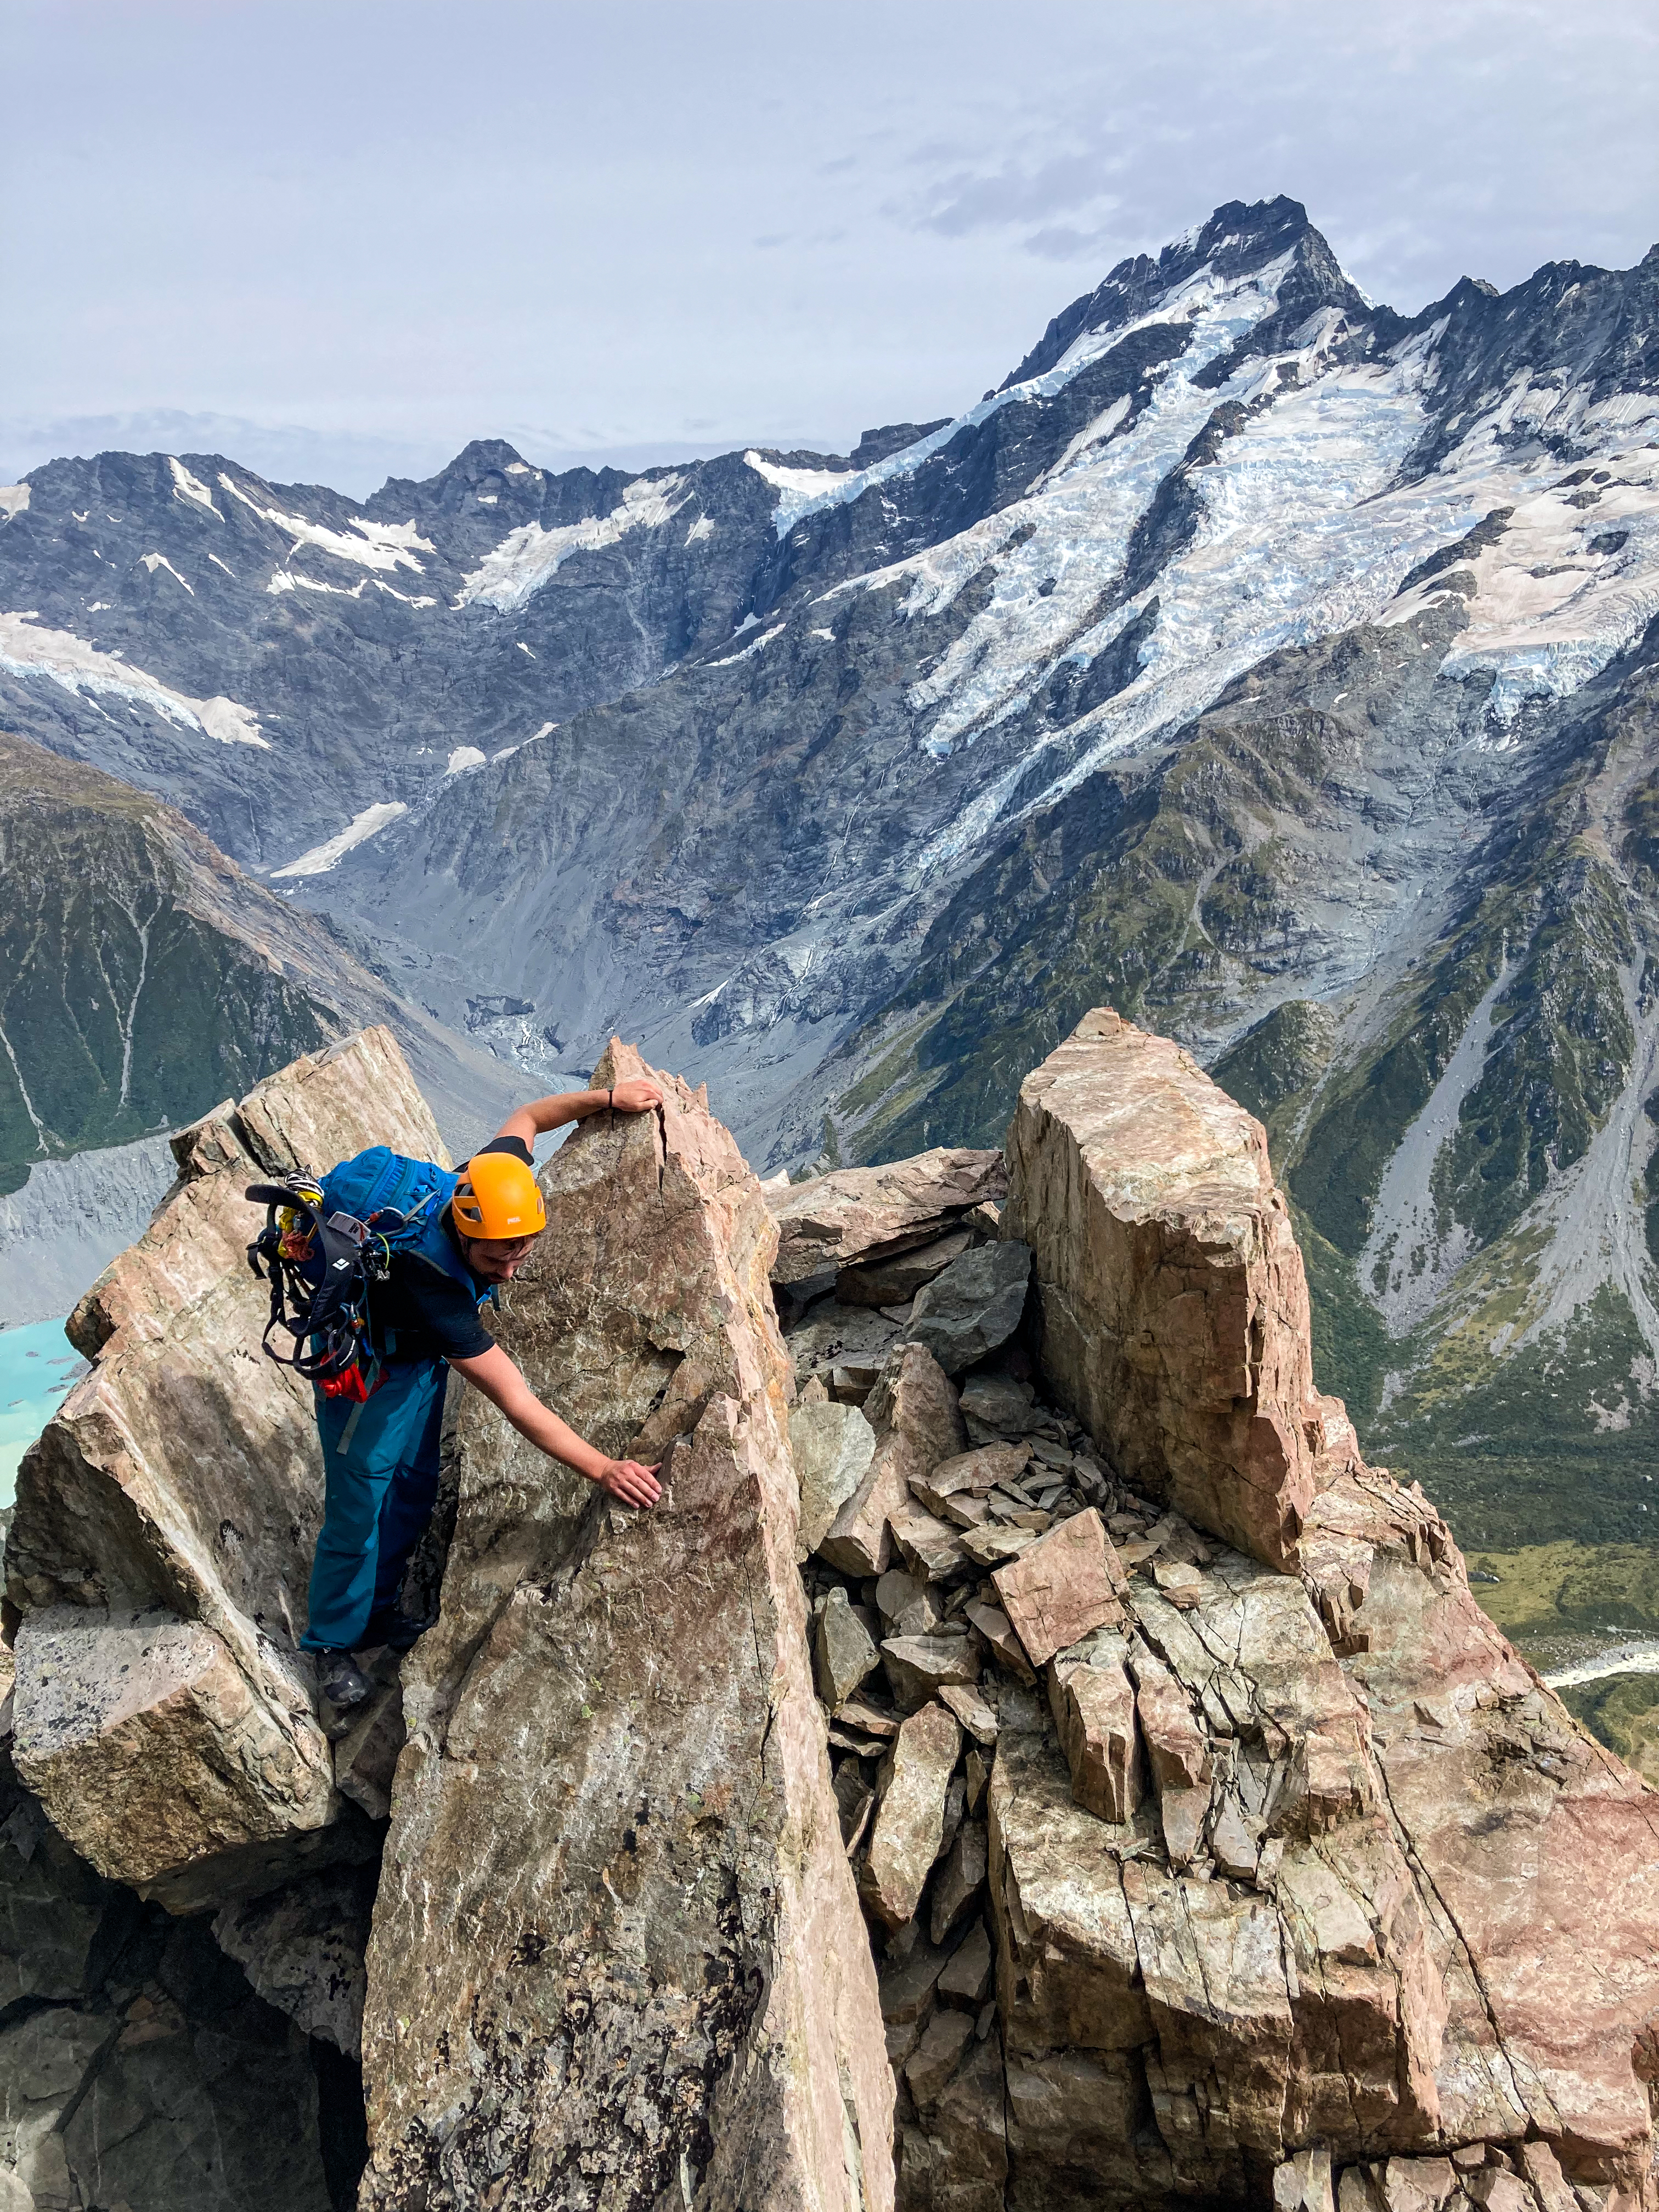
Once you gain the ridge, it took us about an hour to traverse to the end of the cheval. Exposed ridge travel , but with plenty of options for pro (especially loads of spikes – bring plenty of 120cm slings) for simulclimbing. Send the camera out front for the obligatory cheval shot! Theres an old rusty piton next to a good platform at the end of the cheval.
It gets easier from here up to the summit but took a surprisingly long time as we took the rope on and off a few times and needed to make 1x rap: it took us nearly 2 hours from the cheval to the summit. The route finding wasn’t super obvious at one point on the way up passing one final gendarme – we made an unnecessary rap down the south face and then climbed back up a snow field. When viewed from above you can easily turn the gendarme on the north side (see pic below!).
Obvious from above but not so obvious on the way up. The final false summit before the top, turn this gendarme on the N side and save yourself a time consuming rap onto the S face
Approximate rap line with 10x DBAs. Watch out for the big traverse between the 2nd and 3rd DBA
To descend, there are multiple spikes to rap from to get you back to the cheval, which is likely a faster option depending on how confident your down climbing is. Once you’re back across the cheval, 10x 30m raps on DBAs gets you back to where you started. Lots of loose blocks around so be careful of rockfall. Would advise against 60m raps, high chance of getting the rope stuck.
We were moving pretty slowly and were around 12 hours camp to camp but with a bit of simulclimbing, you could expect that to be a fair bit faster. But don’t underestimate how long the final ridge can take, more than one group has spent a night on the route!